Detailing of an F-type R IRR 2015
#1
 07-07-2015, 08:40 AM

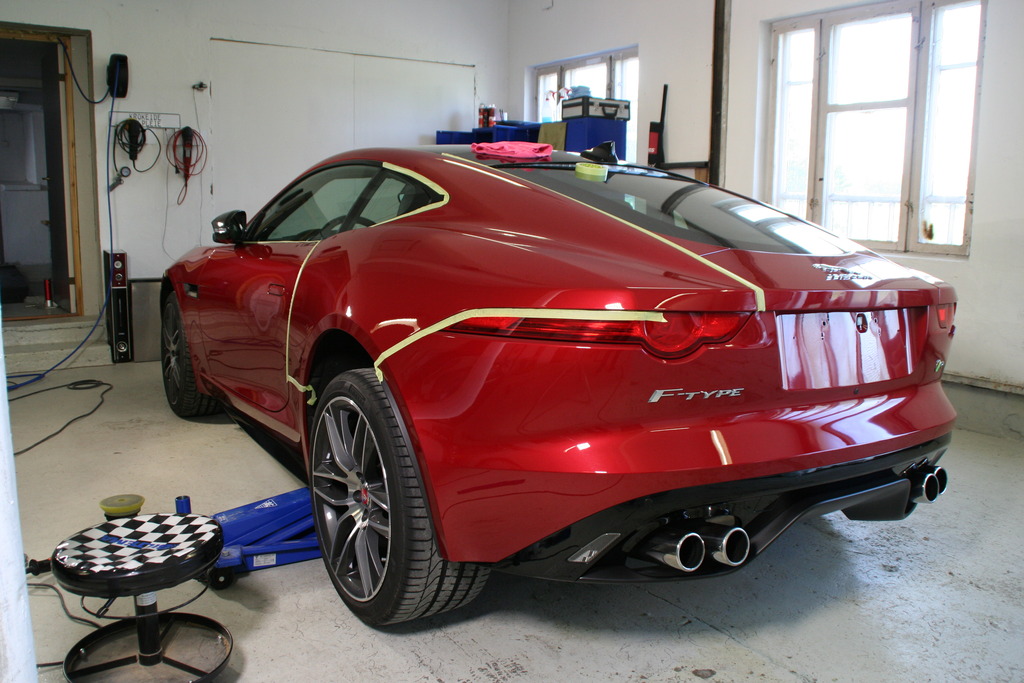
I delivered my F-type to the detailer Sunday evening, and he has just sent me a few pics of the work in progress. The car is just over one year old / 9.000km (I bought it second hand two months ago).
It will be a full detailing job (inside and out), finishing of with different GTechniq coatings on paint, alloys, calipers, exaust, windows/glas etc. He (the detailer) is very interesting in Jaguars, and he wants to spend a bit more time on details than "normal" on this car - so his plan is to be finished on Friday.
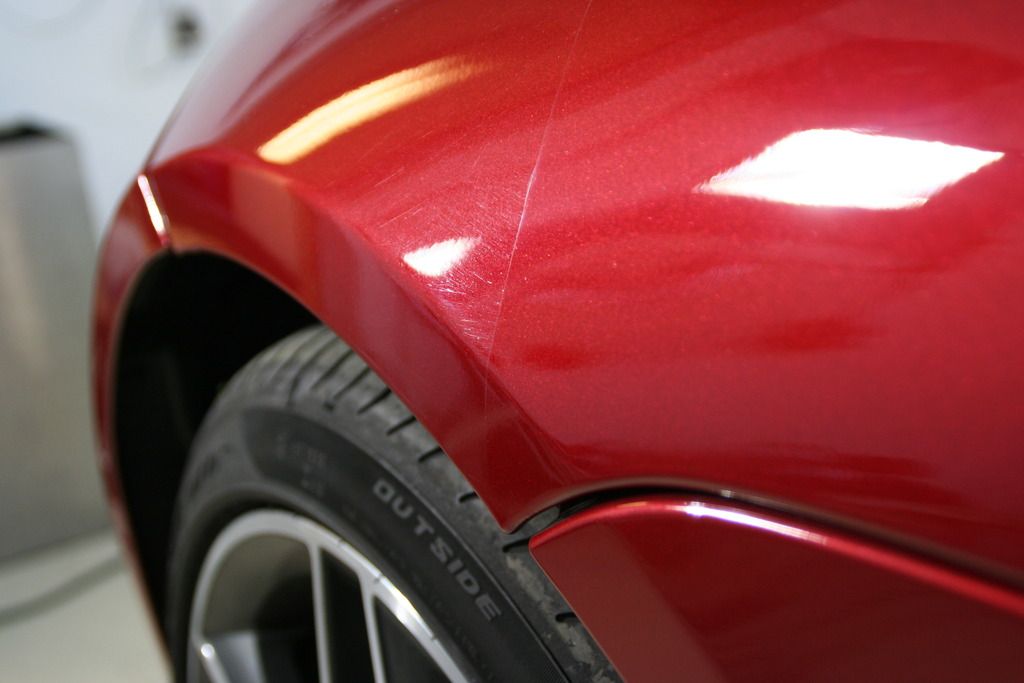
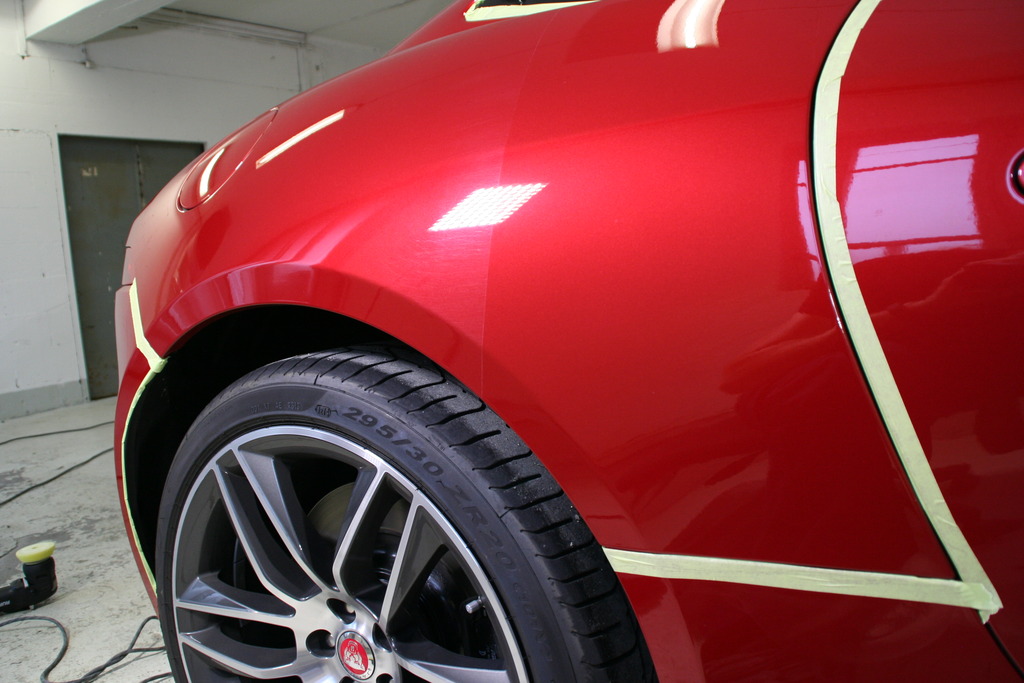
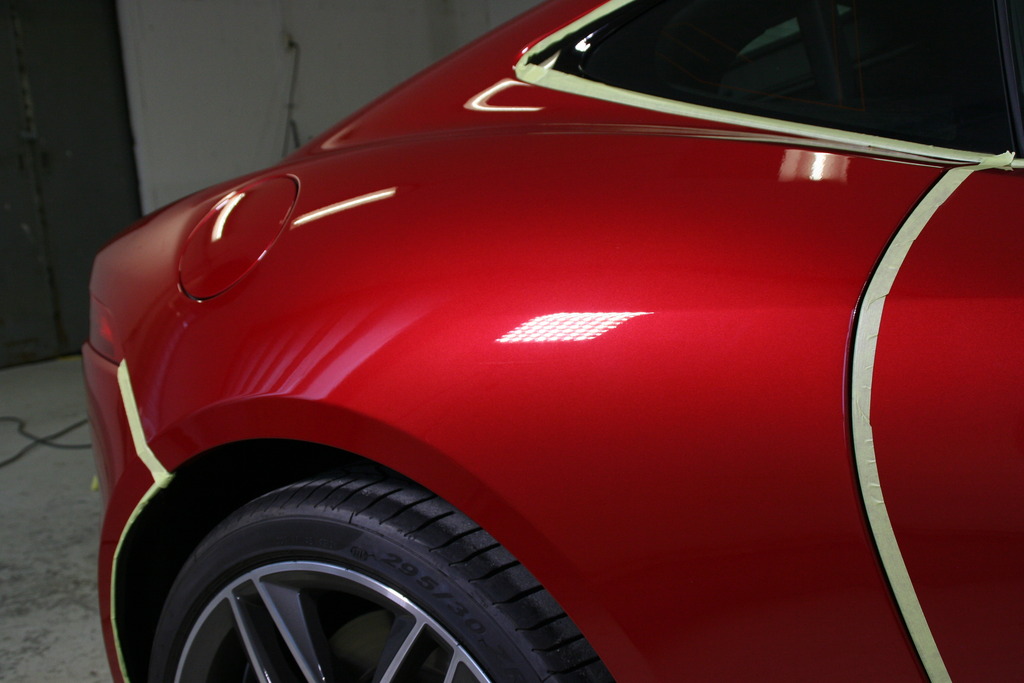
As you can see from one of the pics, there were some light swirls to take care of, but they were not deep so it could be done with ease. The good thing is that it means there is a potensial to make it look even better than it did
So this is what I have gotten so far - and I will continue in this thread with more pics as they arrive - if that is ok?
It will be a full detailing job (inside and out), finishing of with different GTechniq coatings on paint, alloys, calipers, exaust, windows/glas etc. He (the detailer) is very interesting in Jaguars, and he wants to spend a bit more time on details than "normal" on this car - so his plan is to be finished on Friday.
As you can see from one of the pics, there were some light swirls to take care of, but they were not deep so it could be done with ease. The good thing is that it means there is a potensial to make it look even better than it did
So this is what I have gotten so far - and I will continue in this thread with more pics as they arrive - if that is ok?


#4
07-07-2015, 02:41 PM
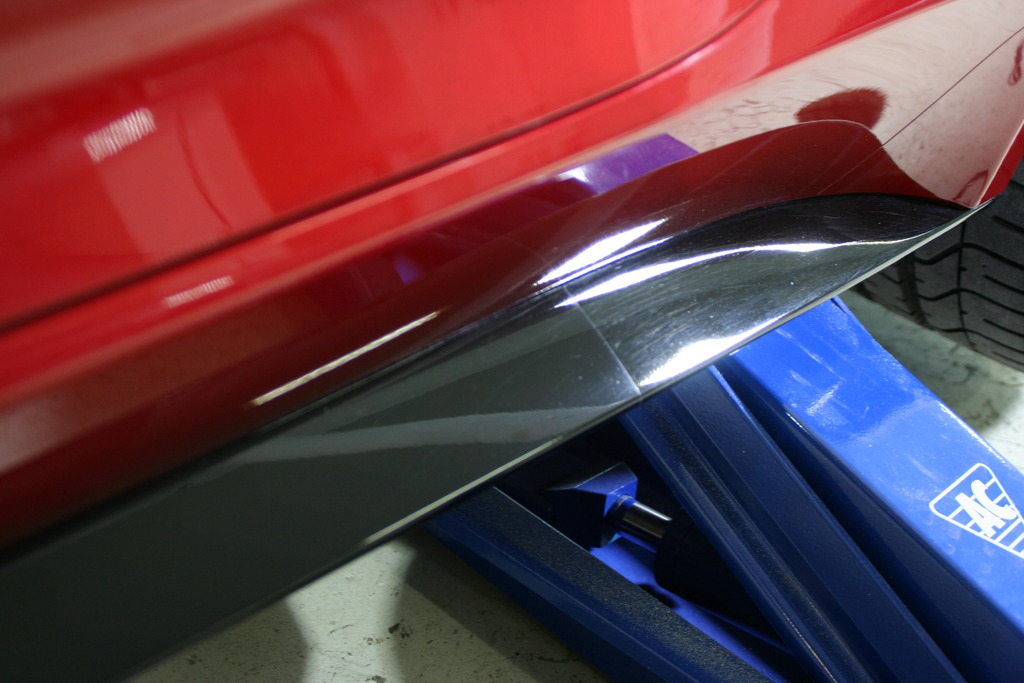
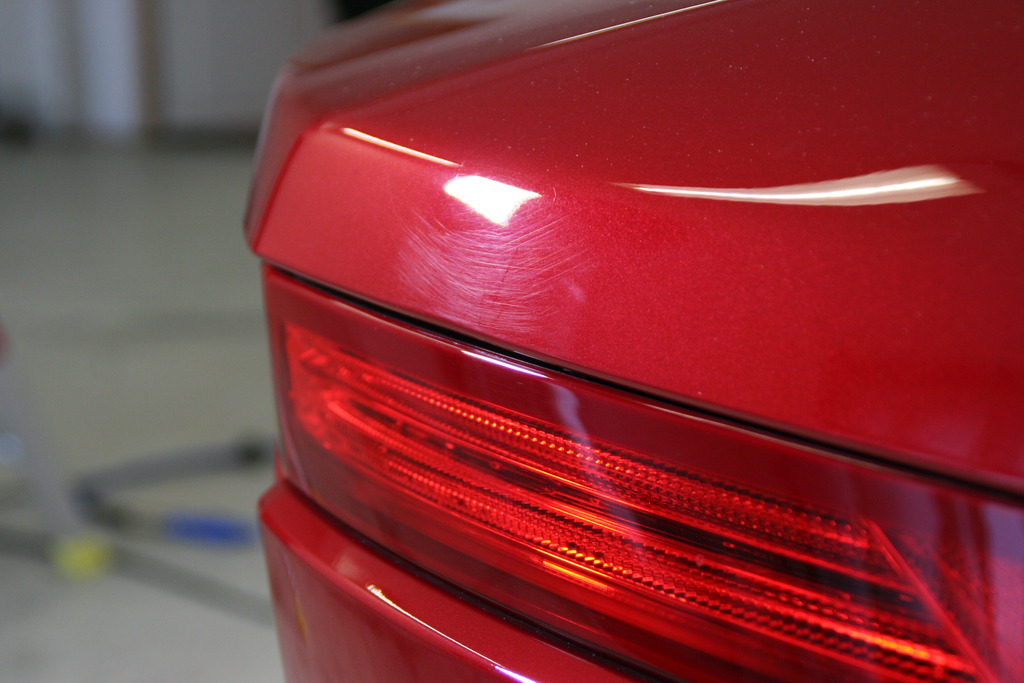
Here comes a few more.
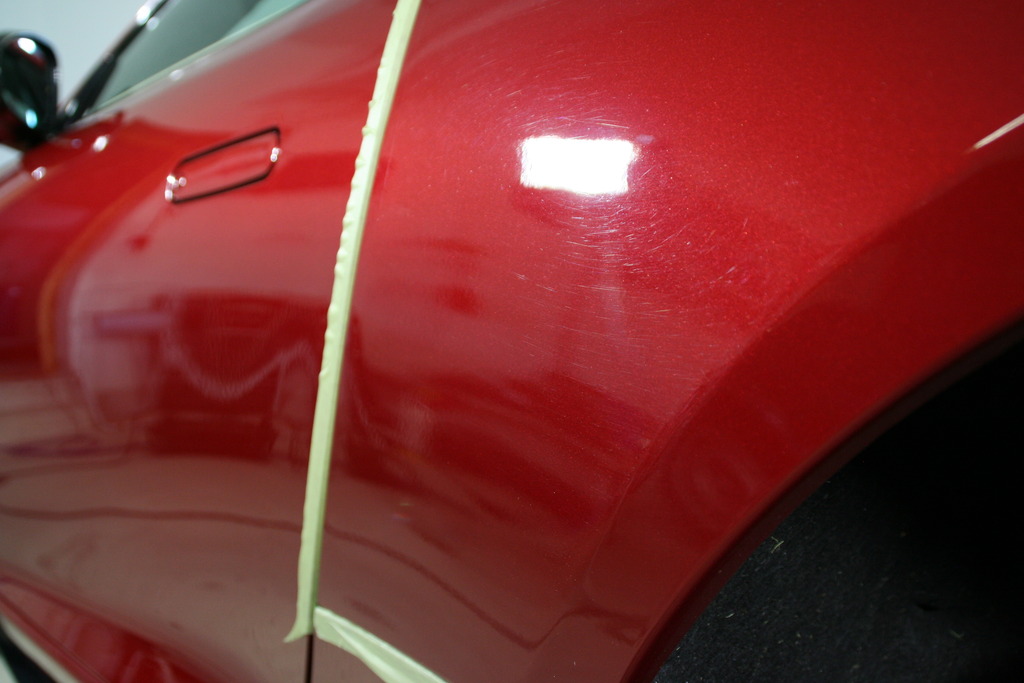
This is a "before and after" polish of the left rear wing (and before additional treatment):

And one of the whole car from that angle...
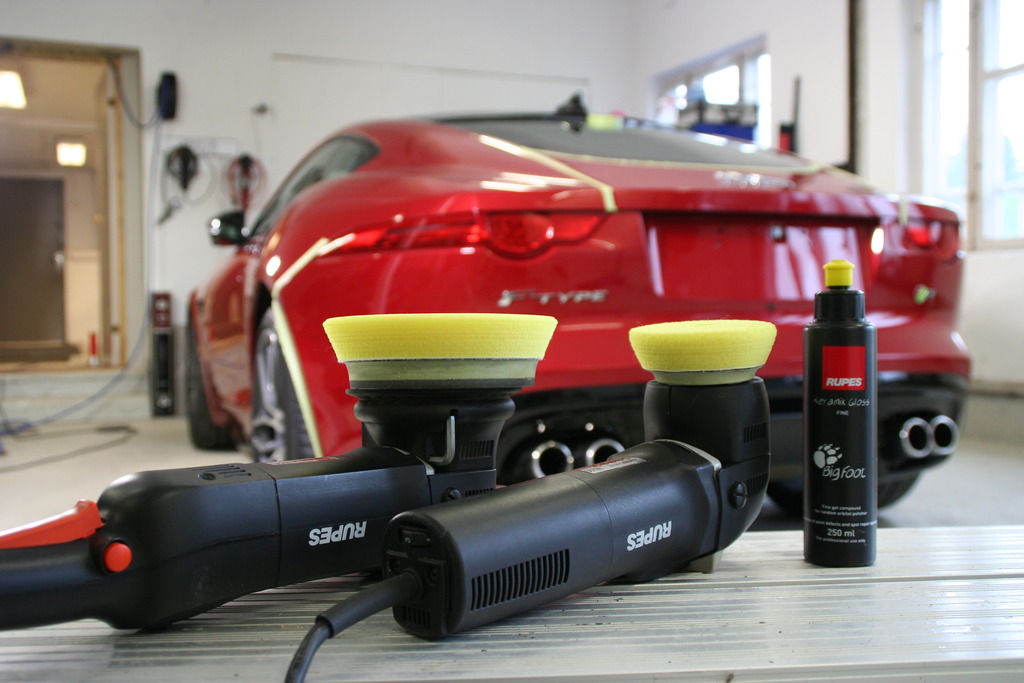
The Tools that have been used so far is Rupes Bigfoot 15 and Rupes Mini polishing maschines with yellow pads and Keramik polish. He first tried a couple of polishes from Menzerna, but on the Jaguars IRR paint, they were rather difficult to dry off afterwards, so the Keramik polish worked better here.
He said the paint is "medium" hard (almost as hard as the paint on my previous VW Touareg), but rather "toughen" and easy to work with. He claims that a good paint sealant will make it a lot more resistant to scratches and swirls, and even minor stone chips.
From my own previous experience with the Touareg that got the same treatment, I can only agree, and I am happy I deceided to do the same here. This time he will use a different GTechniq sealant though, which should be even harder and more durable than the one used on the Touareg (which was GTechniq C1 + EXOv2).
This is a "before and after" polish of the left rear wing (and before additional treatment):


And one of the whole car from that angle...

The Tools that have been used so far is Rupes Bigfoot 15 and Rupes Mini polishing maschines with yellow pads and Keramik polish. He first tried a couple of polishes from Menzerna, but on the Jaguars IRR paint, they were rather difficult to dry off afterwards, so the Keramik polish worked better here.
He said the paint is "medium" hard (almost as hard as the paint on my previous VW Touareg), but rather "toughen" and easy to work with. He claims that a good paint sealant will make it a lot more resistant to scratches and swirls, and even minor stone chips.
From my own previous experience with the Touareg that got the same treatment, I can only agree, and I am happy I deceided to do the same here. This time he will use a different GTechniq sealant though, which should be even harder and more durable than the one used on the Touareg (which was GTechniq C1 + EXOv2).
#5
07-07-2015, 03:08 PM
Arne,
This is a great thread, very informative for me. Question. In your first photo, that line across the fender, is that Xpel on the paint? Which side has the protector, and which not? Are the swirls now under the protectant, or the other way around? I don't understand why the protectant line is where it is, unless there in none at all. So that's the line of tape in photo 3, not aXpel edge ?
This is a great thread, very informative for me. Question. In your first photo, that line across the fender, is that Xpel on the paint? Which side has the protector, and which not? Are the swirls now under the protectant, or the other way around? I don't understand why the protectant line is where it is, unless there in none at all. So that's the line of tape in photo 3, not aXpel edge ?
#6
07-07-2015, 04:50 PM
Veteran Member
The following users liked this post:
Arne (07-08-2015)
#7
07-07-2015, 08:08 PM

Senior Member
The following users liked this post:
Arne (07-08-2015)
Trending Topics
#8
07-08-2015, 01:24 AM
Arne,
This is a great thread, very informative for me. Question. In your first photo, that line across the fender, is that Xpel on the paint? Which side has the protector, and which not? Are the swirls now under the protectant, or the other way around? I don't understand why the protectant line is where it is, unless there in none at all. So that's the line of tape in photo 3, not aXpel edge ?
This is a great thread, very informative for me. Question. In your first photo, that line across the fender, is that Xpel on the paint? Which side has the protector, and which not? Are the swirls now under the protectant, or the other way around? I don't understand why the protectant line is where it is, unless there in none at all. So that's the line of tape in photo 3, not aXpel edge ?
Thank you.
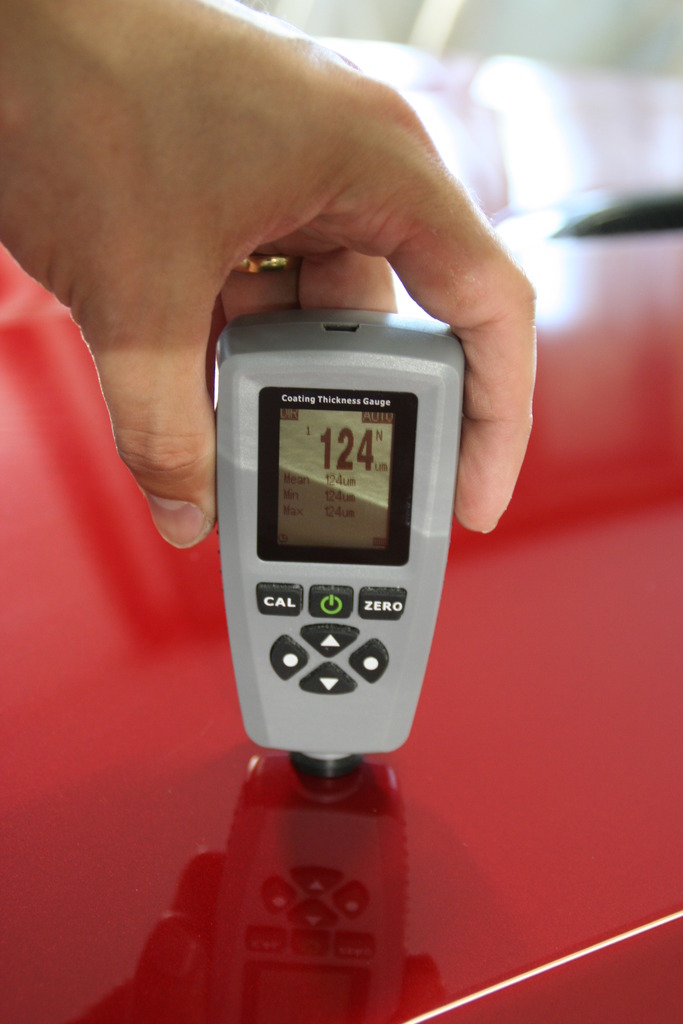
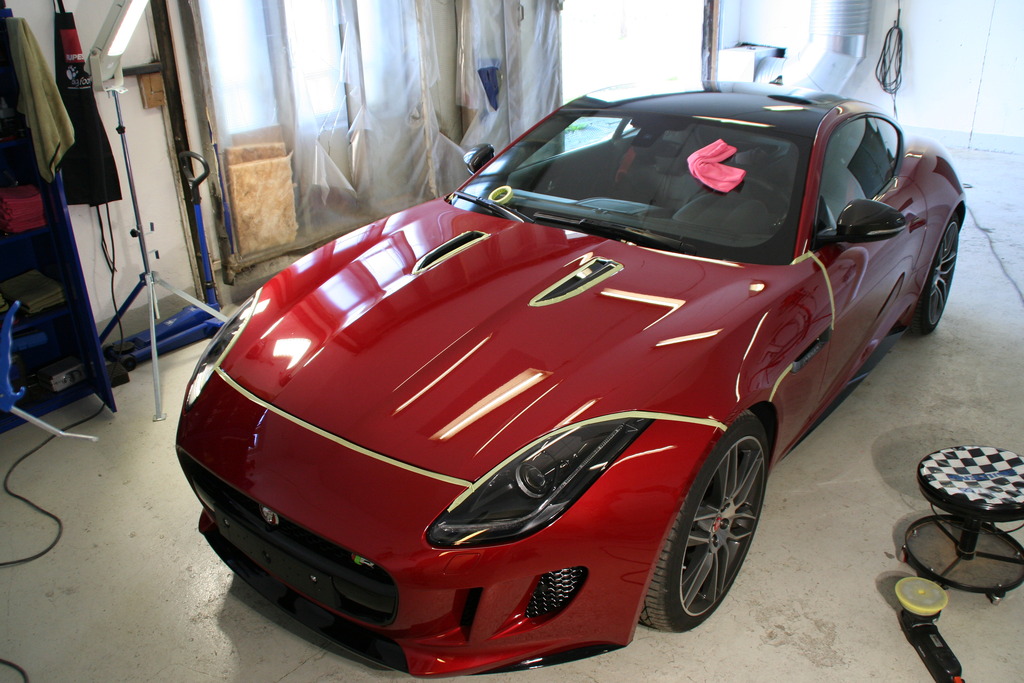
There is no Xpel on the paint anywhere. What the profesional detailer does is to divide all panels into smaller sections with the use of masking tape, and clean and polish each section at a time to keep good control of how much polishing is done and where.
What you see in the first photo is the line where the masking tape that divided two sections were (the tape was removed before taking the photo so that you can easilly see what a differense the polishing job does).
The paint sealant that will be applied later (last part of the prosess a little later this week) will work a little like Xpel, but it is not a film. It is a liquid that when dry will act like a very hard layer/coating on top of the paint. It is also VERY water repellent, and dirt does not get stuck so easilly. You can usually just spray the dirt of with a pressure washer without using any soap (a little depending of what kind of dirt). Bugs and insects are also very easilly removable when washing the car.
There are many different kind of paint sealants, and whey are of different quality. The one he is going to use on my car is a rather new product from GTechniq, and is supposed to be one of the best there is - with long (several years of) durability, if treated correct (which is being carefull of what kind of soap you use when washing the car - try not to use alkaline based soap).
You can read more about it here if you want to:
Gtechniq Smart Surface Science |
ps: I just saw it now - on their web site they actually use a picture of an F-type when you chose "Auto" in the Product menu :-)
pss: I think it is this product (the Platinum) that will be applied on my car (have a look at the video there as well):
http://www.gtechniq.com/about-gtechniq/platinum/
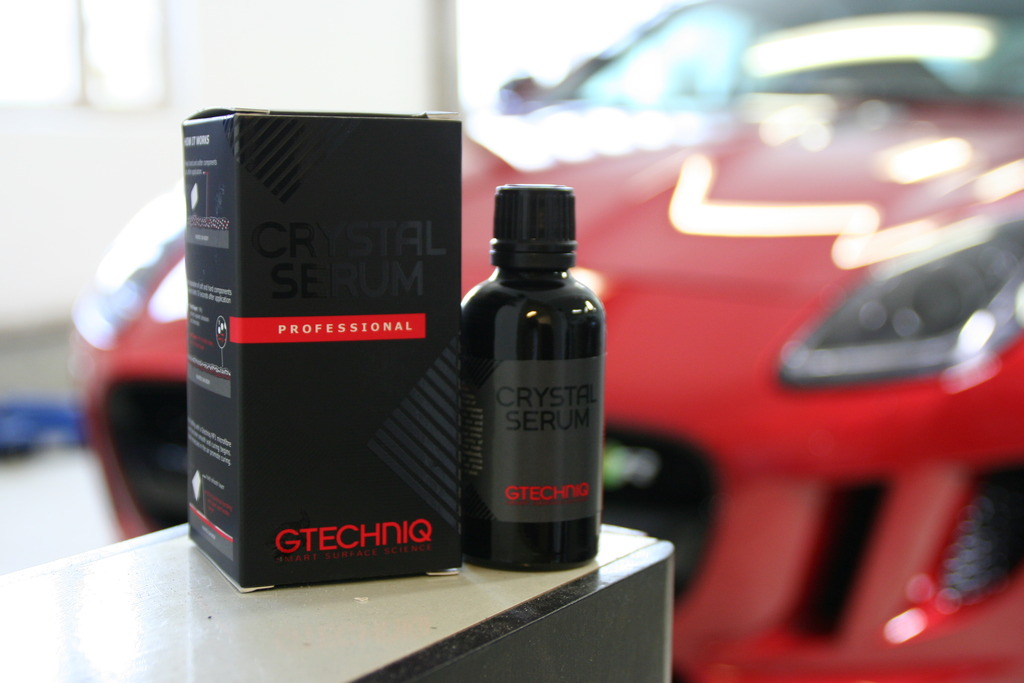
Edit: a correction regarding the coating that is going to be used. Just talked with the detailer, and the coating will consist of one layer of Crystal Serum with two layers of EXOv2 on top of that.
Last edited by Arne; 07-08-2015 at 05:10 AM.
The following users liked this post:
mjm3457 (07-08-2015)
#9
07-08-2015, 01:43 AM
It is nice to do it yourself, and the result can be very good. One big differense between us "amatours" and the professionals is that they can (safely) get rid of minor scratches as well, as they measure the depth of the paint and know how deep they can polish.
How good result you get, is also depending on what kind of wax you use after polishing (as the polishing actually is the cleaning and light rubbing of the paint before further treatment - like waxing or coating). Some waxes can really give a good shine and make the paint come "alive".
#10
07-08-2015, 01:41 PM
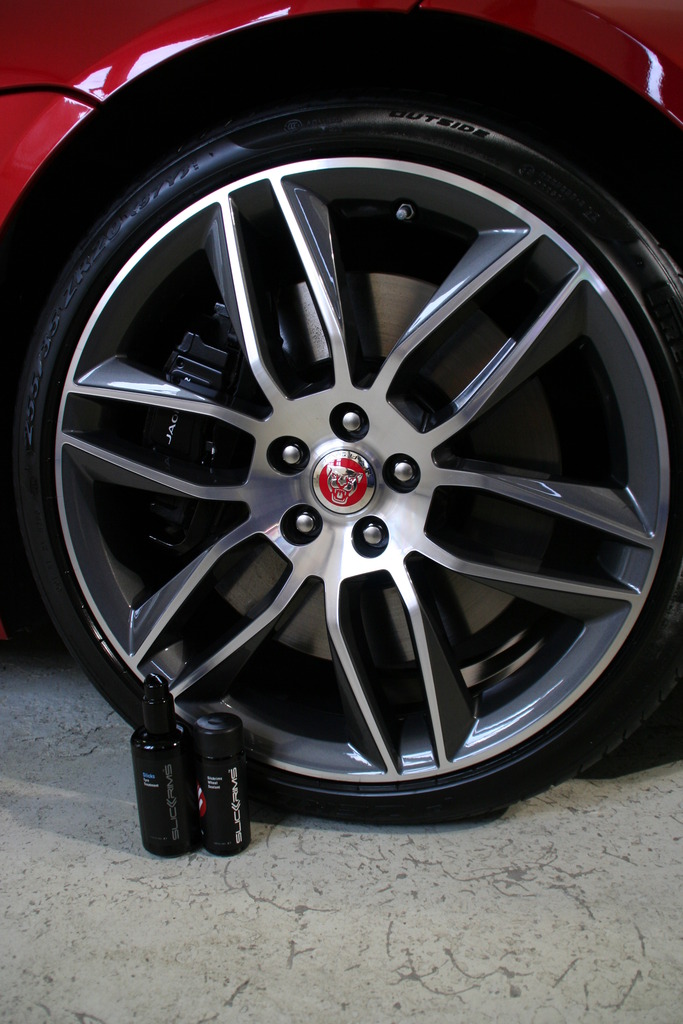
Here are some more pics of todays progression.
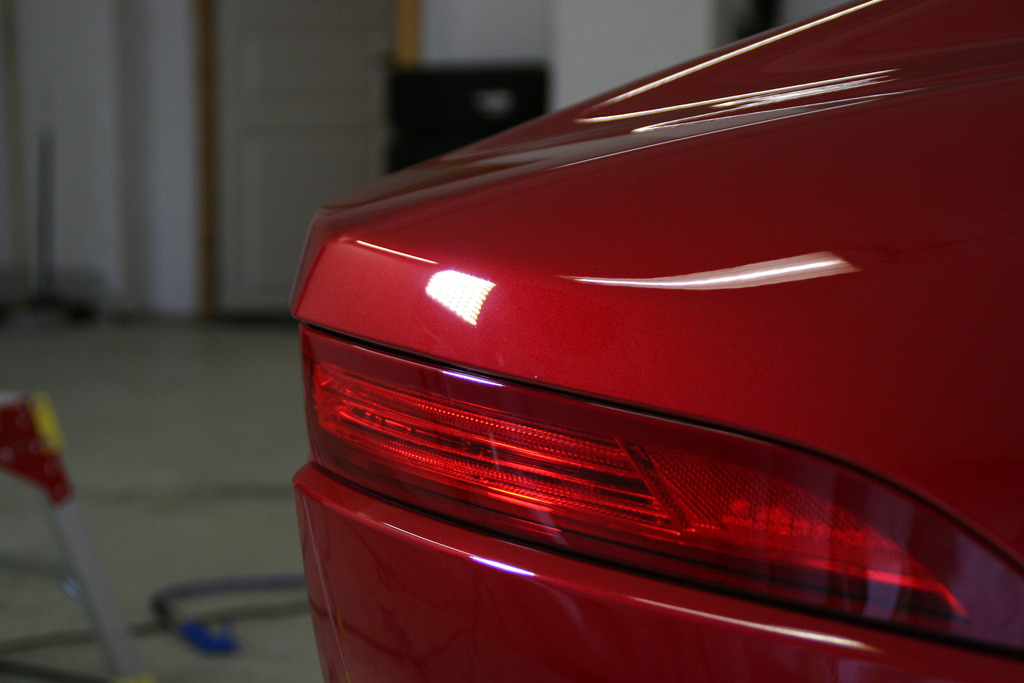
The polishing is now more or less finished, and it's time for coating of the paint, alloys, windows/glas and other details. And in between the leather will get a light treatment as well.
The detailer is rather impressed with the paint quality and the fitment of the panels. He actually says it is a notch better than a Ferrari F12 with a specially ordered paint (exclusive) in very much the same color, that he detailed some months back.
The following users liked this post:
burnie (07-09-2015)
#12
07-08-2015, 04:02 PM
Looks very impressive.
I spend too much time detailing cars myself, however I use the 'Armstrong' method - no mechanical polishers! Purists say that the results are better...I'm not sure, but one thing I do know it takes me a damn site longer!
I had my MY14 coated in ExoV2 - Impressive stuff. Water beaded off very well. It has to be applied, following the instructions to the letter and in a good, clean environment. Looks lovely when done, and a quick spray of Carnuba QD and a micro fibre is all you need to maintain the finish.
The latest MY16 I have, has had a full custom Xpel wrap applied, and I removed and coated the wheels in Gtechniq C5 wheel armour (it's the mutz nuts) so no more waxes or polishing required anywhere...well except for the odd spray of Pledge household wax!
#13
07-09-2015, 01:02 AM
It is very correct that the ExoV2 (top coat) needs to be maintained with some kind of "quick detailer" to keep the water-repellent finish in good shape. But that is an easy job from time to time after a good wash (can be done at the same time as you dry of the car with a micro fiber cloth).
The Crystal Serum coating will last several years though, and even longer if you do the quick detailing once in a while.
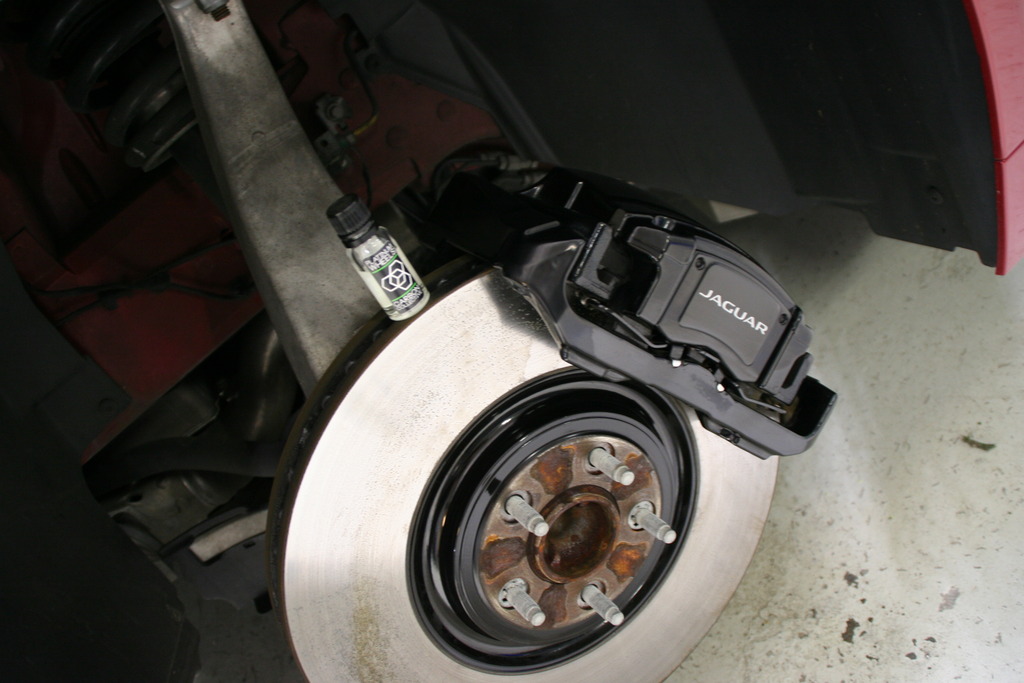
The wheels will be removed and coated on all surfaces (except for the surface that goes against the hub). Not shure which coating he will use, but it would not surprice me if it is the same as you used Tel (the C5).
A good detailing job do make it easier and more fun the wash the car afterwards
The Crystal Serum coating will last several years though, and even longer if you do the quick detailing once in a while.
The wheels will be removed and coated on all surfaces (except for the surface that goes against the hub). Not shure which coating he will use, but it would not surprice me if it is the same as you used Tel (the C5).
A good detailing job do make it easier and more fun the wash the car afterwards
#14
07-10-2015, 12:56 AM
The detailer has been good at "teasing" me by sending me all these photos during the work.
Below are the latest photos. The remaining work are applying the EXOv2 on the Paint (two layers on top of the Crystal Serum which was applied yesterday), treatment of the windows and glas, and some leather conditioning).
Below are the latest photos. The remaining work are applying the EXOv2 on the Paint (two layers on top of the Crystal Serum which was applied yesterday), treatment of the windows and glas, and some leather conditioning).


#15
07-10-2015, 05:02 AM
Since I am picking the car up later today, he has put a few photos of the car on his website as well (he did not want "everyone" to know the car was in his garage during the week). So far it is just three photos of the car before the detailing job started, but I am pretty shure there will be more photos soon:
https://www.facebook.com/KrokeideBilpleie
You can also see photos of detailing work done on other cars there as well.
https://www.facebook.com/KrokeideBilpleie
You can also see photos of detailing work done on other cars there as well.
#18
07-10-2015, 01:32 PM
The cost of a good detailing job is very much depending on the condition (and size) of the car, and what you want done to it.
The detailer spent a bit more time than usual on this job. Not because it was neccessary, but because he had the time and passion to put some extra effort into it.
He gave me a "special price", and I hope you respect my reluctance to disclose that on an open forum.
Usually a standard job like this would take some 15-25 hours, depending on the condition of the car. He spent close to 50 hours on my car.
Most things are also more expensive in Norway compared to the US or UK, as average salary is also higher here, so it would be difficult to compare.
But I can say that the ingredients and equipment used cost aprox $250,- + labour (but he did not charge me for 50 hours).
Last edited by Arne; 07-10-2015 at 01:53 PM.
#19
07-10-2015, 03:21 PM
The cost of a good detailing job is very much depending on the condition (and size) of the car, and what you want done to it.
[...]
Usually a standard job like this would take some 15-25 hours, depending on the condition of the car. He spent close to 50 hours on my car.
[...]
But I can say that the ingredients and equipment used cost aprox $250,- + labour (but he did not charge me for 50 hours).
[...]
Usually a standard job like this would take some 15-25 hours, depending on the condition of the car. He spent close to 50 hours on my car.
[...]
But I can say that the ingredients and equipment used cost aprox $250,- + labour (but he did not charge me for 50 hours).
Back of the napkin math: Assuming 25-50 hours of labor @ $75/hr or so, plus $250 in materials we're looking at roughly $2,125 to $4,000 USD. (Pricing obvious depends highly on the hourly rate, I used $75/hr as a mid-range price.) I was expecting a much lower price though.
#20
07-10-2015, 03:57 PM
The time spent on my car is not a good reference.
Mine was in rather good conditions and it is not a large size car, so a "normal" job would be in the lower estimates = 15-20 hours, depending on how much you want done. This includes all paint and other external surfaces (alloys, exaust, windows, glas, mirrors, calipers, grill, airducts etc) that will receive different type of coatings after polishing/corrections.
My car got 3 different layers of coating/sealant on all the paint, which also is at least one layer more than "normal". The first/inner layer (Crystal Serum) acts much like the Xpel. He was also extremly carefull of correcting any minor scratches or marks that he could find. I could not find any scratches or marks when I picked up the car today, and that is on a car that is 15 months old now and has done 10.000 km - many of them on German autobahn.
And then it is internal cleaning (everywhere) and treatment of all leather surfaces. It looks and smell brand new inside, and it's hard to see that it has been used at all.
If I had bought this car brand new, and it was presented to me looking like this from the dealer, I would have been very satiesfied. And the protection it now has, is way better that ever before, so it is much easier keeping it that way.
What I can say is that I did pay a lot less than the "napkin math", but again - what I paid is not relevant, as I did get a "special price" since the detailer wanted to do this kind of extended work on this car.
Normally you will show the car to the detailer and tell him what you want done (or ask him for some suggestions), and then you will get a fixed price quote which can differ a lot - depending on condition and size of the car and what you want to be done with it.
Edit: some photos of the finished result with the car out in the sun will come as soon as I get them. Hopefully the photos will turn out good, as the result was amazing
Last edited by Arne; 07-10-2015 at 04:03 PM.