JTIS21 win7 64 install method & new archives
#1
 01-03-2012, 10:13 AM


Hi
We finally have a way to install the JTIS21 Jaguar Shop manual on all the Win7 64 bit computers without having to install vitual machines or xp mode.
This was accomplished:
by Plums furnishing the right technical information and advice on how to get it working properly
and yours truly finding the required files and their locations (later doing the 1st successful install on my Win7 64 bit pro laptop) then writing the instructions and inserting the screen shots that are now in the install PDF file, also successfull install on Win7 64 bit Home premium desktop.
The files are also available from the – Large Files download area sticky thread.
See the JTIS21 CD download with instructions within the thread (has this weblink embedded)
http://www.mediafire.com/?3297awvo3atgw#myfiles
Here the screen shot of the folders and files for the JTIS21 on the large files download area in the mediafire.com:
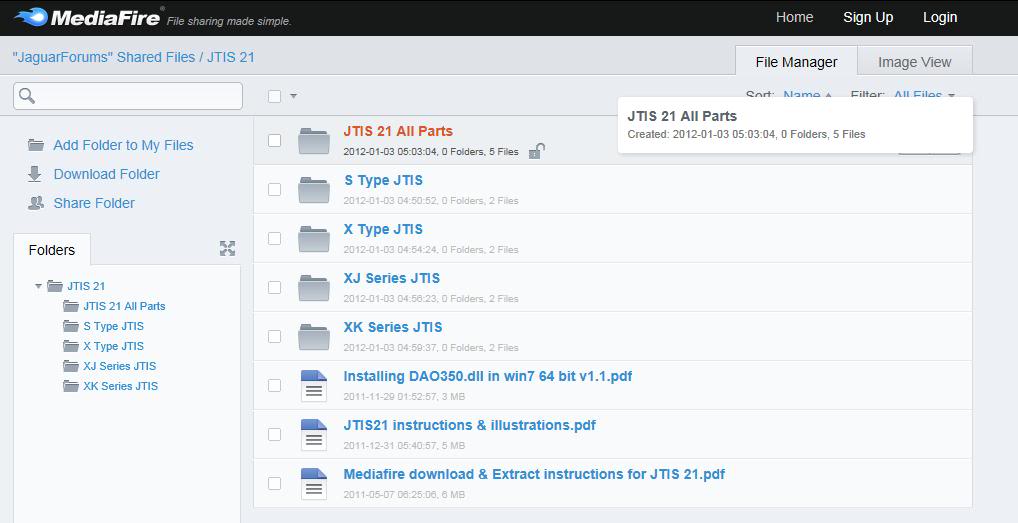
I have created separate Special Edited versions of the JTIS21 by Jaguar model series as shown in the screenshot above.
Folder “JTIS 21” has the four folders listed below . Also has the Win7 64 bit JTIS21 install instructions PDF file (Installing DA350.dll in Win7 64 bit ver 1.1); the JTIS21 instructions and illustrations PDF file; and the Mediafire download & Extract instructions PDF file.
Folder “JTIS21 All Parts” has the entire JTIS21 archive – the 3 self extract archive files total 481 megs – also the technical guides archive and the CD disk label image file.
These Special Edited JTIS21 archives by model series have the Win 64 bit Install PDF file and the 64 bit files are included in them.
Folder “S Type JTIS” is a special edited JTIS archive – the 2 self extract archive files total 277 megs – only has the Jaguar S Type model shop repair information (The X type, XJ series and XK series have been removed).
Folder “X Type JTIS” also is SE JTIS archive with 2 files in the self extracting archive (311 megs) - only X Type is included, other models have been removed.
Folder “XJ Series JTIS” same type of SE JTIS archive – 2 files (344 megs) only XJ models
Folder “XK Series JTIS” same type of SE JTIS archive – 2 files (287 megs) only XK models
The reason these archives are still pretty large is that the graphic files in the DATA/GRAPHIC folder total 225 megs (just over 13000 files).
All these JTIS archives are also available on my personal mediafire.com account – here are the weblinks:
S Type
http://www.mediafire.com/?uia8xdbrr8nh6
X Type
http://www.mediafire.com/?kla0gklx17lr6
XJ Series
http://www.mediafire.com/?gbpriw5milokh
XK Series
http://www.mediafire.com/?bmorw1escearp
Win7 64 bit instructions and required files (Win7 issues)
http://www.mediafire.com/?987a1qjb2aal7
JTIS21 All Parts (JTIS 21 Downloads)
http://www.mediafire.com/?54tdwq3vx0xub
Update: 3/6/2013 - there appears to be a problem with mediafire.com about large sized multiple archived files downloads - mediafire wants to a download fee.
Use the following weblinks to the JTIS all models archive files I have on my dropbox.com account (instead of using mediafire):
https://www.dropbox.com/s/fvdg6rsl63...20CD.part1.exe
https://www.dropbox.com/s/bwx4uch8m9...20CD.part2.rar
https://www.dropbox.com/s/xk49mq38ch...20CD.part3.rar
End of Update
I will be adding a new JTIS thread to the approriate Jaguar model sections that will provide more information on the above.
I am sure there will questions and I will be the point person for all the support issues.
Jim Lombardi
We finally have a way to install the JTIS21 Jaguar Shop manual on all the Win7 64 bit computers without having to install vitual machines or xp mode.
This was accomplished:
by Plums furnishing the right technical information and advice on how to get it working properly
and yours truly finding the required files and their locations (later doing the 1st successful install on my Win7 64 bit pro laptop) then writing the instructions and inserting the screen shots that are now in the install PDF file, also successfull install on Win7 64 bit Home premium desktop.
The files are also available from the – Large Files download area sticky thread.
See the JTIS21 CD download with instructions within the thread (has this weblink embedded)
http://www.mediafire.com/?3297awvo3atgw#myfiles
Here the screen shot of the folders and files for the JTIS21 on the large files download area in the mediafire.com:
I have created separate Special Edited versions of the JTIS21 by Jaguar model series as shown in the screenshot above.
Folder “JTIS 21” has the four folders listed below . Also has the Win7 64 bit JTIS21 install instructions PDF file (Installing DA350.dll in Win7 64 bit ver 1.1); the JTIS21 instructions and illustrations PDF file; and the Mediafire download & Extract instructions PDF file.
Folder “JTIS21 All Parts” has the entire JTIS21 archive – the 3 self extract archive files total 481 megs – also the technical guides archive and the CD disk label image file.
These Special Edited JTIS21 archives by model series have the Win 64 bit Install PDF file and the 64 bit files are included in them.
Folder “S Type JTIS” is a special edited JTIS archive – the 2 self extract archive files total 277 megs – only has the Jaguar S Type model shop repair information (The X type, XJ series and XK series have been removed).
Folder “X Type JTIS” also is SE JTIS archive with 2 files in the self extracting archive (311 megs) - only X Type is included, other models have been removed.
Folder “XJ Series JTIS” same type of SE JTIS archive – 2 files (344 megs) only XJ models
Folder “XK Series JTIS” same type of SE JTIS archive – 2 files (287 megs) only XK models
The reason these archives are still pretty large is that the graphic files in the DATA/GRAPHIC folder total 225 megs (just over 13000 files).
All these JTIS archives are also available on my personal mediafire.com account – here are the weblinks:
S Type
http://www.mediafire.com/?uia8xdbrr8nh6
X Type
http://www.mediafire.com/?kla0gklx17lr6
XJ Series
http://www.mediafire.com/?gbpriw5milokh
XK Series
http://www.mediafire.com/?bmorw1escearp
Win7 64 bit instructions and required files (Win7 issues)
http://www.mediafire.com/?987a1qjb2aal7
JTIS21 All Parts (JTIS 21 Downloads)
http://www.mediafire.com/?54tdwq3vx0xub
Update: 3/6/2013 - there appears to be a problem with mediafire.com about large sized multiple archived files downloads - mediafire wants to a download fee.
Use the following weblinks to the JTIS all models archive files I have on my dropbox.com account (instead of using mediafire):
https://www.dropbox.com/s/fvdg6rsl63...20CD.part1.exe
https://www.dropbox.com/s/bwx4uch8m9...20CD.part2.rar
https://www.dropbox.com/s/xk49mq38ch...20CD.part3.rar
End of Update
I will be adding a new JTIS thread to the approriate Jaguar model sections that will provide more information on the above.
I am sure there will questions and I will be the point person for all the support issues.
Jim Lombardi
Last edited by jimlombardi; 03-06-2013 at 05:05 PM. Reason: fixed JTIS21 All Parts My personal mediafire weblink
The following 25 users liked this post by jimlombardi:
00franky00 (08-13-2014),
aamcobrian (01-06-2018),
Aonsaithya (01-29-2013),
Cash Jackson (11-15-2016),
Catawba (04-11-2017),
and 20 others liked this post.
#2
01-04-2012, 04:59 AM
Veteran Member
The following 2 users liked this post by Translator:
Cash Jackson (11-15-2016),
jimlombardi (02-07-2012)
#4
01-22-2012, 06:55 PM

#5
01-22-2012, 10:53 PM
Hi shejag
Looks like you found a typo error in the PDF file for the microsoft KB information file for microsoft 32 help file download. It should read -KB917607 not -KB91760.
Update - The WinHlp32 (Windows 7 64 bit operating system) is on my mediafire account in the win7 issues folder. File name is MS Help software update -x64.msu (file size is 701 kb).
Here is the weblink to the file: http://www.mediafire.com/download.php?xzq9ty1yxu3xnmn
Also here is the weblink to the win7 issues folder (this folder contains 4 files - dao350.dll ; Install PDF file ; MS Help software update ; xp_fix.exe): http://www.mediafire.com/?987a1qjb2aal7
Here is the microsoft weblink (where I downloaded the file to my PC):
Download: WinHlp32.exe for Windows 7 - Microsoft Download Center - Download Details
Here is part of what is on the webpage:
"KB Articles: KB917607
Files in this download
The links in this section correspond to files available for this download. Download the files appropriate for you.
Windows6.1-KB917607-x64.msu then there is download button (my comment - for Windows 7 64 bit operating system)
Windows6.1-KB917607-x86.msu then there is download button (my comment - for Windows 7 32 bit operating system)."
You use the x64 one for windows 7 64 bit operating system - this is the one that is also in the special edited versions archives downloads. The weblink to it on my mediafire account is also in the 5 different versions of the install PDF files (page 6 in the all inclusive version and page 5 in the other 4 special edited versions has a screenshot of JTIS21 folder showing the mshelp file from these archives).
I will upload this file to the my mediafire account for downloads and ask translator to copy it to the large file download also on mediafire.com.
Sorry about that, changing the PDF is going to be a more difficult task because the PDF file is included in all of the download archives.
Jim Lombardi
Last edited by jimlombardi; 01-23-2012 at 06:19 AM.
#6
01-23-2012, 02:15 PM
Jim Lombardi
Thanks I eventually realised how to proceed and got as far as registering the DAO file, however it did not register succesfully
I got to page 8 and the command line is as yours C:\windows\system32>
PAGE 9 shows the modified command line now starts with C:\Users\Administrator> followed by the entered new text.
How did it change ?
I have tried the text as follows C:\windows\SysWOW64\regsvr32.exe �C:\Program Files (86)\Common Files\microsoft shared\DAO\dao350.dll� without success
The mesaage splash screen { the module "" C:\ program failed to load. make sure the binary is stored at the specified path or debug it to check for problems with the binary or dependent DLL files The specified module could not be found }
DAO 350.dll is stored in the correct path ?
Shejag
#7
01-23-2012, 05:18 PM
Hi shejag
Did you follow the directions on page 6:
Download DA350.dll (you have to use this 32 bit file because there is no 64 bit file is available) –
Save downloaded file in C:\Program Files (x86)\Common Files\microsoft shared\DAO (use the "save as" option)
Copy and paste the next line ( as shown in next screenshot)
C:\Windows\SysWOW64\regsvr32.exe "C:\Program Files (x86)\Common Files\microsoft shared\DAO\dao350.dll"
Here is the result – the registering of the dao350.dll has succeeded
Did you follow the directions on page 6:
Download DA350.dll (you have to use this 32 bit file because there is no 64 bit file is available) –
Save downloaded file in C:\Program Files (x86)\Common Files\microsoft shared\DAO (use the "save as" option)
Copy and paste the next line ( as shown in next screenshot)
C:\Windows\SysWOW64\regsvr32.exe "C:\Program Files (x86)\Common Files\microsoft shared\DAO\dao350.dll"
Tip: place mouse pointer before first character of line, then hold down shift key and place mouse pointer after last character at end of line,
then right click to bring up menu and click on copy. Now on command screen, place mouse pointer after C:\Users\Administrator> then right click to bring up menu and click on paste.
press the enter key (runs regsvr32.exe file)Here is the result – the registering of the dao350.dll has succeeded
Now the dao350.dll is registered in the Win7 64 bit Operating System. Then type exit and press the enter key (to close the command line session)
shejag, it looks like maybe you did not put the dao350.dll into the C:\Program Files (x86)\Common Files\microsoft shared\DAO folder.
That is probably why the dao350.dll failed to register.
If you still have a problem, then send me a private message with the exact error message and I will help resolve the issue.
Jim Lombardi
Last edited by jimlombardi; 01-24-2012 at 03:20 PM.
Trending Topics
#8
01-24-2012, 10:56 AM

Jim,
Thanks for info on JTIS21. After struggling to get the service manual working I found that I don't have the dao350.dll file on my computer, but do have the doa360.dll. Any suggestions for a old computer novice. I currently have to use an old laptop with my disc to get to the manual, and can't print. It would be fantastic to get this loaded my on Win7 64-bit computer. Thanks
Ross
#9
01-24-2012, 12:37 PM
Veteran Member
The following users liked this post:
sailross (01-24-2012)
#10
01-24-2012, 03:21 PM
Hi
You can download the dao350.dll that is on my mediafire.com account in the win7 issues folder:
Use this weblink: Free File Sharing Made Simple - MediaFire
Jim Lombardi
You can download the dao350.dll that is on my mediafire.com account in the win7 issues folder:
Use this weblink: Free File Sharing Made Simple - MediaFire
Jim Lombardi
#12
01-27-2012, 09:08 PM
Hi
I just posted this information in the XK & XKR 1996-2006 section.
Note: the instructions & screenshots in XK sticky tread - post #9 are for the special edited versions - X Type, S Type, XJ, XK.
I will start another new thread for the all models archive - to show where the final destination location of the JTIS files and folders should be placed.
Look at post# 9 - here is the weblink to the thread:
https://www.jaguarforums.com/forum/x...11/#post461216
I decided that this is a better way to distribute the information instead of putting all the instructions and screenshots in all the sticky threads.
Jim Lombardi
Last edited by jimlombardi; 01-28-2012 at 07:40 AM.
#13
01-28-2012, 10:15 AM
Hi
I started this new post because it is important to have the JTIS21 files and folders placed in the same final destination folder location.
Note: these instructions & screenshots for the JTIS21 all models (not the special edited versions for individual model achive downloads).
This will make the install process more standardized and leads to better/easier support resolutions to any future issues that may come up.
Here is some more documentation on the install process for the JTIS21 all models (versus the documentation for the special edited versions by model).
I downloaded the full JTIS21 archive files this morning. I took about 35 minutes (10 minutes, then 17 minutes, then 8 minutes).
I took step by step screenshots from the mediafire.com Jaguar account download pages to the final destination of the JTIS21 files and folders placement.
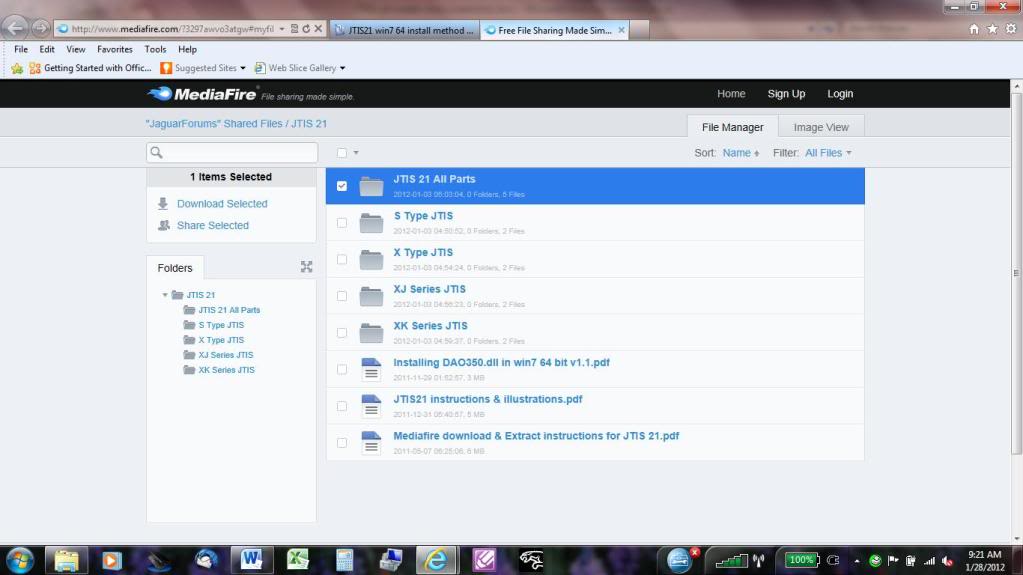
This 1st screen is the MediaFire Jagauar account webpage for JTIS21 archive file folders.
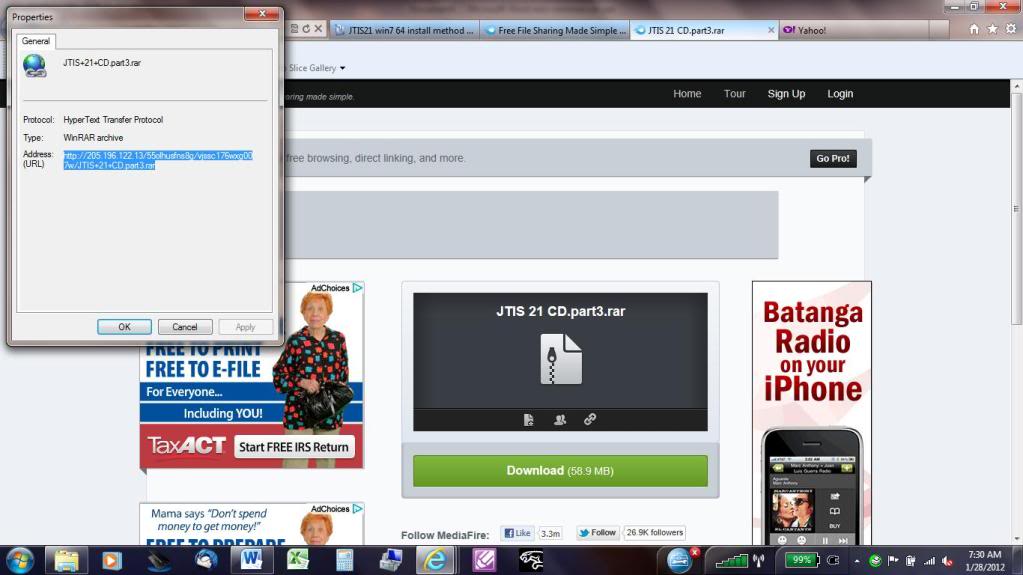
Second Screen is showing how I copied the web address for the 3rd part file by right clicking the download button, then I opened a new windows explorer tab and pasted in the web address.
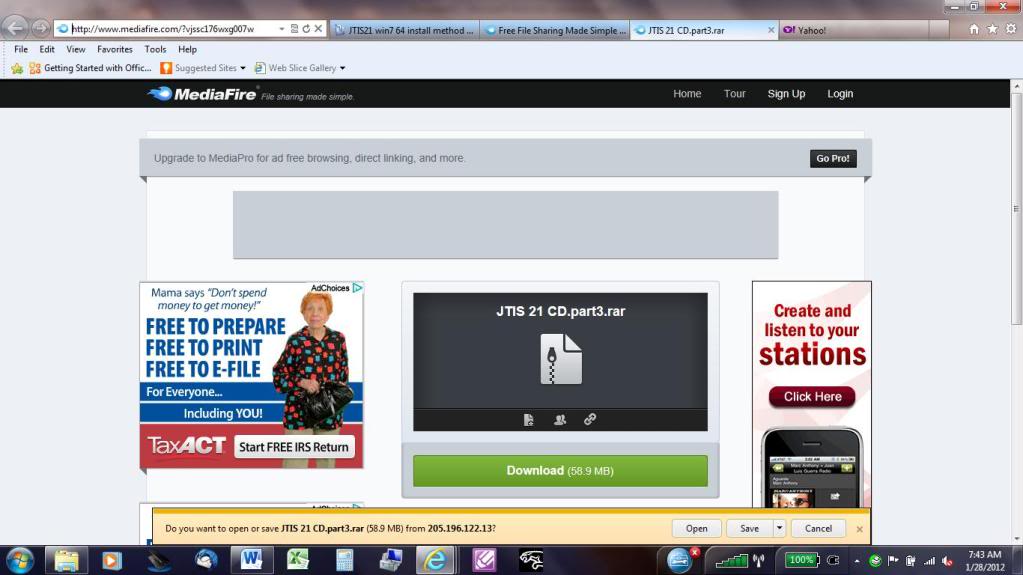
Here is the screenshot showing the new tab and the request to either open or save the file from the download. I choose the save, then the save as option (to my downloads folder).
Here is the screenshot of my Downloads folder with the 3 archive files in it.
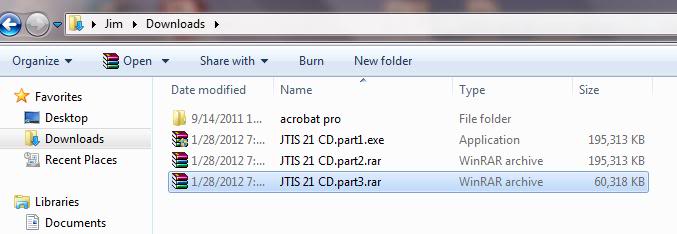
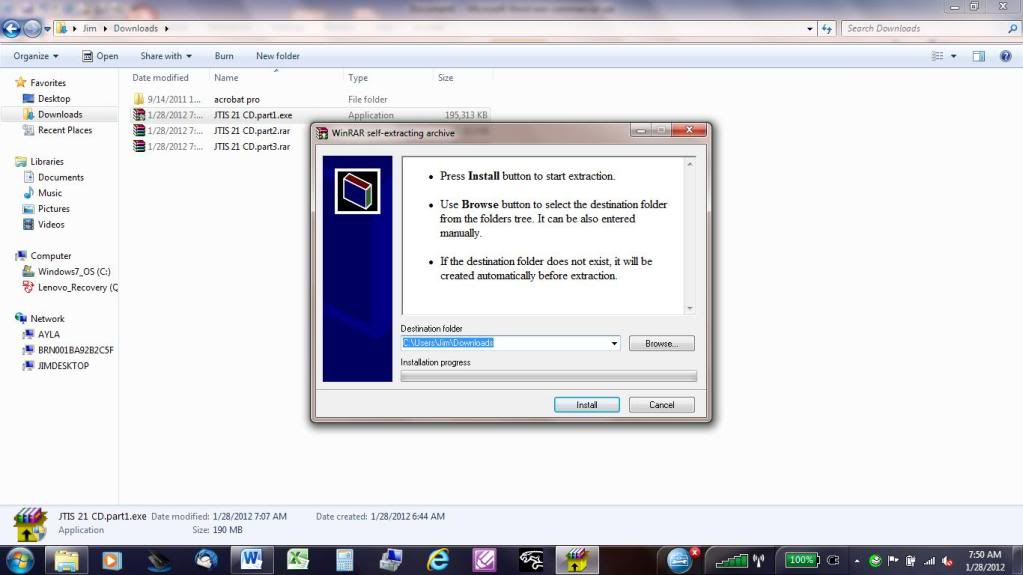
Here is the screenshot showing running the archive exe file (JTIS21 CD.part1.exe) to extract the files.
Also shows the downloads folder as the destination folder. Change the destination folder to a new folder (JTIS21) see next 2 screenshots - because the download folder is not best location to hold the extracted files.
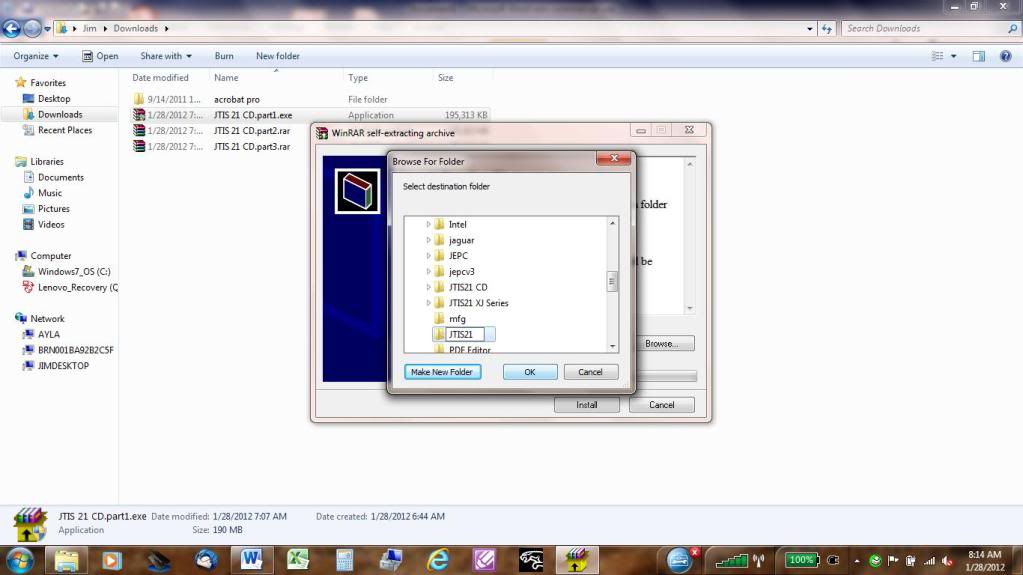
Here is the screenshot showing the running of part1.exe and changing the destination folder.
I used the browse button, then highlighted and opened the my computer folder, then highlighted and opened the Windows7_OS (C: ) folder, then I used the make new folder button to create a new JTIS21 subfolder.
Then I selected the JTIS21 subfolder as the destination folder. Then used the install button.
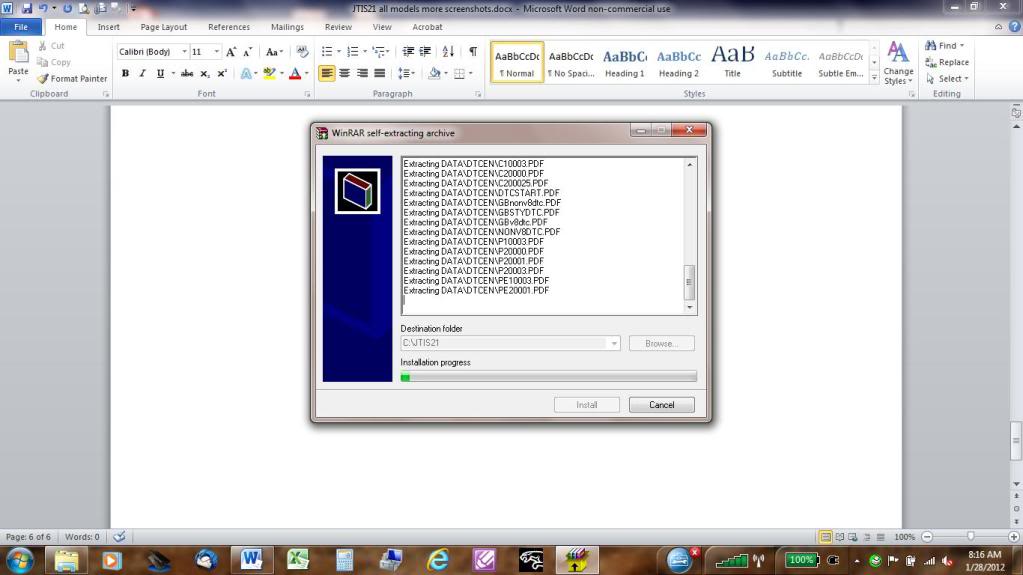
This screenshot shows the extract processing the files into the JTIS21 folder.
Screenshot of the JTIS21 folder after the archive extraction is completed. Notice that I have highlighted the setup.exe.
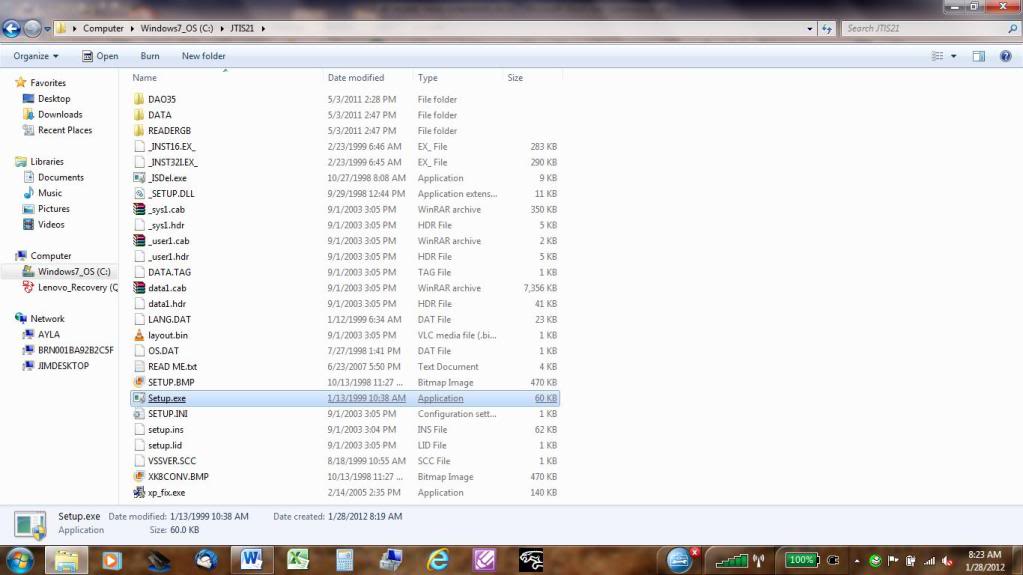
Now I ran the setup.exe in this folder. You need to ignore all the setup error messages during this part of the install (they pertain to the 32 bit OS systems - ie winXP 32 PCs).
Then I clicked the finish button and let the laptop reboot.
The install was a complete success. JTIS21 all models is working flawlessly.
Jim Lombardi
I started this new post because it is important to have the JTIS21 files and folders placed in the same final destination folder location.
Note: these instructions & screenshots for the JTIS21 all models (not the special edited versions for individual model achive downloads).
This will make the install process more standardized and leads to better/easier support resolutions to any future issues that may come up.
Here is some more documentation on the install process for the JTIS21 all models (versus the documentation for the special edited versions by model).
I downloaded the full JTIS21 archive files this morning. I took about 35 minutes (10 minutes, then 17 minutes, then 8 minutes).
I took step by step screenshots from the mediafire.com Jaguar account download pages to the final destination of the JTIS21 files and folders placement.
This 1st screen is the MediaFire Jagauar account webpage for JTIS21 archive file folders.
Second Screen is showing how I copied the web address for the 3rd part file by right clicking the download button, then I opened a new windows explorer tab and pasted in the web address.
Here is the screenshot showing the new tab and the request to either open or save the file from the download. I choose the save, then the save as option (to my downloads folder).
Here is the screenshot of my Downloads folder with the 3 archive files in it.
Here is the screenshot showing running the archive exe file (JTIS21 CD.part1.exe) to extract the files.
Also shows the downloads folder as the destination folder. Change the destination folder to a new folder (JTIS21) see next 2 screenshots - because the download folder is not best location to hold the extracted files.
Here is the screenshot showing the running of part1.exe and changing the destination folder.
I used the browse button, then highlighted and opened the my computer folder, then highlighted and opened the Windows7_OS (C: ) folder, then I used the make new folder button to create a new JTIS21 subfolder.
Then I selected the JTIS21 subfolder as the destination folder. Then used the install button.
This screenshot shows the extract processing the files into the JTIS21 folder.
Screenshot of the JTIS21 folder after the archive extraction is completed. Notice that I have highlighted the setup.exe.
Now I ran the setup.exe in this folder. You need to ignore all the setup error messages during this part of the install (they pertain to the 32 bit OS systems - ie winXP 32 PCs).
Then I clicked the finish button and let the laptop reboot.
The install was a complete success. JTIS21 all models is working flawlessly.
Jim Lombardi
Last edited by jimlombardi; 09-08-2012 at 10:22 AM.
#14
01-28-2012, 05:05 PM

Member
Join Date: Dec 2011
Location: Beverly Hills, Michigan
Posts: 34
Received 0 Likes
on
0 Posts
#15
02-04-2012, 08:21 AM
Hi
The dao350.dll file must be in correct folder to have the JTIS21 software work properly.
The DAO folder owner is whatever the Win7 has assigned to it (such as Creator Owner or Trusted Installer User Account).
If you are having a problem with getting the dao350.dll into the DAO folder then we have to change the folder owner to our user account name.
You have to use following steps to take ownership control of the DAO folder:
The DAO folder location:
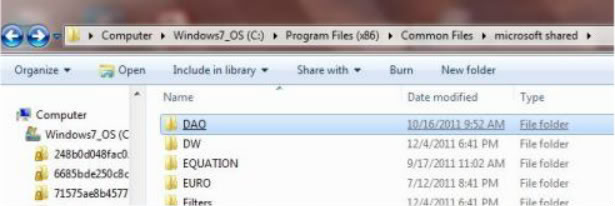
On 64 bit (Win7, Vista, and XPsyst??) Operating systems is C:\Program Files (x86)\Common Files\microsoft shared\DAO
On 32 bit (Win7, Vista, and XP) Operating systems is C:\Program Files\Common Files\microsoft shared\DAO
The next screenshot is showing the DAO folder location on Win7 64 bit.
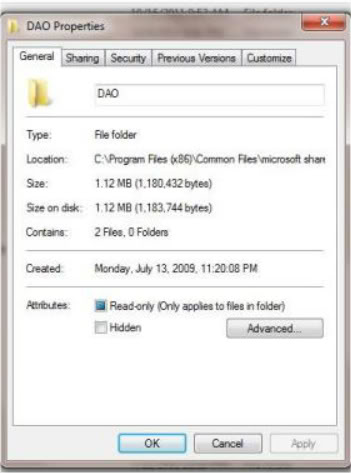
1st step to taking ownership of the DAO folder is to view the folder properties by right clicking on the DAO folder.
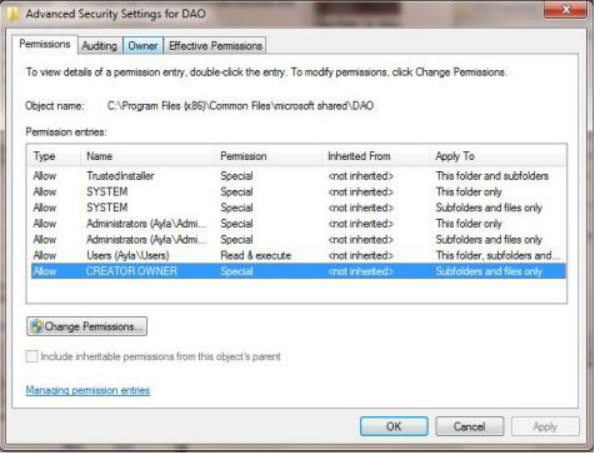
The current owner of DAO folder is the Creator Owner.
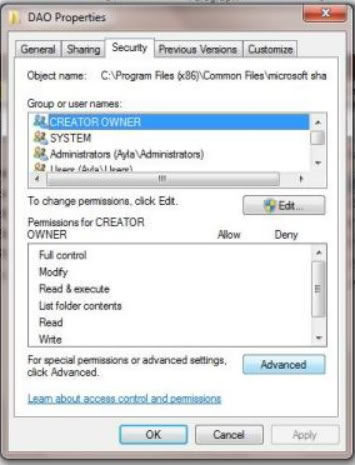
DAO folder property screen - click on the Security Tab - you need to start going through the folder security screens to make the necessary changes.
Here is the folder security showing the CREATOR OWNER highlighted (the user accounts Creator Owner and Trusted Installer have full rights permissions for this folder. Click on the Advanced button.
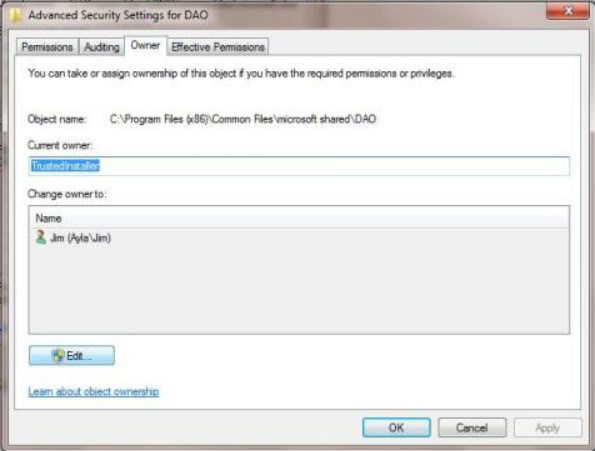
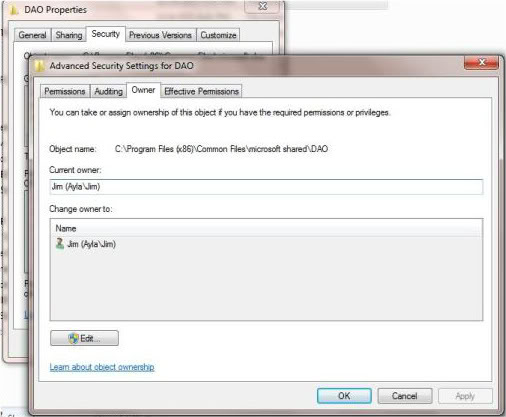
On this screen (Advanced Security Setting for DAO), click on the Owner tab.
This screen shows the current owner (Trusted Installer) of the DAO folder. Click on the Edit button (on next screen you will select your user account name to become the new owner of the folder).
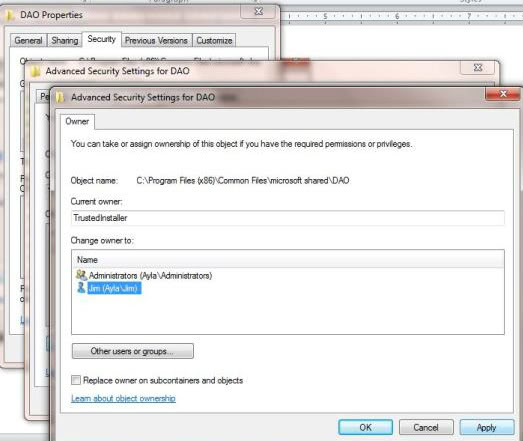
Click on your user account name (my user account name on the screenshot is Jim (Ayla\Jim) and then click on the Apply button to take ownership control of the DAO folder.
This screen shows the popup of the confirmation that you have taken ownership of the folder.
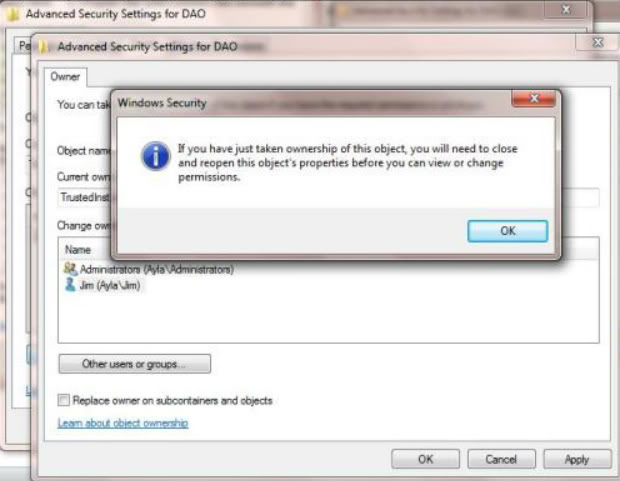
This screen shows your user account is now the current owner of the folder. Now you just have to keep clicking on all of the OK buttons on the screens as they come up to get back to the DAO folder listed on my computer folder listings.
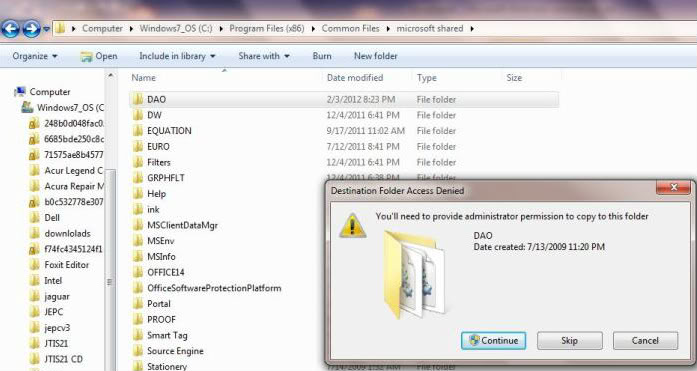
Now when you try to add the dao350.dll into the DAO folder, you will get this warning popup (Destination Folder Access Denied). Just ignore it.
Click on the Continue button and the file is added successfully.
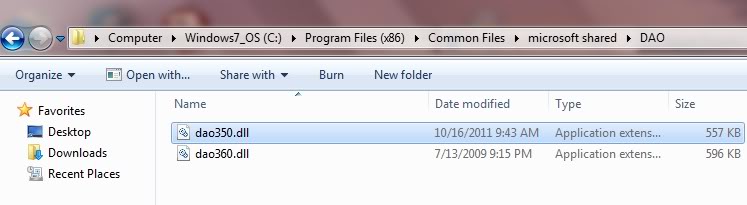
Here is a screenshot showing the dao350.dll added in the DAO folder.
Jim Lombardi
The dao350.dll file must be in correct folder to have the JTIS21 software work properly.
The DAO folder owner is whatever the Win7 has assigned to it (such as Creator Owner or Trusted Installer User Account).
If you are having a problem with getting the dao350.dll into the DAO folder then we have to change the folder owner to our user account name.
You have to use following steps to take ownership control of the DAO folder:
The DAO folder location:
On 64 bit (Win7, Vista, and XPsyst??) Operating systems is C:\Program Files (x86)\Common Files\microsoft shared\DAO
On 32 bit (Win7, Vista, and XP) Operating systems is C:\Program Files\Common Files\microsoft shared\DAO
The next screenshot is showing the DAO folder location on Win7 64 bit.
1st step to taking ownership of the DAO folder is to view the folder properties by right clicking on the DAO folder.
The current owner of DAO folder is the Creator Owner.
DAO folder property screen - click on the Security Tab - you need to start going through the folder security screens to make the necessary changes.
Here is the folder security showing the CREATOR OWNER highlighted (the user accounts Creator Owner and Trusted Installer have full rights permissions for this folder. Click on the Advanced button.
On this screen (Advanced Security Setting for DAO), click on the Owner tab.
This screen shows the current owner (Trusted Installer) of the DAO folder. Click on the Edit button (on next screen you will select your user account name to become the new owner of the folder).
Click on your user account name (my user account name on the screenshot is Jim (Ayla\Jim) and then click on the Apply button to take ownership control of the DAO folder.
This screen shows the popup of the confirmation that you have taken ownership of the folder.
This screen shows your user account is now the current owner of the folder. Now you just have to keep clicking on all of the OK buttons on the screens as they come up to get back to the DAO folder listed on my computer folder listings.
Now when you try to add the dao350.dll into the DAO folder, you will get this warning popup (Destination Folder Access Denied). Just ignore it.
Click on the Continue button and the file is added successfully.
Here is a screenshot showing the dao350.dll added in the DAO folder.
Jim Lombardi
Last edited by jimlombardi; 04-14-2012 at 10:30 AM.
The following users liked this post:
Norri (02-04-2012)
#16
02-07-2012, 05:22 PM

Join Date: Oct 2007
Location: PHX some of the time
Posts: 116,687
Received 6,240 Likes
on
5,442 Posts
#17
02-17-2012, 02:22 AM

Junior Member
Great job, JTIS on Windows 7 at last! I'd failed to get it running on Windows 7 and been really frustrated by having an old CD copy of it, but no longer having any PCs that would run it. Now everything is cool, but...
A few weeks ago I downloaded the XJ-specific version of JTIS and managed to get it running on W7 with the excellent instructions on this forum. I then made the decision that the XJ6 V6 X350 needed pastures new and that it would be replaced by a nice shiney S-Type 2.7D, a neccessity as I'm now doing more than 50 miles a day and 26MPG was a bit too mouch for my pocket to bear!
So, I downloaded the full version of JTIS and installed it over the top of the XJ-only version, ran it up and found that it still showed as the XJ-only one. So, I used the Windows Uninstall tool and removed JTIS, then reinstalled it; same problem. So, I tried another uninstall, but this time removed 'unused DLLs' too; same problem. So, I uninstalled it, removed unused DLLs, shutdown and restarted my PC, reinstalled the full version and I've still got the XJ-only version! Another uninstall and this time I went back to my trusty CD copy and installed from that; bloop! another fail and JTIS grinning in my face and telling me that it had no data on my new S-Type :-(
Does anyone have any idea how to switch between model-specific versions of the downloaded JTIS, or how to REALLY uninstall it so that I can start from scratch?
Many thanks, in hope and aniticpation...
Dynamo
#18
02-17-2012, 03:05 PM
Hi
If you already had a version of the JJTIS installed and tried to install another special version of it, then you will have issues with the wrong version of JTIS startup screen coming up.
You probably have more than one JJTIS.INI file on your PC.
When you click on the JJTIS.EXE file in the C:\JAGUAR folder, the software looks for the JJTIS.INI file to get the location of the data files and other operational files.
Here is a partial view of the JJTIS.INI file contents (created from C:\JTIS 21 XJ\setup.exe):
[File
StartFile=C:\JTIS21 XJ\data\startup.txt
DataPath=C:\JTIS21 XJ\data
DTCStartFile=DTCStart.PDF
Whatsnew=C:\JTIS21 XJ\data\whatsnew.sgm
The originally installed software puts in JJTIS.INI file in the C:\Windows folder.
But windows7 also keeps track of the recently accessed files including a copies of any of these JJTIS.INI files from other multiple installation retries of the JTIS software. The JJTIS.EXE maybe finding the JJTIS.INI file in any of these other folder locations instead of the one in the C:\WINDOWS folder.
Search your PC for JJTIS.INI to see if you have extra JJTIS.INI files.
Delete all the JJTIS.INI files and reboot your PC.
Then run the setup.exe in the (C:\JTIS21 or C:\JTIS21 XJ or whatever special verison of JTIS) folder (this will create a new JJTIS.INI in the C:\windows folder and update the other files in C:\Jaguar folder).
This should fix the startup issue.
Jim Lombardi
Last edited by jimlombardi; 02-18-2012 at 06:30 AM.
The following users liked this post:
Norri (02-18-2012)
#19
02-18-2012, 04:45 AM
Junior Member
#20
02-18-2012, 06:26 AM
Hi Dynamo
I found the 2.7 Diesel V6 listed in Ebayer seller iguide Jaguar 2004 - 2009 XJ XJ6 XJ8 XJ350 XJX358 Workshop Repair Manual in PDF file format (2.7 TDVi V6 Diesel 3.0L V6 3.5L V8 4.2L V8 & 4.2L V8 Supercharged).
The price of the download is $20.
Here is the website link to the Ebay listing:
2004-2009 JAGUAR XJ XJ6 XJ8 X350 X358 Workshop Repair Manual inc 2.7 TDVi Diesel | eBay
I believe that this repair shop manual was created from extracts from iguide's topix Jaguar subscription.
Only independent repair shops and Jaguar repair shops can buy subscriptions to the Jaguar shop repair files on the Jaguar topix website.
Let me be clear that I have no financial or any other relationship with Ebayer iguide. I am only providing information about where and what shop repair guides that are available.
The AllData DIY online subscription for S Type does not include the 2.7 Diesel engine.
Jim Lombardi

