
1999 S Type Progress Thread
#1
 02-23-2017, 11:19 AM


Well, when my Uncle stopped driving, I inherited a well looked after and used S Type.
Whilst browsing the bay for some bits and bobs, I found a 2000, in the same colour locally for a give away price. I purchased it as a donor car. The benefit of the donor car was that it had a splendid interior which would be the first thing to change.
I began to create a list of things to work on and as quick as I knock them off another arrives....
In the following posts I intend, time allowing to post with pictures the progress.
Thanks for viewing.
Initial list of things to deal with;
Front Brake Pads
Rear pads and disks
Sort out fault code P1386 and P1388
Oil change (possibly to suit above codes)
N/S wheel bearing (hub)
Parking Sensors U/S
Upgrade "Premium" stereo system
4 New Tyres
Air Con fix
Mot
Retro a fully heated windscreen (Why? - 'cos I can)
Replace rear track rod ends (split rubbers)
Repair broken remote fobs
Just a short list, should be a doddle!
#2
02-23-2017, 12:03 PM
The fobs that came with the car were not working correctly. In fact one locked and unlocked the car and one only locked the car. Neither opened the boot although that is another story.
Before and after external case:
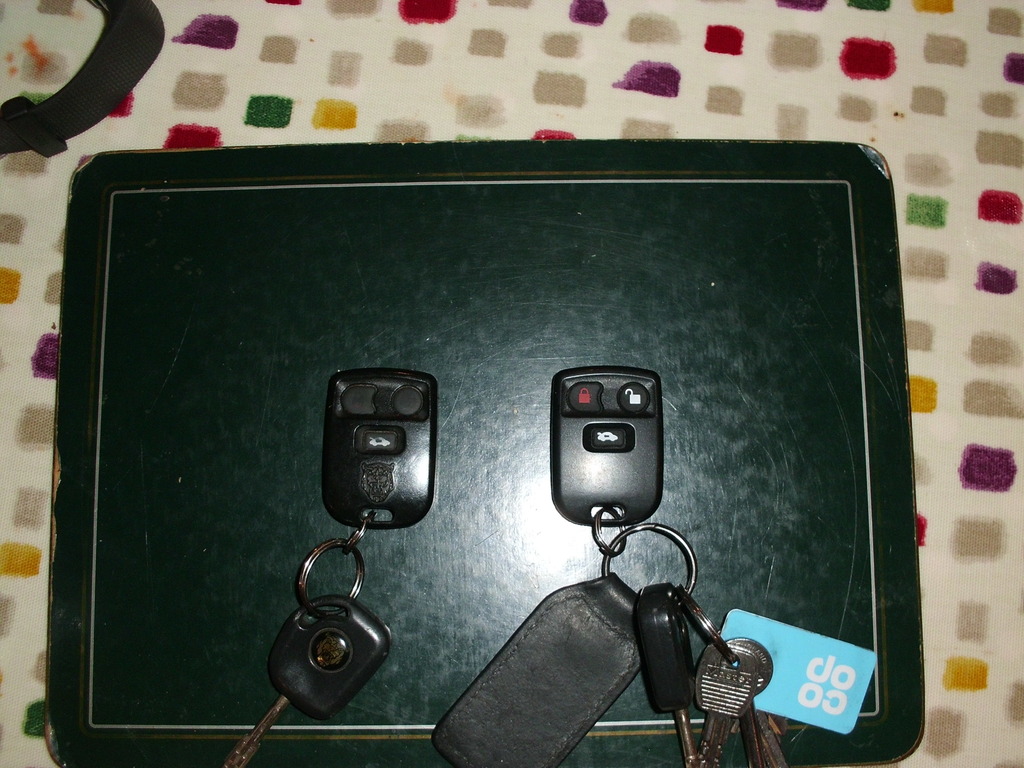
With a little help from two of these little badgers;
NEW JAGUAR S TYPE 3 BUTTON REMOTE KEY FOB CASE & RUBBER BUTTONS REPAIR KIT | eBay
I did not take a before picture but all of the little buttons (circled) had come away or were coming away. They had also lost their "click".
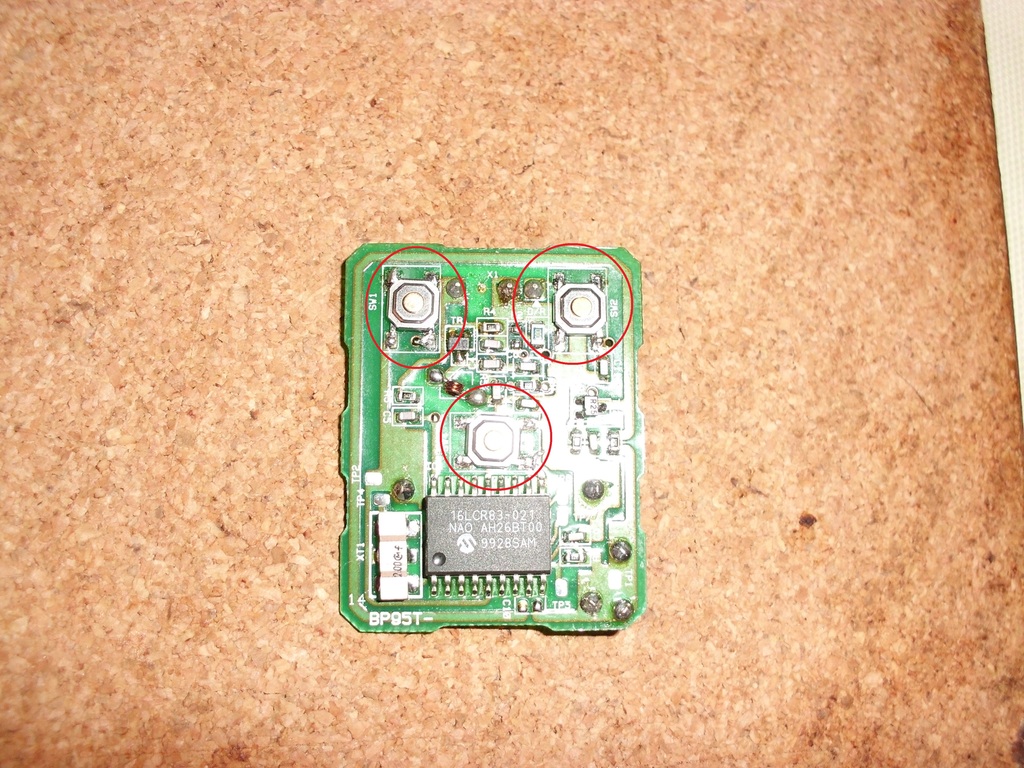
I picked them all off and re-soldered the new buttons onto the PCB.
There was no need to have them reprogrammed. they all worked well, except that neither operated the boot which I will explain later.
#3
02-23-2017, 12:22 PM
I have had the following work done at my friends garage:
Oil and filter change Oil 0 winter 20 in an attempt to solve the rattle in the VVT system UPDATE - Cured the rattle but codes remain and over retarding - �80.00
Swap of N/S hub to cure wheel bearing noise - �90.00
Change of front pads and rear discs and pads - �100.00 (Now that is a bargin!)
4No winter Dunlop tyres, part worn as there is not much of the winter season left - �100.00 (Fitted)
Mot (No advisories) �45.00
Rear track rod arms - �155.60
Next on list;
Rear parking sensors
Seat swap
Stereo Upgrade
Air Con fix
A post cover repair
Fix remote/interior boot opening
Repair headlamp aim
Fix leak into boot
Repair lighter fitting and add extra socket in arm rest for bluetooth FM receiver
Sort out "clunk" to N/S over bumps - Suspect ARB bushes
Last edited by XJR 308; 02-23-2017 at 12:29 PM.

#6
02-23-2017, 01:35 PM
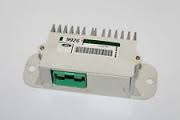
Since having the car the rear parking sensors have not worked. There is a long (5 or 6 second) noise from the speaker but nothing else.
As suggested by another member I took the car to my "local (90 mile round trip) Inde to have the codes checked. Apart from the issues with the VVT and an old one for the abs, he was unable to draw any codes. He was not very helpful and insinuated that I did not need the parking sensors anyway. Well yes, i suppose he has a point but they are there so I want them to work! Needless to say the journey was not worthwhile an only goes to re-enforce my opinion that although people have the tools, the majority of them do not know what they are doing. Or maybe he was right, the codes for the parking sensor do not show up? Who knows - Who cares.
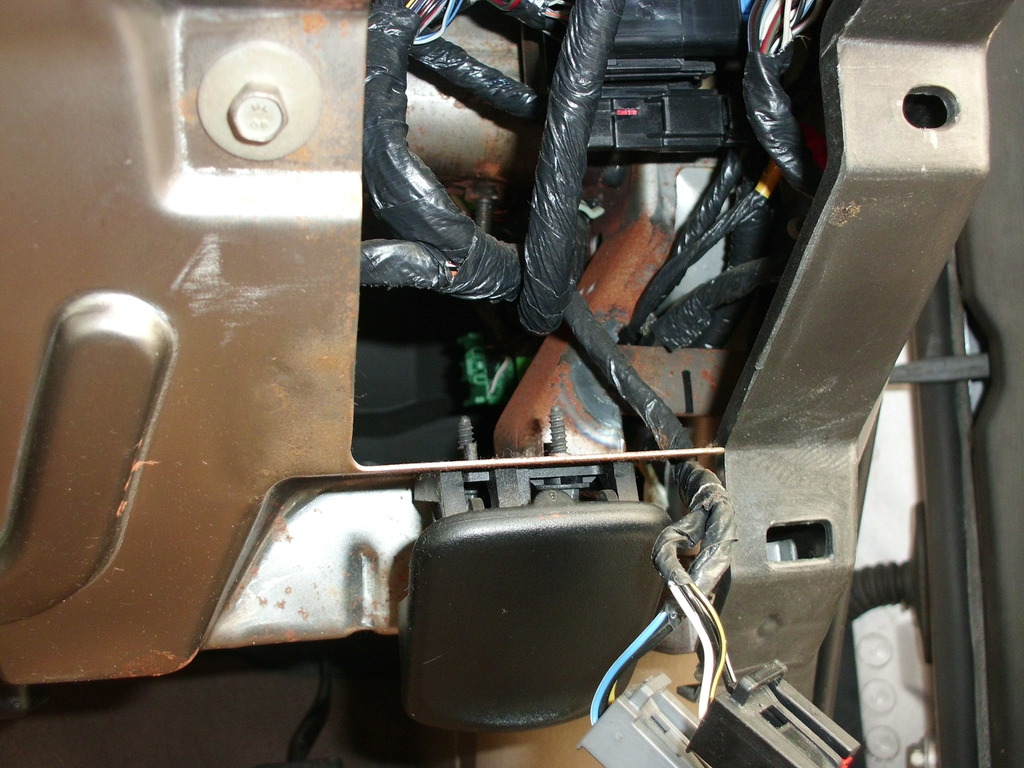
With the lights working as they should I decided to hack the electrics to provide my own source to the module.
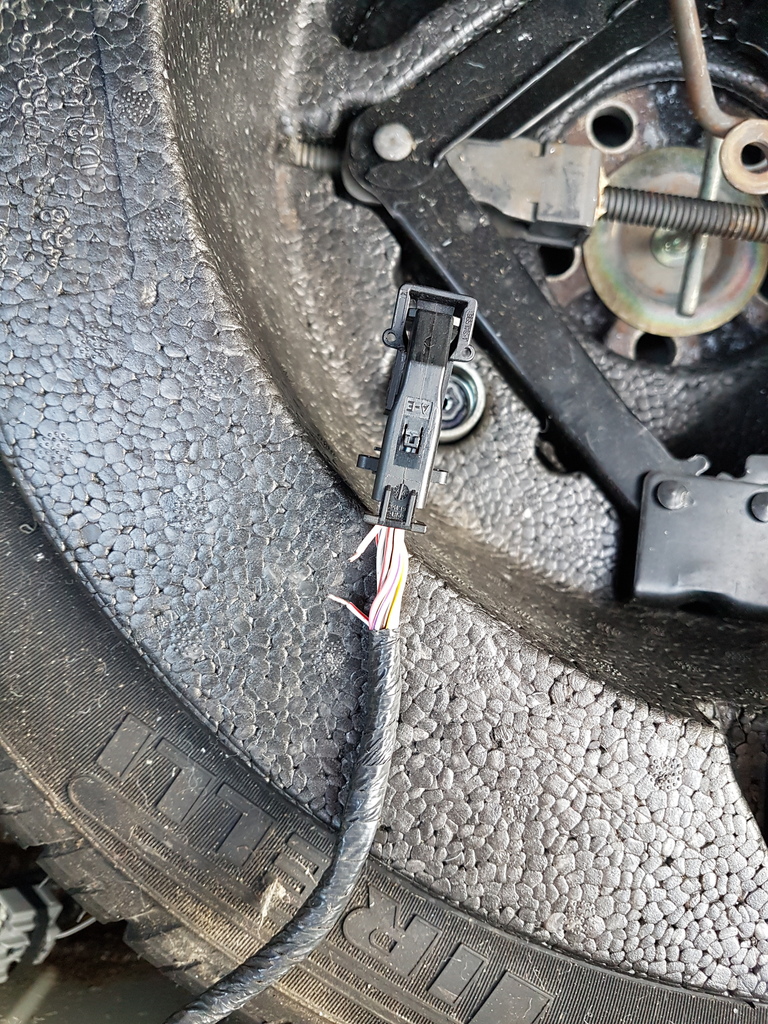
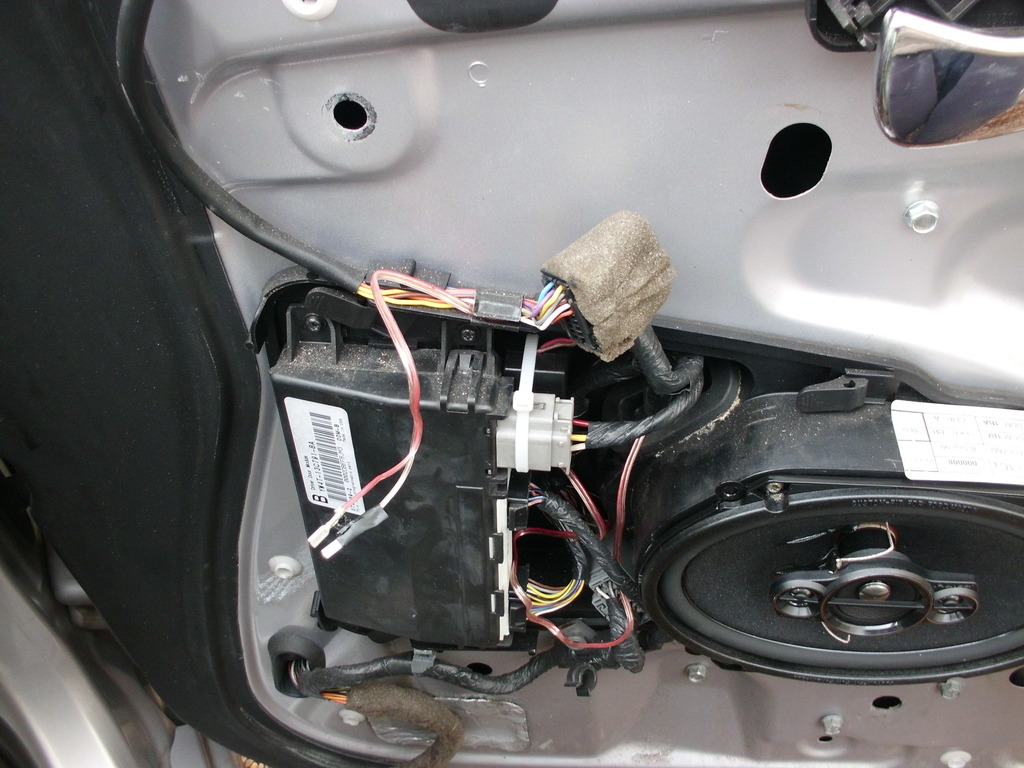
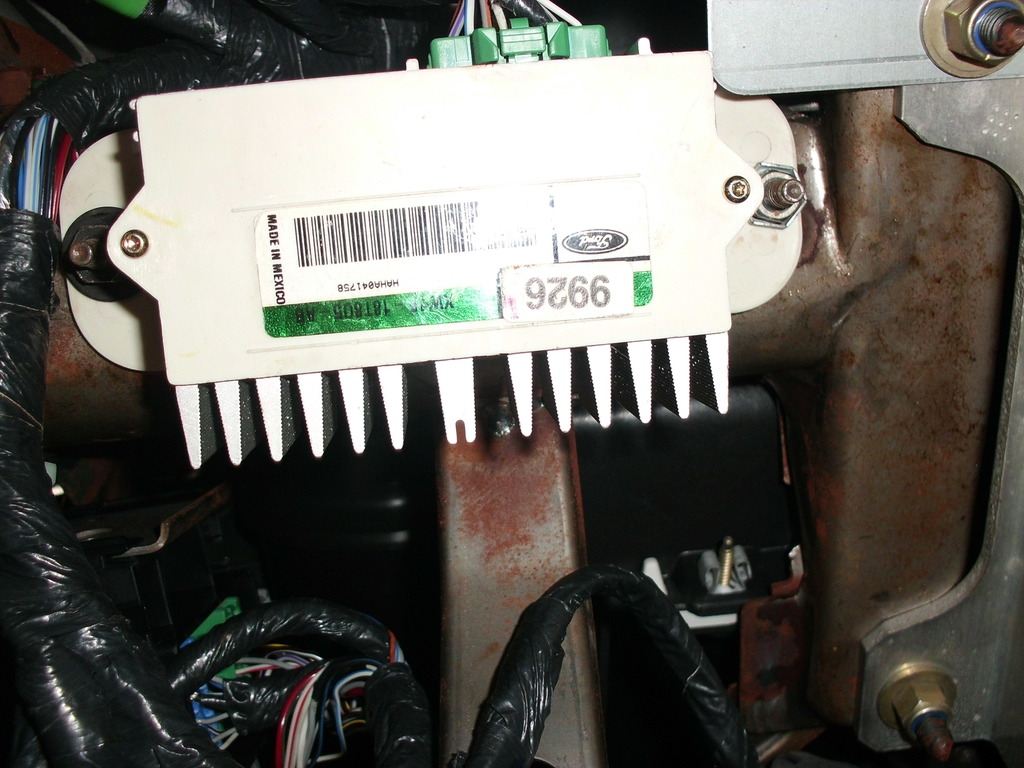
So I set about investigating the module. From the picture below, one can see it is pretty much U/S - Water damage.
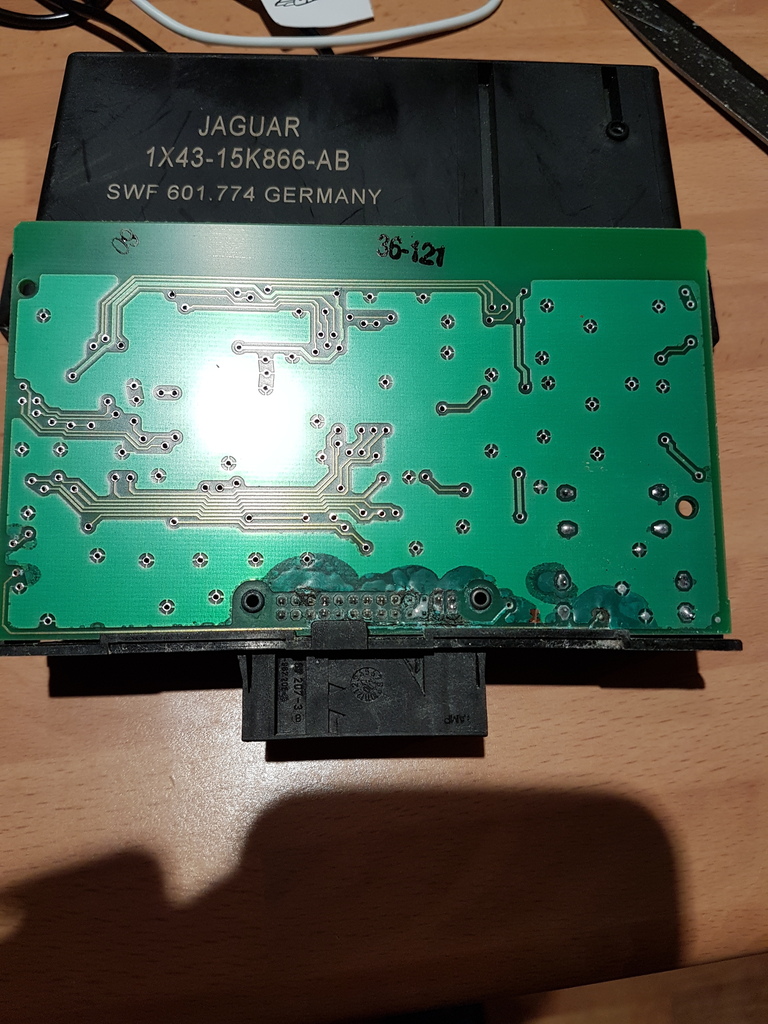
So I bought another off Ebay with matching numbers. Although it looked spotless inside, it did not work. - Well it did but only in every gear apart from reverse!!
Not put off by this I checked with the wiring diagram
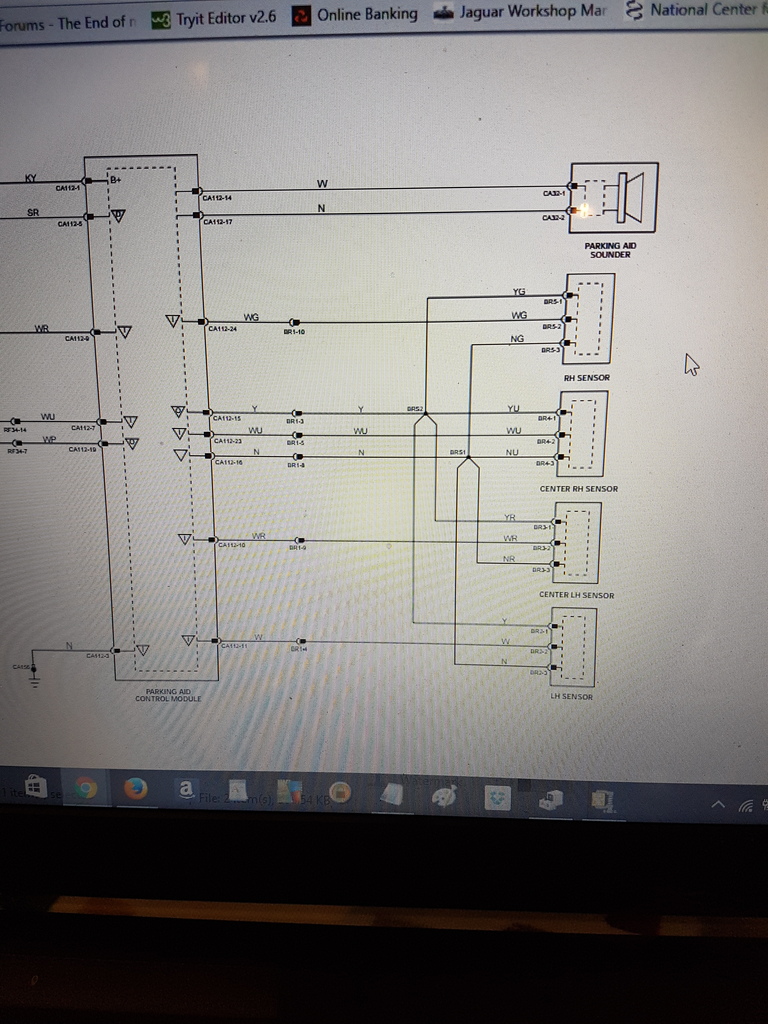
So, it appears that the module is activated following an input + feed through Pin #9. In turn Pin #9 obtains its feed from the feed to the earth side of the reversing lamp side. Therefore in order to operate the module needs a + feed which it was being supplied with on a permanent basis due to the positive earthing system the S Type uses within (and not limited to) the rear lighting system.
So with the + earth side of things aside, basically the earth on the reversing bulb is + UNLESS reverse is selected in which case the + is converted to - and the bulb illuminates - Simples.
So the art is to convert the - that is produced when reverse is selected onto a + and then projected into Pin #9
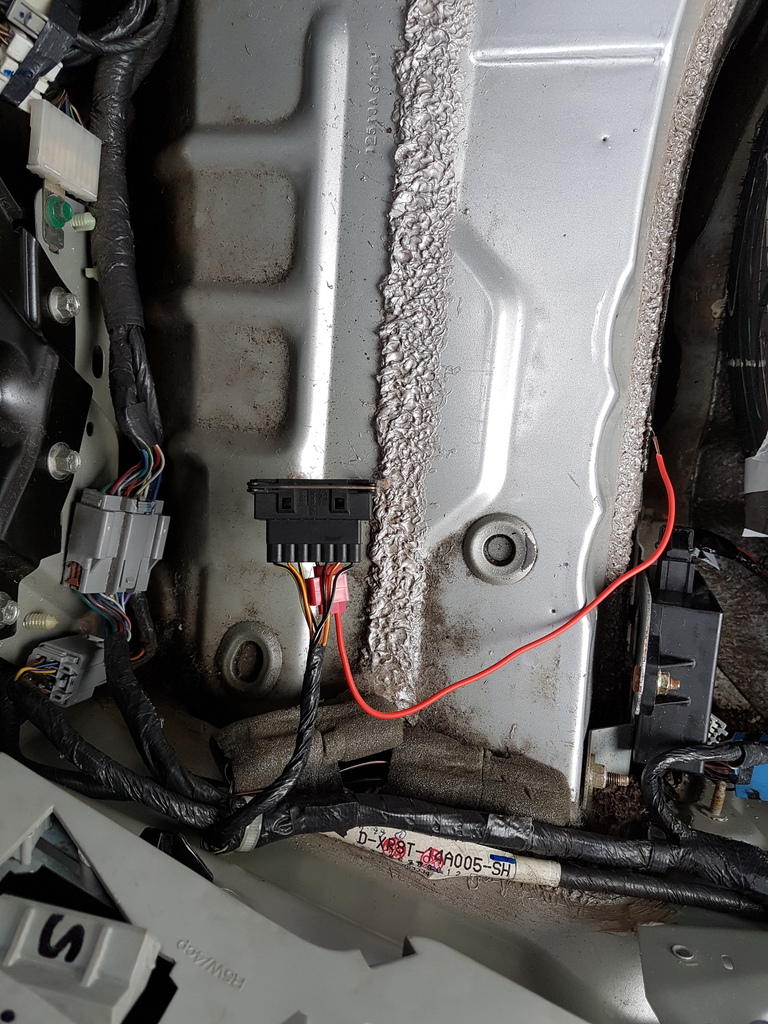
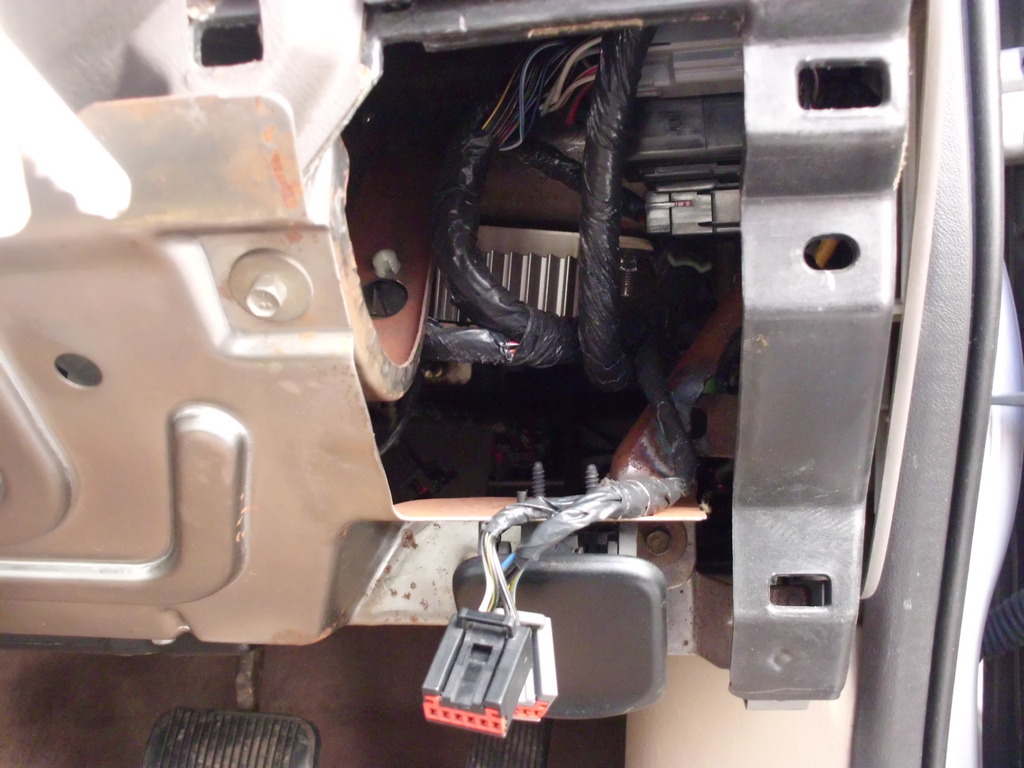
First of all, I cut into the Pin #9 wire, short of the harness plug
And attached a length of suitable wire going into the plug. Seal the end of the wire from the main loom. Once the plug is inserted into the module one can test its operation with a connection to the + terminal on the battery.
The next step is to run a + feed from the battery, via a fuse to provide the feed for the module.
Next was to connect up a wire to what is going to be my - feed from the reversing light. Remember this will be + unless the reversing light is illuminated.
Connect another length of wire into Pin #4 of the rear lamp cluster plug. I also tested that this connection gave NO feed whatsoever with the ignition off
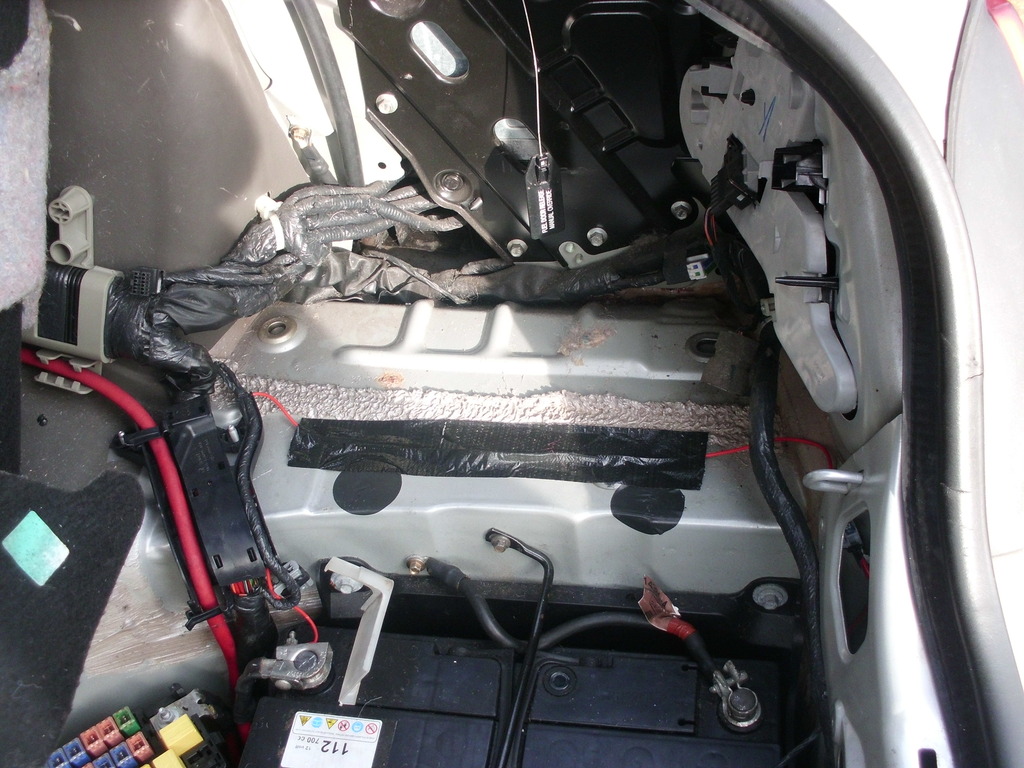
The next step was possibly the most difficult to find a source for. After a lot of thought I decided on a feed from the redundant sat nav system. I was keen to find a + source that switched off fully when the ignition was off, not one that remained on until the electrical system "shut down" as I was concerned that this may cause the battery to go flat.
So I had my 4 wires and using a relay I connected as follows
+ from battery to - from lamp cluster to cause the switch
+ from Sat Nav output to Parking module when switched
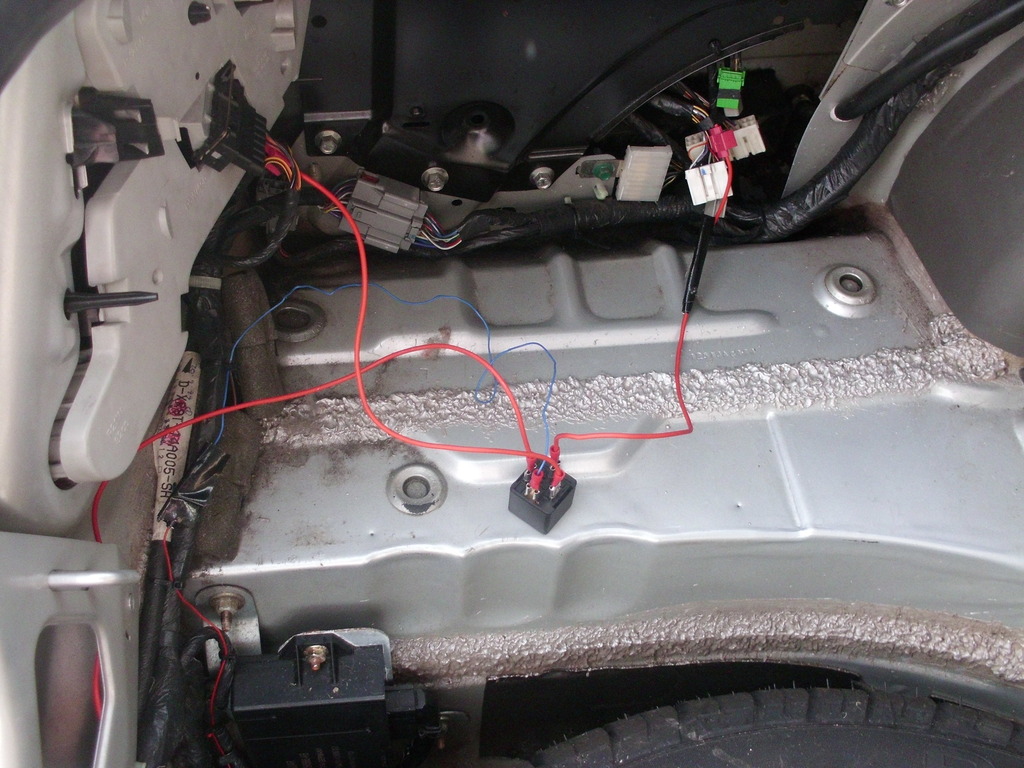
I had to use some blue wire as I ran out of red!
Works great and now not in every gear except the one I want!
As suggested by another member I took the car to my "local (90 mile round trip) Inde to have the codes checked. Apart from the issues with the VVT and an old one for the abs, he was unable to draw any codes. He was not very helpful and insinuated that I did not need the parking sensors anyway. Well yes, i suppose he has a point but they are there so I want them to work! Needless to say the journey was not worthwhile an only goes to re-enforce my opinion that although people have the tools, the majority of them do not know what they are doing. Or maybe he was right, the codes for the parking sensor do not show up? Who knows - Who cares.
With the lights working as they should I decided to hack the electrics to provide my own source to the module.
So I set about investigating the module. From the picture below, one can see it is pretty much U/S - Water damage.

So I bought another off Ebay with matching numbers. Although it looked spotless inside, it did not work. - Well it did but only in every gear apart from reverse!!
Not put off by this I checked with the wiring diagram

So, it appears that the module is activated following an input + feed through Pin #9. In turn Pin #9 obtains its feed from the feed to the earth side of the reversing lamp side. Therefore in order to operate the module needs a + feed which it was being supplied with on a permanent basis due to the positive earthing system the S Type uses within (and not limited to) the rear lighting system.
So with the + earth side of things aside, basically the earth on the reversing bulb is + UNLESS reverse is selected in which case the + is converted to - and the bulb illuminates - Simples.
So the art is to convert the - that is produced when reverse is selected onto a + and then projected into Pin #9
First of all, I cut into the Pin #9 wire, short of the harness plug

And attached a length of suitable wire going into the plug. Seal the end of the wire from the main loom. Once the plug is inserted into the module one can test its operation with a connection to the + terminal on the battery.
The next step is to run a + feed from the battery, via a fuse to provide the feed for the module.

Next was to connect up a wire to what is going to be my - feed from the reversing light. Remember this will be + unless the reversing light is illuminated.
Connect another length of wire into Pin #4 of the rear lamp cluster plug. I also tested that this connection gave NO feed whatsoever with the ignition off

The next step was possibly the most difficult to find a source for. After a lot of thought I decided on a feed from the redundant sat nav system. I was keen to find a + source that switched off fully when the ignition was off, not one that remained on until the electrical system "shut down" as I was concerned that this may cause the battery to go flat.
So I had my 4 wires and using a relay I connected as follows
+ from battery to - from lamp cluster to cause the switch
+ from Sat Nav output to Parking module when switched

I had to use some blue wire as I ran out of red!

Works great and now not in every gear except the one I want!
#7
02-23-2017, 01:37 PM
Trending Topics
#8
02-23-2017, 01:40 PM
I try and do most of the work myself although I am too old (and lazy) to do most of the hard labour myself.
Thanks for your interest.
#9
02-23-2017, 01:52 PM

Veteran Member
The following users liked this post:
XJR 308 (02-23-2017)
#10
02-23-2017, 02:24 PM

Veteran Member
The following users liked this post:
XJR 308 (02-23-2017)
#11
02-23-2017, 04:08 PM
I expect that is the case. There is only a certain amount of wire chasing my attention span will allow.
Clearly Pin #9 is supposed to be a - input feed so somewhere along the line in the wiring loom something is array.
Although a hack is not a purists view, it is far more fun and mind expanding that wire chasing, which is mundane in its repetitiveness.
Thanks for your post.
Clearly Pin #9 is supposed to be a - input feed so somewhere along the line in the wiring loom something is array.
Although a hack is not a purists view, it is far more fun and mind expanding that wire chasing, which is mundane in its repetitiveness.
Thanks for your post.
#12
02-23-2017, 04:13 PM
My Inlet manifold has one valve at the back and one on the top. I am hoping not to have the issues that having a lower one at the back can cause.
#13
02-26-2017, 03:48 PM

Member
If there was water damage in the module, I might suggest you seal up the trunk (multiple other threads regarding how-to) just to ensure no more water gets in there since there are 3 other modules you don't want to break  . Might also check the sunroof drains as well
Good Thread, thanks for sharing
. Might also check the sunroof drains as well Good Thread, thanks for sharing
The following users liked this post:
XJR 308 (04-08-2017)
#14
04-08-2017, 09:32 AM
If there was water damage in the module, I might suggest you seal up the trunk (multiple other threads regarding how-to) just to ensure no more water gets in there since there are 3 other modules you don't want to break . Might also check the sunroof drains as well
Good Thread, thanks for sharing
. Might also check the sunroof drains as well Good Thread, thanks for sharing

I lifted the seal up and applied a *generous* amount of clear silicone and refitted the seal I also ran a silicone line between the seal and body the length of the red line above Silicone was also applied to the crease where water was penetrating.
Over the last few weeks I have upgraded the stereo system and applied a cd hack to listen to my MP3 player with CD quality which is *FAR* better than a bluetooth or cassette system currently on the market!
Same unit - Spot the oddity....
Front:

Back:

Regards
XJR 308
Last edited by XJR 308; 04-08-2017 at 09:58 AM.
#15
04-08-2017, 09:51 AM
Having followed advice recieved on this Forum, I had been running around with some 0 Winter 20 for some miles 3.5K following a flush. I had got to the stage that I was resigned to seriously looking into the Litre of ATF mixture that some talk of as having a beneficial effect.
I walked into my usual motor factors and to say they were horified at the prospect was an understatement. They persuded my to try one more additive.
Comma Engine Flush;

The beauty (apparently this is not the norm?) of this is that you leave it in the engine until your next oil change is due. I have to say this made me thing it would be crap, weak if you like.
Over the next 500 miles I made a consious effort to use the kick down. Initially I got the usual crappy kickdown reaction along with the odd limp mode at WOT that I was used to. Dash occasionally flashing at me.
Then, low and behold the car had a new feel to it, like it had found another cylinder if you like. I braced myself and floored it. Smooth and responsive, well as responsive as a 3.0 S Type can be (I sometimes miss my XJR).
Having found a local man with a snap on reader, we cleared the fault and went for a run. I kicked the **** out of the engine for 10 minutes and the code had not returned
Happy Days
Regards
XJR 308
#16
04-08-2017, 04:43 PM
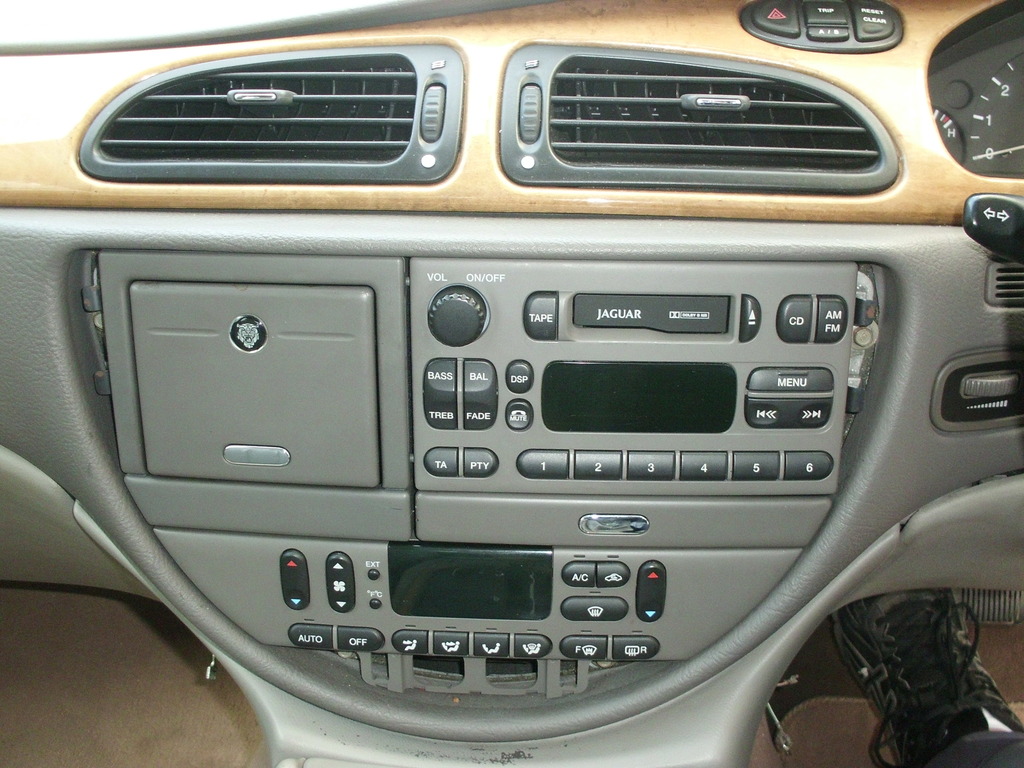
I took a flyer and bought a used Premium sound unit off EBay. Although the picture was poor, it sounded in good condition but with no code.
I was disappointed that although indeed it was in good condition, it was Sable fronted instead of the Antelope or Mink, I was after.
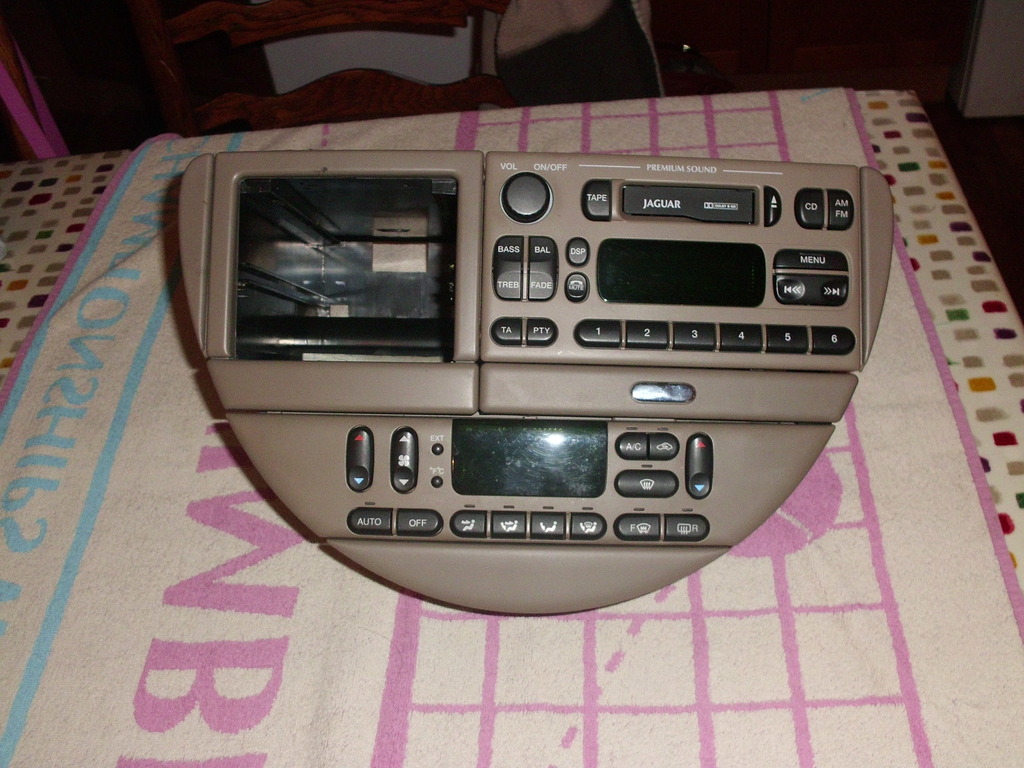
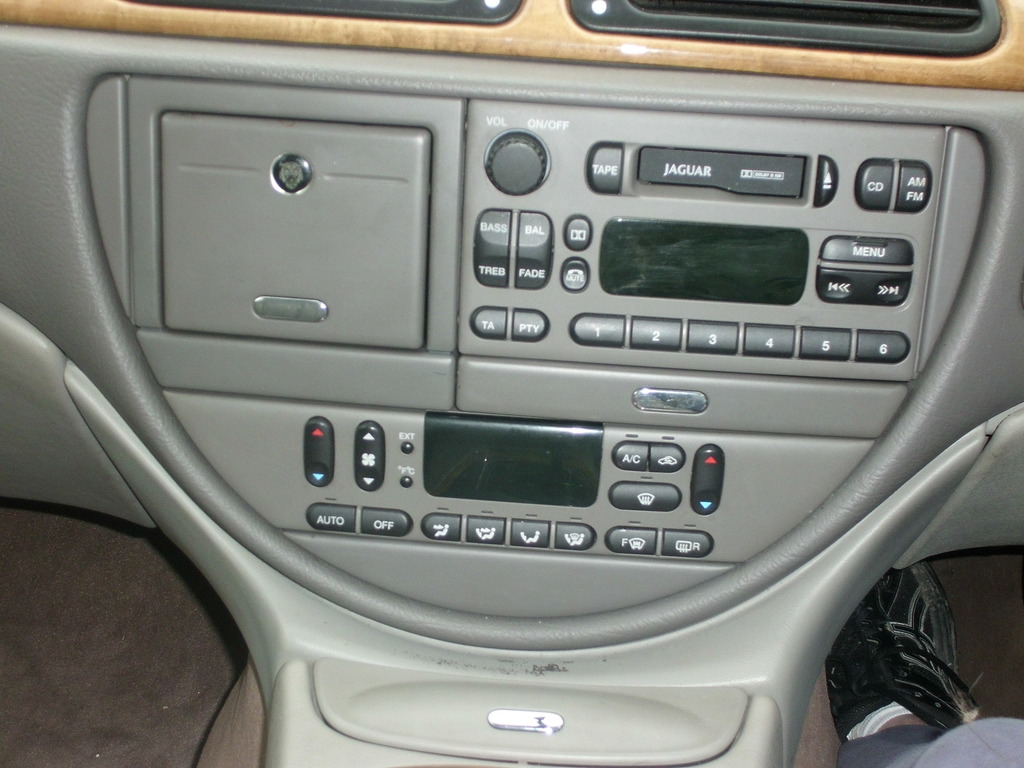
Not put off by this I set about changing the head unit face plate. I was not fussed by the fact "Premium" was not showing.
The only thing I needed to do was to swap the DSP button from the Premium front plate into my regular unit.
To start, I removed the front plate from both units. This is very easy and requires the removal of 4 Torx screws, two on one side;
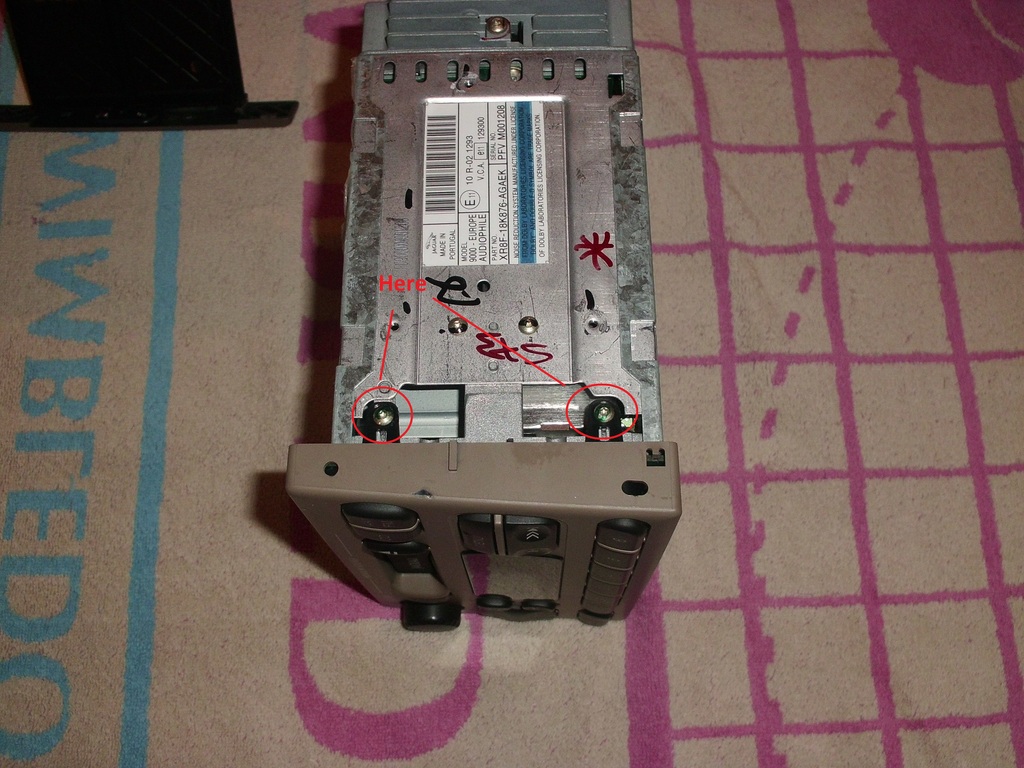
And two on the other. The black plastic tangs can then be raised slightly to lift the faceplate away from the unit.
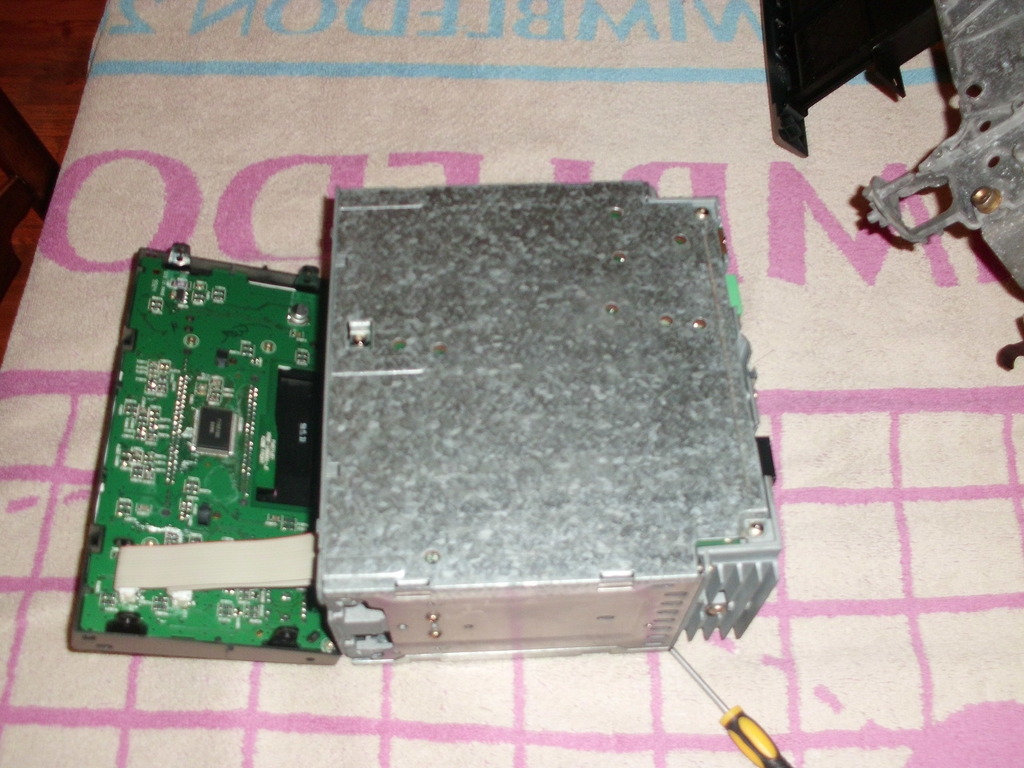
Unclip the motherboard cables and you have them free.
Remove the seven Torx screws that secure the motherboard to the front panel.
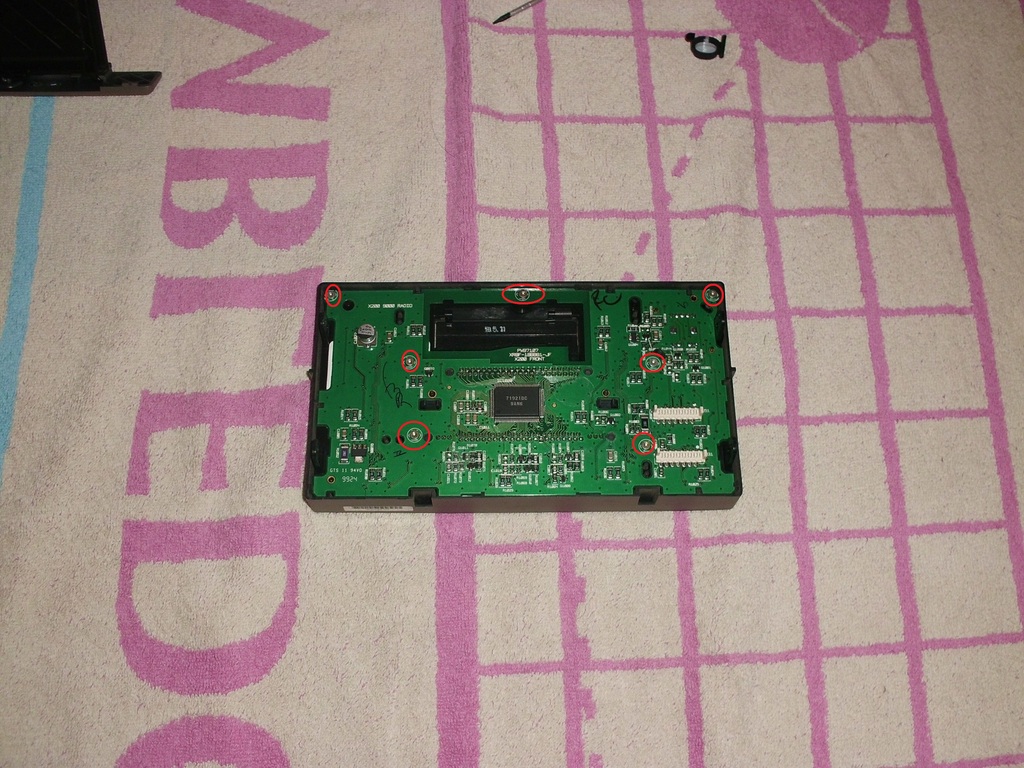
And remove the motherboard and plastic cover. The cover holds the motherboard to the plastic plart that transmits the button presses onto the motherboard. This takes some ***** as some force is required as the motherboard is well clipped in. With luck you will, like I did remove the board intact and without damaging any of the retaining clips. It is worth taking a not of what fits in where at this stage.
Remove the white plastic backing sheet.
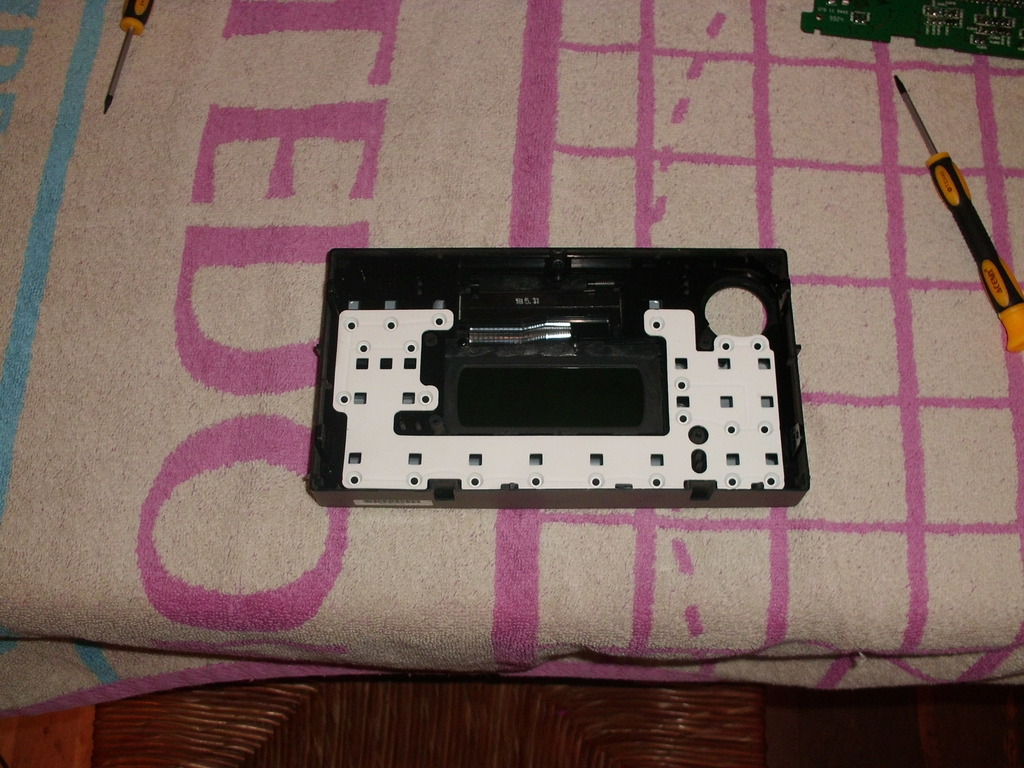
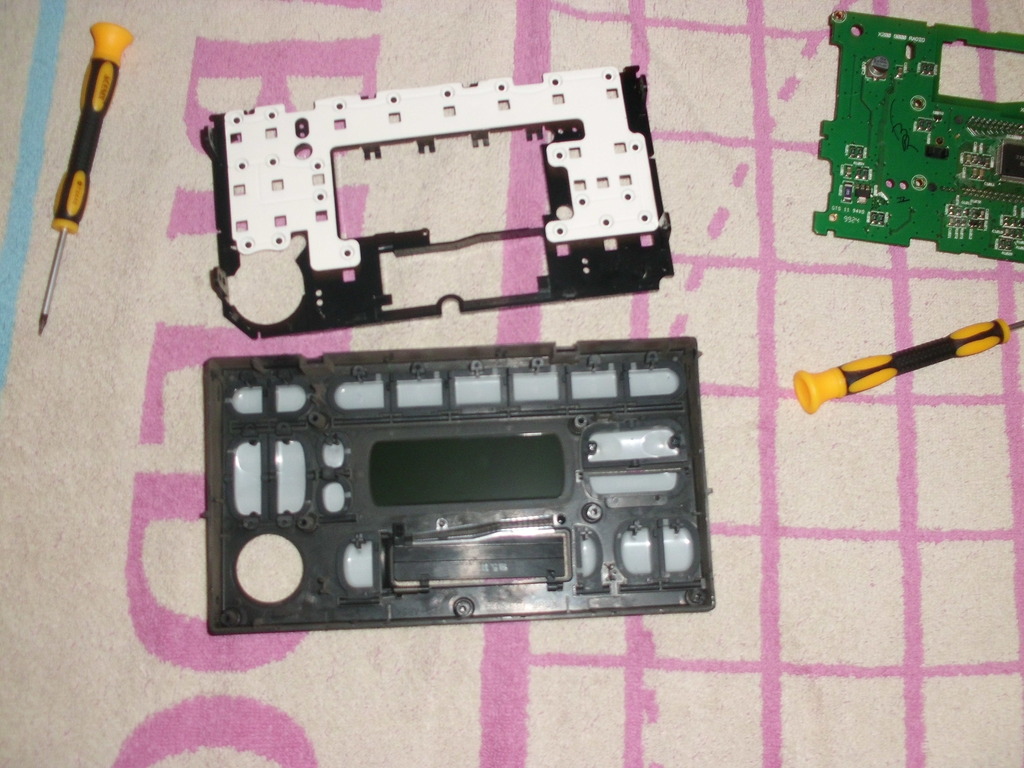
All that remains is to remove the DSP button and switch it for the dolby button in the lower spec head unit.
Fortunately putting the head face back together is a lot easier than its dismantling!
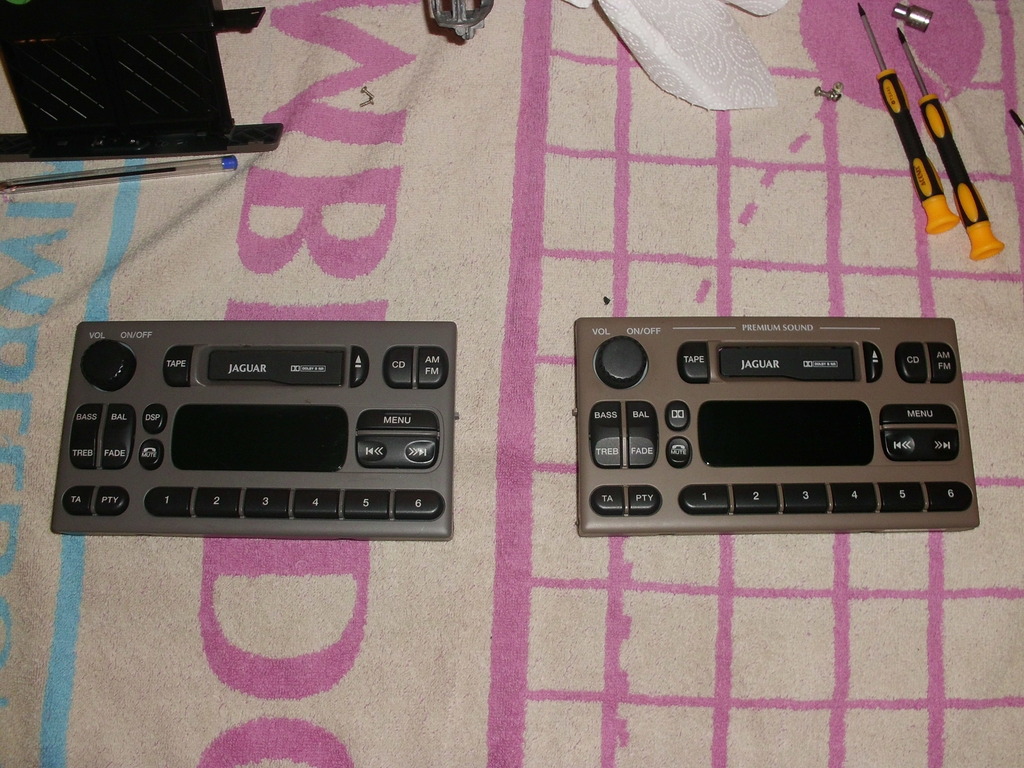
Put the front section back on the head and you are good to go!
Cost �39.00 Delivered.
With the uprated amplifier and woofer outputs I purchased one of these;

Cost �29.00 Delivered.
And one of these;
�11.00 Delivered.
Regards
XJR 308
I was disappointed that although indeed it was in good condition, it was Sable fronted instead of the Antelope or Mink, I was after.


Not put off by this I set about changing the head unit face plate. I was not fussed by the fact "Premium" was not showing.
The only thing I needed to do was to swap the DSP button from the Premium front plate into my regular unit.
To start, I removed the front plate from both units. This is very easy and requires the removal of 4 Torx screws, two on one side;

And two on the other. The black plastic tangs can then be raised slightly to lift the faceplate away from the unit.

Unclip the motherboard cables and you have them free.
Remove the seven Torx screws that secure the motherboard to the front panel.

And remove the motherboard and plastic cover. The cover holds the motherboard to the plastic plart that transmits the button presses onto the motherboard. This takes some ***** as some force is required as the motherboard is well clipped in. With luck you will, like I did remove the board intact and without damaging any of the retaining clips. It is worth taking a not of what fits in where at this stage.
Remove the white plastic backing sheet.


All that remains is to remove the DSP button and switch it for the dolby button in the lower spec head unit.
Fortunately putting the head face back together is a lot easier than its dismantling!

Put the front section back on the head and you are good to go!
Cost �39.00 Delivered.
With the uprated amplifier and woofer outputs I purchased one of these;

Cost �29.00 Delivered.
And one of these;

�11.00 Delivered.
Regards
XJR 308
#17
04-08-2017, 05:08 PM
Initial list of things to deal with;
Front Brake Pads
Rear pads and disks
Sort out fault code P1386 and P1388
Oil change (possibly to suit above codes)[/s] Done
N/S wheel bearing (hub)[/s] - Done
Parking Sensors U/S[/s] - Done
Upgrade "Premium" stereo system[/s]
4 New Tyres - Waiting for the right deal
Air Con fix
Mot
Retro a fully heated windscreen (Why? - 'cos I can)
Replace rear track rod ends (split rubbers)
Repair broken remote fobs
4 New Tyres - Still waiting for the right deal
Retro a fully heated windscreen (Why? - 'cos I can) - Still working on it!
New projects;
Upgrade of standard (awful) speakers
Hack of CD system to supply MP3 quality external input
Addition of 4 channel amplifier
New oil change
New steering wheel (Mink)
IMT o-rings
Rattle under dash passenger airbag
And On....
Regards
XJR 308
Last edited by XJR 308; 04-08-2017 at 05:10 PM.
#18
04-11-2017, 01:24 PM
Having read many (many) threads about improving the poor sound generated by the speakers in my S Type, I decided change was required. Initially I wanted to change the speakers and add some bass.
So as above, I purchased the woofer deck and the centre fill amplifier. Along with this, I purchased 2No pairs of Pioneer TS-A6834i and (As the ones i wanted were out of stock) 1No pair of Inphase SXT-1 tweeters with in line crossover.
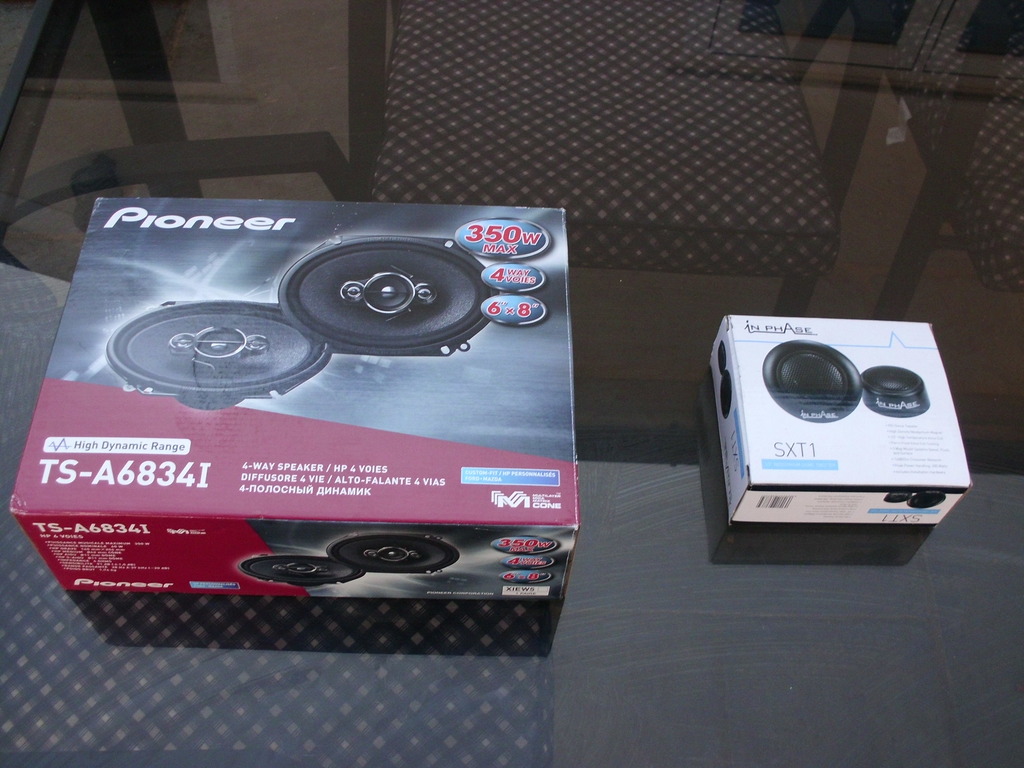
First job was to remove the door cards. I have done these so many times, I can have a door card off in under a minute. The hardest part is the handle surround which is still a little awkward!
4 Torx off;
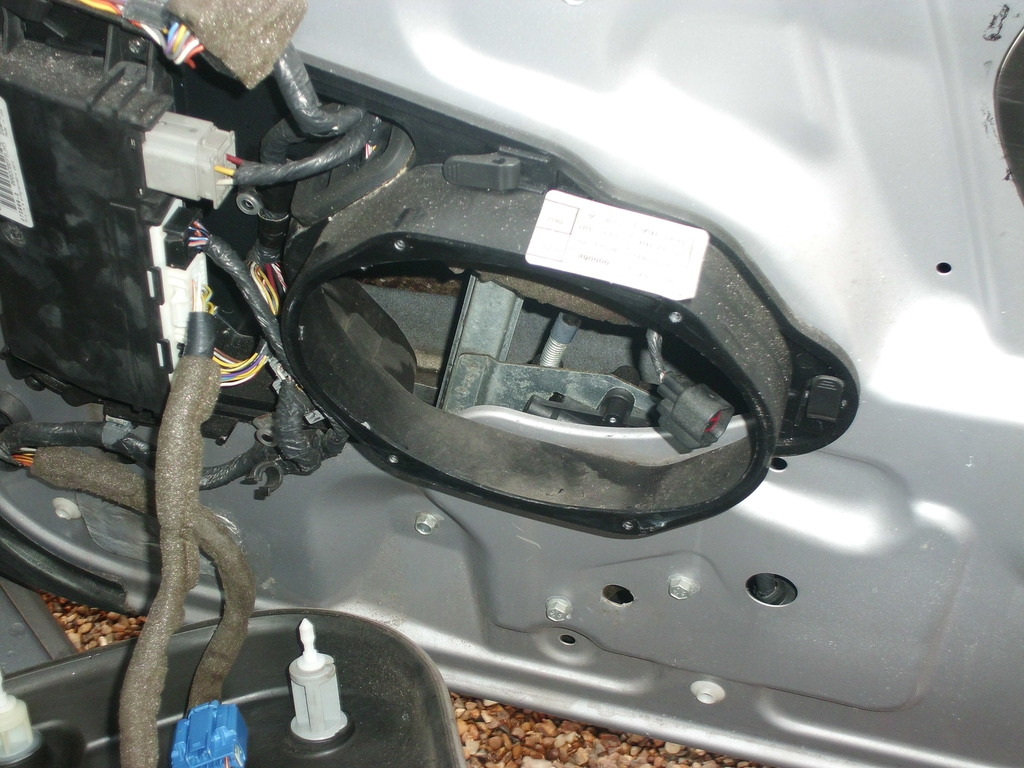
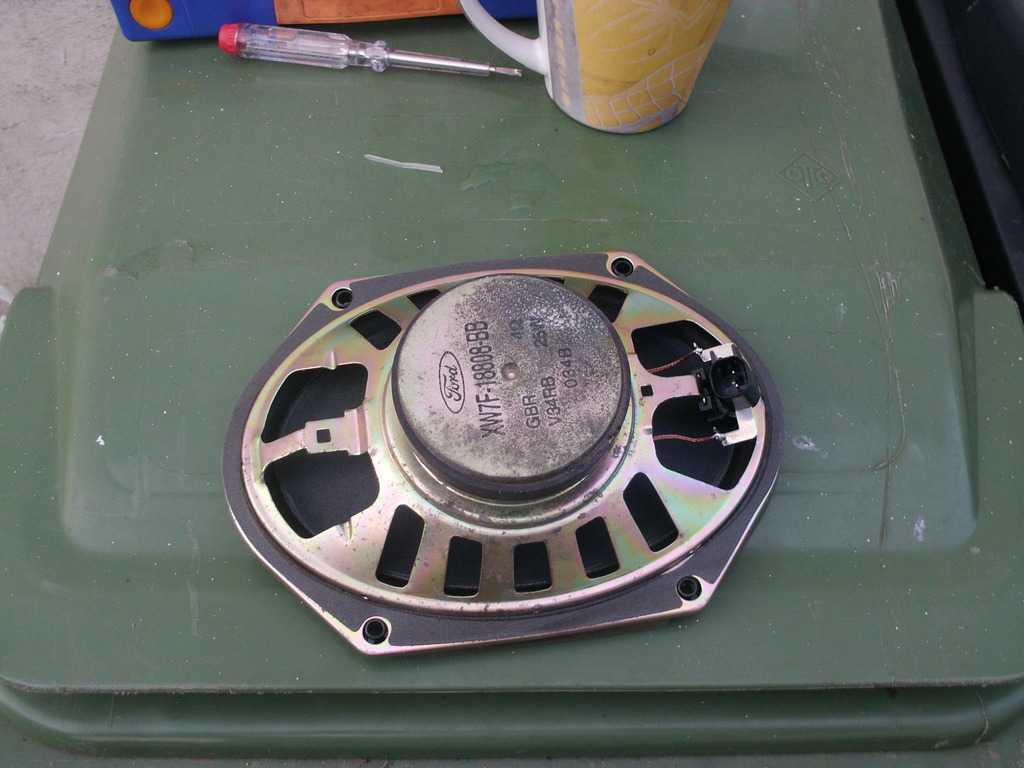
Speaker....Nice!
As I have another set of these speakers in my doner car, I decided to detatch the speaker plug off of the speaker so I could, using my spare set return the speakers to stock should I need to.
Detached the plugs from the speakers and attached the new speakers using the wires supplied. I also attached the feed for the tweeters to this plug (not shown)
Replace speaker, feeding wire for tweeter back throught the speaker backing housing.
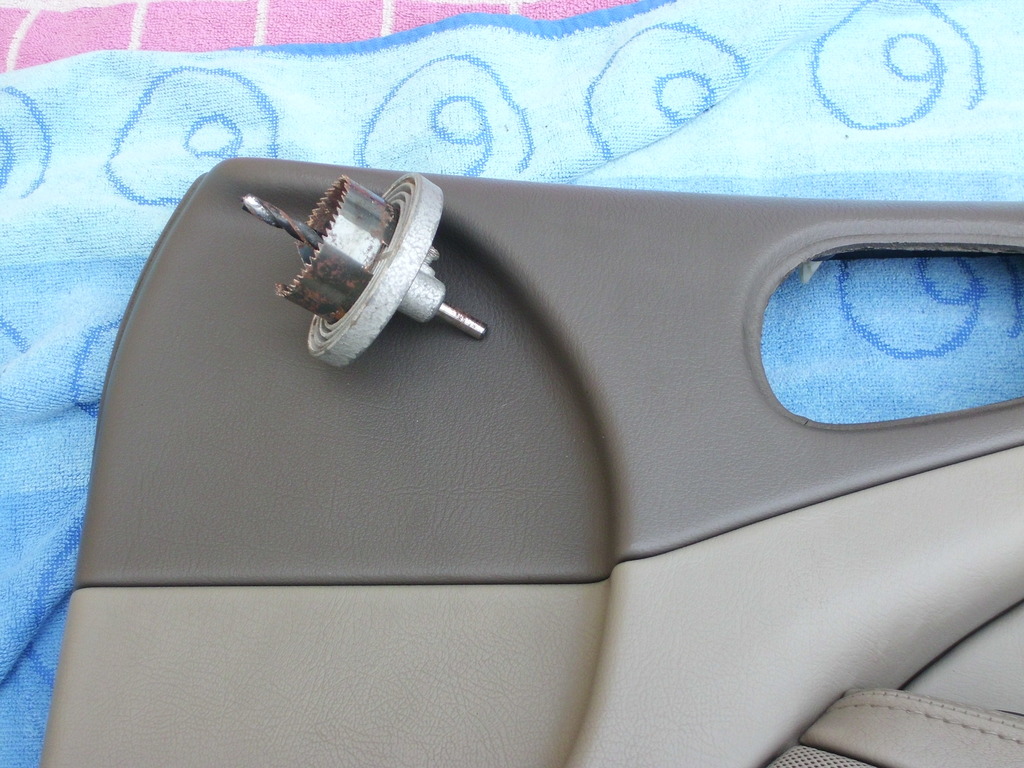
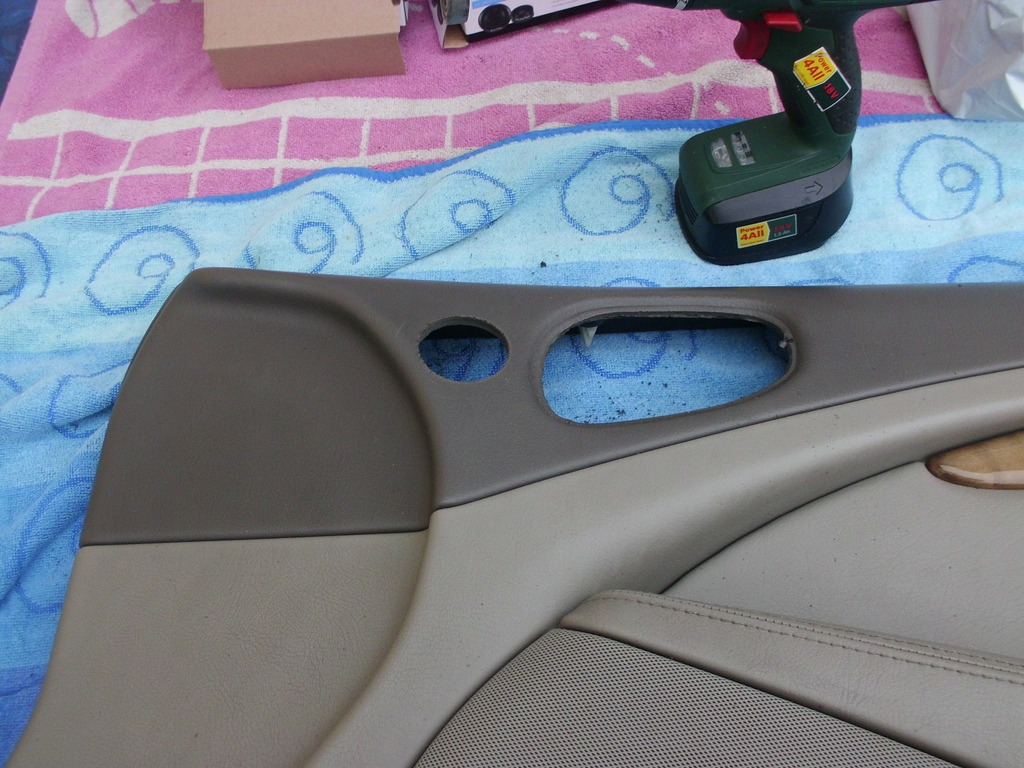
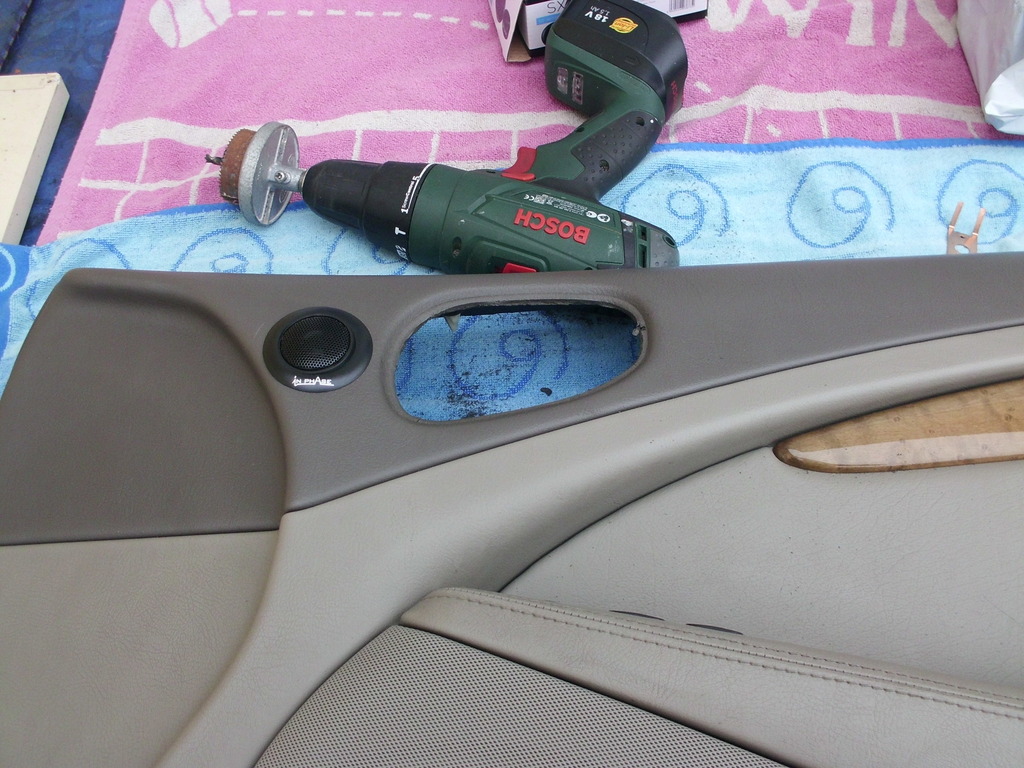
Taking the door card I cut a 4" (100mm) hole (using a dry liner cutter). There are not many places in the card that are sufficiently flat to ensure a good seal, from the thread i had copied this from, this seemed to be the best place.
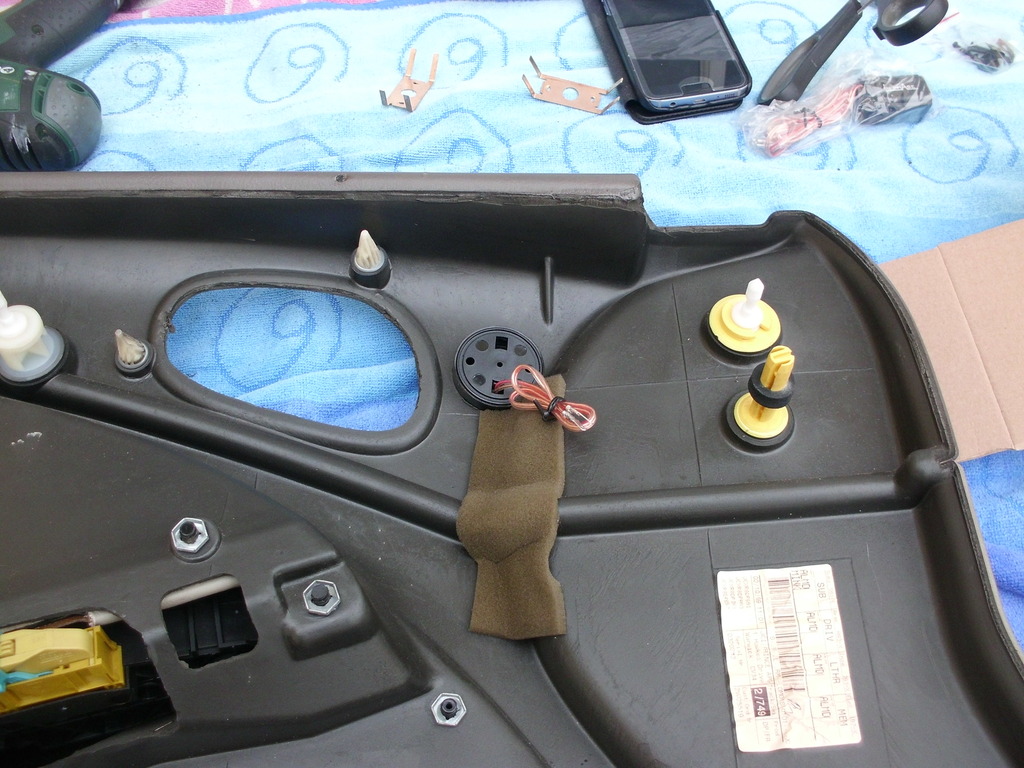
Connect the tweeter to the wire you had left loose from the lower speaker and re attach the door card;
One down, three more to go: - Allow 15 minutes a door.
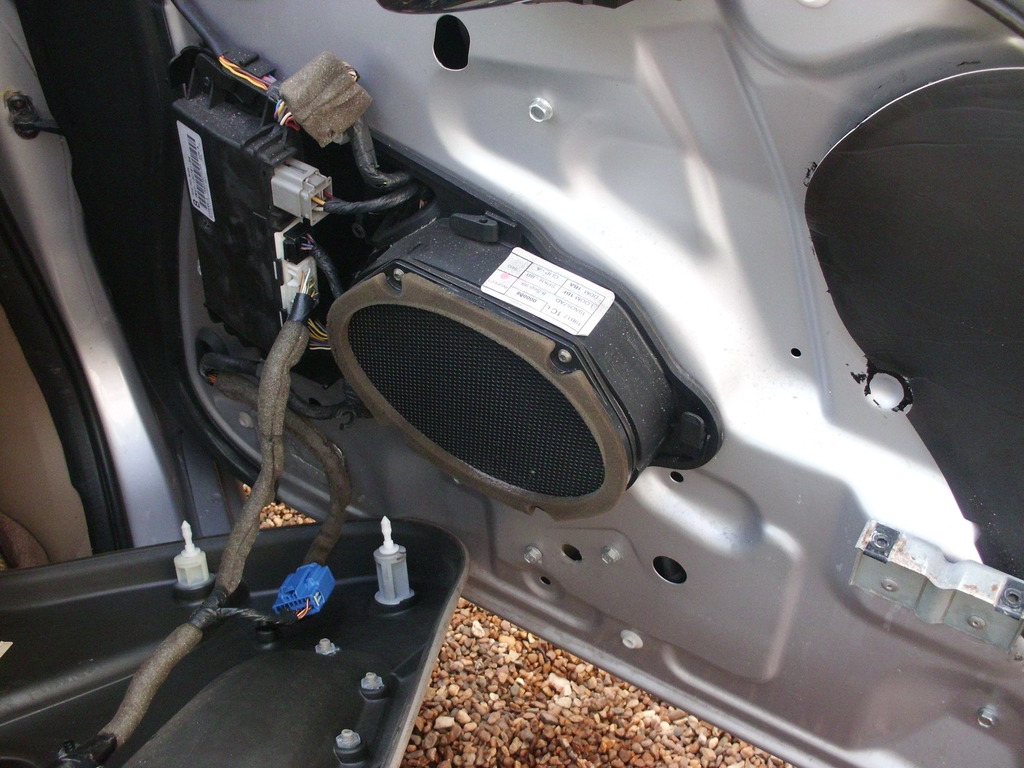
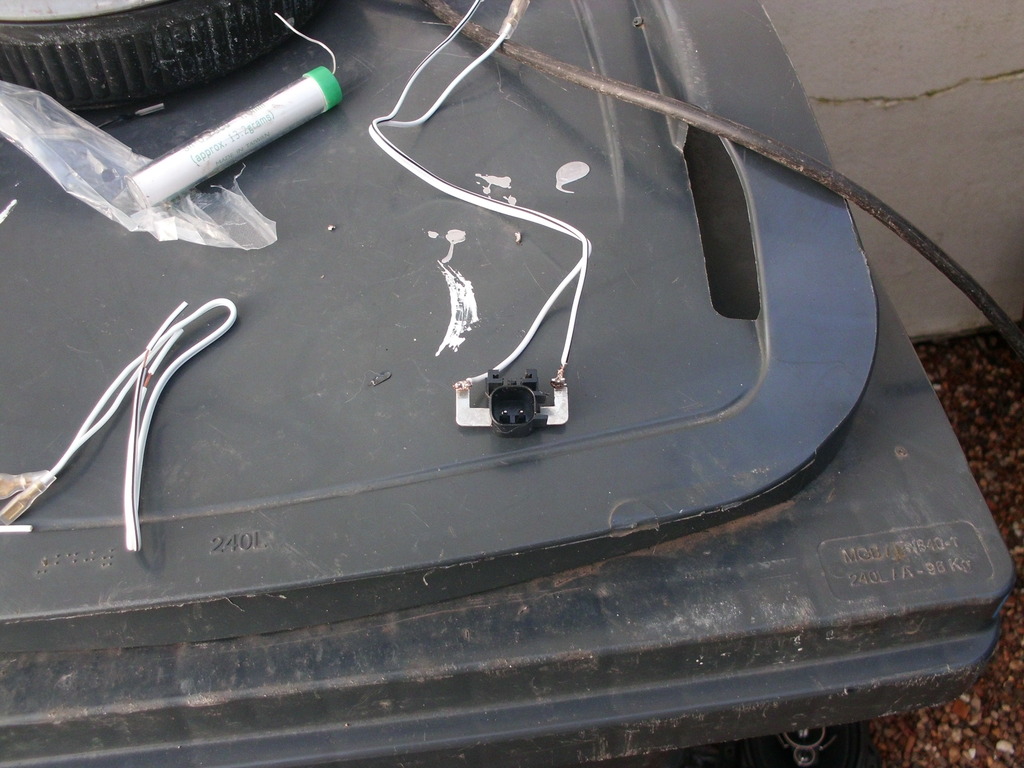
Attach the rear woofer deck to the underside of the pacel shelf and attach to the pre wired multiplug. The deck came without bolts so trusty cable ties were used;
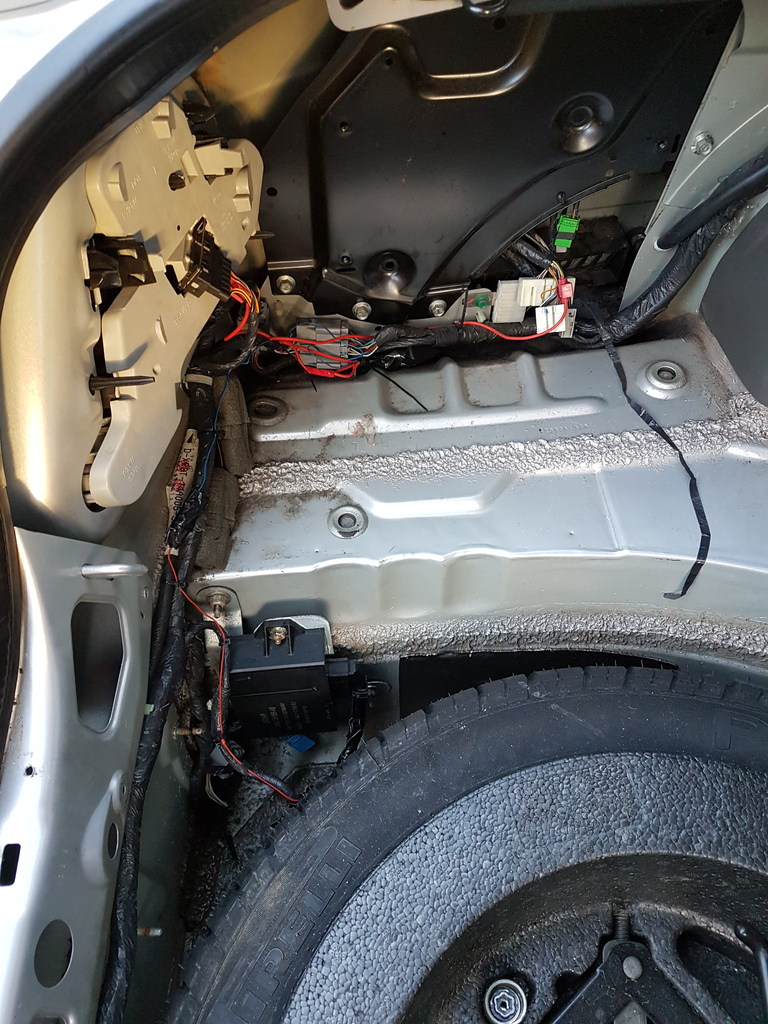
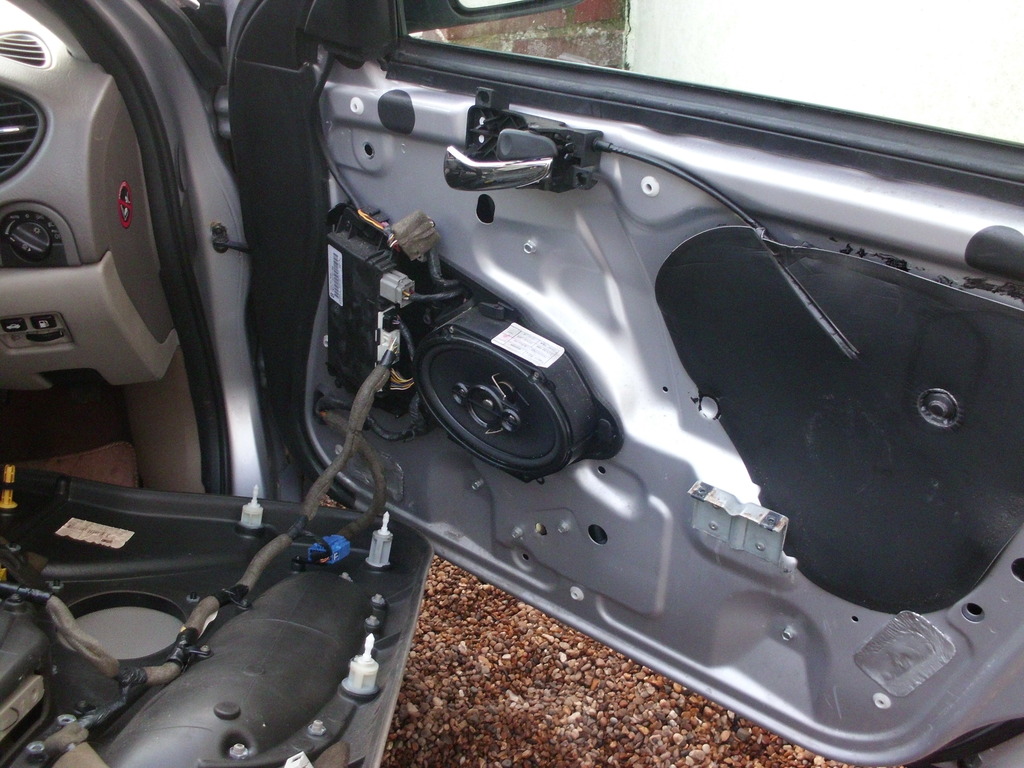
The centre fill amplifier fits (On RHD cars) behind the external light switch and is bolted onto two metal threads already there and connected to a multiplug that is already in place.
It is the GREEN multiplug that can be seen it the picture below. You will need to remove the lower cowl by removing two Torx and pulling off. One of the fixing threads can be seen above the green multiplug, north of the loom.
In place, secured by two nuts and plugged in;
And from below;
The centre fill speaker wires are part of the wiring loom and are accessed from behind the radio.
Not sure what to do with these speakers as the centre console (lower) is curved, so speaker options are limited and I have seen none specific to this model for sale.
Inspiration from this thread: Definitive Guide to upgrading your S Type Audio/Video system. Worth Viewing
The sound quality is like night and day. Volume and clarity of the combined head and speaker change is difficult to put into words. The added woofer deck compliments it all well - Quite simply one of the best upgrades I have ever done!
Cost �205.00 - Installed in under 2 hours (Including pictures)
Whilst I was at it I wanted to introduce my MP3 player so I bought one of these;
I adapted this to allow me to use BOTH my CD changer AND an aux input!
Regards
XJR 308
So as above, I purchased the woofer deck and the centre fill amplifier. Along with this, I purchased 2No pairs of Pioneer TS-A6834i and (As the ones i wanted were out of stock) 1No pair of Inphase SXT-1 tweeters with in line crossover.

First job was to remove the door cards. I have done these so many times, I can have a door card off in under a minute. The hardest part is the handle surround which is still a little awkward!

4 Torx off;

Speaker....Nice!

As I have another set of these speakers in my doner car, I decided to detatch the speaker plug off of the speaker so I could, using my spare set return the speakers to stock should I need to.
Detached the plugs from the speakers and attached the new speakers using the wires supplied. I also attached the feed for the tweeters to this plug (not shown)

Replace speaker, feeding wire for tweeter back throught the speaker backing housing.


Taking the door card I cut a 4" (100mm) hole (using a dry liner cutter). There are not many places in the card that are sufficiently flat to ensure a good seal, from the thread i had copied this from, this seemed to be the best place.


Connect the tweeter to the wire you had left loose from the lower speaker and re attach the door card;
One down, three more to go: - Allow 15 minutes a door.
Attach the rear woofer deck to the underside of the pacel shelf and attach to the pre wired multiplug. The deck came without bolts so trusty cable ties were used;

The centre fill amplifier fits (On RHD cars) behind the external light switch and is bolted onto two metal threads already there and connected to a multiplug that is already in place.
It is the GREEN multiplug that can be seen it the picture below. You will need to remove the lower cowl by removing two Torx and pulling off. One of the fixing threads can be seen above the green multiplug, north of the loom.

In place, secured by two nuts and plugged in;

And from below;

The centre fill speaker wires are part of the wiring loom and are accessed from behind the radio.
Not sure what to do with these speakers as the centre console (lower) is curved, so speaker options are limited and I have seen none specific to this model for sale.
Inspiration from this thread: Definitive Guide to upgrading your S Type Audio/Video system. Worth Viewing
The sound quality is like night and day. Volume and clarity of the combined head and speaker change is difficult to put into words. The added woofer deck compliments it all well - Quite simply one of the best upgrades I have ever done!
Cost �205.00 - Installed in under 2 hours (Including pictures)
Whilst I was at it I wanted to introduce my MP3 player so I bought one of these;

I adapted this to allow me to use BOTH my CD changer AND an aux input!
Regards
XJR 308
Last edited by XJR 308; 04-11-2017 at 01:33 PM.
The following 2 users liked this post by XJR 308:
joycesjag (04-11-2017),
Jumpin' Jag Flash (04-13-2017)
#19
06-03-2017, 07:35 AM
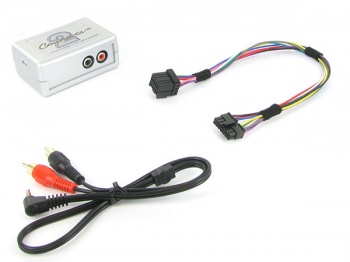
I am sure everyone has seen the "box" than you can substitute for your CD changer input.

It is a good bit of kit, it allows MP3 input but does not allow you to use your CD changer.
So I bought one and it worked well. Very well infact.
However the ability not to use my CD plater was bugging me.
There were two main problems;
1) The amplifier in the head would not work for the CD input unless there was a CD playing
2) The input from my MP3 device was low, so there was a need for a pre amp of some sort.
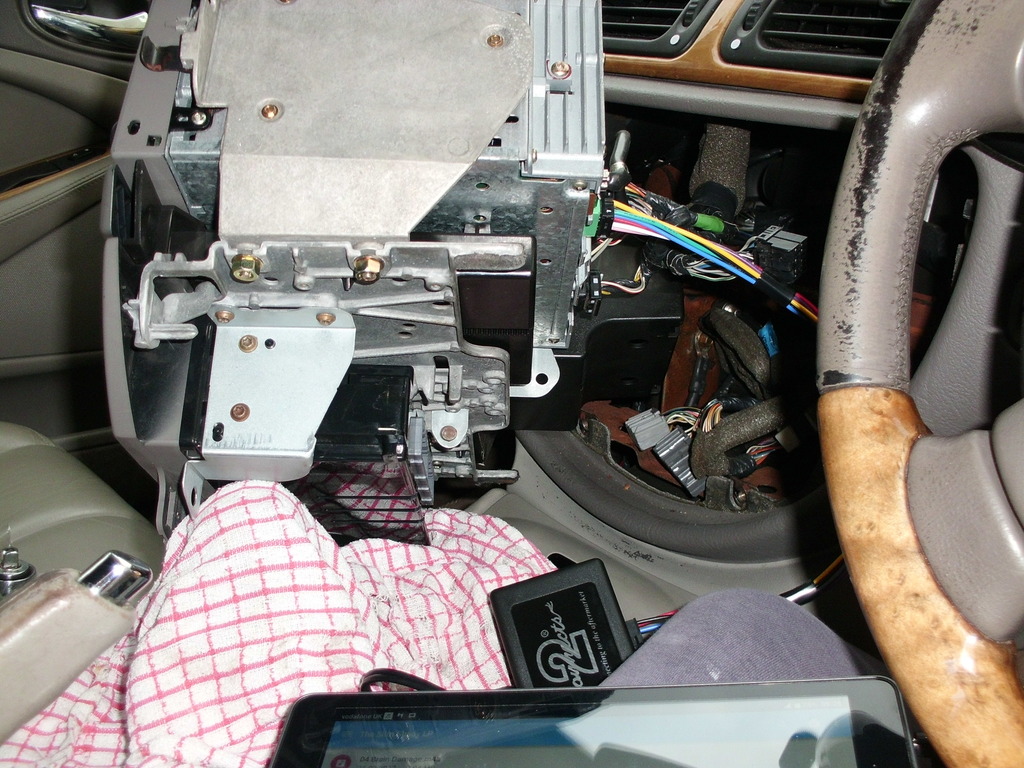
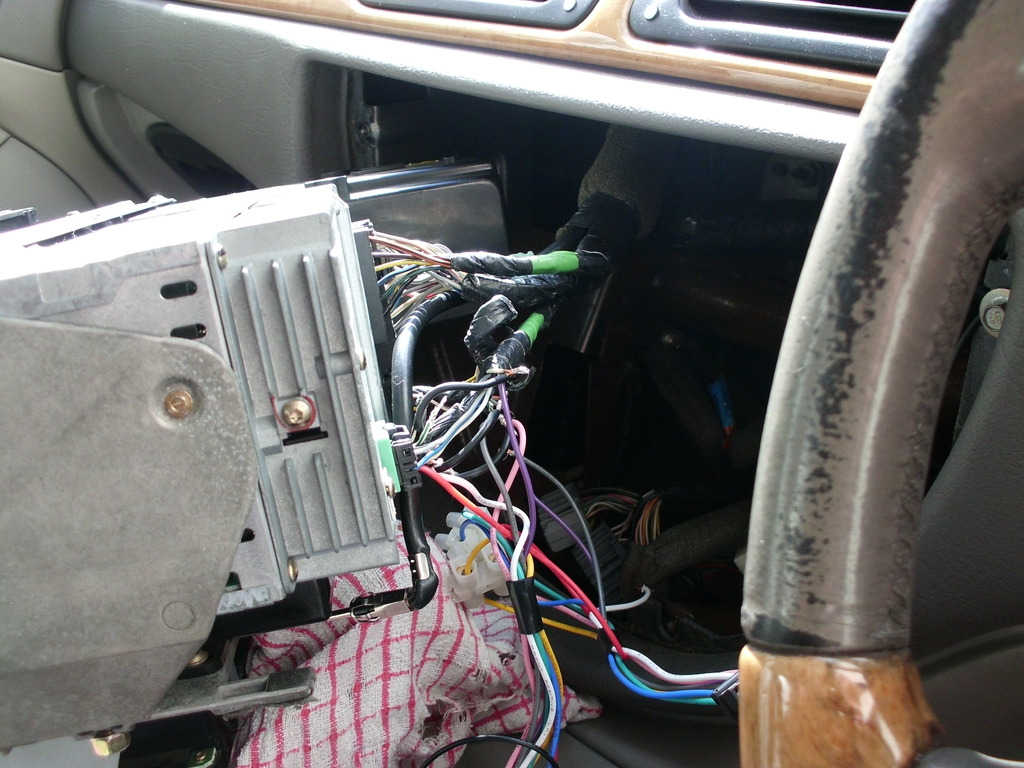
So, I decided to combine the aux adaptor to the hack to provide the pre amp sound. Power to the pre amp is gained from the head unit. The power cable (red) needs to be removed from the multi block on the aux adaptor and slid into the multi block on the head unit. This is plug and play. The earth for the aux adaptor needs to be attached to earth. (more later)
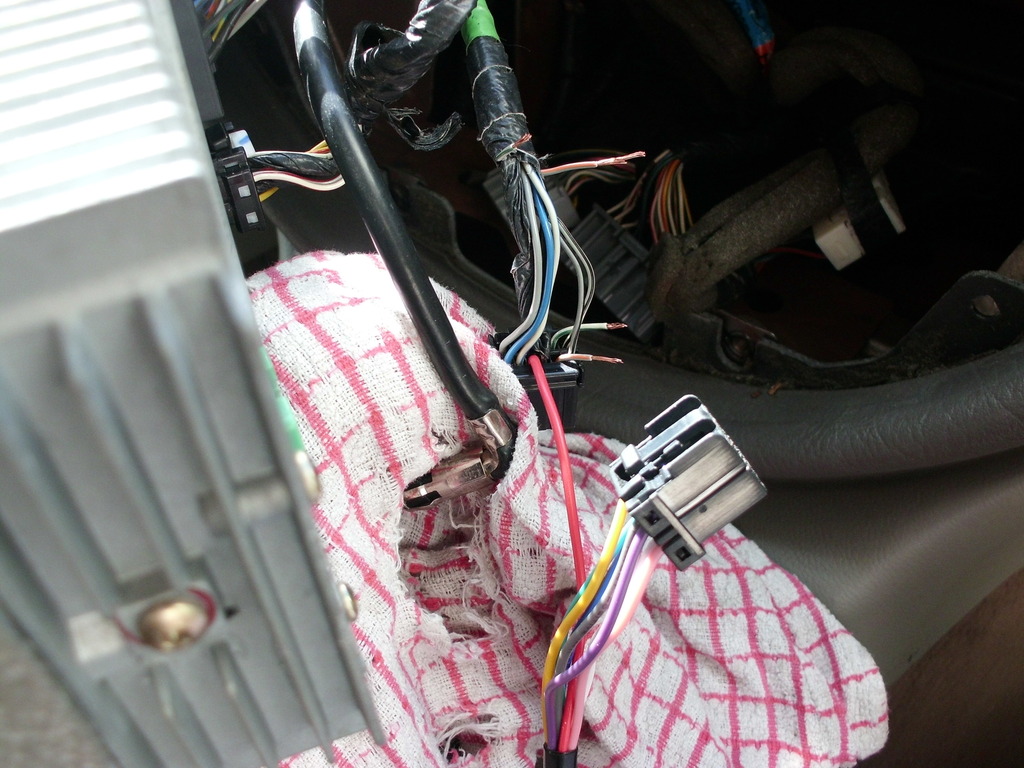
Cut the 4 input sound wires from the head multi plug (as seen above) and attach/include the wires from the aux adaptor from the corresponding pins on that plug.
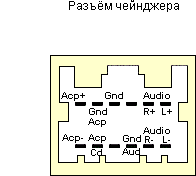
This is not the clearest of pictures but it shows all 4 sound input wires with the aux input sound wires spliced to the existing. I forgot to take a better picture before I cleared it all up with tape!
You can test this is working by playing an MP3. Obviously you will hear the sound of the CD that is playing but you will get the sound and confidence it is working.
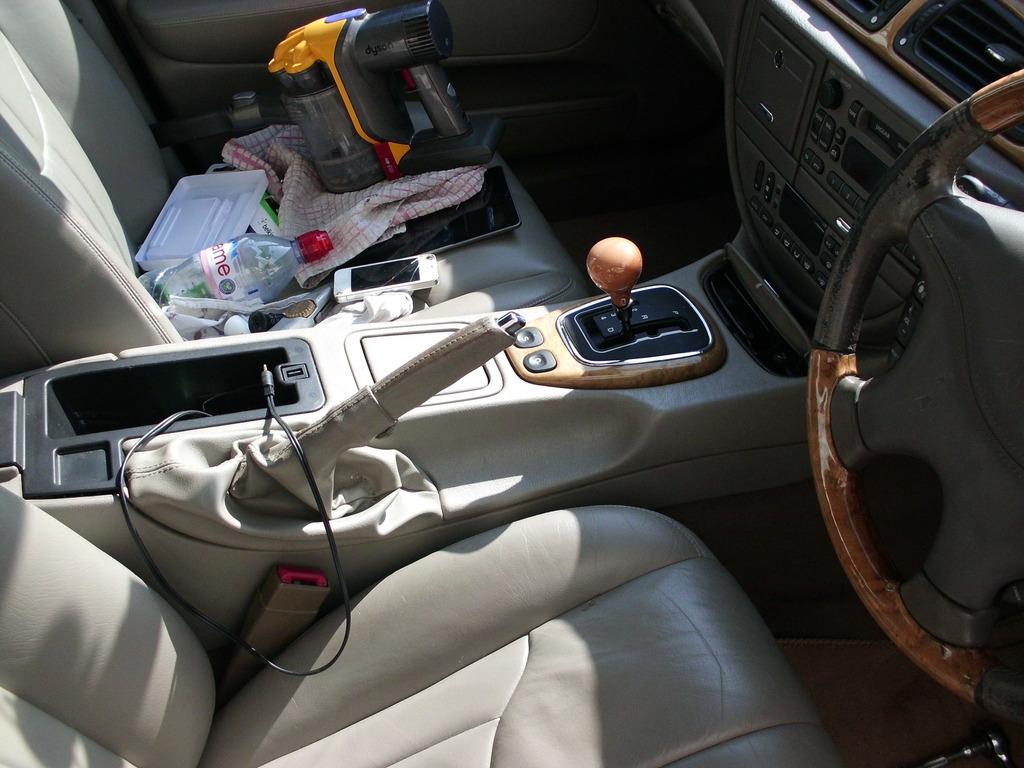
You will now need to decide where you want the plug to appear for your MP3 player. I chose the console (trather than sunblind I had used before) and quickly fed an extension under the console and up into the armrest cubby hole.
Now, I cannot remember which one the earth wire is from the aux unit multi plug. I think it is the white on (they are all marked). Put everything back behind the head unit (secure with cable ties) and lastly attach the earth (the part to the aux box NOT multiplug) to one of the screws that hold the head unit in. As below (you can't see it but it is there)
So, you have got it working!
Make up a 80 min CD from here and stick it in multi changer slot 1
I still have not got the centre fill speakers sorted!
It is a good bit of kit, it allows MP3 input but does not allow you to use your CD changer.
So I bought one and it worked well. Very well infact.

However the ability not to use my CD plater was bugging me.
There were two main problems;
1) The amplifier in the head would not work for the CD input unless there was a CD playing
2) The input from my MP3 device was low, so there was a need for a pre amp of some sort.
So, I decided to combine the aux adaptor to the hack to provide the pre amp sound. Power to the pre amp is gained from the head unit. The power cable (red) needs to be removed from the multi block on the aux adaptor and slid into the multi block on the head unit. This is plug and play. The earth for the aux adaptor needs to be attached to earth. (more later)

Cut the 4 input sound wires from the head multi plug (as seen above) and attach/include the wires from the aux adaptor from the corresponding pins on that plug.


This is not the clearest of pictures but it shows all 4 sound input wires with the aux input sound wires spliced to the existing. I forgot to take a better picture before I cleared it all up with tape!
You can test this is working by playing an MP3. Obviously you will hear the sound of the CD that is playing but you will get the sound and confidence it is working.
You will now need to decide where you want the plug to appear for your MP3 player. I chose the console (trather than sunblind I had used before) and quickly fed an extension under the console and up into the armrest cubby hole.

Now, I cannot remember which one the earth wire is from the aux unit multi plug. I think it is the white on (they are all marked). Put everything back behind the head unit (secure with cable ties) and lastly attach the earth (the part to the aux box NOT multiplug) to one of the screws that hold the head unit in. As below (you can't see it but it is there)

So, you have got it working!
Make up a 80 min CD from here and stick it in multi changer slot 1
I still have not got the centre fill speakers sorted!
#20
06-03-2017, 07:45 AM
4 New Tyres - Still waiting for the right deal
Retro a fully heated windscreen (Why? - 'cos I can) - Still working on it!
New projects;
Upgrade of standard (awful) speakers
Hack of CD system to supply MP3 quality external input
Addition of 4 channel amplifier
New oil change
New steering wheel (Mink)
IMT o-rings
Rattle under dash passenger airbag
And On....
Regards
XJR 308
Addition of 4 channel amplifier - Scrapped as not needed
New steering wheel (Mink) - Rare as rocking horse ****!
IMT o-rings - Still to do!
Rattle under dash passenger airbag - Turn up stereo!
And On....
Last edited by XJR 308; 06-03-2017 at 07:49 AM.