
A Problem and Solution that may help Someone!
#1
 10-21-2009, 06:45 PM


Join Date: Oct 2009
Location: North Carolina, USA
Posts: 7
Likes: 0
Received 0 Likes
on
0 Posts
Howdy Gang, I bought my S-type about two weeks Ago and On the way home one night I noticed that everytime I pressed the Gas Pedal I would get a failsafe engine mode, amber light. Being new to jaguar I was so frustrated but I will use my experience to help anyone else that may have this issue.
Step one- Take your car to your local autozone or Advance auto parts and Ask to use their OBDII Scanner.
Step two- Look under the lower steering wheel cover towards the right and you will see a small black box with a cap over it. Slide the cap off to expose the connection Then, connect the OBDII scanner to your car.
Step three- Turn your car to the on position ( it doesnt have to be running) and follow the scanners directions on running the codes
Step four- the scanner will list multiple codes but in my case it show p-codes 1 of 1. My Code was p1576 which is the APP sensor (Accelerator pedal position sensor) I was able to find this out through Alldatadiy.com
I purchased a year subscription and it shows all p-codes and Jaguar specific mfg. codes
Step five- Purchase part and once it comes in Install it, Afterwards use the OBDII scanner again to clear the codes and the check engine light if you have fixed the issue, Other than that the APP sensor was $475 bucks from the DEALERSHIP, Only because it is the entire pedal and sensor assembly, This is not a sensor that your neighborhood auto parts store will stock.
Other than the Failsafe engine mode, the symptoms were erractic idle during warm up, it would bounce from 1200rpm to 700rpm Since there is not a physical line form the pedal to the throttle body It can be tricky to diagnose without pulling your codes. a faulty app sensor will send the car into crawl mode, a Red Failsafe engine mode. Hopefully this will help other s-type drivers should they encounter this issue!
Last edited by JimC64; 10-21-2009 at 07:38 PM. Reason: Please DO NOT USE THE ALTERNATIVE WORD HERE! It is unacceptable
#2
10-21-2009, 07:14 PM
Guest
Posts: n/a
I would sure like to take apart, that Acceleator Pedal Sensor, I think it's a variable resistor.
The 1st throttle body control module problem I came accross , ended up being a stickey throttle plate.
''It wouldn't open''
Trouble with P1589 ,see
http://www.automotiveforums.com/vbul...d.php?t=968873
The electrical signal can't force a throttle plate open, unlike a traditional cable driven throttle body can, it's like a bad APPS with no signal.
Good job S-type jag!
Do you want to sell the old one?
$475+Install = ?
I wounder, if the salvage yard know how much they are worth.
Maybe we can fix and sell on Ebay.
Last edited by danielsatur; 10-26-2009 at 05:57 PM.
#3
10-22-2009, 01:19 AM

Veteran Member
S-typeJag - this appears to be the first time this has happened to anyone on this forum so you've been unlucky. Check with your dealer and/or jtis to make sure you don't have something else that ought to be done, such as teaching the car the behaviour of the new devices.
I say "devices" because I understand it should have two sensors (which are cross-checked).
If the source of the devices (potentiometers, commonly known as pots) can be found then their detailed specification can be found. That's needed because they are probably precision pots. They may or may not be linear. Then a repair is quite possible if you know what you're doing - but it must be done properly or the outcome is impossible to predict.
If you've the tools (a multimeter is about all you need but it needs to read ohms and preferably to a reasonable precision with a few ranges - hey, almost all meters do that nowadays), you could measure the devices on the new one and the old ones as well as reading any maker's markings. A good parts supplier can probably then identify what you'd need.
Don't take readings with the new one connected to the car.
If you take readings, chances are only 1 of the 4 pots will be different and that is then the faulty one.
#4
10-22-2009, 08:50 AM
Guest
Posts: n/a
Bingo!
The signal from the APPS was probably shorted out causing the damage, the inside of car is dry, the cowl is a serious problem with water leaking into the Engine carpartment.
There is a fix, and check with jaguar service.
I was doing a search using Forum tool ''COWL'', not Thread, and also found other issues.
1) PCU unit faults
2) Misfiring faults
3) Limp mode faults
Forum search tool 'P1576' not thread, and now, because of metioning cowl,the search will work under ''Cowl''
Yep!
Try using a garden hose on the front windsheild to simulate rain with low pressure, lift the hood,and watch the water falls, no water should go onto the engine.
http://www.automotiveforums.com/vbul...d.php?t=893556
Last edited by danielsatur; 10-26-2009 at 05:53 PM.
#6
10-22-2009, 12:54 PM
Member
Join Date: Oct 2009
Location: Long Island, NY USA
Posts: 46
Likes: 0
Received 0 Likes
on
0 Posts
danielsatur, I went out and got the items you mentioned to resolve the Bonnet (hood) water leak problem, i.e. black baseboard trim & Loctite glue and was ready to apply your fix, but first I wanted to do your water test.
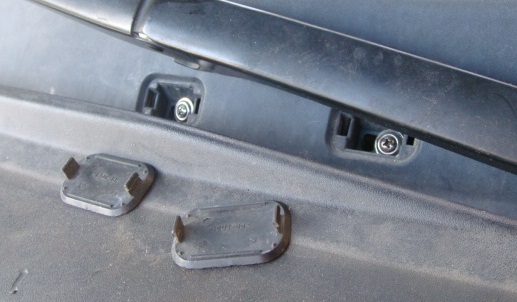
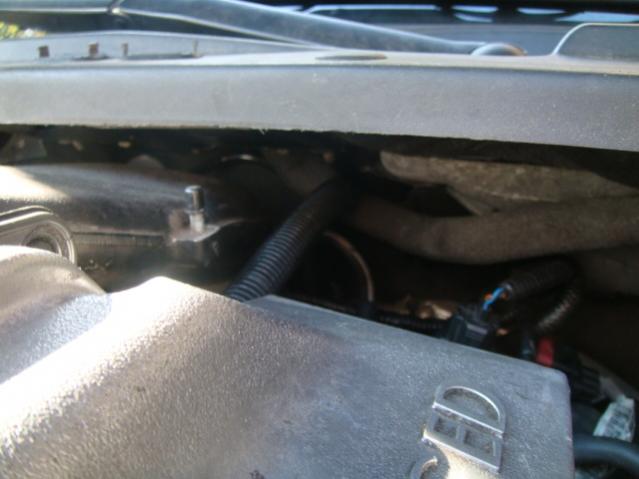
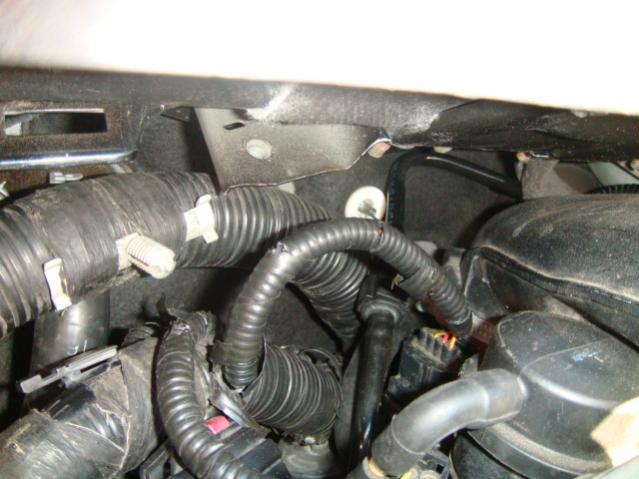
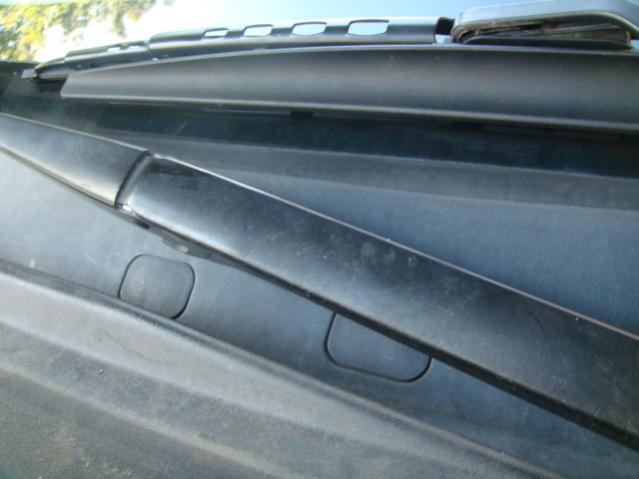
When I did the water test I found that the specific location that water leaked into the area of the Throttle body and associated connectors was by the 2 hold down screws access points in the cowl. (see picture DSC00406)
So I did the following:
1. Remove the 2 black plastic covers to the access point.
2. Use black Silicon Sealant around the edges and place it back in the access points (Make sure you put on plastic gloves!)
3. If you like you can do the other 5 as well to make sure that no water goes into the engine area.
4. Let dry
Then do the water test again.
I found that water no longer got through and was sent to the sides where it drains
out.
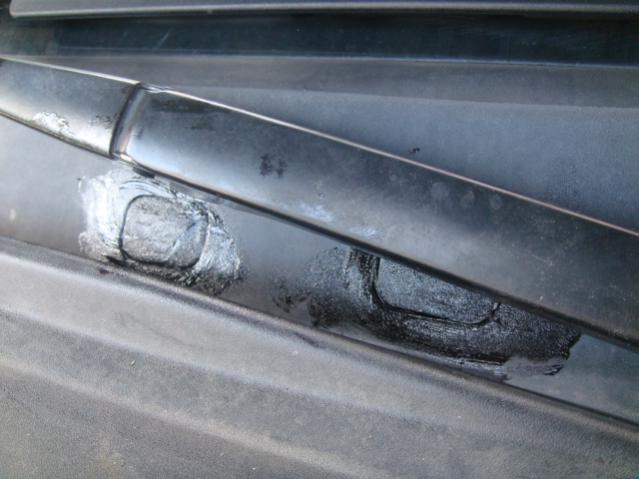
I also tested how hard it was to remove the access covers once silicon sealant was on them.
I found that a small knife used around the edges would cut the sealant and then a flat screwdriver can be used to pop out the covers.
This is an easier method to stop the water leaking into the Throttle body area.
I also added several other pictures of the covers and what it looked like after the sealant was place. DSC00409 is the finished project.
When I did the water test I found that the specific location that water leaked into the area of the Throttle body and associated connectors was by the 2 hold down screws access points in the cowl. (see picture DSC00406)
So I did the following:
1. Remove the 2 black plastic covers to the access point.
2. Use black Silicon Sealant around the edges and place it back in the access points (Make sure you put on plastic gloves!)
3. If you like you can do the other 5 as well to make sure that no water goes into the engine area.
4. Let dry
Then do the water test again.
I found that water no longer got through and was sent to the sides where it drains
out.
I also tested how hard it was to remove the access covers once silicon sealant was on them.
I found that a small knife used around the edges would cut the sealant and then a flat screwdriver can be used to pop out the covers.
This is an easier method to stop the water leaking into the Throttle body area.
I also added several other pictures of the covers and what it looked like after the sealant was place. DSC00409 is the finished project.
Last edited by Gessie; 10-22-2009 at 01:03 PM.
#7
10-22-2009, 07:28 PM
Join Date: Oct 2009
Location: North Carolina, USA
Posts: 7
Likes: 0
Received 0 Likes
on
0 Posts
Yes I still have the old sensor and I instyalled it myself and the car is back to normal and running fine, To add to Jag V8 you are correct here is a copy and paste of the actual code and errors. Also Junk yard have no clue that they are sensors and think that the pedal assembly is just a pedal, Good idea daniel. I will look into that.

Trending Topics
#8
10-22-2009, 08:05 PM
Guest
Posts: n/a
#9
07-06-2010, 09:23 PM
Junior Member
Join Date: Jul 2010
Location: Ga, USA
Posts: 9
Likes: 0
Received 0 Likes
on
0 Posts
I just replaced my cops & plugs on my misfiring 2002 S-Type. All is well now and running smoothly. My problems began after she sat outside in a three day monsoon hear in Atlanta at the airport. when we got home I had water all the way up to the battery in the boot and she ran like crap. I took her to the shop where they fixed the boot leak and dried her out. A few weeks later the misfires returned intermittently and progressively got worse until now. Having just signed up, I can't see the great bonnet leak fix pics posted in this thread. I also searched to see if I could find any pics of the vinyl cove base rain diverter project. Maybe someone could direct me there if it exists. Anyway thanks to all who help and I'll see ya in these halls. 
Brian
Brian
#11
07-07-2010, 11:58 AM
Junior Member
Join Date: Jul 2010
Location: Ga, USA
Posts: 9
Likes: 0
Received 0 Likes
on
0 Posts
Thanks so Much Gessie, I'll be glad to see the pics when I become Privileged. I just had the cowl out to do the coil job so I'm pretty sure I know which screws and vanity covers are involved. From your earlier post I gather that's all you sealed, or did you also end up adding the water diverter made with vinyl covebase mentioned by Danielsatur on the automative forums that linked to this thread?
#14
07-08-2010, 05:32 PM
Junior Member
Join Date: Jul 2010
Location: Ga, USA
Posts: 9
Likes: 0
Received 0 Likes
on
0 Posts
#15
07-08-2010, 06:03 PM
Junior Member
Join Date: Jul 2010
Location: Ga, USA
Posts: 9
Likes: 0
Received 0 Likes
on
0 Posts
#16
07-09-2010, 01:09 AM
Veteran Member
#17
07-09-2010, 07:59 AM
Junior Member
Join Date: Jul 2010
Location: Ga, USA
Posts: 9
Likes: 0
Received 0 Likes
on
0 Posts
#18
07-09-2010, 08:16 AM
Veteran Member
I recall a TSB about adding a rubber sealing pad - under the cowl, I think - to stop water getting into the engine bay. Can't find it - my brain's old and tired 
Although Danielsatur was a pain day-to-day, you do want to stop water getting in and bathroom sealant under the cowl is an OK fix I reckon. Anyone have better/other thoughts?
Although Danielsatur was a pain day-to-day, you do want to stop water getting in and bathroom sealant under the cowl is an OK fix I reckon. Anyone have better/other thoughts?
#19
07-09-2010, 08:29 AM


Veteran Member
Just check those cowl screws from time to time to ensure that they stay tight. If memory serves me correctly, there are 7 or 8 of them....
You could always make a gasket out of rubber to place underneath the cowl and then crank it down tight using the cowl screws. Most decent-sized towns have rubber & gasket businesses that sell to industrial applications. I stopped into one a couple of years ago to get a big piece of rubber to make my own gasket for the high-mount stop lamp on the rear of my 1999 Dodge Ram cab. The OEM gasket was a piece-of-crap foam one that Dodge charged about $25 for, and that foam always leaks rainwater after just a few years. The rubber & gasket place actually gave me a big sheet of spare black rubber so I could make my own. Problem solved, and I have plenty of leftover rubber to make two or three more gaskets if I need them down the road....
You could always make a gasket out of rubber to place underneath the cowl and then crank it down tight using the cowl screws. Most decent-sized towns have rubber & gasket businesses that sell to industrial applications. I stopped into one a couple of years ago to get a big piece of rubber to make my own gasket for the high-mount stop lamp on the rear of my 1999 Dodge Ram cab. The OEM gasket was a piece-of-crap foam one that Dodge charged about $25 for, and that foam always leaks rainwater after just a few years. The rubber & gasket place actually gave me a big sheet of spare black rubber so I could make my own. Problem solved, and I have plenty of leftover rubber to make two or three more gaskets if I need them down the road....
Last edited by Jon89; 07-09-2010 at 08:37 AM.
#20
07-14-2010, 11:14 AM
Junior Member
Join Date: Jul 2010
Location: Ga, USA
Posts: 9
Likes: 0
Received 0 Likes
on
0 Posts
Just check those cowl screws from time to time to ensure that they stay tight. If memory serves me correctly, there are 7 or 8 of them....
You could always make a gasket out of rubber to place underneath the cowl and then crank it down tight using the cowl screws. Most decent-sized towns have rubber & gasket businesses that sell to industrial applications. I stopped into one a couple of years ago to get a big piece of rubber to make my own gasket for the high-mount stop lamp on the rear of my 1999 Dodge Ram cab. The OEM gasket was a piece-of-crap foam one that Dodge charged about $25 for, and that foam always leaks rainwater after just a few years. The rubber & gasket place actually gave me a big sheet of spare black rubber so I could make my own. Problem solved, and I have plenty of leftover rubber to make two or three more gaskets if I need them down the road....
You could always make a gasket out of rubber to place underneath the cowl and then crank it down tight using the cowl screws. Most decent-sized towns have rubber & gasket businesses that sell to industrial applications. I stopped into one a couple of years ago to get a big piece of rubber to make my own gasket for the high-mount stop lamp on the rear of my 1999 Dodge Ram cab. The OEM gasket was a piece-of-crap foam one that Dodge charged about $25 for, and that foam always leaks rainwater after just a few years. The rubber & gasket place actually gave me a big sheet of spare black rubber so I could make my own. Problem solved, and I have plenty of leftover rubber to make two or three more gaskets if I need them down the road....

Thread
Thread Starter
Forum
Replies
Last Post
neruda
S-Type / S type R Supercharged V8 ( X200 )
6
10-18-2015 01:19 PM
Currently Active Users Viewing This Thread: 1 (0 members and 1 guests)