
Remove radiator from S-type 3.0 - how to plug transmission cooling lines
#1
 11-12-2016, 11:56 AM


Hi all. I've used this forum a ton and need to get a quick question answered with regard to removal of my radiator from my 2005 3.0 S-type.
Specifically, I need help with the best way to plug the lower transmission cooling line. I pulled the upper line with no issue and no spillage. I'm planning to just use some rubber cover I can get at autozone or pep boys to keep it clean.
But for the lower line, I don't want to spill any fluid if possible and wondered if anyone had a quick idea on how to plug it. I thought about using pinch pliers on the line however, I'm afraid I can't tell is the lines are made of rubber or aluminum.
Also, does anyone have any good guides? I did find a very nicely done video on how to replace the radiator on a lincoln LS that looks very much like what we have in the Stype. Here's the video link if you're facing the same issue I am. However, he uses a pinch clamp for the radiator hose and that's the part I'm not sure about;
At any rate, I'd love to see if anyone else out there has done this successfully and has any hints or suggestions to keep from making any mistakes. If you see anything that is different, can you please post that as well?
Thanks in advance;
Kurt - 2005 3.0 S-type w/ 197K miles. Still runs good.
#2
11-12-2016, 11:59 PM
Veteran Member
Hi Kurt, i didn't watch the film, but have renewed radiators on 2 S-types. Seems when they hit 9 years of service and the 110,000 mile mark, they're prone to spring a leak at the tank/core interface, low, right hand side, aft.
My opinion of pinching hoses is that you are creating your next failure. I have a selection of vinyl caps/plugs of unknown origin - think a vendor gave it to me, a sample or demonstration kit of what they make. Anyway, I just paw thru them until I find something that will fit the bill. Fluid loss was minimal. I recall measuring the capacity of the cooler after I removed it, and may've posted it here. I don't recall it being significant.
Your greatest obstacle in the removal and installation is the a/c line on the LHS. It impinges on the radiator tank nipple as you try to lift it out. I had success lifting the RHS first and bringing it out kind of diagonally or right-side-high as it were, but then only after a slight "tweak" of the a/c line for clearance.
https://www.jaguarforums.com/forum/s...nt-leak-81519/
I don't think i ever got round to the mentioned how-to.
Last edited by aholbro1; 11-13-2016 at 12:28 AM.
The following users liked this post:
zeropegleg (11-14-2016)
#3
11-13-2016, 02:14 AM

Veteran Member
i agree don't pinch the hoses .
i pushed some low pressure compressed air in through the top trans line port in the radiator with the bottom cooler pipe still fitted . and then removed the lower line. maybe 6 droplets came out afterwards , so id recommend that as it worked for me .
there is a rubber flex line then a swivel joint that then is alloy between the swivel and the radiator . there was no need to clamp the pipe . just don't start the car with them off.
you need to remove the two A/C radiator mounting bolts on the front of the radiator as well. i remember needing to bend the alloy A/C pipe closest to the lower coolant pipe hose tail on the radiator to be able to remove it as well .
iv read the A/C needs to be de gassed for the task , i did not .
i just bent it a little then bent it back after the new radiator was fitted .
The following users liked this post:
zeropegleg (11-14-2016)
#4
11-14-2016, 12:16 PM
Thanks both aholbro1 & Datsports.
As it turned out. I ended up using a latex hose I got from Lowes for around $18.00. I just connect the upper and the lower together. I thought this would be a nice way to cover the ends of the hoses and at the same time I might be able to see any leakage. Turns out there was maybe 2 drops from the bottom hose - that's all!
While the video I linked to is a very nice review of this gentleman's experience - and I truly appreciate this guy's hard work at filming too. Truth be told, the Lincoln LS is a bit different in components. However, the basic design is the same so this video walk through is quite good. I followed his recommendations to remove the throttle body and that turned out to be smart as getting the fan out requires that you have plenty of clearance to get it free and the throttle body is in the way. No problem, just 4x 8mm(or 10mm?) bolts, a couple of small hoses and 2 electrical connectors and it's free.
The hardest part of this break down had to be the electrical connectors first followed by the lower radiator host clamp.
Here's a short break down of the steps I took to get this thing apart;
WARNING - I disconnected my neg battery pole first before attempting to remove any electrical connections. Save yourself any further issues and do this first thing!
Some basic items to get out (and this is from memory so pls forgive me if I forget anything);
- remove the top plastic cover over the radiator - easy peasy - no bolts, just plastic tabs
- remove the air box (completely) and it's intake hose. Disconnect the electrical connector to the Air Mass Flow Sensor (did you remember to remove the neg battery pole first?) easy peasy 1 bolt 13 mm (i think it's 13.)
1) Raise the car - put on jack stands - no wheel removal
2) Remove the lower plastic shield under the engine - 6-8 10mm bolts/nuts.
3) Remove the front plastic shield - follow video on youtube called - "how to remove front bumper cover on jaguar stype" - google that, very good vid.
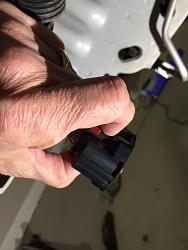
4) remove the Front bumper cover - to get access to the front part of the radiator - this takes only about 30 min! very easy - follow the vid above. Hardest part is getting the bumper cover electrical connector disconnected! what a PITA until I finally figured this out - PUSH UP THE RED TAB ON THE CONNECTOR,

THEN SQUEEZE VERY HARD WITH YOUR THUMB JUST BELOW WHERE THE RED CONNECTOR VACATED & WITH YOUR FOREFINGER ON THE OPPOSITE SIDE - SEE PIC
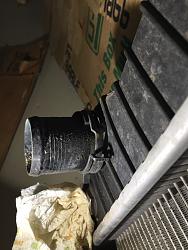
5) drain the fluid from the radiator (note the drain is a black plastic screw type handle that I used a pair of pliers on but probably could have just used by fingers to get it - this is located bottom of radiator ON THE DRIVERS SIDE.
6) remove the electrical connectors on the lower passenger side front. Since you removed the bumper cover, these are now exposed. These were hard to remove as you had to squeeze very hard to release the clips and pull apart. See pix on these. I also had to pull out one of the connectors from its mounting hold in a bracket which is simply tie-wrapped to the front bumper (see pix).
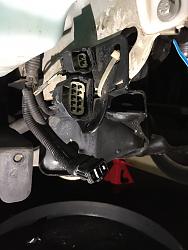
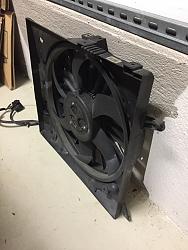
Once these electrical lines are free, I pushed them up into the engine compartment so that they wouldn't get stuck as the fan came out. (back to the fan later)
And here's a side shot of the Fan out
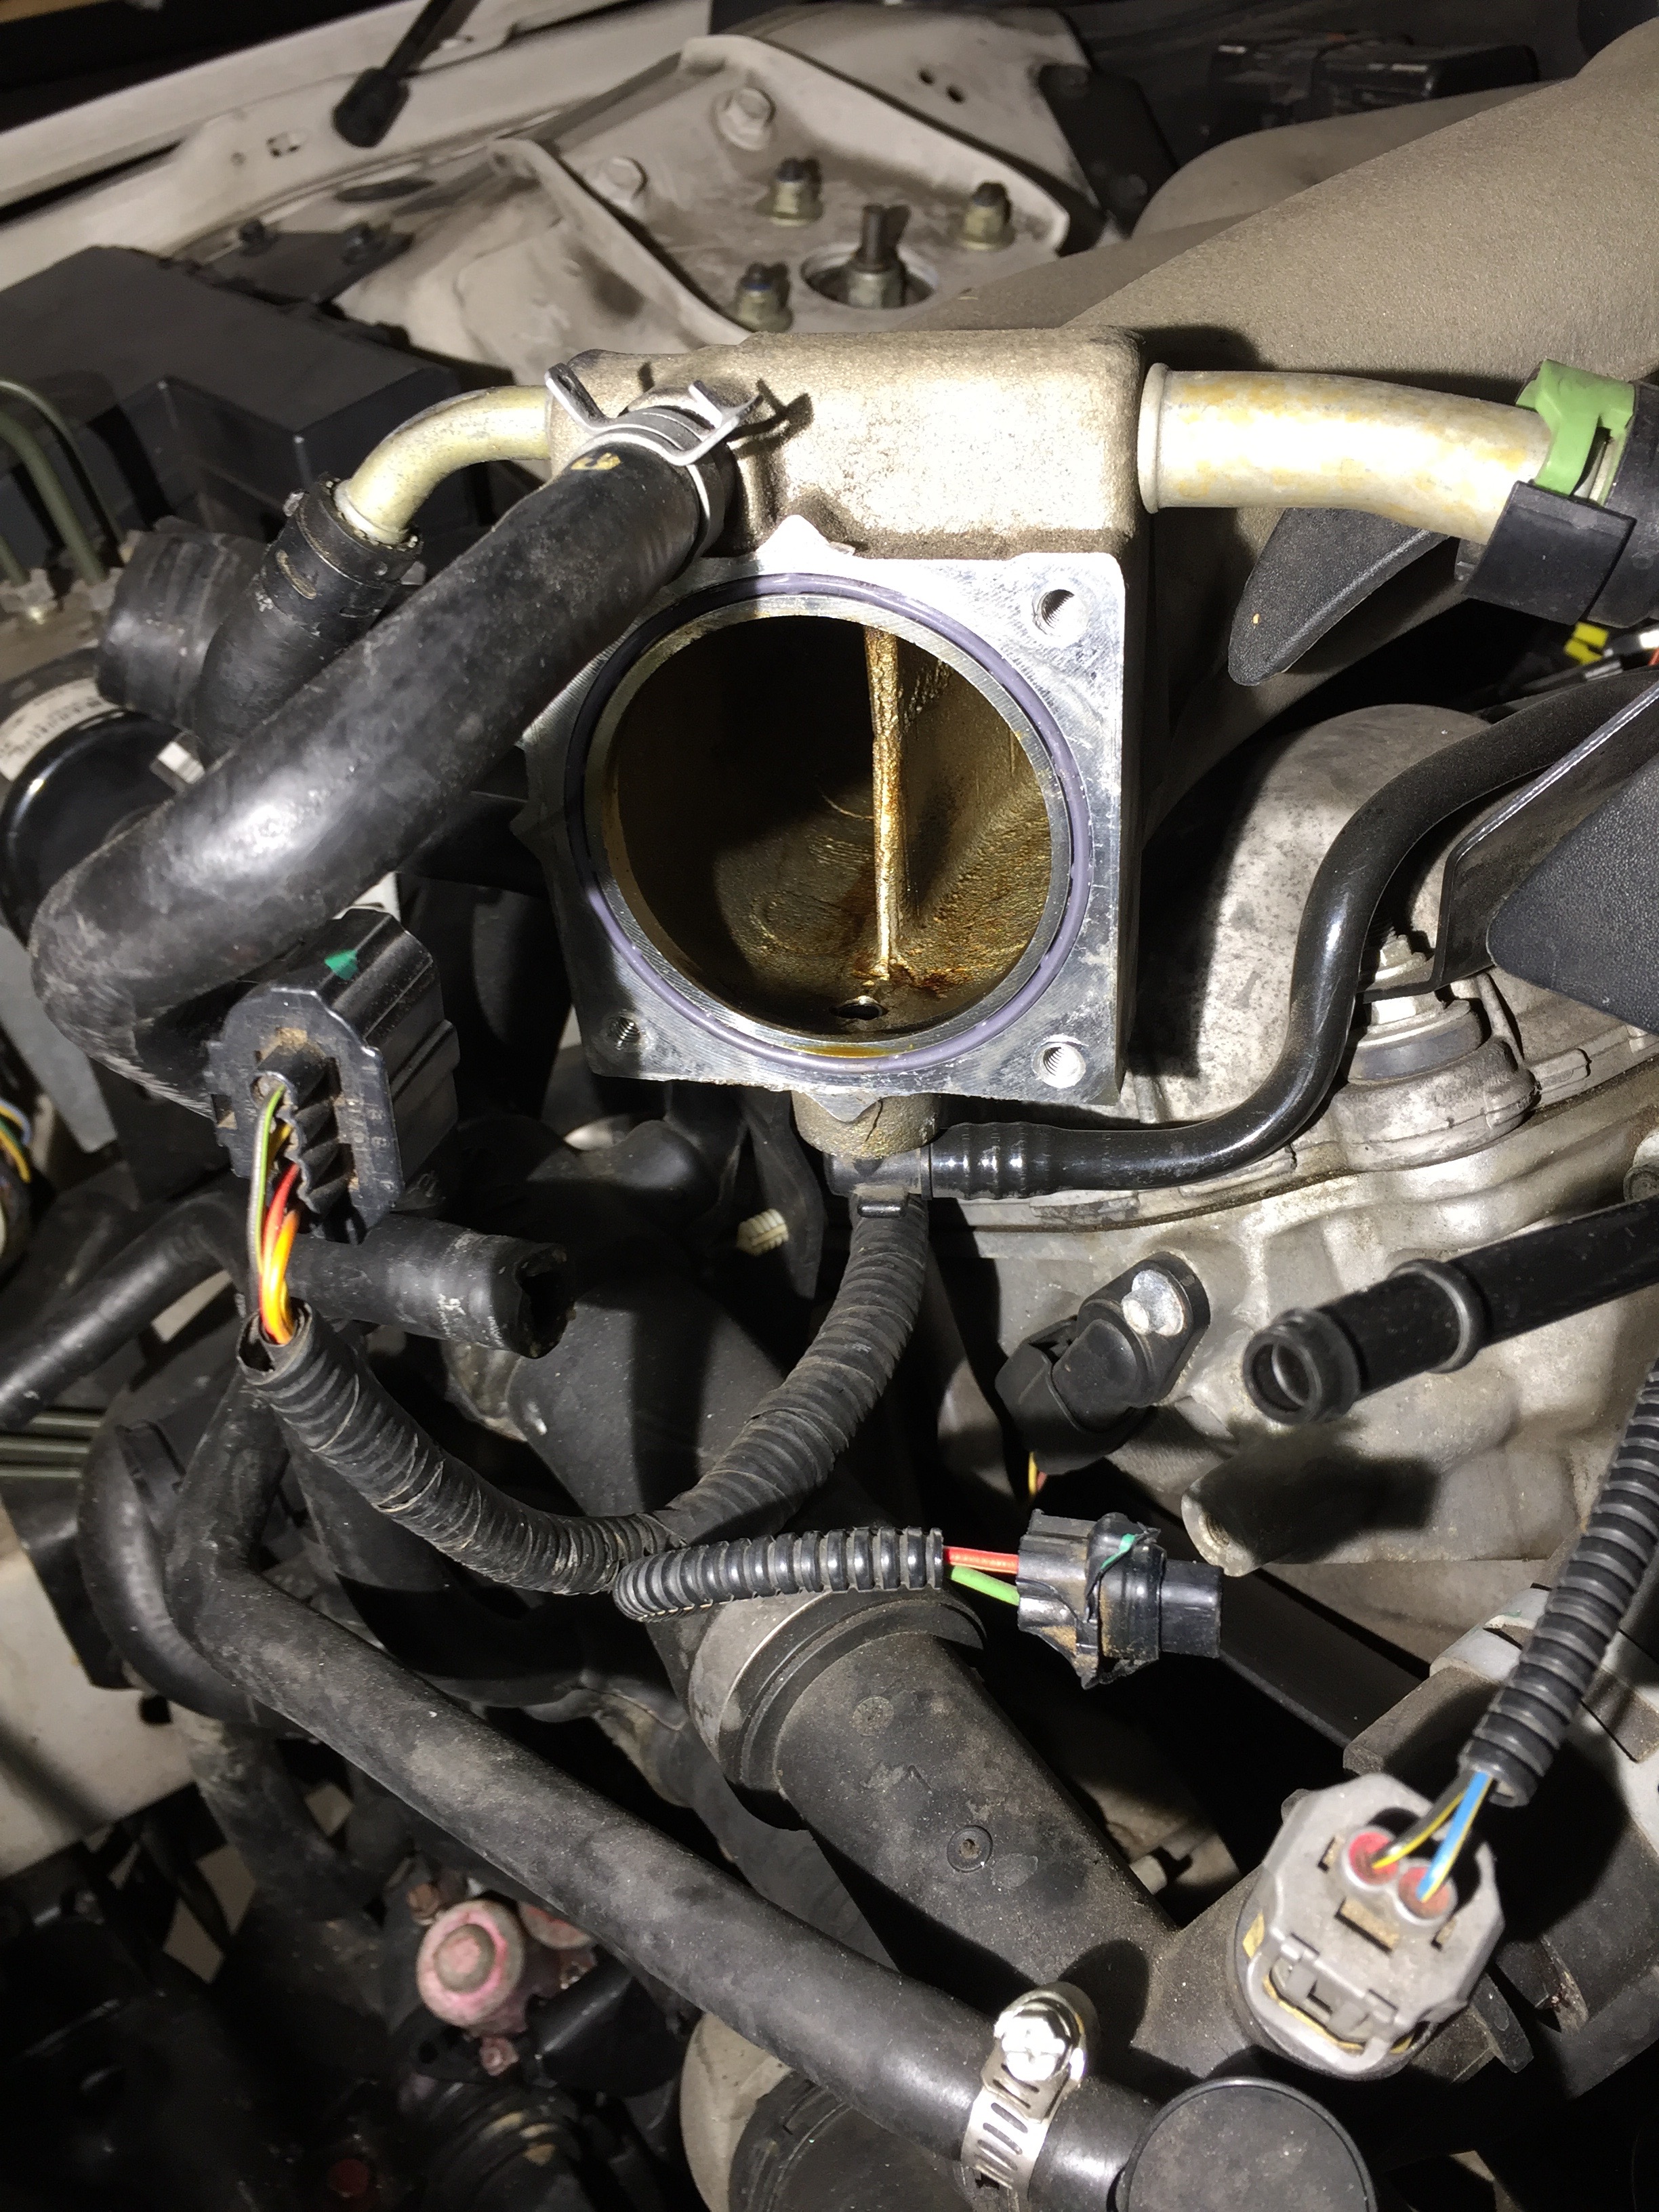
7) Remove the throttle intake and disconnect 2 small hoses and 2 electrical connections. BE CAREFUL NOT TO DAMAGE OR REMOVE THE SMALL GREY GASKET BENEATH THE THROTTLE BODY.

8) Unbolt the Dual Climate Control valve using a very long extension and unclip the electrical connection. This type connector is one you will use your thumb to push in on the connector top and pull up. Push aside the DCC valve with hoses still attached.
9) Remove the upper radiator hose and push aside. Dang clamps need to be replace as they are PITA. I'm going with a standard set of hose clamps and throwing these away.
10) Slowly remove the fan. Don't rush, make sure you don't snag the electrical connectors below. The fan simply is setting down inside grooves and there are just 2 small 8mm bolts on the top sides (left and right) which come out easily.
Once the fan is out, you can remove the top plates holding onto the radiator - 3 bolts on each plate.
11) The front side of the radiator has a big plastic scoopy-thing. that seems like it's there to force air into the radiator. This comes off by simply pulling downward at the edge of the plastic scoop. it's using simple metal tongs which bind the black plastic scoop to the underside of the radiator. Just pull it down to disconnect it from the radiator.
12) unbolt the AC cooler (it's the black radiator-looking thing bolted to the front side of the radiator at both left and right sides.) I think this was just a 8 or 10mm nut. NOTE - once these nuts were off, I also removed the stud which screws into the radiator in case I need to re-use that with the new one.
13) tie wrap the AC cooler to the body of the car up top so that it doesn't exert excess pressure on these lines and cooler.
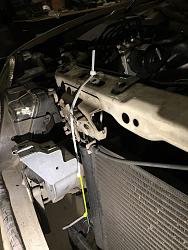
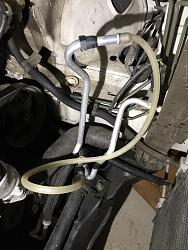
14) Unbolt both the upper and lower Transmission cooling lines from the radiator - located on the driver's side. I used a simple clear(ish) latex hose to connect each end. That way, I keep them clean and I can see if any fluid escapes - there wasn't any, maybe a couple drops).
15) Use a pry bar to bend back the AC lines on the lower (driver's side) of the radiator so that the radiator's lower (intake) port can clear the engine compartment. These AC lines are in the WAY!
16) Take off the squeeze clamp on the lower Radiator hose. This next step was quite difficult!! - Using a long needle nose set of VICE GRIPS (this is key!) come at the clamp sideways - I had to manipulate the clamp from the top to push it over to where I could attack it from the side. I then just moved the clamp forward (NOT BACKWARD AS THERE IS NOT MUCH ROOM) and left it attacked to the radiator. I then just squeezed the large radiator hose and pulled it back with the clamp (CLAMP stayed with the radiator!)
17 - PULL THAT RADIATOR! Rather than trying to manipulate removal of the radiator and the foam on the driver's side, I just used a long screw driver and removed the foam insulation from the radiator (THIS IS KEY). That way, I just had to manipulate and sort of massage the radiator away from the foam + AC hoses etc. on the drivers side. It finally came right up and out.
Whew. that's a lot but I think that covers the hardest parts. In all, this took me about 4 hours. But really most of this was trying to figure out the stinking electrical connectors for the bumper cover and fan! The rest is pretty straight forward.
Please take a look at the pictures below for more detail.
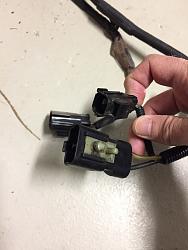
Oh, and 1 last bummer - I ended up breaking the outside shell of the 2 wire (pos + neg?) connector (red and green wires) that connect to the fly-by-wire throttle on the throttle body. So it looks like I'm off to get a pig-tail from somewhere to try and see if I can repair this MAJOR part! If you look closely again at this picture, you can see the damaged connector housing on the smaller 2-wire one.
Oh and prior to all this work, I did go to autozone and borrowed a coolant pressure tester for the jag (NOTE - you'll need 2 items from them, a black box withe pump and some useless connectors and a second small RED plastic carrier/box that contains the screw type mounts you'll need to connect to your reservoir where the cap goes.) I tested my radiator and sure enough, it leaks badly due to a long crack on the lower passenger side of the radiator - the plastic part of the radiator - see picks where I indicate the length of the crack between my thumb and finger.
I should also mention that I first started having an issue with the coolant after asking my wife to take the Jag into a goofy America's service station where they said they knew how to flush the coolant but I'm not sure if they did a good job flushing it or just ended up gooey-ing up the radiator. I did notice that the temp gauge began to hit right at half-way after this flush. Prior to this, it always ran just below the half-way point. At any rate, I usually like to take my Jag only to a certified dealer or a full time Jag shop for servicing. Or... It could be that it has 197K miles and dang it, it's just plumb worn out and it was time to change it.
At any rate, my next quandary will be - do I also replace the water pump at this point? After inspecting the water pump, I don't see any evidence of leakage so I'm not exactly sure but I will probably tackle that as well while I have all this awesome room to work on it!
As it turned out. I ended up using a latex hose I got from Lowes for around $18.00. I just connect the upper and the lower together. I thought this would be a nice way to cover the ends of the hoses and at the same time I might be able to see any leakage. Turns out there was maybe 2 drops from the bottom hose - that's all!
While the video I linked to is a very nice review of this gentleman's experience - and I truly appreciate this guy's hard work at filming too. Truth be told, the Lincoln LS is a bit different in components. However, the basic design is the same so this video walk through is quite good. I followed his recommendations to remove the throttle body and that turned out to be smart as getting the fan out requires that you have plenty of clearance to get it free and the throttle body is in the way. No problem, just 4x 8mm(or 10mm?) bolts, a couple of small hoses and 2 electrical connectors and it's free.
The hardest part of this break down had to be the electrical connectors first followed by the lower radiator host clamp.
Here's a short break down of the steps I took to get this thing apart;
WARNING - I disconnected my neg battery pole first before attempting to remove any electrical connections. Save yourself any further issues and do this first thing!
Some basic items to get out (and this is from memory so pls forgive me if I forget anything);
- remove the top plastic cover over the radiator - easy peasy - no bolts, just plastic tabs
- remove the air box (completely) and it's intake hose. Disconnect the electrical connector to the Air Mass Flow Sensor (did you remember to remove the neg battery pole first?) easy peasy 1 bolt 13 mm (i think it's 13.)
1) Raise the car - put on jack stands - no wheel removal
2) Remove the lower plastic shield under the engine - 6-8 10mm bolts/nuts.
3) Remove the front plastic shield - follow video on youtube called - "how to remove front bumper cover on jaguar stype" - google that, very good vid.
4) remove the Front bumper cover - to get access to the front part of the radiator - this takes only about 30 min! very easy - follow the vid above. Hardest part is getting the bumper cover electrical connector disconnected! what a PITA until I finally figured this out - PUSH UP THE RED TAB ON THE CONNECTOR,

THEN SQUEEZE VERY HARD WITH YOUR THUMB JUST BELOW WHERE THE RED CONNECTOR VACATED & WITH YOUR FOREFINGER ON THE OPPOSITE SIDE - SEE PIC

5) drain the fluid from the radiator (note the drain is a black plastic screw type handle that I used a pair of pliers on but probably could have just used by fingers to get it - this is located bottom of radiator ON THE DRIVERS SIDE.
6) remove the electrical connectors on the lower passenger side front. Since you removed the bumper cover, these are now exposed. These were hard to remove as you had to squeeze very hard to release the clips and pull apart. See pix on these. I also had to pull out one of the connectors from its mounting hold in a bracket which is simply tie-wrapped to the front bumper (see pix).
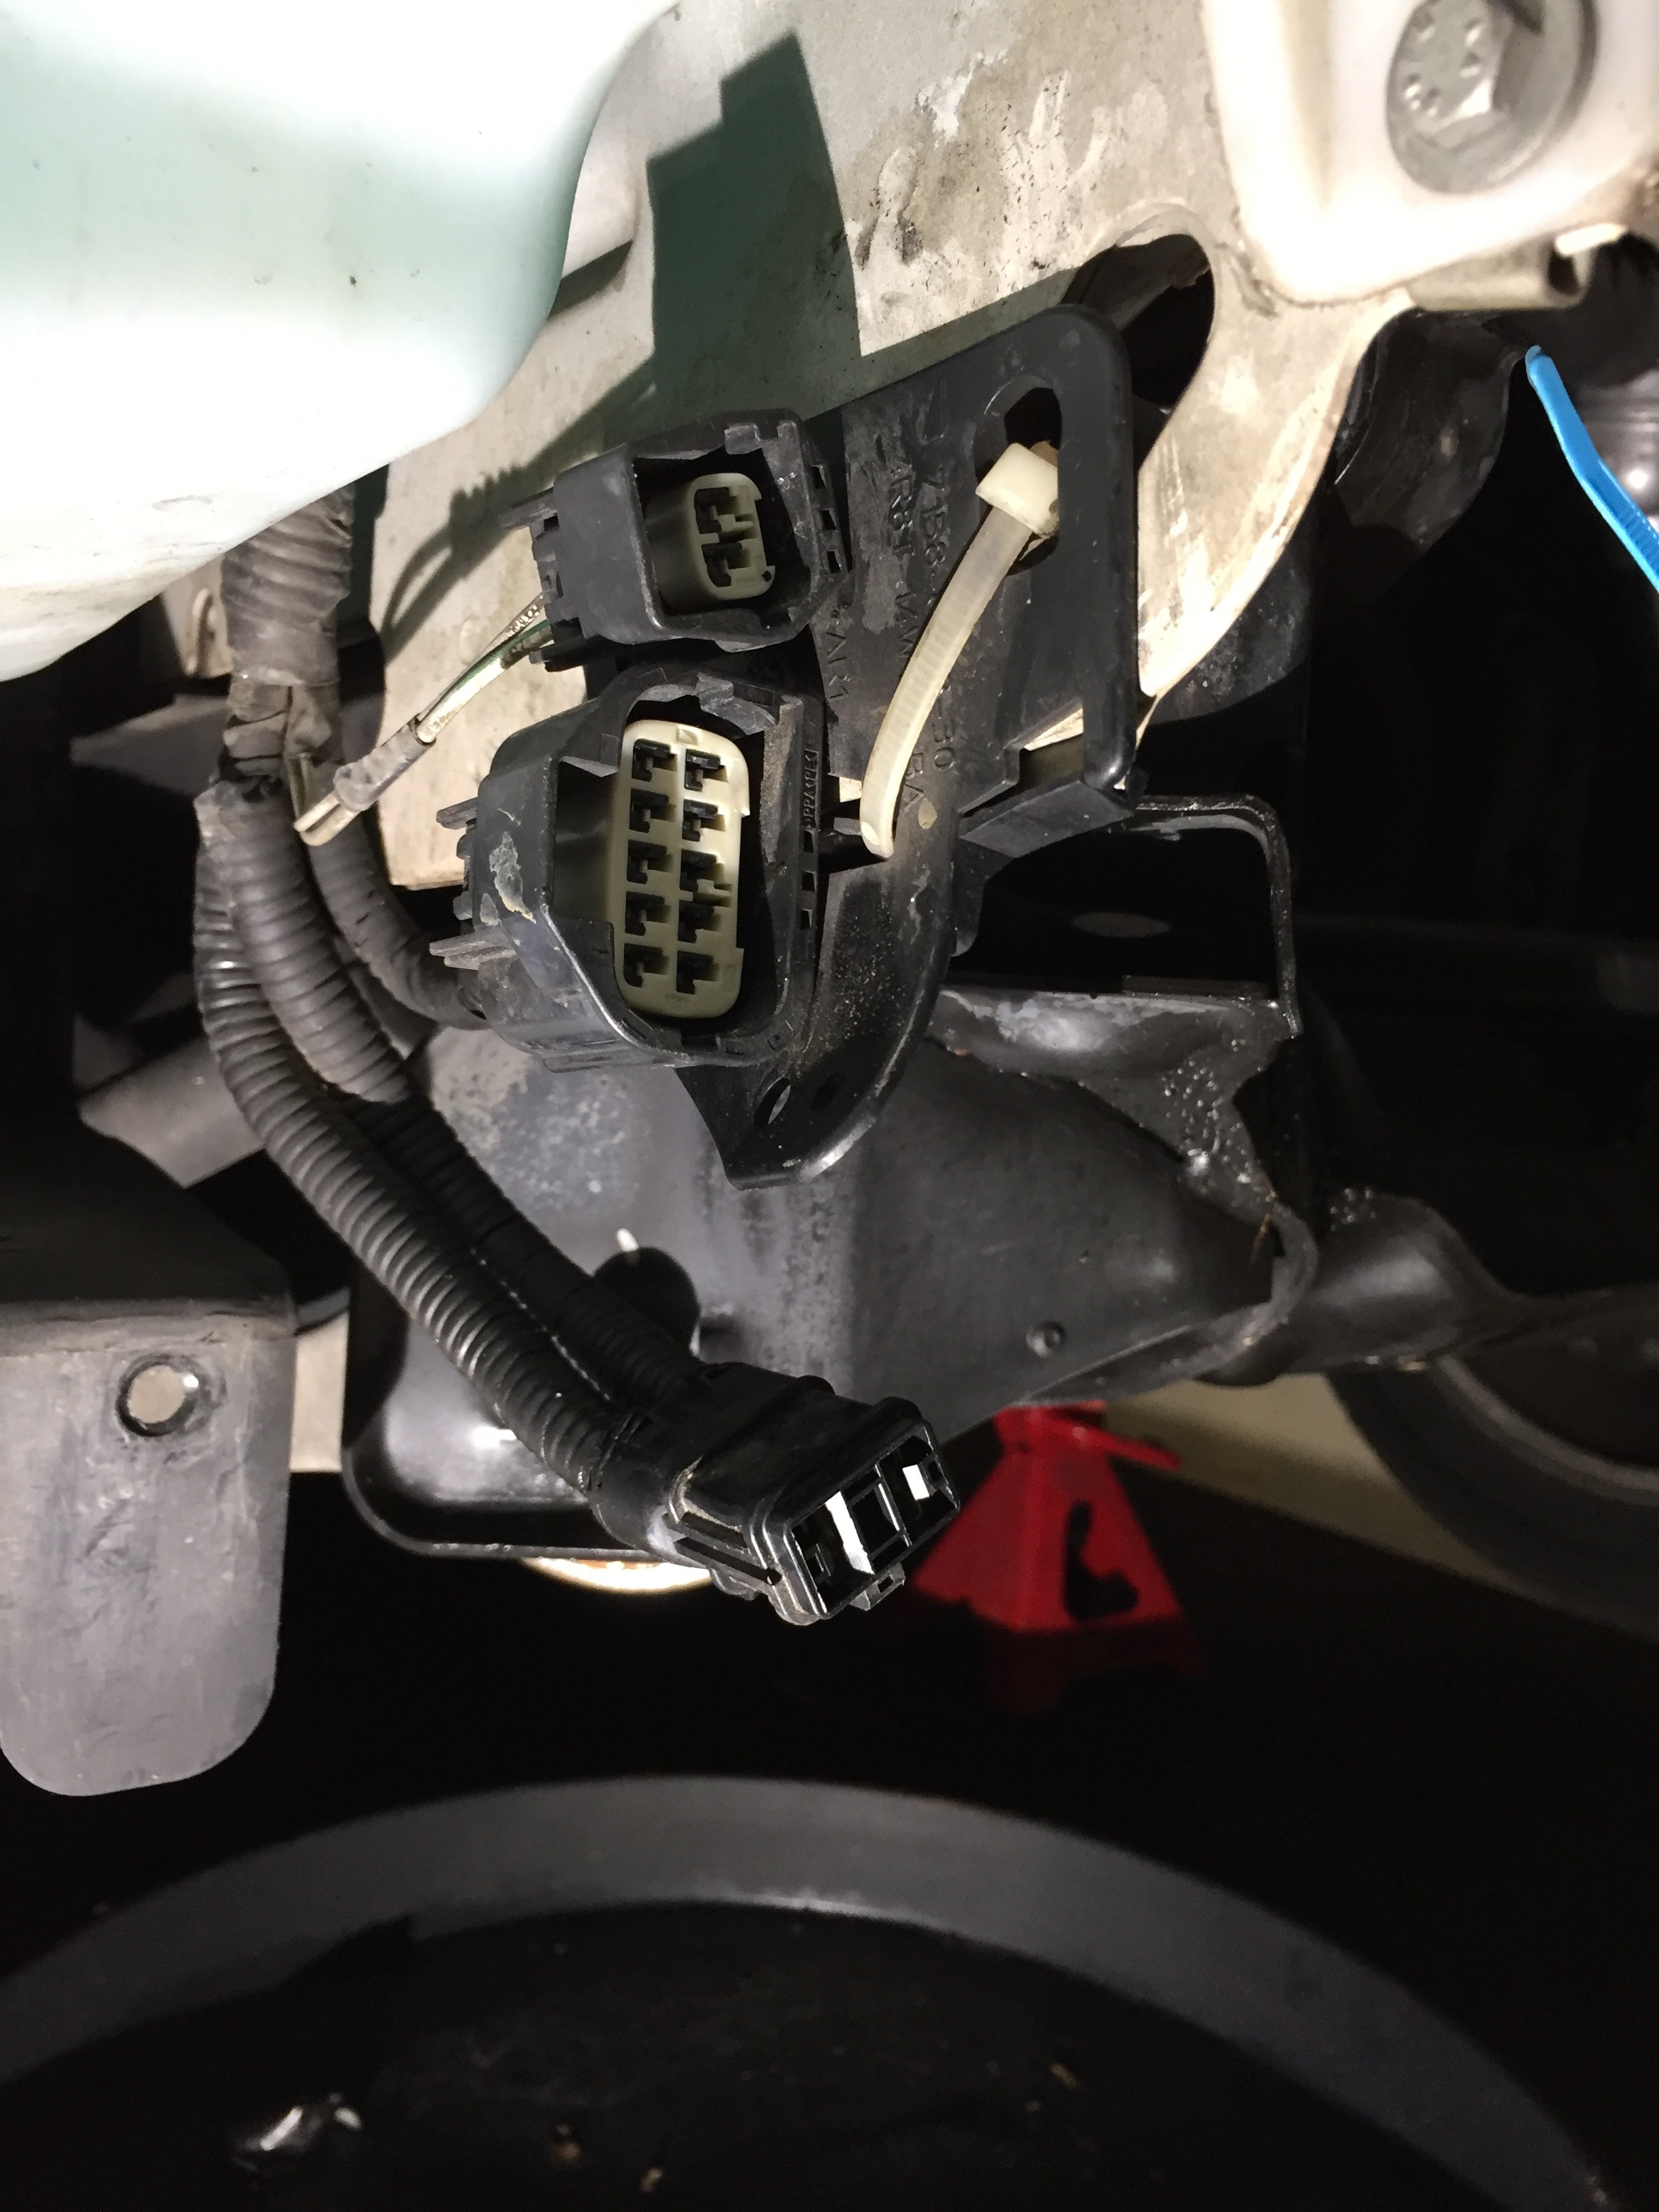
Once these electrical lines are free, I pushed them up into the engine compartment so that they wouldn't get stuck as the fan came out. (back to the fan later)

And here's a side shot of the Fan out

7) Remove the throttle intake and disconnect 2 small hoses and 2 electrical connections. BE CAREFUL NOT TO DAMAGE OR REMOVE THE SMALL GREY GASKET BENEATH THE THROTTLE BODY.
8) Unbolt the Dual Climate Control valve using a very long extension and unclip the electrical connection. This type connector is one you will use your thumb to push in on the connector top and pull up. Push aside the DCC valve with hoses still attached.
9) Remove the upper radiator hose and push aside. Dang clamps need to be replace as they are PITA. I'm going with a standard set of hose clamps and throwing these away.
10) Slowly remove the fan. Don't rush, make sure you don't snag the electrical connectors below. The fan simply is setting down inside grooves and there are just 2 small 8mm bolts on the top sides (left and right) which come out easily.
Once the fan is out, you can remove the top plates holding onto the radiator - 3 bolts on each plate.
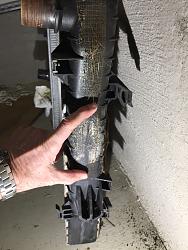
11) The front side of the radiator has a big plastic scoopy-thing. that seems like it's there to force air into the radiator. This comes off by simply pulling downward at the edge of the plastic scoop. it's using simple metal tongs which bind the black plastic scoop to the underside of the radiator. Just pull it down to disconnect it from the radiator.
12) unbolt the AC cooler (it's the black radiator-looking thing bolted to the front side of the radiator at both left and right sides.) I think this was just a 8 or 10mm nut. NOTE - once these nuts were off, I also removed the stud which screws into the radiator in case I need to re-use that with the new one.
13) tie wrap the AC cooler to the body of the car up top so that it doesn't exert excess pressure on these lines and cooler.

14) Unbolt both the upper and lower Transmission cooling lines from the radiator - located on the driver's side. I used a simple clear(ish) latex hose to connect each end. That way, I keep them clean and I can see if any fluid escapes - there wasn't any, maybe a couple drops).

15) Use a pry bar to bend back the AC lines on the lower (driver's side) of the radiator so that the radiator's lower (intake) port can clear the engine compartment. These AC lines are in the WAY!
16) Take off the squeeze clamp on the lower Radiator hose. This next step was quite difficult!! - Using a long needle nose set of VICE GRIPS (this is key!) come at the clamp sideways - I had to manipulate the clamp from the top to push it over to where I could attack it from the side. I then just moved the clamp forward (NOT BACKWARD AS THERE IS NOT MUCH ROOM) and left it attacked to the radiator. I then just squeezed the large radiator hose and pulled it back with the clamp (CLAMP stayed with the radiator!)

17 - PULL THAT RADIATOR! Rather than trying to manipulate removal of the radiator and the foam on the driver's side, I just used a long screw driver and removed the foam insulation from the radiator (THIS IS KEY). That way, I just had to manipulate and sort of massage the radiator away from the foam + AC hoses etc. on the drivers side. It finally came right up and out.
Whew. that's a lot but I think that covers the hardest parts. In all, this took me about 4 hours. But really most of this was trying to figure out the stinking electrical connectors for the bumper cover and fan! The rest is pretty straight forward.
Please take a look at the pictures below for more detail.
Oh, and 1 last bummer - I ended up breaking the outside shell of the 2 wire (pos + neg?) connector (red and green wires) that connect to the fly-by-wire throttle on the throttle body. So it looks like I'm off to get a pig-tail from somewhere to try and see if I can repair this MAJOR part! If you look closely again at this picture, you can see the damaged connector housing on the smaller 2-wire one.
Oh and prior to all this work, I did go to autozone and borrowed a coolant pressure tester for the jag (NOTE - you'll need 2 items from them, a black box withe pump and some useless connectors and a second small RED plastic carrier/box that contains the screw type mounts you'll need to connect to your reservoir where the cap goes.) I tested my radiator and sure enough, it leaks badly due to a long crack on the lower passenger side of the radiator - the plastic part of the radiator - see picks where I indicate the length of the crack between my thumb and finger.

I should also mention that I first started having an issue with the coolant after asking my wife to take the Jag into a goofy America's service station where they said they knew how to flush the coolant but I'm not sure if they did a good job flushing it or just ended up gooey-ing up the radiator. I did notice that the temp gauge began to hit right at half-way after this flush. Prior to this, it always ran just below the half-way point. At any rate, I usually like to take my Jag only to a certified dealer or a full time Jag shop for servicing. Or... It could be that it has 197K miles and dang it, it's just plumb worn out and it was time to change it.
At any rate, my next quandary will be - do I also replace the water pump at this point? After inspecting the water pump, I don't see any evidence of leakage so I'm not exactly sure but I will probably tackle that as well while I have all this awesome room to work on it!
Last edited by zeropegleg; 11-14-2016 at 12:28 PM.
The following 9 users liked this post by zeropegleg:
aholbro1 (02-07-2017),
AraujoSTR03 (02-15-2017),
Datsports (11-14-2016),
Jon89 (11-14-2016),
kr98664 (05-23-2023),
and 4 others liked this post.
#5
11-14-2016, 12:25 PM

#6
02-06-2017, 01:20 PM
#7
02-15-2017, 04:41 PM

Junior Member
Trending Topics
#8
02-15-2017, 05:29 PM
AraujoSTR03,
Did you complete your radiator replacement? If so you may have noticed that the transmission fluid loss was likely minimal, as it was when I replaced my radiator.
If you review this thread, you will notice that on 11/12/2016 Aholbro1 stated: "Fluid loss was minimal. I recall measuring the capacity of the cooler after I removed it, and may've posted it here. I don't recall it being significant."
also, on 11/13/2016 Datsports stated similar: "i pushed some low pressure compressed air in through the top trans line port in the radiator with the bottom cooler pipe still fitted . and then removed the lower line. maybe 6 droplets came out afterwards , so id recommend that as it worked for me ."
As far as checking the fluid level in the automatic transmission, you probably already know that there is no dipstick in the engine compartment. There are other threads that address how to top off and check automatic transmission levels - not something I've done.
If you haven't replaced the radiator yet, Kurt's write up is fantastic! My experience was similar, although I have smaller hands and was able to reach up and complete the work without removing the front bumper - I just removed the main belly pan and the secondary belly pan in front of it. Since you have an S-Type R with 4.2 V8, and if you have larger hands, you may need to remove the front bumper for access.
How many miles do you have on your Jaguar?
The following users liked this post:
AraujoSTR03 (07-23-2017)
#9
02-15-2017, 05:52 PM
AraujoSTR03,
You might find another thread useful for your coolant purge and fill - go to "search" and enter "S-Type V6 air in the cooling system" - lots of good input from various members. In particular the post by NBCat:
"The JTIS workshop manual is a free download. Here is a link to the server containing the files for the S-Type:"
http://www.mediafire.com/?3297awvo3atgw#jq3t61sbd3gd4
Let me know if this works out for you by giving me a "thanks" - the lower right button.
#10
02-15-2017, 08:00 PM
Veteran Member
Unless you let the ends of the cooler lines drop down on the floor and lay there a few days after you disconnect them....might be able to drain the whole gearbox that way!

#12
02-17-2017, 09:54 AM

Veteran Member