
How-to:Tune up/Spark plug change FAQ
#1
 01-07-2011, 09:01 AM

I finally got around to the much-needed tune-up on my car and thought it would be helpful if we all had a walkthrough to help. There is some very good info on this site about it but not all in one place, so here goes.
This is to walk through changing spark plugs/performing a tune-up. The intake manifold will have to come off in order to do this. It is recommended you replace the O-rings (Gaskets) for the upper intake manifold, although my car has 85,000 miles on it and the old ones were in just as good shape as the new ones. A lot of people will say you can re-use them so it�s a judgment call on the owner�s part.
One last note: This is an �At your own risk� type of job. Its very easy to do but remember, take your time, pay close attention to detail, and don�t be afraid to ask questions.
I started by taking off the engine cover, air box, all electrical connectors and plugs, and vacuum lines.
To take off the engine cover remove the engine oil fill cap, then unscrew the 3 screws visible from the top. Pull the cover off and replace oil cap so nothing gets inside the motor.

Next unscrew all (7 or 8 I believe) screws holding the top of the air box and lift. You will want to take off the band clamp holding the hose on so you can get this out of the way.
Inside the air box you will see 2 screws at the bottom holding this down, remove those along with the bracket holding the down the back of the box. There should be 2 screws inside and 3 outside the box. After all screws are removed you should be able to remove the bracket and slide up the air box for removal.


At this point I removed the throttle body. It is recommended to make things easier down the road. Start by removing the plastic line going into the air hose that connected the TB and the air box, remove all electrical connectors to TB and unbolt 4 screws holding TB in place. Again, it is recommended you get a new gasket for this however; I reused mine because the dealer didn�t have any and it works fine.

Now that you have the TB and air box removed its time to remove the PCV valve hose. This runs at the top of the motor from the intake manifold to the PCV valve on the valve cover. It�s held on one of two ways, and older version of this hose will just slide right off, the newer revised hose will have band clamps. Since Jaguar has revised this part it is recommended to upgrade to this hose. Also change out the PCV valve since were here and were performing a tune-up to your car.


While removing the PCV valve hose also remove two vacuum lines at the top of the intake manifold. One line is for the brake booster and the other from just behind the TB to a sensor behind the manifold. It is not necessary to remove from the manifold, just unplug from the brake booster and the sensor. When removing from the brake booster be careful, it just pulls right out but may take some finesse. The other line is held in by a speed clip and is very easy to take off. After both of these are disconnected there is one other vacuum line that runs to the top right of the manifold in the back. It is between the manifold and the firewall. This will simply pull right out.


At this point we will also disconnect the remaining electrical connectors on the manifold. There should be 1 at the very top of the manifold at the back and two on the left side of the manifold. These simply pull out just like any other connector.


Almost done!
At this point we can start unbolting the intake manifold. Start right below the TB. You will see a single bold holding the manifold to a bracket.

Take this out and then start working on the bolt in the back of the manifold. This is not hard but it is very tight so it takes patience. As a reference, there are 3 bolts in the back of the manifold. All are tight because there isn�t a lot of clearance between the manifold and the firewall. 2 bolts are easy to see and hold a clip for wires running back there. The 3rd bolt is just blow this clip and holds the manifold to a bracket so it doesn�t move.
I took the socket wrench from the left side, reached all the way back and felt for it. After a loosened it a little but I could take it the rest of the way by hand. This bolt will be the most time consuming. After the bolt in the back is removed there will be 2 more bolts of the same size just above it. These hold a bracket to the manifold. It is not necessary to remove these completely, just loosen them to slide the bracket out the way for removal.

After you have these bolts removed you can start to unbolt the manifold. There should be 7 (I believe) bolts holding this down. After removing all of the manifold should pull right out. Again be very careful while doing this. It�s very easy to bump the aluminum water hose to the left of the manifold and cause a coolant leak.
After you have the manifold off its time to replace the gaskets between the upper and lower intake manifold. Simply pull the old ones out with needle nose pliers, try not to pry them out with a screwdriver. The manifold is soft aluminum and will scratch/gouge very easily. Once you�ve taken out the old and put the new ones in cover up the ports with a clean rag and start changing out the plugs.


To change out the plugs start one at a time by unscrewing the ignition coil connected to each plug and pull it out. You now have access to the plug.
After putting the new plugs in installation is exact opposite.
Good luck!!!
This is to walk through changing spark plugs/performing a tune-up. The intake manifold will have to come off in order to do this. It is recommended you replace the O-rings (Gaskets) for the upper intake manifold, although my car has 85,000 miles on it and the old ones were in just as good shape as the new ones. A lot of people will say you can re-use them so it�s a judgment call on the owner�s part.
One last note: This is an �At your own risk� type of job. Its very easy to do but remember, take your time, pay close attention to detail, and don�t be afraid to ask questions.
I started by taking off the engine cover, air box, all electrical connectors and plugs, and vacuum lines.
To take off the engine cover remove the engine oil fill cap, then unscrew the 3 screws visible from the top. Pull the cover off and replace oil cap so nothing gets inside the motor.
Next unscrew all (7 or 8 I believe) screws holding the top of the air box and lift. You will want to take off the band clamp holding the hose on so you can get this out of the way.
Inside the air box you will see 2 screws at the bottom holding this down, remove those along with the bracket holding the down the back of the box. There should be 2 screws inside and 3 outside the box. After all screws are removed you should be able to remove the bracket and slide up the air box for removal.
At this point I removed the throttle body. It is recommended to make things easier down the road. Start by removing the plastic line going into the air hose that connected the TB and the air box, remove all electrical connectors to TB and unbolt 4 screws holding TB in place. Again, it is recommended you get a new gasket for this however; I reused mine because the dealer didn�t have any and it works fine.
Now that you have the TB and air box removed its time to remove the PCV valve hose. This runs at the top of the motor from the intake manifold to the PCV valve on the valve cover. It�s held on one of two ways, and older version of this hose will just slide right off, the newer revised hose will have band clamps. Since Jaguar has revised this part it is recommended to upgrade to this hose. Also change out the PCV valve since were here and were performing a tune-up to your car.
While removing the PCV valve hose also remove two vacuum lines at the top of the intake manifold. One line is for the brake booster and the other from just behind the TB to a sensor behind the manifold. It is not necessary to remove from the manifold, just unplug from the brake booster and the sensor. When removing from the brake booster be careful, it just pulls right out but may take some finesse. The other line is held in by a speed clip and is very easy to take off. After both of these are disconnected there is one other vacuum line that runs to the top right of the manifold in the back. It is between the manifold and the firewall. This will simply pull right out.
At this point we will also disconnect the remaining electrical connectors on the manifold. There should be 1 at the very top of the manifold at the back and two on the left side of the manifold. These simply pull out just like any other connector.
Almost done!
At this point we can start unbolting the intake manifold. Start right below the TB. You will see a single bold holding the manifold to a bracket.
Take this out and then start working on the bolt in the back of the manifold. This is not hard but it is very tight so it takes patience. As a reference, there are 3 bolts in the back of the manifold. All are tight because there isn�t a lot of clearance between the manifold and the firewall. 2 bolts are easy to see and hold a clip for wires running back there. The 3rd bolt is just blow this clip and holds the manifold to a bracket so it doesn�t move.
I took the socket wrench from the left side, reached all the way back and felt for it. After a loosened it a little but I could take it the rest of the way by hand. This bolt will be the most time consuming. After the bolt in the back is removed there will be 2 more bolts of the same size just above it. These hold a bracket to the manifold. It is not necessary to remove these completely, just loosen them to slide the bracket out the way for removal.
After you have these bolts removed you can start to unbolt the manifold. There should be 7 (I believe) bolts holding this down. After removing all of the manifold should pull right out. Again be very careful while doing this. It�s very easy to bump the aluminum water hose to the left of the manifold and cause a coolant leak.
After you have the manifold off its time to replace the gaskets between the upper and lower intake manifold. Simply pull the old ones out with needle nose pliers, try not to pry them out with a screwdriver. The manifold is soft aluminum and will scratch/gouge very easily. Once you�ve taken out the old and put the new ones in cover up the ports with a clean rag and start changing out the plugs.
To change out the plugs start one at a time by unscrewing the ignition coil connected to each plug and pull it out. You now have access to the plug.
After putting the new plugs in installation is exact opposite.
Good luck!!!
#2
01-07-2011, 01:01 PM
Nice photo post. I posted this one a while back showing the locations of the three bolts on the back of the intake manifold. https://www.jaguarforums.com/forum/s...ghlight=razkid
#3
01-07-2011, 01:27 PM

The following 3 users liked this post by XJS 88:
#4
01-07-2011, 01:38 PM

#6
01-07-2011, 06:51 PM

The following users liked this post:
whatshappening01 (08-25-2021)
#7
01-07-2011, 08:06 PM

I just did this job the beginning of December, I sure wish you would have posted this before I did it. Although, I had no problems with the job (I have turned wreachs for a living since I was 12), this is my first cat. There's just one thing that happened that was not expected. The outside temp gauge never kept the right temp, it was always 9 degrees off, now even when it's cold it goes right to 127 degrees. I did nothing to the sensor or even around the sensor. But otherwise every thing went good doing the job, but I had a little help with my Chilton Manual too....LOL
Trending Topics
#9
01-08-2011, 12:52 PM

#10
01-08-2011, 12:58 PM
I called jag before I started the project for torque specs but they wouldn't give me any. I don't have access to JTIS, as I am a mac user, but maybe someone else will be able to find it. The dealer told me they don't even use a torque wrench when doing this. They just "tighten till its tight".
As far as plugs go, I've read many different opinions on this site about which ones to use. I just bought OEM plugs from the jag dealer. I figured if they are good enough to put in from the factory they are good enough for the tune-up.
As far as plugs go, I've read many different opinions on this site about which ones to use. I just bought OEM plugs from the jag dealer. I figured if they are good enough to put in from the factory they are good enough for the tune-up.

#12
01-08-2011, 07:00 PM
Per JTIS: The intake manifold retaining bolts in position 1, 2 and 3 are longer than the retaining bolts in position 4, 5 and 6.To install, reverse the removal procedure.Install the new intake manifold gaskets.Complete the tightening sequence.Tighten to 10 Nm.
5----3
-2 1 4 6
Front of car
5----3
-2 1 4 6
Front of car
Last edited by Razkid; 01-08-2011 at 07:04 PM.
The following 2 users liked this post by Razkid:
Vettklr (03-01-2011),
whatshappening01 (08-25-2021)
#14
01-09-2011, 08:45 AM
Thank you to all. Great information. I wasn't looking to skimp with after market. I was hoping to improve perfomance. My 2.5 isn't and from what I have read, never will be a speed demon. But, any improvement would be welcome. I'll stick with original though. Don't want to chance decrease in performance. Again, thank you all.
#15
01-09-2011, 11:49 AM
Veteran Member
Join Date: Nov 2006
Location: Glasgow, Scotland UK
Posts: 47,303
Received 9,005 Likes
on
4,113 Posts

The following users liked this post:
Glissman (03-06-2014)
#16
02-14-2011, 06:13 AM

Wow! This is amazing. I am a new forum member and I am so happy I found this site. It contains so much information!
You sound experienced with service and was hoping to get some insight on a situation I am facing. I am mechanically challenged and the dealership does my service. Most recently 100k service including replace belt-drive, replace spark plugs, change oil, pollen filter and of course the usual inspections. In addition I had them replace the air filter, BG cooling flush, brake fluid flush, steering flush, fuel filter, replaced rear stabilizer bar bushings.
Got it back and when I accelerate only @ 52-62 range I get vibration in the car (not in the steering wheel) and my gas mileage went down. Didn't do that before taking it in. I brought it back to the dealer (and it is still there now) They went through it, said it was nothing they did, and say they isolated the vibration to the torque convert to be what is causing the problem.
Could this be related to the work they did? Possibly spark plug or gaskets on inlet manifold replacement? I have to face this Monday again.
#17
05-08-2011, 07:00 AM

Junior Member
Join Date: May 2011
Location: Stirlingshire
Posts: 4
Likes: 0
Received 0 Likes
on
0 Posts
Great post and brilliant photos but my UK spec 2002 2.1 X Type has air intake scoops/horns attached to the front of the air filter box with short concertina air intake hoses which pass under the bonnet slam panel. These short hoses seem to be heat welded to both the air filter box and the air intake scoops/horns. How do I detach them so I can get the air filter box off so I can get at the stuff underneath?
Roger
Roger
#19
07-18-2011, 01:26 AM
Senior Member
RicZko, Good post, so good of you to take the time! I actually changed my plugs this afternoon. It would have been about a 2 hr job if I knew what I was doing and didn't take breaks. However, my version was about 4hrs. Then, I stumbled on your posting tonight, AFTER I just changed my plugs! Murphy's Law?  ..but I did have a resource, Steve Hannes Jag blog.
Jaguar Motor Project: Motor Project # 5 - Changing Plugs
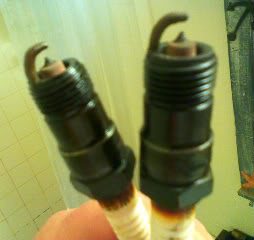
See my plugs with 94K miles on them. Notice the big ole gaps and burnt porcelain. The gaps measured 0.064" or better. I set the new ones to 0.050".
Steve's blog does list torque specs for the intake manifold's 6 bolts, the 4 bolts on the TB, and the plugs themselves. I assume he has the JTIS, not sure, but I do not have it. Anyway, I followed his step by step procedure for changing out the spark plugs on a Jag X-type. I got it all done but now my idle is all over the place.
I started the car up after everything was back in place, and I had a high idle....like 2000rpm. I've never seen this car do anything but a perfect idle.
Anyway, upon driving the idle jumped around at will. When I got to stop lights the idle would run up to 2000rpms on its own and then back down to 1000rpms... Up and down and again.......I have a stick shift so my gear at a stop light is neutral (none) Hence I don't jerk around, but I'm sitting there with 2000 rpm's under my hood!
...While driving, the engine would change the fuel input and the car would lunge fwd or drop back. This jerking motion is hard on my transfer case! ...any ideas?
After restarting the problem persists. I rechecked my plugging-in of the vacuum lines and electrical plugs, everything is in and tight. I did disconnect the battery for this project, and reconnected it properly. And one more thing, I don't have an engine light illuminated!

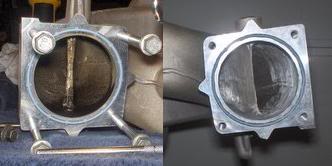
As an aside to my engine idle problem, I also took a Dremel tool to the area directly behind the throttle body to bring an aerodynamic shape to the partition behind the butterfly valve in the TB. This might improve the air flow just a little. I had it all apart, why not?
Before - After
Pics are from the blog, I did about the same thing, just didn't take my own pics. He actually removed more material than I did and brought the partition to a thin fin as you can see. I didn't do it quite that cool. I could only get my tool in so far!
..but I did have a resource, Steve Hannes Jag blog. Jaguar Motor Project: Motor Project # 5 - Changing Plugs
See my plugs with 94K miles on them. Notice the big ole gaps and burnt porcelain. The gaps measured 0.064" or better. I set the new ones to 0.050".
Steve's blog does list torque specs for the intake manifold's 6 bolts, the 4 bolts on the TB, and the plugs themselves. I assume he has the JTIS, not sure, but I do not have it. Anyway, I followed his step by step procedure for changing out the spark plugs on a Jag X-type. I got it all done but now my idle is all over the place.
I started the car up after everything was back in place, and I had a high idle....like 2000rpm. I've never seen this car do anything but a perfect idle.
Anyway, upon driving the idle jumped around at will. When I got to stop lights the idle would run up to 2000rpms on its own and then back down to 1000rpms... Up and down and again.......I have a stick shift so my gear at a stop light is neutral (none) Hence I don't jerk around, but I'm sitting there with 2000 rpm's under my hood!
...While driving, the engine would change the fuel input and the car would lunge fwd or drop back. This jerking motion is hard on my transfer case! ...any ideas?
After restarting the problem persists. I rechecked my plugging-in of the vacuum lines and electrical plugs, everything is in and tight. I did disconnect the battery for this project, and reconnected it properly. And one more thing, I don't have an engine light illuminated!
As an aside to my engine idle problem, I also took a Dremel tool to the area directly behind the throttle body to bring an aerodynamic shape to the partition behind the butterfly valve in the TB. This might improve the air flow just a little. I had it all apart, why not?
Before - After
Pics are from the blog, I did about the same thing, just didn't take my own pics. He actually removed more material than I did and brought the partition to a thin fin as you can see. I didn't do it quite that cool. I could only get my tool in so far!
Last edited by Patterson; 07-18-2011 at 03:46 PM.
#20
07-18-2011, 06:33 PM
Senior Member
OK, I got it. Stupid mistake! I forgot to replace one of the big clamp rings that go around the MAF sensor tube. I had noticed this ring missing, but the corrugated hose fits so tight over the tube from the air box, that I figured it made a 'Good enough' seal. I didn't think it would cause my car to act so crazy! Anyway, I did the spark plug change at my Dad's house, so I'll have to ride over and pick up my clamp ring.
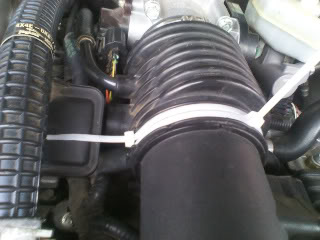
I used zip ties so I can drive in the meantime. Car runs normal now
I used zip ties so I can drive in the meantime. Car runs normal now
Last edited by Patterson; 07-19-2011 at 01:52 AM.
The following 6 users liked this post by Patterson:
geewilicurs (01-23-2016),
harvey_birdman (11-20-2012),
rf69 (01-07-2012),
Sgregor (04-26-2012),
Stuart Beattie (02-19-2014),
and 1 others liked this post.