
Retrofit OEM Amplifier & Speaker Upgrade FAQ
#21
 01-22-2012, 06:59 AM


Senior Member
#22
01-22-2012, 11:08 AM


#23
01-22-2012, 11:39 AM

Well thanks mate.
Just in case you don't see the new post, it's here https://www.jaguarforums.com/forum/x...rim-kit-66954/
Just in case you don't see the new post, it's here https://www.jaguarforums.com/forum/x...rim-kit-66954/
#24
02-21-2012, 06:34 AM
Senior Member
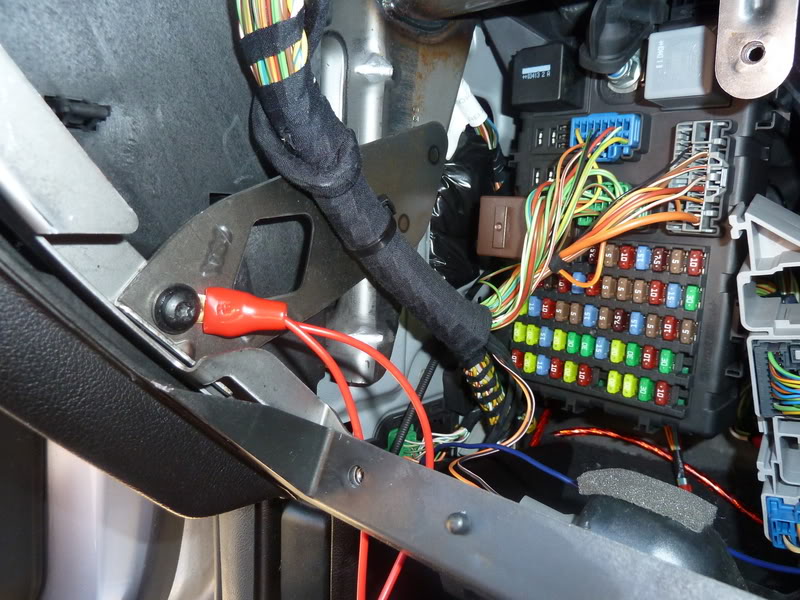
Cameron, how did you remove the panel below the steering wheel column to gain easier access to the fuse box and door connectors? I removed the two screws at the bottom, but something else is obviously holding it in place. Couldn't find any instructions either on JTIS.
Man is this project A LOT more tedious and involved than the SatNav retrofit, I spent two days just putting together the custom harness and fitting it in the car (not even completely hooking it up yet). I can't believe I still have to finish hooking up the harness, fit the new pins in the doors for the tweeters (2x), remove the rear parcel shelf and mount the subs (which is like a mini project by itself), as well as mount and hookup the new speakers(6x) when the adapters are available for sale again. This better be worth it.
.
Last edited by spielnicht; 02-21-2012 at 12:24 PM.

#26
02-23-2012, 10:17 AM
....Man is this project A LOT more tedious and involved than the SatNav retrofit, I spent two days just putting together the custom harness and fitting it in the car (not even completely hooking it up yet). I can't believe I still have to finish hooking up the harness, fit the new pins in the doors for the tweeters (2x), remove the rear parcel shelf and mount the subs (which is like a mini project by itself), as well as mount and hookup the new speakers(6x) when the adapters are available for sale again.
I hope so. I'm satisfied with the results on mine.
#27
02-23-2012, 10:20 AM
#28
03-26-2012, 09:09 AM
Senior Member
I've finally completed the Premium Sound retrofit.
First I'd like to thank Cambo for all his help in providing this great guide that made it cake to do the retrofit. With that said, yes his guide makes it cake, but the actual work is bloody tedious, it's just so involved. It took me almost 5 weekends (working 4-6 hours each) to complete it.
I had originally planned on the same exact setup as Combo, with the Focals in the doors and Kicker subs in the rear shelf. The only difference was that I went with 2-way coax speakers in the rear doors because I didn't have the door handles with the tweeters on hand.
After installing everything, I have to say that I didn't like the sound. Maybe it was the fact that I started this with the handicap that I was used to my Merc's Harman Kardon premium audio, which sounds AWESOME. To be fair, the new setup was better than the original setup, but not enough to justify the $$$$ I spent on the Focals and subs. Again, to be fair, I'm sure the Focals would kick-@ss if they were powered by a more powerful sub. I think the fact that setup was highly skewed toward the highs (ear piercing highs) played the biggest part in me not liking it. Plus, the subs level was set to max and yet they weren't providing enough kick. That, I blame on the free-air setup. If they had been enclosed, I'm sure they'd be good.
So, that same week I ran into someone at my new job's parking garage who has an X-Type with the factory Premium Sound. We started talking and then I asked if I can listen to their system. I was actually impressed. The sound was much balanced between the highs and lows and it was obviously folds better than the original setup. So, I decided to remove the Focals and Kicker subs that evening, return them before my return window expired and look for the original Alpine speakers. A week later I struck gold as I found an 06 donar X-Type that had all the parts I wanted; Alpine door speakers, Alpine tweeters, Alpine subs, as well as the rear door handles with tweeters and rear parcel shelf speaker grille. I got the whole set for almost half of what I paid for the other setup.
To get to the point, I'm not crazy happy about the all-factory Premium Sound setup, especially when compared to my Merc's Harman Kardon system, but it's FOLDS better than the original non-Premium Sound setup, so I can say the effort and $$ are worth it and good satisfying enough for remaining years I have with my X.
Last edited by spielnicht; 03-26-2012 at 09:14 AM.
#29
03-31-2012, 05:03 AM
Glad you got it done in the end Spielnicht.
I never said it was an "easy" job, i spent months planning it out, studying wiring diagrams, the posts from x-dave and others on the UK forum, finding the parts, etc....
Now, I have to wonder about some of your experience...
I have to agree. The factory setup has a full 40w per channel driving into the front tweeters. It was even worse when I put in the tweeters without the capacitor. Even with the cap it's still not perfectly balanced.
I'm kicking myself for not measuring the impedence of the Focal midbass & tweeters (actually resistance, and then estimating the impedance, Generally, the reading given by an ohmmeter will be about 2/3 to 3/4 of the impedance of the speaker. So, a 4 ohm speaker will typically measure about 2.5 - 3 ohms, and an 8 ohm speaker will typically read about 5-6 ohms, while a 16 ohm speaker will measure around 12 ohms.)
I suspect that the Focals might be 2ohms each, and when you use the Focal crossover it connects the midbass & tweeter in series, bringing the total load to 4ohms, as well as splitting the signal. I'm thinking along these lines because the front stage is now very much louder than the rear stage.
Unfortunately I sold off the unused pair of crossovers...
So my next idea is to attenuate the signal to the tweeters with L-PADS but I've not had the time to play around with this yet...
Now this is where I have a different experience. I can't turn the sub level up past about +3, there is so much power running to the subs they are quickly overloaded & start to clip at high volume (i.e. >20). The output at +3 is more than enough, in fact on some bass-heavy tracks the volume from the subs can be a little annoying. So I don't understand how your install could have been so weak in bass?
I do suspect however, that maybe I don't have an "X-Type Sedan" amp.
There are different part numbers for the amp used in the X350, S-Type, X-Type Sedan & X-Type Wagon. The amps have the same connections and look identical, but they have different part nos so maybe they are tuned differently...? I don't know just an idea...
I agree, and i'm glad you are satisfied.
TBH this is still an unfinished project for me, i'd like to play around with tuning the system with the L-Pads, obviously the original factory setup was tuned to the speakers used, now that we changed the speakers well some adjustment is necessary....
I have to wonder how much you paid for the Kickers, to me they were cheap! In fact they were only 50 EUR each. The Focals were much more expensive at 133 EUR per pair.
I never said it was an "easy" job, i spent months planning it out, studying wiring diagrams, the posts from x-dave and others on the UK forum, finding the parts, etc....
Now, I have to wonder about some of your experience...
Originally Posted by spielnicht
that setup was highly skewed toward the highs (ear piercing highs)
I'm kicking myself for not measuring the impedence of the Focal midbass & tweeters (actually resistance, and then estimating the impedance, Generally, the reading given by an ohmmeter will be about 2/3 to 3/4 of the impedance of the speaker. So, a 4 ohm speaker will typically measure about 2.5 - 3 ohms, and an 8 ohm speaker will typically read about 5-6 ohms, while a 16 ohm speaker will measure around 12 ohms.)
I suspect that the Focals might be 2ohms each, and when you use the Focal crossover it connects the midbass & tweeter in series, bringing the total load to 4ohms, as well as splitting the signal. I'm thinking along these lines because the front stage is now very much louder than the rear stage.
Unfortunately I sold off the unused pair of crossovers...
So my next idea is to attenuate the signal to the tweeters with L-PADS but I've not had the time to play around with this yet...
Originally Posted by spielnicht
Plus, the subs level was set to max and yet they weren't providing enough kick.
I do suspect however, that maybe I don't have an "X-Type Sedan" amp.
There are different part numbers for the amp used in the X350, S-Type, X-Type Sedan & X-Type Wagon. The amps have the same connections and look identical, but they have different part nos so maybe they are tuned differently...? I don't know just an idea...
Originally Posted by spielnicht
so I can say the effort and $$ are worth it and good satisfying enough for remaining years I have with my X.
TBH this is still an unfinished project for me, i'd like to play around with tuning the system with the L-Pads, obviously the original factory setup was tuned to the speakers used, now that we changed the speakers well some adjustment is necessary....
I have to wonder how much you paid for the Kickers, to me they were cheap! In fact they were only 50 EUR each. The Focals were much more expensive at 133 EUR per pair.
#30
05-31-2012, 11:33 PM

Backseat and parcel shelf out
This is a job in itself, seat base out (breaking the plastic retaining clips on the way, FYI the P/N is C2S 31685)
Then the side squabs out (same plastic clips at the bottom) and the quick release clips on the top, push in the black tabs.
Cambo, how many plastic retaining clips are needed down the seat base & side squabs. Want to order online but need the right quantity. Thanks.
#31
06-01-2012, 12:06 AM
The following users liked this post:
Rockyf (06-01-2012)
#32
04-14-2015, 12:12 AM
Member
Just one question did you replace the head? if so how did you get the input into the amp? I thought looking at this amp the only input is from that fiber optic cable and the head would have to support that. I bought a double din head but I think it won't work with this alpine amp, I think I have to run new wires to the back and swap out the alpine amp with an aftermarket amp 
Thanks for any help!
Jeff
Thanks for any help!
Jeff
#33
04-14-2015, 12:24 AM
#34
06-13-2015, 10:18 AM
#35
04-15-2016, 12:54 PM

Junior Member
Hi
I hope you don't mind me high jacking this thread but I hope my message may be of some use!
I�ve recently added premium audio to my 2006 X type estate that was originally fitted with a 6 speaker setup fed from the head unit. My 2006 car had tweeters and woofers in the front doors and woofers in the rear doors. My car also had factory nav, 6 cd changer, voice control and Bluetooth. The premium audio upgrade has been completed by many people before me and so my intention isn�t to cover old ground that is better explained by others elsewhere. I have found some information that I�ve not seen elsewhere though so I thought I�d share this as it may be of help to others. All the connection points reference below refer to the Jaguar wiring diagrams.
Installation Methodology
I also used the blue CA230 connection method in the front foot well to interface to rear door speakers and front door bass speakers to the new amp in the boot. I chose this method as it is easy to get to the speaker wiring which in my RHD car is next to the bonnet/hood release lever. The CA230 connection is easily accessible once the glovebox is removed from the car. I fitted my car with a Jaguar/Alpine premium audio amp, 4 Jaguar/Alpine premium audio tweeters in the doors, 4 JBL woofers in the doors and a Jaguar/Alpine sub in the boot. I could of used Jaguar/Alpine woofers in the doors too but I wanted to make the job slightly harder(!). I also added an ACM to my car in the boot (not in the factory position near the head unit) and a rear view camera while I performed the audio upgrade.
I made several looms up to connect premium audio to my car. I wanted to spend the minimum time installing premium audio in the vehicle to make the installation as �plug and play� as possible, hence the multitude of looms! I fitted the door speakers and replaced the rear door handles to take tweeters on my driveway, which took about a day of my time. I also added Silent Coat to the doors while I had the cards off and put some Waxoil in for good measure. I prefer holding a soldering iron to a hammer so after I built the looms I searched for a company who would assist me in disassembling the interior of the car to install the looms & associated equipment. After a couple of false starts I discovered DF Communications in Aberdeen, UK. I met with one of their engineers who was extremely helpful and was happy to assist with the install. I booked the car in at the DF workshop for a full day for the main loom, sub and amp install. This work took about 6 hours to complete. I would highly recommend DF for any car electronics installation work. DF were the only people I found who would take on this project. I have no connection with DF, apart from being a happy customer. DF have a website at www.dfcommunications.com and their phone number is 01224 588844.
I created a document which ended up being 30 pages long with the upgrade details to capture everything. This document is too big to upload and much of the information it contains it also available elsewhere. I�ll upload points that may be of use to others from my document though. Excuse my wiring diagram, I didn�t have access to a drawing program when I produced this masterpiece.
Audio Amp Speaker Loom
This loom connects the Jaguar/Alpine amp mounted in the boot of the car to the CA230 connector in the front foot well, to the front door tweeters and to the sub in the boot. The loom uses a 18-way Multilock to connect to the amp, a TE Connectivity 4 way to connect to the sub and a male/female pair of blue JST Automotive PB2 16 ways to connect to CA230 in the car. The standard audio system supplies 1 speaker pair to each front door, that is split to feed the front door tweeter and woofer. The premium audio system has an output from the Alpine amp directly to feed the front door woofers and front door tweeters. The standard system has a woofer in each rear door and the premium system has a woofer and a tweeter in each rear door. Both standard and premium systems feed the rear door speakers from a single pair via CA230.
Looking at the Jaguar wiring diagrams I could see that the front door tweeter and front door woofer are wired independently through the door to the passenger area of the car and connect together at CAS15 & CAS16 and CAS17 & CAS18 on the standard system. I wasn't the first person to notice this! To stop having to pull cables through the doors I wanted to tie in to the existing harness on the passenger side of the harness. With this in mind I bought a scrap interior loom for an X type so I could see where CAS 15-18 were. As can be seen in the photos CAS 15-18 are very close to the CA230 connector. The 4 front door tweeter wires along with the D2B wakeup signal on the amp power loom are the only wires I had to cut on the car to install the system. The left side door wires were cut near the fuse box under the dashboard, which is awkward to get at. I found this task very easy though as DF completed this bit! The right side door wires were cut near CA230 after the sill cover trim had been removed (next to the front passenger seat) and is easily accessible. This saved having to pull a wire to the right hand front door. Bear in mind the standard and premium tweeters have a capacitor installed on one leg, so if you are buzzing signals out with a DVM you might see some resistance changes as the cap charges. The pictures I�ve attached were taken before I used loom tape.
Audio Amp Power Loom
The audio amp power loom uses a 12-way Multilock connector to interface to the amp. Two earths, two 12v permanent feeds and a D2B wakeup signal are required on the connector. Two power feed pairs are required as the amp can pull 30amps and each Multilock connector pin is rated at 15amps. I used the rear mounted accessory socket CA146 in the boot, which is rated at 30amps, to provide power. The OEM amp install on an X type uses unswitched power for the amp and so I did the same. Acc switched power is also available from the same rear mounted connector if a C2S48039 relay is installed behind the glove box in position R2. D2B wakeup is available from the D2B connected devices in the boot, I pulled mine from the DVD nav system by splicing the orange wire.
Front Door Looms
I used Jaguar/Alpine premium audio tweeters for all four doors in my car, meaning the front door tweeter connections required no changes behind the door cards. I used JBL speakers for the woofers in all of the doors so I made up some small looms with 2 way Multilock connectors to interface to the existing door loom and crimp terminals to connect to the new woofers. The Jaguar door wiring could be cut here instead of making a loom but I wanted plug and play, hence I used this solution.
Rear Door Looms
My car only had woofers in the rear doors and I needed to replace the woofer and add a tweeter to each door. The tweeters mount in new interior door handle surrounds that I sourced from the front doors of a scrap car and fitted to my rear doors. I used a large drill bit to trim the plastic away from the original cards to remove the handles. The loom for the rear door comprises of 2 way Multilock connectors to interface to the existing door loom, crimp terminals to connect to the new woofers and Multilock FH 2 way connectors to plug in the new door tweeters.
D2B Optical Loom
I originally intended to add an additional connector to the D2B network for the amp. Due to space constraints in my estate and the fact I never use the 6 CD changer as I have an ACM I chose to remove the 6CD changer and use it�s D2B connector. If I had decided to keep the changer I would of added another D2B connection point via a scrap D2B harness I have and robbing it for bits. Alternatively I could of used another ACM harness, PN C2C38901, which would provide an additional D2B connection point for a plug and play install.
Jaguar Part Numbers
C2S37784 Estate sub woofer that fits in place of offside boot cubby box.
C2S44677LFN Rear trim piece that covers the sub in an estate
C2C21747 & C2C21748 are the Jaguar/Alpine door tweeters that are used in the front and rear doors. The tweeters are handed, hence the two part numbers.
C2S38104 Jaguar estate Alpine amp (C2S38103 is the saloon version).
Connectors used
I tried to order as many parts as possible from RS in the UK. RS do not carry the sub woofer 4 pin connections and so I ordered these from Mouser. The RS part numbers are shown below where available.
18-way Multilock 070 RS PN 531-4590 & Multilock 070 socket pins RS PN 690-9809 for the 18 way Alpine amp speaker connector.
12-way Multilock 070 RS PN 362-9086 and Multilock 070 sockets pins RS PN 690-9809 for the 12 way Alpine amp power connector.
Housing FH 2 way RS PN 719-0428 connectors and Multilock 070 pins RS PN 690-9809 to connect to OEM speakers.
2-way Multilock 070 1-row cap housing RS PN 362-9137 and MULTILOCK 070 Crimp Pin Connector, Male RS PN 362-9373 to connect to OEM speaker wiring.
4 way connector, TE Connectivity Mouser PN 571-1456983-1, & connection pins, TE Connectivity Mouser PN 571-1393366-1 for 4 way sub woofer connector.
The �blue� CA230 interface connectors that can be used to wire the alpine amp into the footwell speaker termination point are JST Automotive PB2 16 way. I sourced some male & female CA230 connectors from a scrap car so I don�t have the exact part numbers for them, only the make.
Trim pieces that might break!
C2S13494 pins used to hold door cards to door.
C2S20168 Female part of door card mount.
C2S31685 Rear seat squab retaining clips if you chose to remove the rear seat for the install. We did not need to do this though.
Additional notes
To add tweeters to the rear door handles I bought front door handles from a scrap car. I then removed the rear door handles from my car and fitted front door handles. Removing the rear door handles was easy, I just used a large drill bit to carefully trim the plastic away from the circular handle mounts. I wanted to leave as much of the circular mounts in place as possible as and I intended to use self tappers in these holes to locate the door handle while the glue cooled. I used a Stanley knife to remove the other straight sections of plastic that were used to hold the handles to the doors. Again I only removed the minimum necessary as I wanted to use the straight sections of plastic to locate the new handles while the glue cooled. After I had screwed the new handles to the door cards I used plenty of hot glue to hold them in place. I also applied some hot glue to the tweeter mounts in all 4 doors as there was a small amount of movement in them.
The sub woofer mounts via m6 bolts to the car. The bolt holes were present on my vehicle but the holes were not tapped. I used an m6/1mm tap for this. The sub woofer cover trim mounts to the existing car trim and the sub, no additional hardware is required. The polystyrene boot tidy under the boot floor that sits under the offside cubby hole needs cutting to allow the sub to fit.
Conclusions
I�d buzzed all the cables out before installation and amazingly as soon as DF and I plugged the amp in it worked! The sound is much better than before. Silent Coat in the doors and better quality speakers will also help but the DSP function and better amplification plays its part too I�m sure.
Thanks
The following users liked this post:
Cambo (07-31-2016)
#36
07-30-2016, 08:26 PM

Great thread a lot of good info here. I have a jaguar 2012y 400w base system. I bought Focal three way components for fronts. Is there a possibility to connect Focal crossover in there? I know that capacitors are being used originally......maybe there is a way?! Anyone wondered about this? Cheers
#37
07-31-2016, 09:41 AM
I have bought Audio Control LC7i line converter. Now I am looking to buy a six channel amplifier to power front three way speakers. I am going to power each speaker at front for example tweeter, midrange, woofer with separate channel. I installed Focal components at fronts and I did not use crossover. I did not use capacitors as well, cause i will set filter in amplifier. I don't want to touch rear speakers though. I just want to get good sound from front stage.
Is this going to work? Any audio experts here? Asking cause I am noob in this area
At the moment everything just started, i haven't got 6 channel amp yet.
Any advice?
Is this going to work? Any audio experts here? Asking cause I am noob in this area
At the moment everything just started, i haven't got 6 channel amp yet.
Any advice?
#38
01-13-2020, 05:58 AM

#39
04-25-2020, 03:35 PM
Junior Member
Join Date: Jan 2014
Location: Poland , Rzeszow
Posts: 10
Likes: 0
Received 0 Likes
on
0 Posts
Thanks to X-Dave and Cambo I have comipleted successfuly my project of premium sound upgrage, but thetre is one small issue I have no clue how to sort out.
I have CD changer and AMP in the trunk and original fiber optic loom phone-amp.
Have checked it with the light if any of fiber optic link is not broken and all looks good.
The issue is that using simple cdc fiber optic I can use CDC if I disconnect from CDC and plug it to AMP Premium Sound kicks in. Seperately both CDC and AMP wors fine.
When I want to use them both using loom Phone-AMP CDD and AMP both do not work, tried all options and from the connection diagram all looks good but do not work.
here is loom connection scheme:
BOOT 1 to CDC 2 CDC 1 to AMP 2 AMP1 to BOOT 2
"wake up" orange cable loomed from CDC to AMP
as I mentioned CDC and AMP used on CDC cable BOOT1 to CDC2 CDC1 to BOOT2 works fine
HELP! what needs to be done? is there any chance that I have to program system to use AMP and CDC at the same time using mongoose?
......
just checked again and now CDC is working but AMP is dead. It was working on CDC loom few hours ago. Could I broke it by switching fiberoptic order while troubleshooting loom or is it possible that my system cancelled it and left only CDC. My radi is not touch screen it is standard CD player and climatronic Unit.
I am depressed 2 full days of wiring soldering and hard work in interior was happy to hear my sound for few minutes and now stuck with AMP not working and no sound at all.
#40
04-26-2020, 02:26 PM
Junior Member
Join Date: Jan 2014
Location: Poland , Rzeszow
Posts: 10
Likes: 0
Received 0 Likes
on
0 Posts
After few hours of digging it appeared that amp orange cable had cold connection to orange cable �fiber optic wake up� and when soldering again everything came back to life and my loom CDC APM made from phone amp loom works just perfect. successfuly also upgraded my CD dash player with line out that connected to my parrot mki9000 plays music via cd line over Bluetooth and hands free works well just have to remember when listening to the radio to switch into CD to answer or make calls hand free!!! How to upgrade CD line out thanks to JagDroid See link below https://sites.google.com/willcoxonli.../jaguar/part-4
mission completed
mission completed

Thread
Thread Starter
Forum
Replies
Last Post
lickahotskillet
XJ6 & XJ12 Series I, II & III
0
09-11-2015 07:54 PM
Currently Active Users Viewing This Thread: 1 (0 members and 1 guests)