
04 X-TYPE oil pan gasket FAQ
#61
 11-03-2013, 11:04 AM


#62
11-03-2013, 11:08 AM
Thank you for taking the time to help me all this time after you succeeded in doing this repair. Other people reading this forum should carefully read your comments of 4-22-12 and 5-13-12 in this very forum for the details you provided. I plan to follow that advice to the letter!
I have been bending four wrenches for 10 days, and I can't bend them quite right for this job. It would be so helpful if you would post a picture of your modified wrench, or e-mail it to me, as you appear to have done for someone else back in 2012*.
I also noted that you describe bending a 10mm wrench, but these pan bolts have 13mm bolt-heads. It appears that you got by with the 10s, by getting the tip of that much smaller wrench onto the 13mm bolt heads, is that right? I have never heard of doing anything like that, but if it works, that would be a heck of a breakthrough, because the wrench head should take up 30% less room in this very confined space.
*You may e-mail me, if you prefer not to post a picture in this forum, at imk9@lycos.com
The following users liked this post:
rickbct (11-24-2014)
#63
06-22-2014, 01:09 PM

Junior Member
Join Date: Feb 2011
Location: california
Posts: 10
Likes: 0
Received 0 Likes
on
0 Posts
#64
07-14-2014, 10:21 PM
Junior Member
Join Date: Jul 2014
Location: Houston
Posts: 1
Likes: 0
Received 0 Likes
on
0 Posts
#65
07-15-2014, 12:48 AM
Senior Member
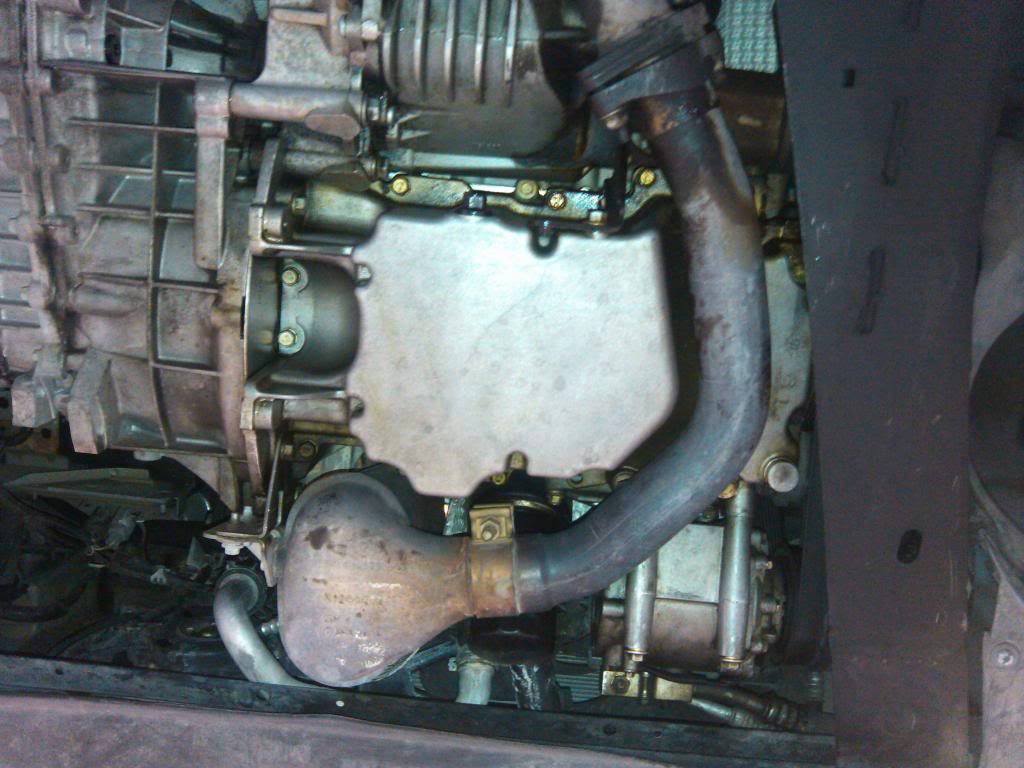
Here's a picture of an 2002 X Type oil pan. Manual trans. A picture is worth a thousand words. Maybe members can repost the pic and point out the trouble spots, including where to drill the access hole, etc. Oil pan gasket replacement sucks on most cars these days. Give me a 64 Camero!
Last edited by Patterson; 07-15-2014 at 12:56 AM.
#66
07-15-2014, 06:01 AM

Here's a picture of an 2002 X Type oil pan. Manual trans. A picture is worth a thousand words. Maybe members can repost the pic and point out the trouble spots, including where to drill the access hole, etc. Oil pan gasket replacement sucks on most cars these days. Give me a 64 Camero!
The following users liked this post:
Patterson (07-16-2014)

#68
07-22-2014, 08:47 AM
Member
#69
07-24-2014, 05:15 PM
Junior Member
Join Date: Feb 2011
Location: california
Posts: 10
Likes: 0
Received 0 Likes
on
0 Posts
#70
08-13-2014, 08:39 PM

Junior Member
New Jag owner here, actually the father of a 17yr old son who bought a 2004 X-type 3.0 for his first car. Ended up having a small oil leak from the oil pan gasket. Succeeded in doing the operation, THANKS TOO ALL WHO POSTED ON HERE and all went well (I will post detailed pics as soon as I can).
Anyhow, after the first fire of the engine I have the check engine light on and the airbag light is flashing a 5-3 code? does anyone know why those would have came on? They were not on previous to changing the gasket. I did have the car lifted up about 18-20" in the front for a couple of days.
Anyhow, after the first fire of the engine I have the check engine light on and the airbag light is flashing a 5-3 code? does anyone know why those would have came on? They were not on previous to changing the gasket. I did have the car lifted up about 18-20" in the front for a couple of days.
#71
08-14-2014, 03:03 AM
Junior Member
Ok, here is a quick reference guide with pictures for replacing your oil pan gasket. Make sure you have plenty of time, old clothes and lots of rags. Its good practice to make sure you have all of the correct tools as well. Make sure to support your X properly and try to raise the front end so you have lots of elbow and wrenching room.
I did the hole drilled into the transfer case support to get to the hidden bolt and I also had to remove the oil pan pickup in order for the pan to drop at the end. If you end up taking off the front catalytic converter and finding a way to loosen both of the upper bolts on the AC compressor then you can get away without removing the oil pan pickup because I think you can slide the pan enough forward to drop the notch that will get caught up under the area where you drill the hole for the hidden bolt and then slide it back.
Drain oil and remove oil filter.
#1 - Remove the transfer case bolt where the hidden oil pan bolt is under

#2 - Before you start drilling the hole I would take a minute to soak the exhaust elbow clamps with penetrating lube like liquid wrench


#3 - Use a sharpie and visually try to align your hole with the hidden bolt and make a starting mark. Start drilling the hole with smaller bits and gradually go up. Once my hole was drilled about 3/16 I used some hole bits and this worked well and opened the hole fairly quickly. I finished up by using a 7/8" drill bit, this size will allow you to get a socket in and out nicely. Clean the area of shavings and make sure you vacuum out the transfer case hole where you just drilled the hole (there are tons of shaving inside)


#4 - Now you can remove the three nuts from the brackets on the exhaust elbow. Use a small piece of wood and tap the elbow at the bend until you see about 1/2" of movement in the front connection. Now you should be able to use a screw driver and separate the rear connection


#5 - Remove the bolt holding the black cover plate and remove to uncover two of the oil pan bolts

#6 - Remove the pan to trans bolt that holds the lower part of the metal bracket that secures the front cat. Remove the small bolt holding the cat to this bracket (I used liquid wrench on this bolt as well). Now loosen the upper bolt that hold the upper part of the metal bracket and swing it out of the way, hand tighten to hold this out of the way


#7 - Remove the other pan to trans bolt

#8 - Remove the front inner fender well cover to allow access to the belt tensioner and ease of access to two of the pan bolts

#9 - Use a 3/8" breaker bar if you can, I only had 1/2" so I had to find a real thin 3/8" ratchet with a 12" tube to help get leverage. Pull down toward the ground (pretty hard) and use your other hand to slide the belt off of the AC compressor

#10 - Now remove the lower AC compressor bolts (might be a little hard since they are long). Loosen the upper 2 bolts IF YOU CAN. I could not get to one of them and could only loosen 1 of them

#11 - Ok now you can remove all of the 15 oil pan bolts. Take your time and maneuver the pan to its lowest position. This is where you will need to get at the two bolts and one nut that holds the oil pan pickup on. Trust me its not that hard. (If you removed the front cat and were successful at loosening the upper AC compressor bolts to move it about and inch then you might not have to take the pickup out). I forgot to take a picture of removing the pickup, basically getting to the two bolts you will access through the fender well and the nut from under the front of the car. Once that is off it is easy to get the pan off

#12 - Now its time to clean the gasket edges on the both surfaces. I used a good carb cleaner and a rag. It takes a little time to get all of the scum off


#13 - Use a couple small zip ties to hold the new gasket in place. Make sure you use holes that will be easy to get to so you can snip them off when its time

#14 - With a rubber seal gasket you DO NOT need to use additional sealer but according to the manual you need to use about a 10mm bead of WSE-M4G323-A6 or OEM equivalent I used (Permatex Ultra Black RTV silicone #82180)

#15 - I did not stick the beads of silicone on yet because you have roughly 6 minutes or so to install the gasket after you stick the beads on the gasket. I first maneuvered the oil pan in to a rough position to give me enough room to reinstall the oil pan pickup (I forgot to take a picture of the oil pan pickup bolts again on this step). Make sure to tighten to spec about 10ft lbs for the bolts and 7ft lbs for the nut - or just make sure they are nice and tight without over tightening them. Once you have the pickup attached you can add the beads of silicone to the gasket (use the included tube cap for good access). Now get under and push the pan up (try not to touch the surfaces completely yet), get a couple of bolts in and then hand tighten them, quickly get all of the other bolts in and hand tighten those. Once satisfied then using the chart below tighten the bolts in that order to 18ft lbs. Now the pan is secured and good to go. The silicone says dry in an hour and totally dry in 24hrs. I would try not to add your new oil or run the car until after 24hrs has past

Finish - Now reinstall everything the same way it came out. Don't forget the belt and the upper bolts on the AC compressor. The torque specs on the pan to trans is 33ft lbs.
I hope this helps others out. I was successful and very proud that I could do this myself. All the $$ I saved and I learned a ton. I might have forgot small details but you get the just.
Thanks to all of the others on here that have submitted info on this procedure.
I did the hole drilled into the transfer case support to get to the hidden bolt and I also had to remove the oil pan pickup in order for the pan to drop at the end. If you end up taking off the front catalytic converter and finding a way to loosen both of the upper bolts on the AC compressor then you can get away without removing the oil pan pickup because I think you can slide the pan enough forward to drop the notch that will get caught up under the area where you drill the hole for the hidden bolt and then slide it back.
Drain oil and remove oil filter.
#1 - Remove the transfer case bolt where the hidden oil pan bolt is under
#2 - Before you start drilling the hole I would take a minute to soak the exhaust elbow clamps with penetrating lube like liquid wrench
#3 - Use a sharpie and visually try to align your hole with the hidden bolt and make a starting mark. Start drilling the hole with smaller bits and gradually go up. Once my hole was drilled about 3/16 I used some hole bits and this worked well and opened the hole fairly quickly. I finished up by using a 7/8" drill bit, this size will allow you to get a socket in and out nicely. Clean the area of shavings and make sure you vacuum out the transfer case hole where you just drilled the hole (there are tons of shaving inside)
#4 - Now you can remove the three nuts from the brackets on the exhaust elbow. Use a small piece of wood and tap the elbow at the bend until you see about 1/2" of movement in the front connection. Now you should be able to use a screw driver and separate the rear connection
#5 - Remove the bolt holding the black cover plate and remove to uncover two of the oil pan bolts
#6 - Remove the pan to trans bolt that holds the lower part of the metal bracket that secures the front cat. Remove the small bolt holding the cat to this bracket (I used liquid wrench on this bolt as well). Now loosen the upper bolt that hold the upper part of the metal bracket and swing it out of the way, hand tighten to hold this out of the way
#7 - Remove the other pan to trans bolt
#8 - Remove the front inner fender well cover to allow access to the belt tensioner and ease of access to two of the pan bolts
#9 - Use a 3/8" breaker bar if you can, I only had 1/2" so I had to find a real thin 3/8" ratchet with a 12" tube to help get leverage. Pull down toward the ground (pretty hard) and use your other hand to slide the belt off of the AC compressor
#10 - Now remove the lower AC compressor bolts (might be a little hard since they are long). Loosen the upper 2 bolts IF YOU CAN. I could not get to one of them and could only loosen 1 of them
#11 - Ok now you can remove all of the 15 oil pan bolts. Take your time and maneuver the pan to its lowest position. This is where you will need to get at the two bolts and one nut that holds the oil pan pickup on. Trust me its not that hard. (If you removed the front cat and were successful at loosening the upper AC compressor bolts to move it about and inch then you might not have to take the pickup out). I forgot to take a picture of removing the pickup, basically getting to the two bolts you will access through the fender well and the nut from under the front of the car. Once that is off it is easy to get the pan off
#12 - Now its time to clean the gasket edges on the both surfaces. I used a good carb cleaner and a rag. It takes a little time to get all of the scum off
#13 - Use a couple small zip ties to hold the new gasket in place. Make sure you use holes that will be easy to get to so you can snip them off when its time
#14 - With a rubber seal gasket you DO NOT need to use additional sealer but according to the manual you need to use about a 10mm bead of WSE-M4G323-A6 or OEM equivalent I used (Permatex Ultra Black RTV silicone #82180)
#15 - I did not stick the beads of silicone on yet because you have roughly 6 minutes or so to install the gasket after you stick the beads on the gasket. I first maneuvered the oil pan in to a rough position to give me enough room to reinstall the oil pan pickup (I forgot to take a picture of the oil pan pickup bolts again on this step). Make sure to tighten to spec about 10ft lbs for the bolts and 7ft lbs for the nut - or just make sure they are nice and tight without over tightening them. Once you have the pickup attached you can add the beads of silicone to the gasket (use the included tube cap for good access). Now get under and push the pan up (try not to touch the surfaces completely yet), get a couple of bolts in and then hand tighten them, quickly get all of the other bolts in and hand tighten those. Once satisfied then using the chart below tighten the bolts in that order to 18ft lbs. Now the pan is secured and good to go. The silicone says dry in an hour and totally dry in 24hrs. I would try not to add your new oil or run the car until after 24hrs has past
Finish - Now reinstall everything the same way it came out. Don't forget the belt and the upper bolts on the AC compressor. The torque specs on the pan to trans is 33ft lbs.
I hope this helps others out. I was successful and very proud that I could do this myself. All the $$ I saved and I learned a ton. I might have forgot small details but you get the just.
Thanks to all of the others on here that have submitted info on this procedure.
The following 13 users liked this post by diggitydesigns:
alan924 (10-28-2014),
BlackJagX2005 (08-15-2016),
brag (10-08-2015),
clyons (08-17-2014),
gkubrak (02-17-2017),
and 8 others liked this post.
#72
08-14-2014, 03:12 AM
Junior Member

The following 3 users liked this post by diggitydesigns:
#73
10-27-2014, 02:19 PM
ok so i posted a few weeks ago about this topic. got a few helpful tips and a few snotty responses. in the end, heres what i can give back to anyone who read my original thread about changing the gasket cause they wanna save money and do it themselves. it is possible but read closely, and determine for your self what way you wanna go.
JAGUAR X-TYPE OIL PAN GASKET REPLACEMENT
While car is parked open hood and remove the following:
BATTERY AND BOX
open the battery box and remove the cover
remove battery holder bracket and nuts
hold the bolts for the bracket and pop away from battery box (pull straight away from battery box)
then slide them down, and out away from battery box
remove terminal wires, take out battery
unclip battery box sensor located on the back side of box in middle
remove the box by lifting up (be cautious of breather hose from stock battery. it is fed through the box underneath in two spots and goes up the outside the box nearest the water pump belt. this has to come out before the box. to do this slide breather hose down from the side first with a thin Philips head screwdriver. then feed it through the two bottom holes. box comes right out)
AIR FILTER AND BOX
remove air filter
unclip hose clamp from manifold to air intake tube (the bendy rubber part)
unclip maf sensor on side of air intake tube
remove top of air box, intake tube and maf as one unit
remove the two screws inside of air box
remove the two screws outside of air box that screw into the valve covers
remove the screw holding the charcoal filter to air box
holding the sides of r box lift straight up gently, you will feel a pop. this is a holder on the bottom of the air box that presses into a grommet. just pops in and out, to center the air box and better hold it
once popped out of grommet it slides straight up and off of air inlet tubes (the ones that stick out in front of radiator) this is a little tricky but its simple
TIRES
loosen lug nuts then jack up car
remove tires
RADIATOR SUPPORT BRACKET
remove access cover from both sides of inner wheel wells
Remove radiator splash shield (big black piece across whole front end)
drain coolant (drain plug on lower hose connector)
remove lower hose passenger side (remove clip and wiggle plastic piece away from holder)
remove upper hose to T style connector (top of thermostat housing) right side
remove hose from other side of T connector (remove the bolt from hose to wire harness bracket. remove clip and wiggle plastic away from holder)
remove aluminum hose to thermostat housing (starts next to oil filter, goes up to the T connecter and connects below thermostat housing)
remove the four bolts on each side of radiator support bracket (they are up above the bumper but three can be removed with socket and 8� extension, and get the fourth with a ratchet and deep socket with no extension on both sides)
remove black metal plate above air inlet tube (two screw connect to the air inlet tube)
remove inlet tube now that radiator can be slightly lowered without support bracket
COOLING FAN ASSEMBLY
underneath air box is a wiring harness bracket(it has that rubber grommet for the air box attached to it). its held on by two small nuts, remove them
remove the wiring harness from the plastic clips that are underneath the air intake tube and are now exposed
DON�T remove the clips from the bracket
reposition the whole bracket with wires attached on top of the valve cover(be careful, its not gonna go far, hook it on the screw that�s sticking up on the valve cover
disconnect the two wiring clips for the cooling fan located on drivers side of radiator in the module for fan
the cooling fan is held on by four holders on the radiator. to remove fan, lift up and slide out of all four connectors, move assembly towards motor and gently slide down and out of car through the underneath.
TAKE CAUTION!!!!!!! it is a very tight squeeze!! failure to use caution will ruin your radiator!!!
to prevent damage: slide a thin piece of cardboard between radiator and cooling fan assembly when removing the assembly, this will keep it from flattening you radiator ribs or punching a hole through it
OIL
drain oil, replace drain plug
remove oil filter
EXHAUST
directly after the exhaust manifolds on each side is a catalytic converter, coming off of that is a down tube, where the left side(front of car) meets the right side down tube. this 2-1 pipe connects to a flexible pipe that�s welded to the front muffler.
left side
start by removing the 2 nuts from where left down tube meets the right down tube
then remove the 2 bolts from the left catalytic converter to the bracket that is attached to the back of the oil pan(leave the bracket connected to the catalytic converter alone, the screw is probably rusted and might strip out if you try to remove)
remove the three bolts from the left catalyst heat shield. move heat shield forward s best as possible.
there are two 02 sensors, one on top sticking through the heat shield, and one on the lower side near the bracket. take the one out near the bracket, and unclip the one on top from underneath the battery box
remove the three bolts that hold catalyst to exhaust manifold(careful they strip out easy. it is best to use a socket with a star pattern the reverse of a torx bit on the top of the bolts and NOT remove the nuts. the bolts are secured into the catalyst and slide through the manifold then get the nuts put on)
remove left hand catalyst and down tube as one unit, as well as left heat shield)
right side
remove two nuts holding flexible muffler pipe to the right side down tube(Careful, rusted exhaust bolts like to snap off rather than unscrew)
looking at right side down tube from through wheel well, remove the bolt holding the heat shield it will be directly in front of right down tube, holding the heat shield to the cars sub-frame. this alows you to kinda bend it away
while its bent remove the nut from the right down tube clamp(it holds down tube to the catalyst) the bolt is directly behind the exhaust tube, kinda tricky to get. i had to cut the bolt down to get a short socket on it, and then it snapped anyway, so i fabricated a stainless one for reinstallation w/new bolt and nut
remove right hand down tube
BRACKETS / OTHER
looking at the engine oil pan you will see two brackets that will need to come off
start with the one holding the transfer case air scoop. it has to small bolts underneath the main shaft of the transfer case, remove them. then there is one bolt holding it to the oil pan, remove this.
remove bracket
the other bracket was attached to the left hand catalyst to get this one off you need to remove the oil pan to transmission retaining bolts. there is one on each side, remove them.
then you will see that one of the bolts holding transmission together holds bracket in place. CRACK this bolt loose about a 1/4 turn. DO NOT remove it. loosen enough to pivot bracket up and retighten with fingers. this will hold bracket out of the way.
remove the little black cover in the middle of the oil pan (drivers side) to access two of the bolts
remove the accessory drive belt. breaker bar works best. go in through the wheel well and pull down
if you don�t have a breaker bar, use a thin 3/8� drive ratchet set in reverse and slide a 12� length of metal pipe over it
remove two bottom bolts of A/C pump that connect to oil pan
loosen, DO NOT REMOVE the two upper bolts for the ac pump (these are bolted to a bracket for the generator and almost impossible to get back in)
slide A/C pump forward about an inch
if you take a close look at what�s in front of you now, you have clear access to 14 of the 15 bolts for the oil pan. you now have two choices, follow the rules of the hand books and manuals and proceed to drop the following: axles, left and right wheel knuckles, half shafts, steering gear bar, drive shaft, more of the exhaust, intake manifold, right hand catalyst, suspension, SUB-FRAME and other parts, just so you can take out the transfer case to get the last bolt of the oil pan out. OR....you can do what i did using tips from others to get the bolt out, and drill a hole in the casting of the transfer case mount, just enough to get a socket in there, and get the bolt out with out taking above mentioned items off.
ATTENTION: DOING THE FOLLOWING WILL VOID ANY SORT OF WARRANTY YOU HAVE THROUGH JAGUAR OR THROUGH OTHER DEALERSHIP
JAGUAR DOES NOT RECOMMEND THIS, AND NEVER WILL
the reason i did this is this, i have no warranty on my car, and i have a loan on it, so oil leaking from a gasket is not cool. i don�t feel like having my motor seize, and have to make payments on a car i cant drive. i know this was risky but i figured i have to give it a shot, worst case i would mess up my transfer case. rather than engine. if you have any sort of problem with doing this please i beg of you do not read on. i do not condone this on anyone but if it is your last (and pretty much only) resort, as it was mine, here is what i did i hope it might help some people.
OIL PAN
you will need: 3/4� hole saw with an adapter that also holds a 3/8� drill bit(for added accuracy with the pilot hoe drill bit)
a good low torque power drill
safety goggles
bright light
the first thing i did was flipped my new gasket upside down and traced the corner closest to the driver on to card board(the bolt you cant reach, and the ones nearest it). i then punched out holes where the bolts were. using this as a guide i held it to the bottom of my oil pan and centered the two bolts i could see, and marked on the transfer case mount where the bolt is-directly above in relevance that you cant see.
remove the transfer case bolt from the mount you are about drill through, it will be set back in later.
wear safety goggles when drilling.
drill slowly, keeping great tension on the drill.
ALUMINUM CRACKS EASILY, go slow. focus on getting it drilled straight and in line with bolt.
keep in mind: if you don�t drill straight on, you may not be able to get the bolt back in.
look from all angles before drilling. you only get one chance at this, take your time and do it right. if you get it good, you will still have material on the front side of mount, and not puncture through transfer case side wall and spill its oil out; ruining it.
once this is done vacuum up metal shavings, they fly everywhere(hence the safety goggles)
if you did it right, congratulations, you now have access to all 15 oil pan bolts
remove the bolts from oil pan
right next to where you drilled you will see a slot in the casting on the oil pan that goes around the mount you just drilled through. use a screwdriver under there and pry oil pan loose.
DO NOT STICK ANYTHING BETWEEN OIL PAN AND BLOCK MATING SURFACES AND PRY.
THIS WILL DAMAGE MATING SURFACES!!!!
carefully lower the oil pan, which is a little tricky, because so many other things were skipped, but very possible
the rest is simple, clean off any old gasket material, and remove old metal gasket
use a brand new oil pan gasket, the metal kind with the rubber inlay for best results
i used ultra gray gasket sealer for transmissions, it is sensor safe, higher oil resistance and is designed for high torque applications, as the x-type is 10.5-1 compression ratio.
getting the pan back on is a little tricky but before you glue it all up, give it a few dry test runs and see how to rotate pan to get it to seat right, makes it a little easier.
once all back together, new gasket and sealer, all bolts are in and torque them down (25 NM by the way) install the transfer case bolt you took out
install everything in reverse of removal; and you have fresh oil pan gasket at your hose for a cheap price.
my cost:
parts:
oil and filter $30 castrol syntec 5w-30 mobile1 filter
oil pan gasket $ 35 shipped partsgeek.com
gasket sealer $8 ultra gray
radiator fluid $15 dex-cool
bolts/nuts $20 (mostly exhaust bolts that broke, and one oil pan bolt)
drill bits $35
tools $100 (i had to stock up on a bunch of stuff anyway)
total: $242 not bad, i spent more than this but i didn�t list personal costs like 20 bucks to fill the propane tank for my heater, 5 bucks for my new shop light etc...
any way you can reuse fluid if you want, its your choice, i went with new.
with out buying any tools that�s that more saved money
hope this helps someone cause it saved me hundreds of dollars on labor charges. good luck to all and please remember, i am here for help and support from other x owners, and hope to help someone else out. i dont wish to offend any one with this, so if it angers you i apologize in advance, but to my testament i told you not to read on....
STEVIS05
#74
11-25-2014, 10:07 PM

The following users liked this post:
diggitydesigns (02-10-2015)
#75
11-25-2014, 10:16 PM
#78
05-21-2016, 10:51 PM

Senior Member
!st-Tomgee111, you need the wrench size 13mm, not 10mm. 2nd-I made the wrench from the 13mm Z box wrench, used the torch and vise to straight up the handle to made the box and the handle about a little more than 90 degrees, measure the deep of oil pan from the bolt head to the bottom of oil pan then bent the handle about 90 degrees opposite with the head of box wrench, finally I can loosen the bolt out, but the bolt is too long I can't take it out, and the space is too tight, can any one tell me how to cut off the bolt head? I end up have to drilled the hole in the TC bracket, and now the oil pan is of and clean like new oil pan.
#79
08-15-2016, 09:57 AM

Junior Member
Thanks to all the brave soles and innovators for all your helpful tips (especially Diggity). I dove in and followed Diggity's suggestions as I deemed it impossible to reinsert the "ubotanium" bolt if I even got it out. Its a bitch but its doable. One tip is to cut a step drill down with an angle grinder cutoff wheel leaving only the 5/8" back to 3/4" so you can do your final hole pass. A 3/4" boring is more than enough for a 1/4" 13mm deep well socket to gain access to the "ubotanium" bolt. After doing it I was relieved to see there is still more than ample material for structural integrity of the transfer case mount. If you follow Diggity's photo for the placement of the pilot hole it hits the bolt dead center. My final tip is to have access to an air chisel/hammer to drive the exhaust elbow flange back from its seat. Without it I couldn't have disconnected the elbow (tried for over an hour with heat, penetrant and brass hammer - finally remembering my air chisel - duh). No metal needs to be removed from the pan. The oil pickup is difficult and must be removed to remove pan. Refasten tube loosely so you can remount front bracket nut. I didn't use sealant as my block kept getting oil seepage on flange although in hindsight I would but a bead in the two locations highlighted with circles as there is a manufacturing seam in these locations. Use a torque wrench to do the final gasket seating so as not to defeat the gaskets design.
Anyway its not leaking (used a Felpro gasket). Cost me $22 and 10 hours. Would only take about 4 moving forward as I now know the secrets.
Anyway its not leaking (used a Felpro gasket). Cost me $22 and 10 hours. Would only take about 4 moving forward as I now know the secrets.