
Replace knock sensor and spark plugs project with pics (as requested) HOW TO
#1
 10-30-2011, 09:24 PM


Symptoms: Car was in limp home mode (refuses to go above 3,000 RPM, jutters if you try) and engine light was on (P0333 knock sensor "bad"). Let me add that the knock sensor MUST be replaced. I tried simply disconnecting it, connecting the wires, etc. but nothing helped. Do yourself a favor and replace it if you get this error code and are around 100,000 miles. I am at 103,000 miles.
EDIT: Adding the parts that I purchased and where:
-Knock sensor: Motor Products KS305 Knock Sensor ($39 shipped, eBay)
-Upper plenum gaskets: Fel-Pro Ms96494 Plenum Gasket Set ($11.31, Amazon)
-Lower plenum gaskets: Fel-Pro MS96485 Intake Manifold Gasket Set ($16.47, Amazon)
-Spark plugs: Autolite Double Platinum APP605 ($3-$4 each)
Note that the X-Type 3.0L and 2.5L gaskets are the same.
Alright, so here we go. Spent pretty much all day yesterday working on this, but it was worth it. Here's what I did:
-Replaced spark plugs
-Replaced upper and lower plenum gaskets (intake manifold gaskets)
-Replaced knock sensor
Here's how I did it:
1. Disconnect battery, drain coolant (must remove plastic shield under front bumper and then open coolant drain plug) (this pic is from another user)

2. Removed plastic engine cover and air box cover. To remove the lower portion of the airbox, of course remove the two screws at the bottom first then you must pull upward with a lot of force. It should pop-out. (pic 2)

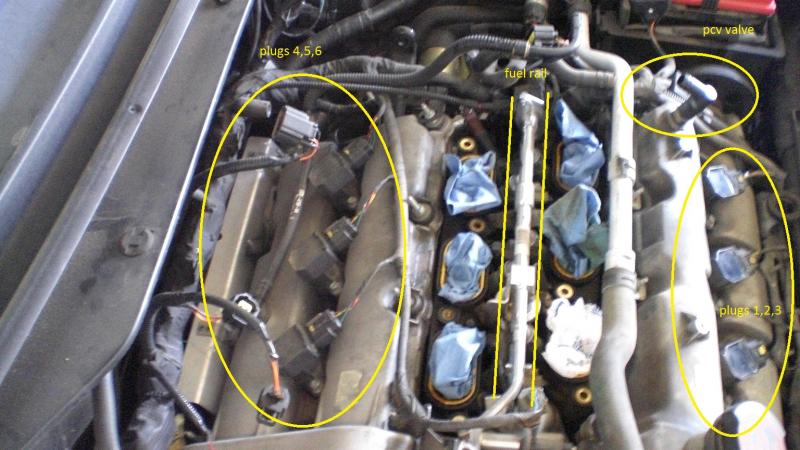
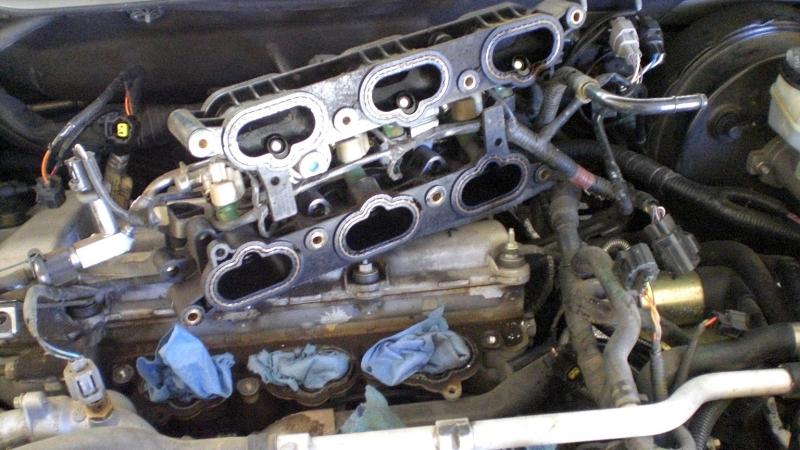
3. Remove upper manifold (must remove vacuum tubes, electrical connections, etc.) There are 4 bolts on the top half of the manifold (3 in back, on on side) and six bolts on the lower portion that connects to the lower manifold.
Important: From here on out, always have rags inserted in the manifold holes. Anything falling in there will go right into your piston valves and you will be screwed.
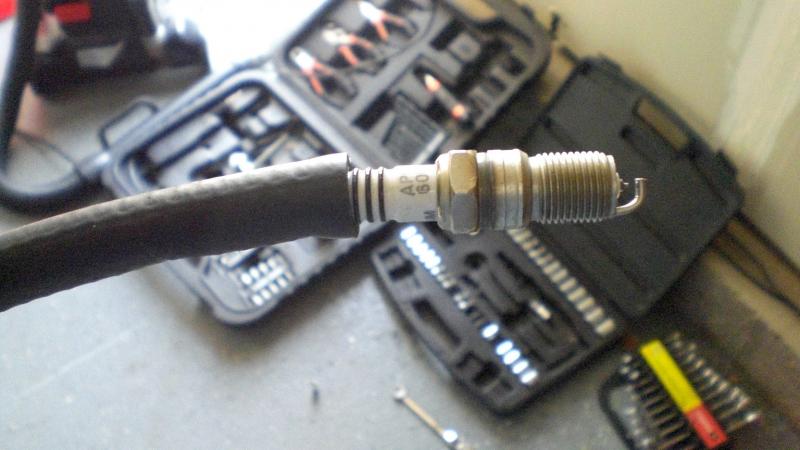
4. All six coil plugs/spark plugs are exposed at this point. I removed each coil (1 bolt each) and used the spark plug socket (rubber washer inserted) to removed each spark plug. See pics of old vs. new plugs. Yikes.
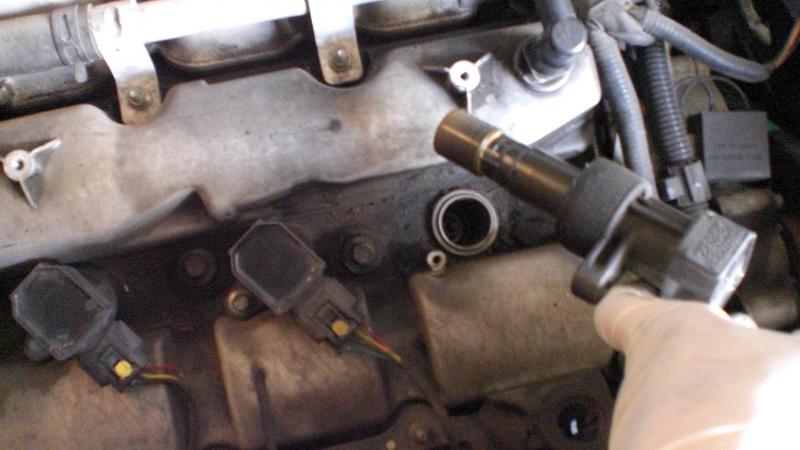


5. Used six inches of 1/2" fuel line to install plugs. I applied a thin layer of anti-seize compound on the threads of each plug before installing them. Just hand tighten until the hose comes loose and then finish later with the socket (rubber washer removed).
6. To remove the lower manifold, I simply took out the 4 main bolts and the 6-8 fuel rail bolts. The allowed me to just fold the upper manifold and fule rail up and out of the way (pic 9). Be sure to move and re-plug the exposed holes.
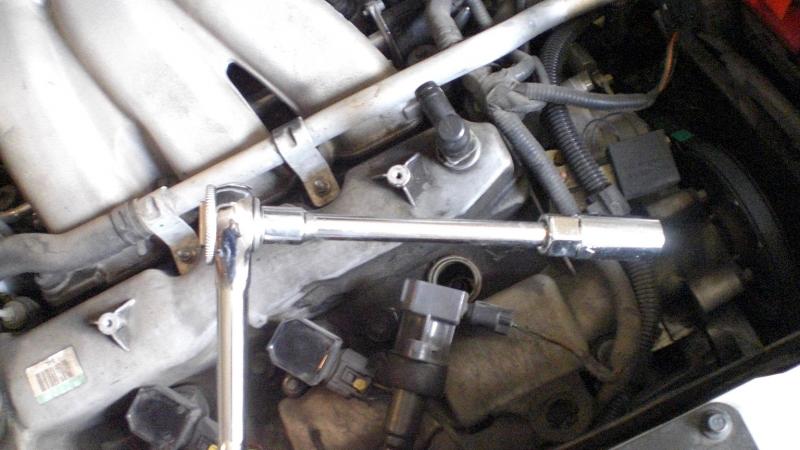
7. As everyone may know, getting to the knock sensor still involves removing a pipe that connects the water pump to the engine block. This comes out, but you are left with an elbow with one bolt that is easy to remove and one that is nearly impossible. I used an angle wrench, crows foot sockets, but nothing would budge it. Well, I had a stroke of genius that I hope doesn't come back to bite me. I used a pry bar to simply push the inlet pipe up enough to get at the knock sensor. (pic12)

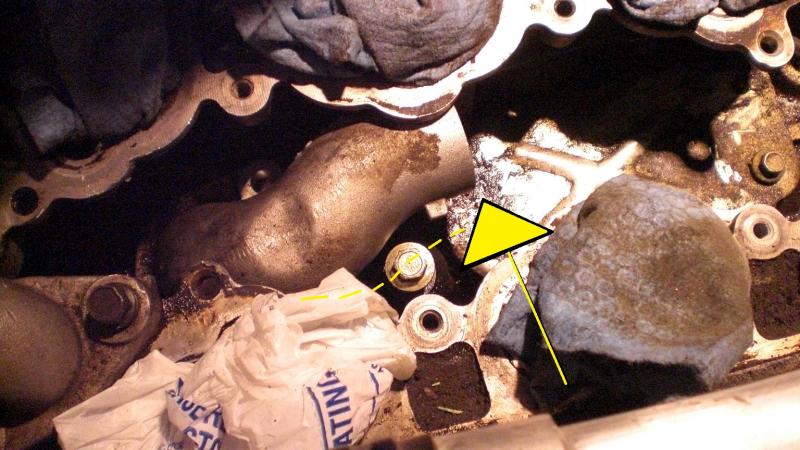
8. I removed the old knock sensor, installing the new one and tightening it (tight but not too tight, don't use a huge lever on this one). At this point I used the same pry bar to slide the angle inlet back into line and replaced the first and only bolt that I could take out.
9. At this point, use a big scotch brite pad to scrub everything clean. All manifold surfaces (upper and lower) and see how clean and bright it all looks after. (pic13) Be sure to replace all gaskets at this point if you haven't already as well.


10. Only advice I can offer when reassembling is to take it slow and ensure that every plug, bolt, and tube is in it's place. This part is exciting, so don't rush it and you won't find yourself having to take everything back apart again to catch something you missed.
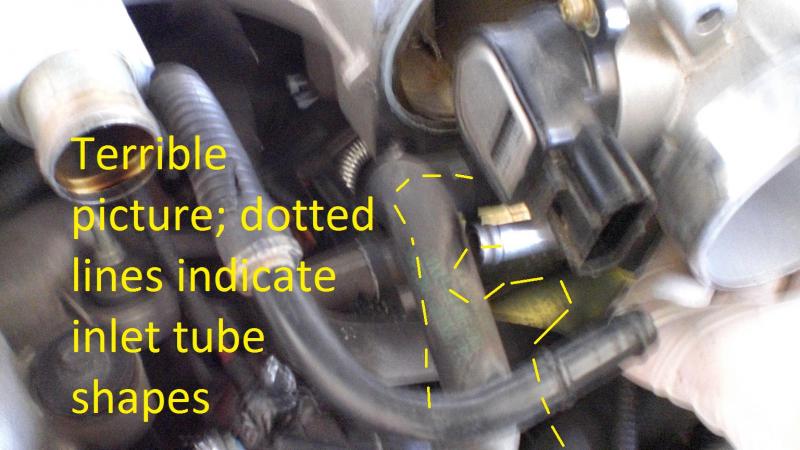
Important: Take a good pic beforehand of the throttle body and the two coolant inlets so you know exactly how to hook them back up. Put them backwards and you'll most likely kill it quickly.
11. After everything is back together, be sure to put the coolant back in. It seems to fill just fine so don't really worry about air inside. Good advice would also be (before starting the car) to turning the key to the on position to let everything activate and reset.
At this point I started the car and it started right up. Took it out slow at first, but once the engine was warm I gave it some gas and was able to easily get above 3,000 rpm. Car runs smooth and feels solid. As expected, after starting the car 5 times, the check engine light went off.
All in all, this was a pretty big job for me but I'm happy I got in and did some maintenance and replaced some gaskets and plugs that potentially have never been replaced. I'll also be watching for any coolant leaks in the event that I damaged the gasket on that elbow, but so far so good. Please post or PM with any comments questions and I'll be happy to help. I hope this helps to give back to the great X-type community that has given me so much help!
EDIT: Adding the parts that I purchased and where:
-Knock sensor: Motor Products KS305 Knock Sensor ($39 shipped, eBay)
-Upper plenum gaskets: Fel-Pro Ms96494 Plenum Gasket Set ($11.31, Amazon)
-Lower plenum gaskets: Fel-Pro MS96485 Intake Manifold Gasket Set ($16.47, Amazon)
-Spark plugs: Autolite Double Platinum APP605 ($3-$4 each)
Note that the X-Type 3.0L and 2.5L gaskets are the same.
Alright, so here we go. Spent pretty much all day yesterday working on this, but it was worth it. Here's what I did:
-Replaced spark plugs
-Replaced upper and lower plenum gaskets (intake manifold gaskets)
-Replaced knock sensor
Here's how I did it:
1. Disconnect battery, drain coolant (must remove plastic shield under front bumper and then open coolant drain plug) (this pic is from another user)
2. Removed plastic engine cover and air box cover. To remove the lower portion of the airbox, of course remove the two screws at the bottom first then you must pull upward with a lot of force. It should pop-out. (pic 2)
3. Remove upper manifold (must remove vacuum tubes, electrical connections, etc.) There are 4 bolts on the top half of the manifold (3 in back, on on side) and six bolts on the lower portion that connects to the lower manifold.
Important: From here on out, always have rags inserted in the manifold holes. Anything falling in there will go right into your piston valves and you will be screwed.
4. All six coil plugs/spark plugs are exposed at this point. I removed each coil (1 bolt each) and used the spark plug socket (rubber washer inserted) to removed each spark plug. See pics of old vs. new plugs. Yikes.
5. Used six inches of 1/2" fuel line to install plugs. I applied a thin layer of anti-seize compound on the threads of each plug before installing them. Just hand tighten until the hose comes loose and then finish later with the socket (rubber washer removed).
6. To remove the lower manifold, I simply took out the 4 main bolts and the 6-8 fuel rail bolts. The allowed me to just fold the upper manifold and fule rail up and out of the way (pic 9). Be sure to move and re-plug the exposed holes.
7. As everyone may know, getting to the knock sensor still involves removing a pipe that connects the water pump to the engine block. This comes out, but you are left with an elbow with one bolt that is easy to remove and one that is nearly impossible. I used an angle wrench, crows foot sockets, but nothing would budge it. Well, I had a stroke of genius that I hope doesn't come back to bite me. I used a pry bar to simply push the inlet pipe up enough to get at the knock sensor. (pic12)
8. I removed the old knock sensor, installing the new one and tightening it (tight but not too tight, don't use a huge lever on this one). At this point I used the same pry bar to slide the angle inlet back into line and replaced the first and only bolt that I could take out.
9. At this point, use a big scotch brite pad to scrub everything clean. All manifold surfaces (upper and lower) and see how clean and bright it all looks after. (pic13) Be sure to replace all gaskets at this point if you haven't already as well.
10. Only advice I can offer when reassembling is to take it slow and ensure that every plug, bolt, and tube is in it's place. This part is exciting, so don't rush it and you won't find yourself having to take everything back apart again to catch something you missed.
Important: Take a good pic beforehand of the throttle body and the two coolant inlets so you know exactly how to hook them back up. Put them backwards and you'll most likely kill it quickly.
11. After everything is back together, be sure to put the coolant back in. It seems to fill just fine so don't really worry about air inside. Good advice would also be (before starting the car) to turning the key to the on position to let everything activate and reset.
At this point I started the car and it started right up. Took it out slow at first, but once the engine was warm I gave it some gas and was able to easily get above 3,000 rpm. Car runs smooth and feels solid. As expected, after starting the car 5 times, the check engine light went off.
All in all, this was a pretty big job for me but I'm happy I got in and did some maintenance and replaced some gaskets and plugs that potentially have never been replaced. I'll also be watching for any coolant leaks in the event that I damaged the gasket on that elbow, but so far so good. Please post or PM with any comments questions and I'll be happy to help. I hope this helps to give back to the great X-type community that has given me so much help!
Last edited by blaydes99; 10-31-2011 at 04:07 PM. Reason: expanded images
#2
10-30-2011, 09:37 PM
Veteran Member
Blaydes, great wite up. You seem to be missing pics. As I was reading, I wanted to expand the images to full size for easier DIY.
Post the pics up and I will edit for you. Or after attaching all images, click "preview post" click an image (that opens in another window). right click "copy" go back to preview page and right click "paste" where you want the image to appear in your post.
Thank you for taking the time to share the DIY w/pics. It will be FAQ'd after the images are loaded.
#3
10-30-2011, 09:40 PM
The following users liked this post:
geewilicurs (01-23-2016)
#5
10-31-2011, 06:08 AM

Join Date: Oct 2007
Location: PHX some of the time
Posts: 116,739
Received 6,250 Likes
on
5,450 Posts

#7
10-31-2011, 01:41 PM
My thoughts on the pry bar and inlet pipe is that the gasket will be fine. Essentially you're only moving the thing about 1/2" off center then back, and I noticed that the bolt actually rotated with the inlet pipe when I moved it. The gasket in the other end of the pipe that I did remove (the elbow that connects to the water pump) is REALLY robust and very thick, so I feel confident that it will keep a good seal.
The following 2 users liked this post by blaydes99:
geewilicurs (01-23-2016),
Spikepaga (06-12-2013)
Trending Topics

#9
11-01-2011, 10:34 AM
The following users liked this post:
geewilicurs (01-23-2016)
#11
11-02-2011, 10:39 PM

Junior Member
#12
11-03-2011, 01:56 PM
I've been living here for several years (working full-time) but I'm originally from Arizona. I live in Utah County. PM me if you get stuck and I'll try to offer some advice.
Last edited by blaydes99; 11-07-2011 at 07:16 PM.
#14
11-17-2011, 08:48 AM

Junior Member
#15
11-17-2011, 09:00 AM
Veteran Member
Join Date: Nov 2006
Location: Glasgow, Scotland UK
Posts: 47,303
Received 9,005 Likes
on
4,113 Posts

#17
11-18-2011, 10:17 AM
Look at the pic that has the dotted yellow line and the yellow arrow that shows how I pushed the pipe out of the way. The knock sensor is held by that bolt that the dotted line crosses over, which should explain also why you need to move the pipe to get at the bolt and get the sensor out. Make sense?

