When you click on links to various merchants on this site and make a purchase, this can result in this site earning a commission. Affiliate programs and affiliations include, but are not limited to, the eBay Partner Network.
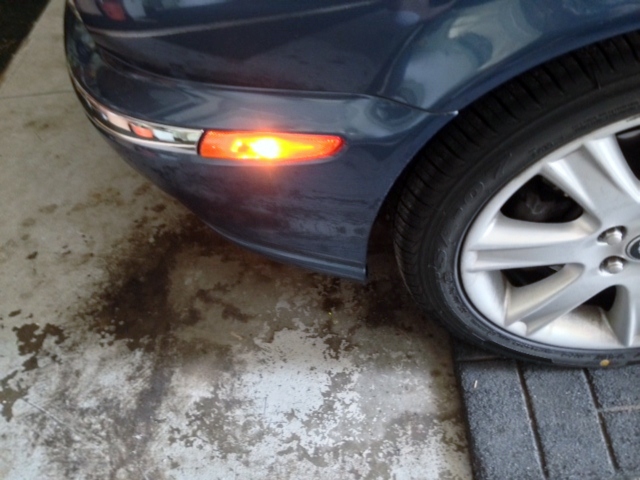
JC: Side marker lights (yellow on front fenders; red on rear fenders) snap into a hole in the fender and are held in place by a metal spring clip on the slender end of the light. Gently pry the slender end away from the fender to release the clip, and change the bulb from the backside of the light.
One caveat: Replacement bulbs are sold in various wattages. Don't be tempted to increase the wattage, or you could melt the backside of the plastic marker light.
If only someone had warned the prior owner of my X-Type!
I did first try the ones from auto zone which were 10 times the price and half as bright.
due to the 15 volts at start up our cars push out these led`s last about 10-12 months but for the price I wont complain. (may just pop a zener diode and resistor in the circuit to help with this at some point)
I highly recommend some dielectric grease on the socket also.
JC: Yes, 5 watt W5W bulbs for the side marker lights. Or LED equivalents, per Paul's suggestion.
The bulb specs are in the workshop manual, exterior lighting section, page 2176. Download a free pdf copy from the How To / Quick Links, at the bottom of this page: https://www.jaguarforums.com/forum/x...essories-5915/
jc, here is an alternate method for removing the side marker light. Take a wood stick (or a flat blade screw driver with masking tape over the end to prevent scratching your car) and place the flat edge against the wide end of the marker light (end opposite the point). Slide the wood stick towards the point about an 1/8" or so. While still apply pressure, slowly pull the stick towards you. This should allow the retaining hook to clear the bumper cover and come out. Once the hook is clear, you can ease off on the pressure and remove the light housing.
Putting it back in is simply sliding the light assembly into the opening, pushing the hook end of the light assembly back against the bumper cover till it is hooked and then pushing the pointy end against the bumper cover.
JC: The Table of Contents in the Workshop Manual has many words that are underlined. These are actually links to the pages. Move your cursor to the underlined words and the arrow changes to a hand. Now click on the underlined word and Adobe will take you to the page on that topic.
Also, click on the bookmark ribbon, 2nd icon from the top on the left side. It opens the table of contents, which again are links you can click to go to that section.
Another trip: Hold the CNTL +F keys to activate Window's Find function. Now you can search for key words in the text - see the Find tool in the top right of the screen shot below.
JC: For the non-working sidelight, I'm no expert on X-Type wiring as some forum members clearly are! But if you have a multimeter (if not, this is a good excuse to buy one), test the plug in the back of the sidelight to see if it's supplying ~12 volts and a good ground.
Set the multimeter to read ~20 DC volts. Remove the troublesome sidelight and unplug it, then turn on all sidelights with the dashboard switch (no need to start the engine). Simultaneously touch the two leads of the multimeter to the two metal contacts in the plug. If it reads 11-12 volts, then try another bulb, or swap the bulb and socket with a working sidelight to isolate the non-working part.
If the plug is not supplying ~12 volts, then try removing some screws holding the black plastic air dam under the front bumper and "swim upstream", looking for the "break" in the 12 volt supply of ground to that sidelight. Let us know what you find. One of the wiring experts (again, not me), will provide more insight.
Check fuse F48 under the hood which also powers the parking light for that side.
the power comes from a large plug located just in front of the Drivers side (US)
front wheel just above above the fog light. pin 5 then runs inside the bumper to the other side.
Even though you posted your message in 2008, I used it last night. On Saturday, in Columbus, Ohio I had my Jaguar X-Type judged at an event. I thought that the side markers were reflectors only. Turns out they should be on when lights are on. Thank you for your tip on how to remove the socket from the reflector/lens. It took awhile, but then I found out that for some reason (Oh, right, it is a Jaguar) on the socket there is a narrow tab thing and a wide tab thing that must be lined up to the openings on the lens. Personally, I am glad that there are blubs in there, because they look "hot" when on! Thanks, again.
Bill, not a problem. I would have loved to have owned a Jag before then, but it wasn't to be. As life goes on though, gotta move up and onward. I wonder what the next Jag after Jackie will be? he he he he. Granted, if I can get this side job I am after, I think there is going to be a lot of interesting mods going on as I will be getting a lot of parts at cost and various work done at a greatly reduced price. We will see. Got a feeling that job is going to be done just to pay for the pieces that I am wanting. He he he he he.
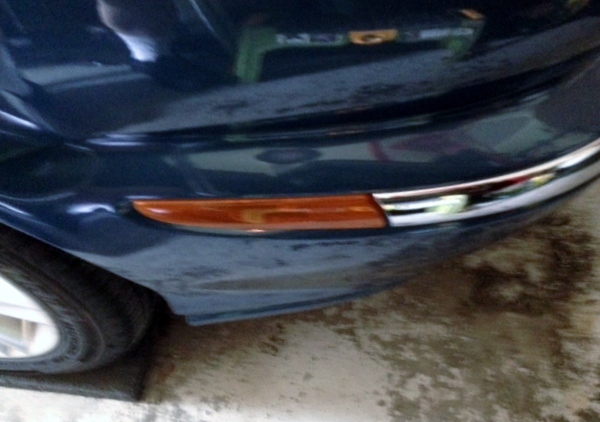
I know this an older thread but I am learning about my side markers and this was helpful to me. I am having a problem with my left side side marker staying in the opening. The light bulb works fine but the assembly fits very loosely. My part looks like the one pictured in post #2 above and has the metal clip on pointed end and plastic tab on wide end. But when I reset it in the opening I don't get the concept of what this light assembly should be grabbing onto to stay secure in the opening. Should the metal clip spring past something inside the body panel and fit snugly? Perhaps I am missing something behind the fender panel?


 05-14-2015, 11:30 PM