When you click on links to various merchants on this site and make a purchase, this can result in this site earning a commission. Affiliate programs and affiliations include, but are not limited to, the eBay Partner Network.
hey VZRod639 - you will appreciate this...my wife got my hood release open...i was hemming and hawing about it, and she grabbed the screwed driver...spent an hour and got it...it is tricky...but like they say once you get it...it will be much easier next time...so i did follow what everyone said, the only difference is with mine the cable just came loose from the connector on the release so i crimped the metal connector where the ball goes on the release so that it would never come disconnected again...here are a bunch of pics which help put the job in a different perspective...
I just used the insrucions in this thread to open my hood after finding out my passenger side latch was not working when I tried to check my oil and fluids. It took some time but it worked. I tend to try and rush things and take shortcuts so I thought I would let everyone know of a BIG mistake.
I figured, "Why disconnect he battery cable? Everyone always says diconnect the batteryfor no reason!" Well I found out why today. As I as poking the screw driver through the hole fishing for the latch, I noticed the screw driver felt hot. When I looked up under at it, I noticed the metal piece was glowing orange! Smoke was coming from inside the hole. Lesson learned....I went back to step one, and disconnected the battery.
hey VZRod639 - you will appreciate this...my wife got my hood release open...i was hemming and hawing about it, and she grabbed the screwed driver...spent an hour and got it...it is tricky...but like they say once you get it...it will be much easier next time...so i did follow what everyone said, the only difference is with mine the cable just came loose from the connector on the release so i crimped the metal connector where the ball goes on the release so that it would never come disconnected again...here are a bunch of pics which help put the job in a different perspective...
How cunning on the part of Jaguar engineer-beancounters. Seems they found another place to use plastic. A metal plate with sideways impact held onto a plastic anchor. What could possibly go wrong?
Guess it's time to get in there before the problem occurs and tweak the cable retainer at the very least.
Mical:
There are pictures in this thread that show what the descriptio is saying, so exactly what do you need help with? I have never done the procedure myself, but I am happy to try and help!
OK ALL YOU NEED IS A flat head screwdriver and PLIERS.
first you will need to remove the inner liner use the pliers to pop out the pins,
now the picture I have of the side of the car i have showing is where your aiming at.once you remove the liner
the next set of pictures is once your under the fender....i didnt remove the wheel I just turn the steering wheel all the way to the right.."trust me its easy" now where I have circled you need to pry the putty and sheet metal it will open just take your time open with a screwdriver you need to open the gap so you can have enough leverage to reach in and pop the latch.. now to pop the latch you will need to pop it by unlocking by making the latch go towards the rear of the car (if you use a hanger youll find exactly where the spring is i found it easer to fish around that way rather than busting up my hands)
once you find the spring you are there..now use the flat head and to pop the latch like i described it before it will take a few times but you will get..
after you do it once you will do it every time its that easy.
replace cables and your golden!
Originally Posted by micalsjag
Can any one please email me the pics related to this post...having very hard time with this...all help is truly appreciated
Not sure how this worksbut I wanted to Thai mr.jimmy. Hood bonnet donehe was very helpful and responded to my many off JF emails. I honestly would have not gotten this done with out our help Jimmy
having found appropriate access ports.I inserted a suitablely sized screwdriver,and then poked,proded,twisted,dug,grunted,muttered,and made up new words,but the hood is up!!!!
Thanks for this -- it worked great for my 2001 XJ8, but I have three recommendations to add.
(1) no need to remove wheel (at least on passanger side -- that's the one I did) -- just turn wheel all the way right and there is enough room, unless your drill and bit are too long to fit (mine just did)
(2) VERY IMPORTANT: I used a 1" hole saw with a pilot bit that stuck out about a half inch, and when I got the hood open I saw that the bit had sideswiped and frayed the electrical harness/cable that runs along that side (the passenger side) of the engine compartment. Thanks be to God, it did not cut any of the wires, but it was awfully close. I suggest not going deeper than 1/4" past the sheet metal with any bit; better off using a normal 3/8 or 1/2 bit, than a hole saw that needs a pilot bit, and also don't go any closer to the side of the engine compartment than necessary. Both sides have cables or hoses that pass right above where you drill the hole.
(3) I used an interior trim tool that had a sort of forked end to remove the pop fasteners that hold the wheel well shield on; worked a lot faster and easier than pliers or a screwdriver.
Good luck! I certainly had it.
Originally Posted by sparkenzap
Advice? About what? It would be hard to tell you what to do, but if you want to open it yourself, here is a step by step. This comes from someone else, and I am sorry I cannot give credit because I do not remember whio wrote it.
Bonnet Latch Procedure
Jaguar XJ8 1998 � 2003.
This document only covers a procedure to manually activate the Bonnet Latches if the interior bonnet lever does not allow the bonnet of the vehicle to pop up on the rear corners of the bonnet.
DO NOT CLOSE THE BONNET UNTIL PROPER OPERATION IS VERIFIED
This procedure does not cover integrity of the interior bonnet lever, condition of the driver side or passengers cables, and the latch mechanisms. After the bonnet is opened inspect the cable connection to the bonnet latch mechanism to ensure the end of the cable is properly attached to the latch trigger. Be sure to observe that each latch is operating properly each time the interior bonnet lever is pulled and released.
Several situations can exist:
1. Driver and passenger Bonnet Latches will not open.
(This could also be a problem with the inside Bonnet Lever or cable connection)
2. Driver side Bonnet Latch will not open but Passenger side operates.
3. Passenger side Bonnet Latch will not open but Drivers side operates.
Always have the interior Bonnet Lever pulled out when using the procedures outlined.
The pressure from the side that is operating properly will generally assist in releasing the stuck latch once you trip the stuck latch
To manually open the Driver side Bonnet Latch:
If both latches are stuck always open the driver side first
- Remove the Driver side wheel
- Remove the �push in� fasteners for the plastic wheel well shield.
- As a reference locate the fastener hole that is about at 1 O�Clock
- Measure about 1 � inches from this fastener toward the rear of the wheel well.
- Drill a hole � - � hole (The metal is thin so do not put a lot of pressure as you drill)
- Use a rigid tool with about a 5 inch reach and no more than 5/16 inch diameter (a screw driver or metal rod)
- Keep the tool used about parallel with the ground / upper fender edge and probe with the tool pushing toward the windshield until you feel something move a little. Then Push, it should move about � inch may be more.
- The Driver side should pop up
To manually open the Passenger side Bonnet Latch:
If both latches are stuck always open the driver side first
- Disconnect the Negative Terminal / Ground on your battery ( you will be drilling in proximity of the front 12V connection and the ECM/Electronic modules)
- Remove the Passenger side wheel
- Remove the �push in� fasteners for the plastic wheel well shield.
- As a reference locate the Fastener hole that is about at 11 O�Clock
- Measure about 1 � inches from this fastener toward the rear of the wheel well.
- Drill a hole � - � hole (The metal is thin so do not put a lot of pressure as you drill)
- Use a rigid tool with about a 5 inch reach and no more than 5/16 inch diameter (a screw driver or metal rod)
- Keep the tool used about parallel with the ground / upper fender edge and probe with the tool pushing toward the windshield until you feel something move a little. Then push, it should move about � inch may be more.
- The Passenger side should pop up
Using the past threads I tried for 5 or 6 hours to pop the hood with no luck.
Bought a digital inspection camera, applied pressure on the hood to take the pressure off, and with the camera and a long steel rod had it open inside of 15 minutes. I now have a new tool which was worth the $138 I paid for it.
I had the same problem, that is how I found forum
the pictures posted are good, but I made my own hole a little bit lower and a little bit left so I could use one to see-yes drill a couple 3/8 holes there- another to follow- forget it- eveyone wants to push UP...but no- it is almost a straight sideways shot with a screwdriver not THAT FAR IN !!! think outside the box- took me 10 min. Once you get it open you will be amazed !!!!! Then you will take the 2 torks screws out of latch and throw them far, far, far, away.
Just kidding, cable probably came off, do yourself a favor now and clean ( really clean-parts washer clean ) the latch- AND replace the cable - unless it is because you left a tool underneath like some other dumbass I know-lol- AND add a tie wrap around it.
congratulations- add some silicone sealer or a body plug, replace the brake pads while tire is off ( you KNOW you need them ) have a happy life - cat be with you !
Had same problem, drilled mutliple holes, used snake camera all to no avail
Had two bodyshop guys comeover and they were stumped.
Removed the hood and pin was still stuck, finally, held hood up in air while one of us banged on the spring with a large screw driver and hammer.
Finally, it came loose. A piece of plastic had broken off the latch and jammed intself in there.
Caused by idiots slamming hood whille closing it.
Had to move the hood around to many positions before it turned loose.
Men, I have read these posts and thanks. Here is my experience from today.
1) wheel removal is required.
2) pull the plastic pins holding the wheel liner, at the bottom of the liner there is a metal fastener with squared sides and a triangular void for a special tool (like a phillips or star), I pried the wheel liner off and pulled 4 pins 10, 11, 12 oclock. The pins should be pulled with a plier leaving the expansion part free. I broke the first one so I could see how they worked. replacement pins are readily available. When reassembling the liner I forced the it back over the triangular fastener. Not the way it was engineered but it worked.
3) When the liner is removed there is an engineered hole at 11oclock. You have to drive a screw diver up perpendicular to the ground. fiddle around and the catch will release.
4) My cable end is broken. There is a stand off rubber thing that holds tension. I need a new one. however I put electrical tape on the cable end and jammed it into the "cradle" and it is working fine.
5) This is a simple repair, and you will see if you follow my advice here. Maybe 30min?
now the explanation above does help..but like most individuals such as myself ..I need to visualize what I am searching for...**ATTENTION DISCONNECT BATTERY FIRST!**
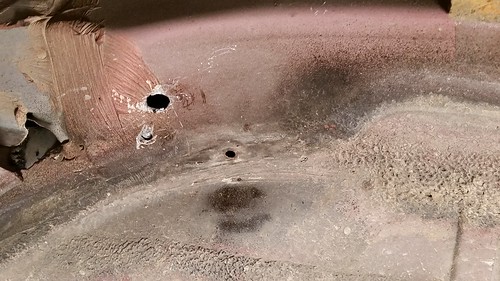
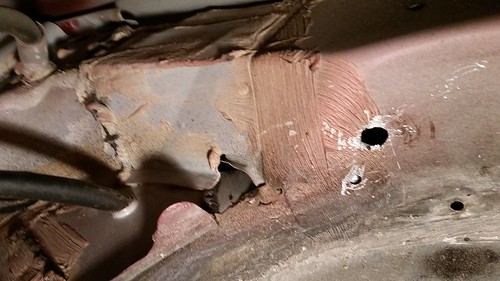
Ok 1st pic is me pointing in the general area that your going to be focusing on once you pull back the liner.
if you search around you will notice a seam of some sort.i used a long screwdriver to help with this project.
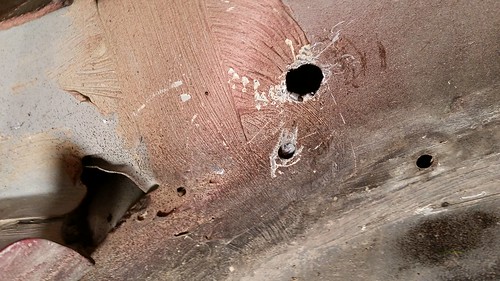
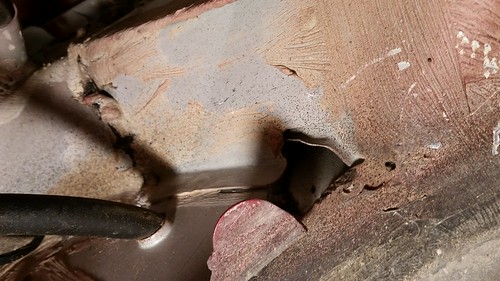
in the 2nd pic you notice a opening ....Now that is where the screw driver will end up being once your pry yourself threw.
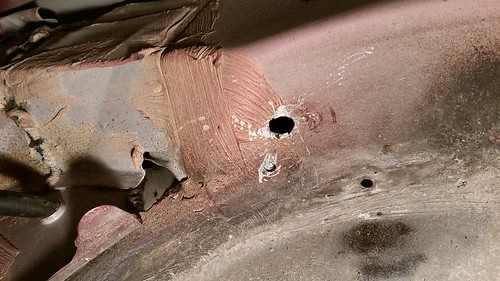
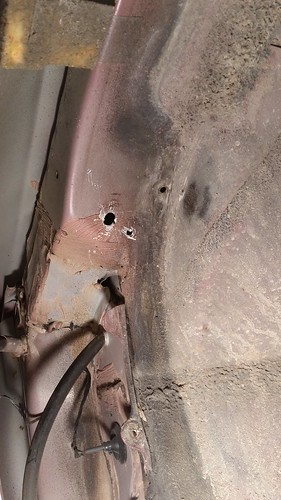
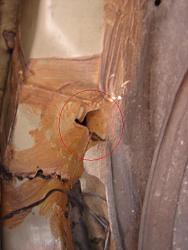
now the 3rd pic kinda just shows what exactly you be doing once your fishing around..you wanna pull it toward the cabin..give it a few tries and youll get it good luck to my fellow JF friends.
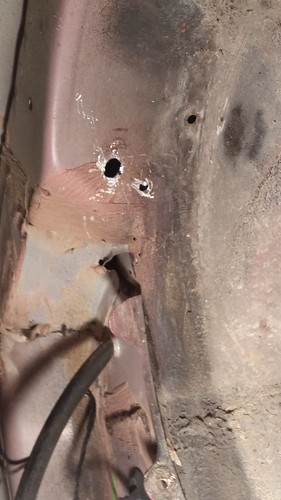
*** update on the last photo i just uploaded you notice a opening in the body ladies and gents that's your sweet spot once you get in past the prying/drilling of the sheet metal.....
i put this on so you have a visual of where you would be sticking your screw driver when poking around " notice the lever "***
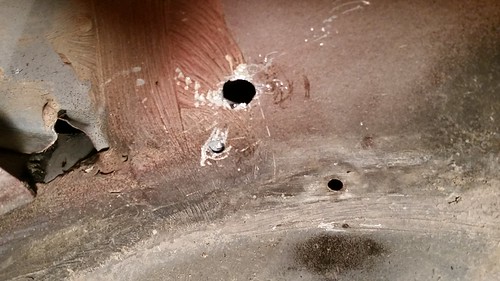
i put 2 more pics up but the one from underneath is where you pry through...just work it enough to get a screw driver in.be nice to your cat..
THIS WILL HELP DO NOT GO TO A DEALER OR SOME JOE-SHMO!! SAVE YOUR SELF MUCHO $$$$$$...ITS VERY EASY!! JUST be sure to thank me on JF it makes me feel good i helped a poor soul out plus i believe in karma !... good luck!
The 3rd pick looks like you have the apparatus resting on top for you to work on it ( the zip tie/tape). How did you get it detached to work on it?
jimmycruz99xjr seems to be able to do this without drilling holes and others have had to drill holes to get this done. Which have most of you had to do drill holes or not drill holes?
I had to do this a few weeks ago and I did NOT have to drill a hole. It does take some time and patience to get it. I read all the posts about where and how to poke and prod and after about 20 minutes of fiddling it finally popped open. I used a 8 inch phillips screw driver and a flashlight.
Original post was for a '99 XJR hood release, so the area to prod should be in the same general area for '01 XJ8, correct?
I saw a small opening following back curve of the wheel well and going toward the rear but the screw driving would only go up in this little crack but mostly everybody thats got it open said they were placing the screw driver or rod almost perpendicular. So then I drill some wholes but still not sure if I'm in the right area?
You can see the crack I'm talking about in most of the photos especially in pic 8 & 9. Also I could some wires in that crack area but again the screw driver seem to go only up...?
1.
2.
3.
4.
5.
6.
7.
8.
Comparing these to jimmycruz99xjr's photos below. The little crack opening is the right area, What do you all think? And how to get the screwdriver to go more perpendicular or sideways in this crack instead of straight up when proding around to release the latch???
If helps anybody with this problem in the future, I found it easier to pop the hood open by placing a flat head at the back of the latch and moving it to release the bonnet rather than the front of the latch (where the end of the cable is).
Have been trying for days even using an inspection camera/scope and still can�t do it
1. Picture is from the underside of the wheel well
2. The outside whole that was there I made it a littler bigger and you can see there is another whole
3. I see the spring end and the end is facing the rear of the car
Should I be pushing this spring end or something else
* * * * * * * * * * * * * * * * * * * * * * * * * * * * * * * * * * * * * * * * * * * * * * * * * * * * * * * * * * *
 02-28-2013, 08:01 AM