Airbag Light
#41
 08-01-2013, 08:43 AM

Veteran Member
The following users liked this post:
OldMike (08-01-2013)
#42
08-01-2013, 06:56 PM

#43
08-22-2013, 10:12 PM
Three weeks later...
I've been on vacation, have driven my XJ8 about 2,000 miles with the airbag light on, so I finally decided to take out the front seat and see what's up.
Well, nothing is easy in Jagland! I seem to have figured out that I need a T-50 to remove the four bolts holding the seat in -- I have T-40, T-45, and T-50 and the T-50 seems to fit tightly while the others are a bit loose.
After a bit of grunting, I got the two front ones loosened, but this is where the fun starts.
I moved the seat forward to expose the rear bolts, put the T-50 on my ratchet and no amount of grunting would even budge the darn things. So, off to the parts store to get a 1/2" to 3/8" reducer so I could use my breaker bar (which, of course, is 1/2" but the T-50 was 3/8"). I gave it a couple of tugs and lo n' behold, now the T-50 torx bold is just about rounded out! I can't budge it, I tried penetrating oil, and carefully tried to get it loose, but to no avail.
So, I decided to leave it alone.
Of course, now the LIGHT IS OFF once again! I can only hope it stays off, but that's wishful thinking to the nth degree.
That's it for now!
Mike
#44
08-27-2013, 09:48 PM

Try the old hammer and chisel trick. Nick the head of the bolt enough to have a slot to
put the chisel in and then just tap it counter clockwise. If the worst happens and the
head of the bolt breaks off you can at least remove the seat and have good access
for drilling out the center of the bolt and inserting a #2 extractor.
You might also try some needle nose vise grips to grab the head of the bolt.
Messed up fasteners are never easy to remove.
'Mouse Milk" penetrating oil is the best stuff around.
The following users liked this post:
OldMike (08-28-2013)
#45
08-28-2013, 09:45 AM
Never heard of Mouse Milk! Might give it a try when I get back to FL -- I'm on vacation with my XJ8 and have been since the beginning of the month. It's amazing how my interest in auto repair wanes when I'm recreating in the great midwest! LOL
PS - the light is still off -- after one brief trip when it was on. However, the seatbelt light is still nonfunctional.
PS - the light is still off -- after one brief trip when it was on. However, the seatbelt light is still nonfunctional.
#46
08-28-2013, 10:55 AM
Veteran Member
both Irwin tools - marketed by Vice Grips - and Craftsman sell bolt extractors that can be hammered onto the worn bolt. Irwin 7mm and 3/8 drive or CM #7 look to fit. Both will have to be hammered down to assure decent purchase/grip on the round T50 bolt.
A li ttle HT Blaster overnight will help (or Mouse Milk - of which I never heard).
Worse part about old cars, no matter how wnderful, is the removal of parts. IMHO.
A li ttle HT Blaster overnight will help (or Mouse Milk - of which I never heard).
Worse part about old cars, no matter how wnderful, is the removal of parts. IMHO.
The following users liked this post:
OldMike (08-28-2013)

#48
08-28-2013, 06:54 PM
Sky Geek sells mouse milk . Don't leave the bottle on it's side once it is opened. It will leak out even with a secure cap.
Buy Mouse Milk Penetrating Oil - 8 oz Bottle at SkyGeek.com
I understand about taking a break from working on the car and just driving it.
I have a whole box of "round tuits".....
Buy Mouse Milk Penetrating Oil - 8 oz Bottle at SkyGeek.com
I understand about taking a break from working on the car and just driving it.
I have a whole box of "round tuits".....
#49
09-05-2013, 07:02 AM
Ok, I noticed something about my airbag light -- first off, whenever I moved the seat around (all the way forward, for example), it seems to clear the light for a while. Secondly, and this is the new thing I've learned, if the light is OFF and I get out of my car with the engine running and get back in, the light will turn ON -- I think it turns on while I'm out of the car, but I haven't checked that closely, yet.
#50
09-05-2013, 07:42 AM

Seeing the seat fixing may help you decide how to attack it. I had T50 ripped out and was expecting to find the securing nut welded under the floor:
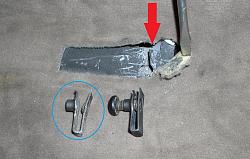
The securing nut (circled in blue) is a spring clip which slides over a round hole in the floor and fitted/removed through a square slot (arrowed red). In the photo, the replacement securing clip on the right has the T50 screwed in from the bottom - it actually goes in the other way round.
If you have to drill the T50 out or cut the head off, the securing nut is easily replaced with nothing more complicated than a flat blade screwdriver.
Graham
The following users liked this post:
OldMike (09-06-2013)
#51
09-06-2013, 07:51 PM
#52
09-06-2013, 08:15 PM
I haven't noticed any particular seat position that makes any difference.
#53
09-10-2013, 04:53 PM
I have the same problem. I brought to dealer and they diagnosed with codes/reader as
1 Faulty Clock Spring
2 Warn crash sensors (by pillars)
Dealer wants 450 for clock spring 250 for sensors - labor extra
May be better to get parts from wholesaler (BritishpartUK) and do it myself when I have time
Good luck
1 Faulty Clock Spring
2 Warn crash sensors (by pillars)
Dealer wants 450 for clock spring 250 for sensors - labor extra
May be better to get parts from wholesaler (BritishpartUK) and do it myself when I have time
Good luck
#55
09-10-2013, 05:48 PM
Veteran Member
worn crash sensors?
The car has a couple, from memory front bulkhead/rear bulkhead (below petty tank on lower panel). but how do you distinguish worn? They're either off or on, and talk to the airbag module to deploy - I suspect worn link wiring under the drivers seat, more of these similar faults are appearing as the wiring gets old and brittle.
And it isn't isolated to the seat - the boot/trunk hinge wiring does the same thing to the switch, I'll wager a few switches have been replaced before checking the wiring.
#57
09-26-2013, 05:36 PM
I'm going to try to get back to this project real soon. I have to figure out how to get the rear bolts out so I can get the front seat out. I stripped one of them, so I think I'll need a "kit" to get it out. Any suggestions?
#58
09-27-2013, 09:15 AM
Senior Member
What is the writing in the trunk that affects the air bag? Is there some relation to the wires on the trunk lid or is it something else. Am happy to pull the seat out if I knew what wires in the harness I needed to fix. From the outside they seem fine. Can the write on the passenger cause the same effects?
#59
09-27-2013, 09:30 AM

(click on the image to enlarge it)
Spring Nut: JZM100007
Torx Screw - M10: JZS10095
Graham
#60
09-27-2013, 04:44 PM
What is the writing in the trunk that affects the air bag? Is there some relation to the wires on the trunk lid or is it something else. Am happy to pull the seat out if I knew what wires in the harness I needed to fix. From the outside they seem fine. Can the write on the passenger cause the same effects?
As for "drilling" them out - I'd be more than happy to do so, but I've never had to do that before so I'd love to know what I need to buy in order to drill it out. I've seen some kits, but was wondering if anyone had a recommendation. Thanks. Looking forward to resolving this issue.
One more note -- the light has been even more (actually less, in a sense) intermittent since I started messing with the seat and giving it a good cleaning (underneath). However, the other day, as I was driving to work, I readjusted the steering wheel position just a bit by holding the knob down and lowering the wheel a small amount -- the light came one as I was doing that.