How to fit a double-din nav radio into a 98-03 x308 XJ8
#1
 10-23-2009, 11:40 AM


I can finally answer the eternal question that has been plaguing my mind since I bought my XJ8, how can I fit a better radio in here? The answer is not an easy one. As many have discovered, the factory radio's face is *almost* double-DIN tall, a fair bit wider than a standard DIN radio and, and the radio electronics behind the scene are single DIN sized. But I can now safely say that it IS possible to install this JVC KW-NT1 Nav radio into your XJ8:

Hoy you say? The answer is not easy. I need to finish the install tonight and upload pictures, but here's the deal in a nutshell:
Obviously the electronics in a double-DIN nav won't fit in the dash, so you have to put them somewhere else, so I chose the trunk. This necessitates a Nav system where the screen is not an integral part of the unit, so I chose a NAV with a detachable faceplate. The size constraints dictate that a screen that's actually double-DIN tall won't fit, so I searched and came up with this JVC unit, as you can see, the CD/DVD drive occupies about the top 1/2 inch of the unit and is fixed, this makes the screen unit just about the perfect size for the opening in the car. This isn't for the feint of heart.
Step 1. Buy the radio
Step 2. Look at the mating connectors on the radio and face plate, you'll need to extend those a long distance.
Step 3. Find multi-conductor cable with enough pairs to extend the wiring, in my case I used 11 bundles of CAT5e cable (just because that's what I already had) and I made my own wiring harness.
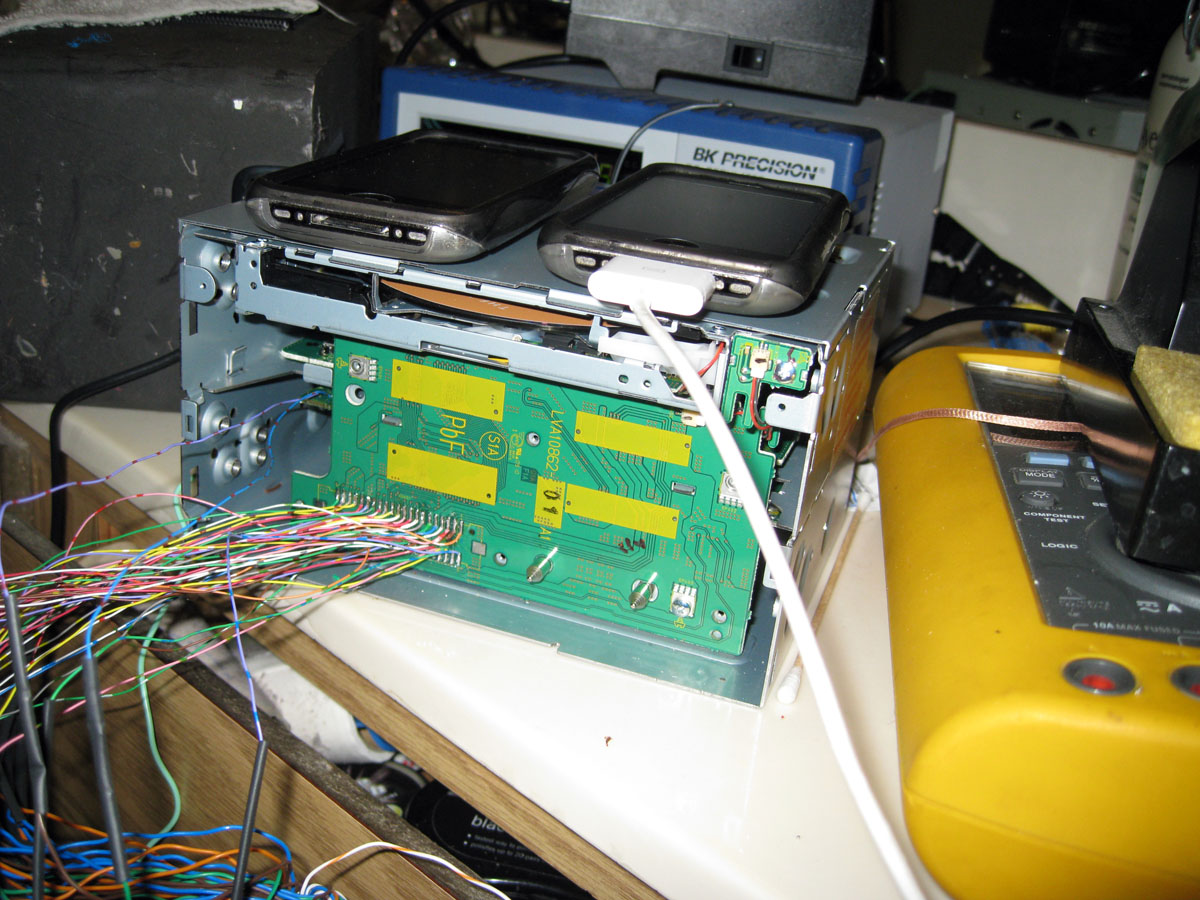
Step 4. Disassemble the face place and head unit exposing the boards that contain the connectors.
Step 5. Solder the cable to the boards, you might want to think of some disconnect connector at this point to make installation easier.
Then you get something like this:
More pics / details to follow.
Hoy you say? The answer is not easy. I need to finish the install tonight and upload pictures, but here's the deal in a nutshell:
Obviously the electronics in a double-DIN nav won't fit in the dash, so you have to put them somewhere else, so I chose the trunk. This necessitates a Nav system where the screen is not an integral part of the unit, so I chose a NAV with a detachable faceplate. The size constraints dictate that a screen that's actually double-DIN tall won't fit, so I searched and came up with this JVC unit, as you can see, the CD/DVD drive occupies about the top 1/2 inch of the unit and is fixed, this makes the screen unit just about the perfect size for the opening in the car. This isn't for the feint of heart.
Step 1. Buy the radio
Step 2. Look at the mating connectors on the radio and face plate, you'll need to extend those a long distance.
Step 3. Find multi-conductor cable with enough pairs to extend the wiring, in my case I used 11 bundles of CAT5e cable (just because that's what I already had) and I made my own wiring harness.
Step 4. Disassemble the face place and head unit exposing the boards that contain the connectors.
Step 5. Solder the cable to the boards, you might want to think of some disconnect connector at this point to make installation easier.
Then you get something like this:
More pics / details to follow.
The following users liked this post:
mvossen (04-02-2014)
#2
10-23-2009, 09:17 PM
Veteran Member
Hi Alex
I saw the thread topic and was just warming up to reply that "it can't be done because there's not enough room behind the head unit, blah, blah, blah" and then I saw your frankenstein car stereo pictures and I'm blown away.
It must have taken some guts to rip a brand new (expensive) head unit apart and try this, huge respect to you.
So c'mon, you've given us a teaser..... let's see some pictures of the completed install !
I think the difference between "great" and "utterly amazing" will be how you finish around the unit so that it looks like it was always supposed to be there.
Looking forward to seeing the pics !

#4
10-24-2009, 10:28 AM
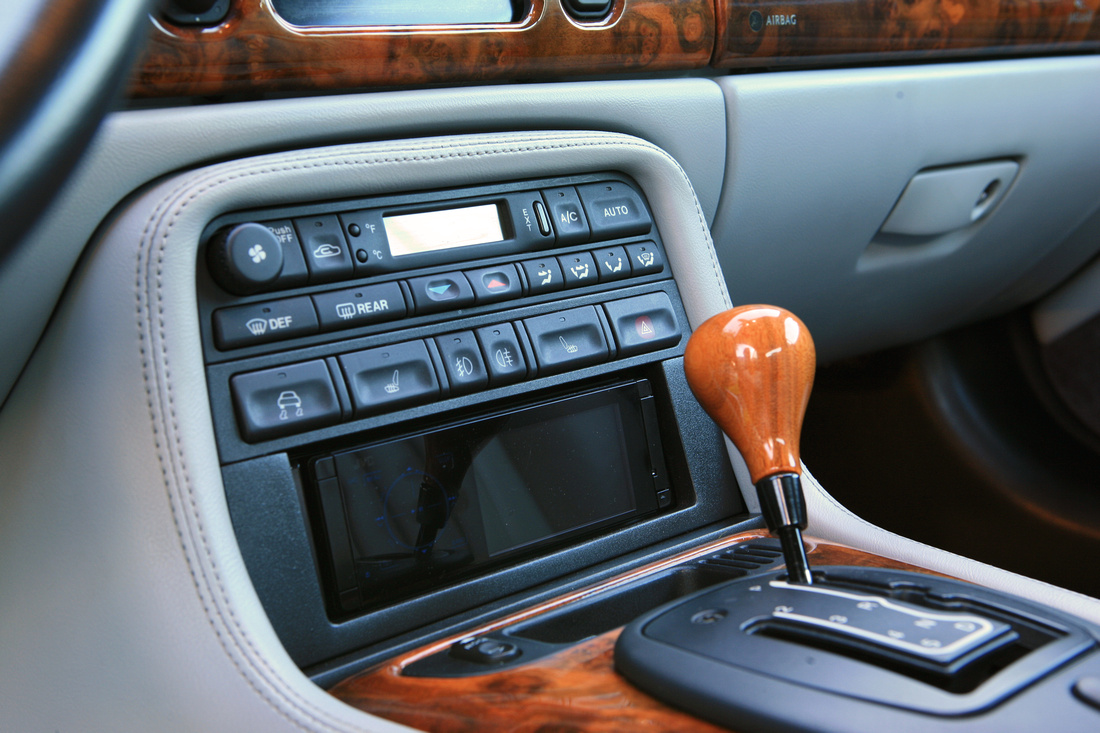
Sadly, I have a feeling I won't be going to "utterly amazing" my plastic finishing skills are a mere shell of my lack-lustre soldering skills, I just have the tenuous grip on sanity and reason required to hack apart a $650 radio  I think I'll go for the leather covered wood surround ala the ones Ian sells, It makes the most sense for me since the radio is a touch shiny and the XJ8 is the commuter car anyway.
I think I'll go for the leather covered wood surround ala the ones Ian sells, It makes the most sense for me since the radio is a touch shiny and the XJ8 is the commuter car anyway.
#5
10-25-2009, 12:12 PM
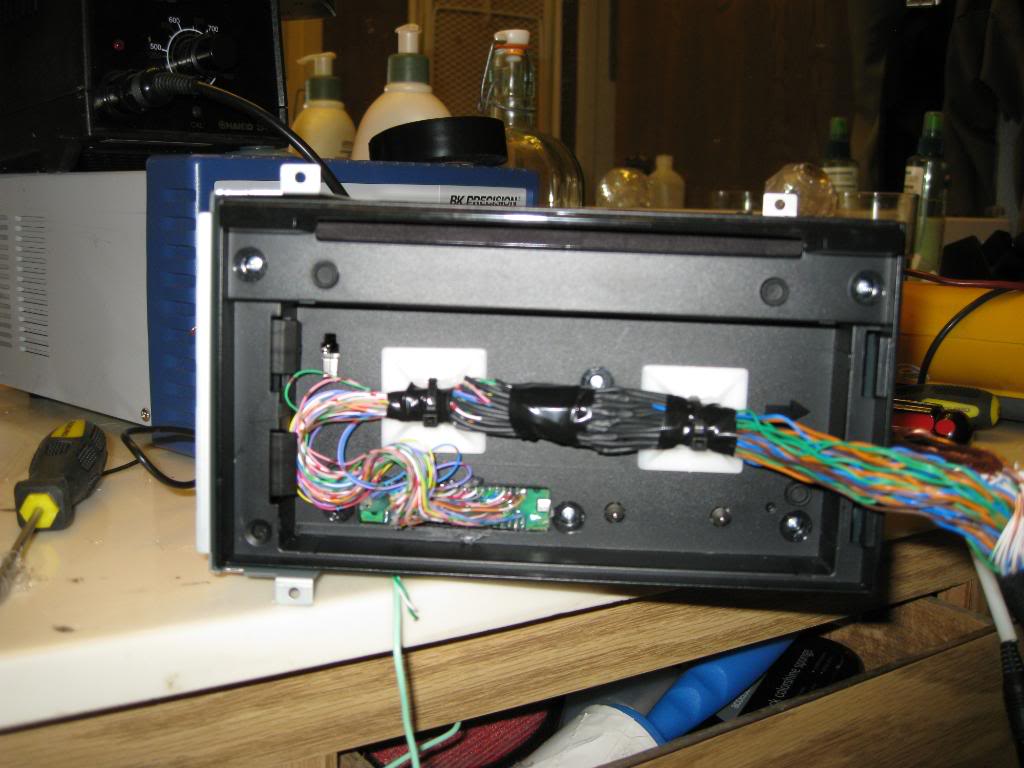
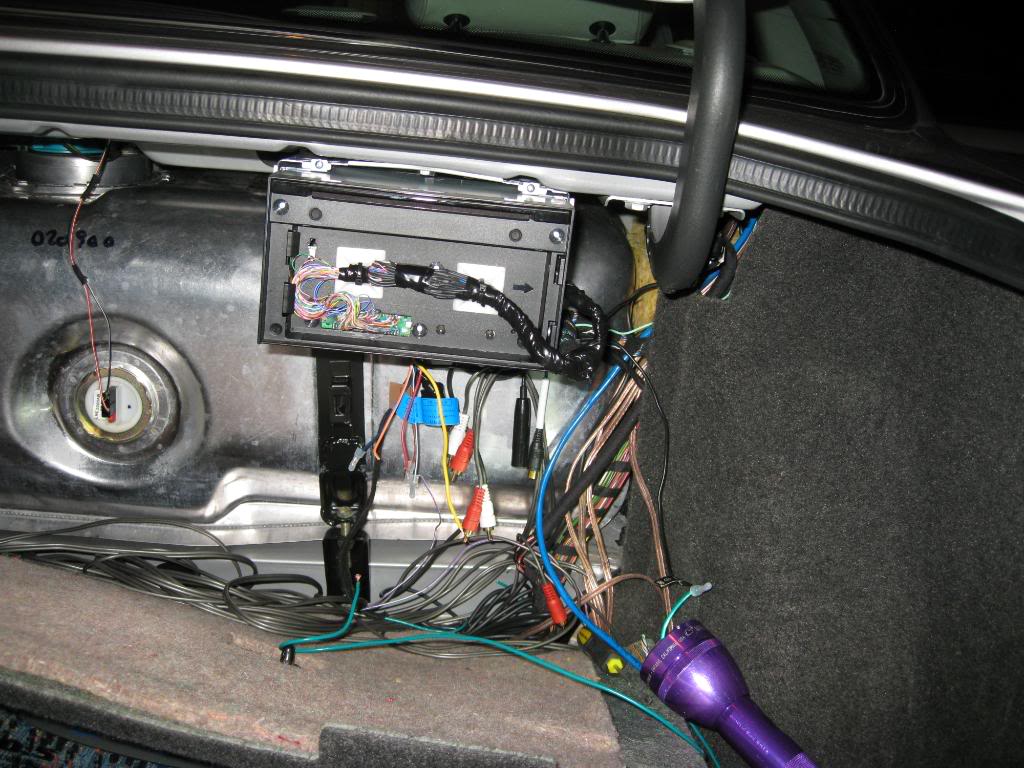
Now that it's working I added removable connectors to facilitate the installation. I just used two plain DB25 connectors one female and one male on each end so they are keyed. I also decided to move the buzzer/beeper from the head unit to the face place otherwise you'd never hear it beeping since it's going to be in the trunk. The beige cable is a USB connector, this JVC radio has it's USB connector on the face plate which I thought looked ugly so I decided to re-route that to the centre console compartment.

Next I put the face back on the head unit running the cables thru the former dock connector opening
Pull the centre console out of the car, along with the back seats and the hat shelf, you will find an opening between the trunk and the passenger compartment on the passenger side of the car (LHD). Here's the cable, fortunately it was just about exactly the right length.
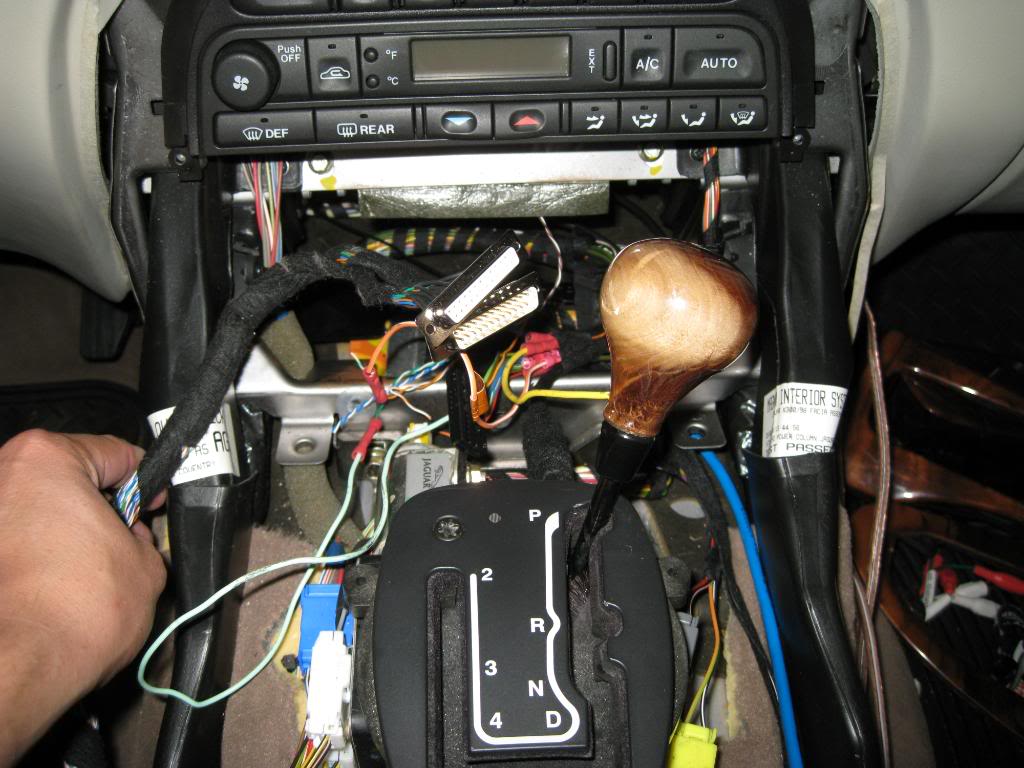
Here we are with the "head unit" now in the trunk:
Nearing completion, here's the face plate in place, sans any trim:
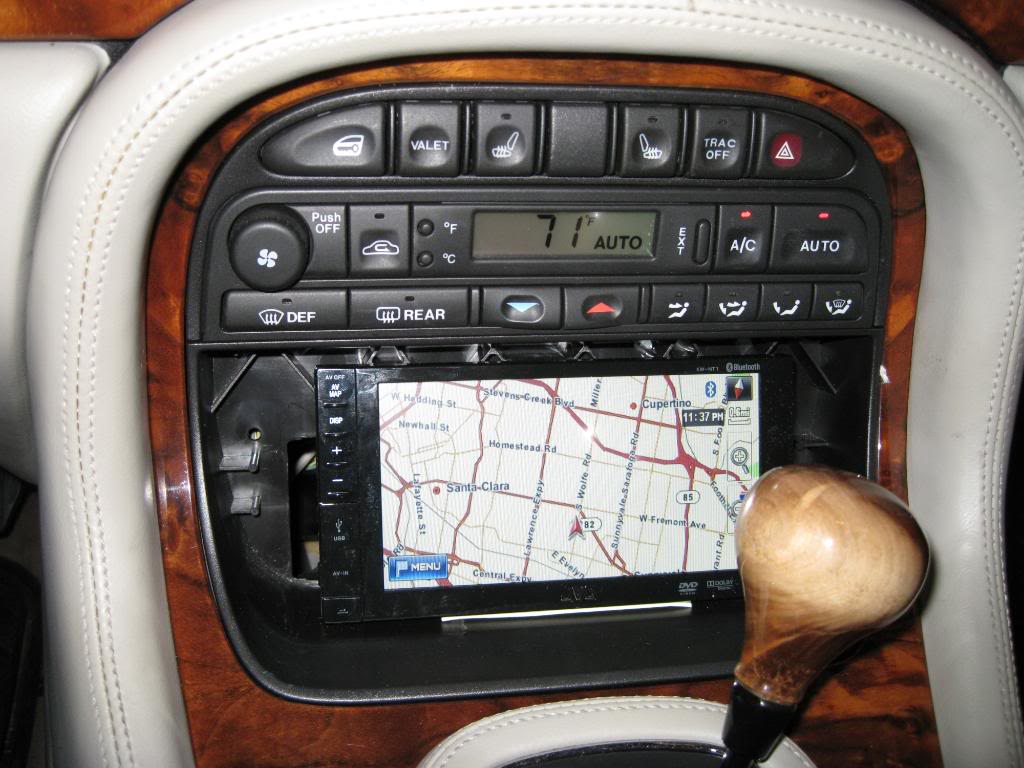
Of course now that I got the whole thing in there, I realised that I forgot to install the steering wheel control adapter and run that to the back (oops) So that's a project for this coming week. The control works perfectly, I had it on the JVC single DIN radio that was in the car before we started this project.
Next I put the face back on the head unit running the cables thru the former dock connector opening
Pull the centre console out of the car, along with the back seats and the hat shelf, you will find an opening between the trunk and the passenger compartment on the passenger side of the car (LHD). Here's the cable, fortunately it was just about exactly the right length.
Here we are with the "head unit" now in the trunk:
Nearing completion, here's the face plate in place, sans any trim:
Of course now that I got the whole thing in there, I realised that I forgot to install the steering wheel control adapter and run that to the back (oops) So that's a project for this coming week. The control works perfectly, I had it on the JVC single DIN radio that was in the car before we started this project.
The following users liked this post:
mvossen (04-02-2014)
#7
10-25-2009, 12:27 PM
Veteran member
Trending Topics
#8
10-25-2009, 01:43 PM
Veteran Member
Great job Alex!
Just to check my understanding..... I assume the dvd slot on the head unit thats now in the trunk is for the nav disc? (and if so you wont really need access to it very often) and that you'll be supplying your music from an ipod/mp3 player up front ? (so basically you don't need to go near the trunk at all in future)
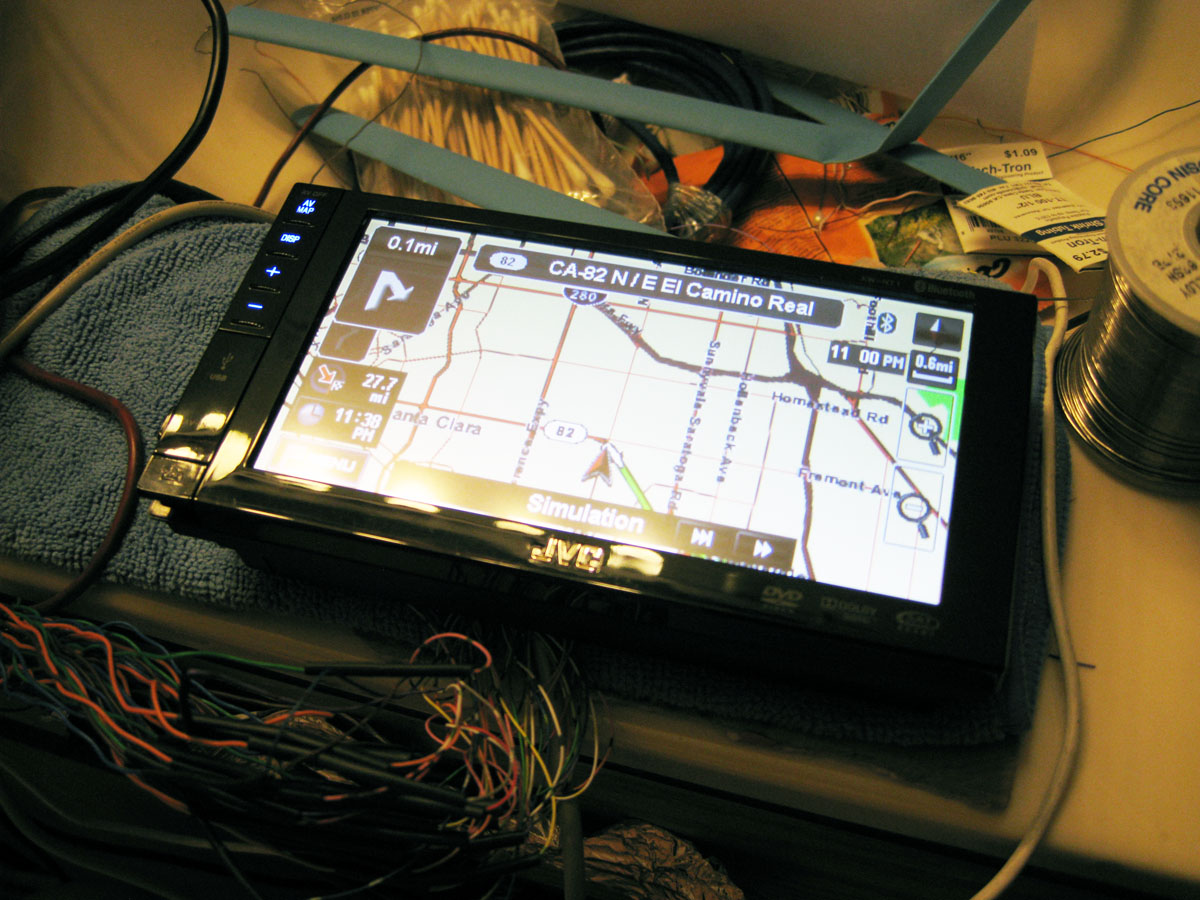
By the way, from the looks of the location on your GPS you're just round the corner from me (I'm off the 280 at Saratoga) so when you get it all finished I may buy you a coffee to get a look at it !
@Matt. Your matched faceplate surround is true craftsmanship.
Just to check my understanding..... I assume the dvd slot on the head unit thats now in the trunk is for the nav disc? (and if so you wont really need access to it very often) and that you'll be supplying your music from an ipod/mp3 player up front ? (so basically you don't need to go near the trunk at all in future)
By the way, from the looks of the location on your GPS you're just round the corner from me (I'm off the 280 at Saratoga) so when you get it all finished I may buy you a coffee to get a look at it !
@Matt. Your matched faceplate surround is true craftsmanship.
#9
10-25-2009, 03:03 PM
That would be very kind of you, that is about what I was thinking of doing. Can you describe the process?
#10
10-25-2009, 03:06 PM
Great job Alex!
Just to check my understanding..... I assume the dvd slot on the head unit thats now in the trunk is for the nav disc? (and if so you wont really need access to it very often) and that you'll be supplying your music from an ipod/mp3 player up front ? (so basically you don't need to go near the trunk at all in future)
By the way, from the looks of the location on your GPS you're just round the corner from me (I'm off the 280 at Saratoga) so when you get it all finished I may buy you a coffee to get a look at it !
@Matt. Your matched faceplate surround is true craftsmanship.
The slot is for a CD/DVD, the nav in this JVC unit is 100% flash based which is actually quite nice since it's fast and has a very complete database with phone numbers, POIs, etc. Personally I only ever use my iPods, so integration was essential. I didn't even bother to hook up the AM/FM antenna. Maybe sometime later on that. For me, there would really be no reason to go to the trunk except to update the nav (via DVD) or if I absolutely had to listen to a CD or watch a DVD (while parked).
#11
10-25-2009, 04:03 PM
Veteran member
I took a flat black, a textured black (the one used for the outdoor patio furniture), and a fine clear (from the automotive paint area) to do a several step method of matching the right amount of each. Its more to taste, but I probably did the black/texture/clear 3-step about 4 times till I got it right.
#12
02-26-2010, 12:14 PM

Junior Member
Join Date: Feb 2010
Location: Brussels, Belgium
Posts: 11
Likes: 0
Received 0 Likes
on
0 Posts
@AlexD : I, too, am fascinated at your successful installation of a navigation radio/DVD in the XJ8.
I just have one question which is probably stupid, so please bear with a beginner! But, what happened to all the controls (fog light, hazard light switch etc.) in the row above the original radio which you removed?
And, how did the installation job finish?
I am just about to buy a 2001 X308 (3.2L 'Executive') here in Belgium, Europe. I sure wish I had your skills (and courage!), but I guess I will just have to bear with the rather primitive built-in navigation system. All the same, I could perhaps find someone here able to follow your instructions.
Great to have seen your photos. Thanks for sharing!
#14
03-01-2010, 02:25 PM
Junior Member
Join Date: Feb 2010
Location: Brussels, Belgium
Posts: 11
Likes: 0
Received 0 Likes
on
0 Posts
#15
03-01-2010, 03:16 PM
Veteran Member
@ City Top
No problem. The only finished XJR double dins I've seen are in this link....
http://www.avforums.com/forums/porta...-upgrades.html
The first one (2 single DINs of different makes) is exactly the reason why we are trying so hard to do better. It just doesn't look right at all. The second one is pretty nice I think, but quite a bit of work. Maybe workng with leather materials and padding is easier and more forgiving than working with solid materials. I think maybe making the leather material black instead of cream in this case may even make it look better ? I always admire H2oBoys face plate, it really is just "factory"
Last edited by Sarc; 03-01-2010 at 03:22 PM.
#16
03-04-2010, 10:45 AM
Junior Member
Join Date: Feb 2010
Location: Brussels, Belgium
Posts: 11
Likes: 0
Received 0 Likes
on
0 Posts
I think the Jag I am about to buy is fitted with the Motorola M8989 car phone which is a dual-band fixed mount GSM car phone (with handset and handsfree kit) for Europe (900/1800 MHz), similar to the Motorola M930 for the US (950/1900 MHz), except the M8989 is older.
Apart from being able to deliver a very strong signal in 900 MHz (8W instead of the 2W standard for handheld cell phones) which is a great advantage in zones with bad coverage, the M8989 is completely outdated in many respects and I would prefer to use my handheld (HTC, but will switch to iPhone).
Now, if one were to follow AlexD's spectacular installation, a Bluetooth connection between the phone in the driver's shirt pocket and the main unit in the trunk of the car would probably not work very well. I wonder if there is a solution to make the car nav-radio work as a handsfree kit? By placing the iPhone in the trunk too?
#17
03-04-2010, 04:31 PM
Veteran Member
@ CityTop
Easy. Can even be done with the original factory stereo. Follow our other thread on this topic... https://www.jaguarforums.com/forum/s...ad.php?t=11547
Easy. Can even be done with the original factory stereo. Follow our other thread on this topic... https://www.jaguarforums.com/forum/s...ad.php?t=11547
Last edited by Sarc; 03-04-2010 at 05:06 PM.
#18
03-05-2010, 11:16 AM
Now, if one were to follow AlexD's spectacular installation, a Bluetooth connection between the phone in the driver's shirt pocket and the main unit in the trunk of the car would probably not work very well. I wonder if there is a solution to make the car nav-radio work as a handsfree kit? By placing the iPhone in the trunk too?
No need to worry, the reason I selected the JVC unit is because the bluetooth electronics are contained in the detachable faceplate which is now located in my centre console, bluetooth reception is exceptional I might add, much better than my factory system for my Volvo. The only thing that is in the trunk that is a bit of a pain is the CD player, which I never use. The USB jack for connecting an iPod or other player is in the centre console as well. If you really wanted to listen to AM/FM radio you could hack a cable together, I did not bother since I never listen to the radio. If you have a desire for XM/Siruis, just put the antenna on the rear parcel shelf (that's where I put the GPS antenna).
#20
03-07-2010, 10:17 AM
Junior Member
Join Date: Feb 2010
Location: Brussels, Belgium
Posts: 11
Likes: 0
Received 0 Likes
on
0 Posts
@AlexD --> Very positive information about bluetooth. Could you quote the exact model name of the JVC? I don't seem to find it in your earlier posts.
Well, if iPod/iPhone can be connected, I have absolutely no need for a CD player. My entire CD collection has been ripped to iTunes a long time ago. BTW, I have had my car CDs stolen twice 
Don't think so. I have never seen a car in Europe with a satellite radio. I don't know if they work over here. But I definitely use FM radio on an almost daily basis, so that's a 'must have' 
Thanks for all the input. I expect to have my XJ8 3.2L 'Executive' in about two weeks and will start to look for someone who can do this installation.
How did you go about the "final touch" in the end? Did you get a black piece to fit around the screen of the JVC?
Thanks for all the input. I expect to have my XJ8 3.2L 'Executive' in about two weeks and will start to look for someone who can do this installation.
How did you go about the "final touch" in the end? Did you get a black piece to fit around the screen of the JVC?