Update on my X358
#1
 03-13-2014, 09:43 AM

Join Date: Nov 2006
Location: Glasgow, Scotland UK
Posts: 47,303
Received 9,005 Likes
on
4,113 Posts

#2
03-13-2014, 12:09 PM
Join Date: Nov 2006
Location: Glasgow, Scotland UK
Posts: 47,303
Received 9,005 Likes
on
4,113 Posts
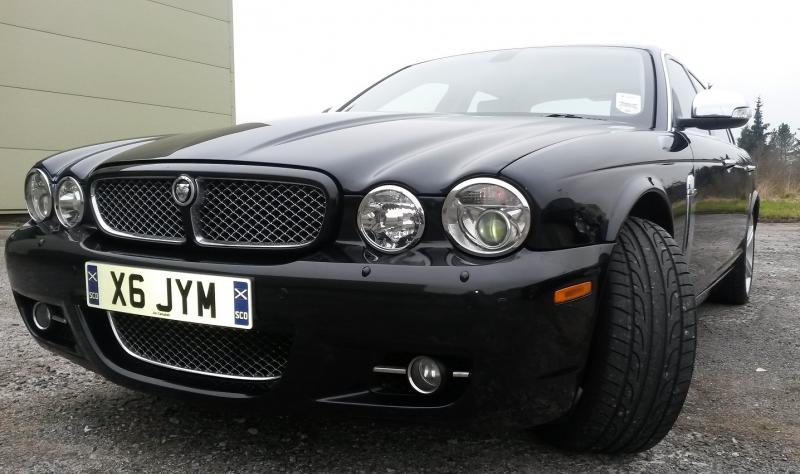
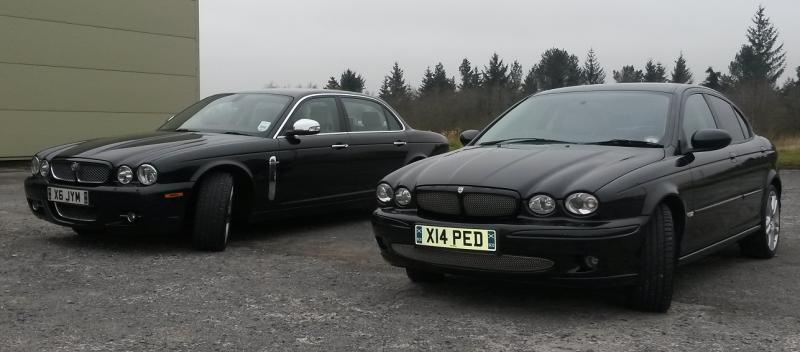
Not the best of days but dry ( at least for a while ) and as long as my son was washing his I thought I'd give mine the once over.
Just a quick wash n dry and a good chance for a photo opportunity with the new plates etc and Peter with his tints, painted calipers, mesh grille etc....
He'll be adding more though I'm sure....


Just a quick wash n dry and a good chance for a photo opportunity with the new plates etc and Peter with his tints, painted calipers, mesh grille etc....
He'll be adding more though I'm sure....


The following 5 users liked this post by JimC64:
anindyam (03-13-2014),
Cambo (03-23-2014),
Don B (03-13-2014),
friscoricky (03-15-2014),
grantorino62 (04-20-2016)

#5
03-16-2014, 07:33 PM
Join Date: Nov 2006
Location: Glasgow, Scotland UK
Posts: 47,303
Received 9,005 Likes
on
4,113 Posts


#6
03-16-2014, 07:40 PM


Join Date: Feb 2014
Location: Crossroads of America
Posts: 19,391
Received 12,737 Likes
on
6,379 Posts
NICE! Would you mind sharing how you cleaned the insides of the wheels?
Thanks!
Don
#7
03-16-2014, 11:45 PM
Senior Member
Really nice job Jim! Like the black calipers!
To spruce things up a little more you could take fine sand paper and clean off the aluminum dust shield that is behind the rotor that sits higher then the rotor by about 1.5 inches. A few simple passes with the sand paper will remove the brake dust and and that part will shine just like new - an extra nice touch since you have such nice see through open rims.
To spruce things up a little more you could take fine sand paper and clean off the aluminum dust shield that is behind the rotor that sits higher then the rotor by about 1.5 inches. A few simple passes with the sand paper will remove the brake dust and and that part will shine just like new - an extra nice touch since you have such nice see through open rims.
Last edited by lcmjaguar; 03-17-2014 at 08:18 PM.
The following users liked this post:
JimC64 (03-17-2014)
Trending Topics
#8
03-17-2014, 07:17 PM
Join Date: Nov 2006
Location: Glasgow, Scotland UK
Posts: 47,303
Received 9,005 Likes
on
4,113 Posts
Really nice job Jim! Like the black calipers!
To spruce things up a little more you could take fine sand paper and clean off the aluminum flange that is behind the rotor that sits higher then the rotor by about 1.5 inches. A few simple passes with the sand paper will remove the brake dust and and that part will shine just like new - an extra nice touch since you have such nice see through open rims.
To spruce things up a little more you could take fine sand paper and clean off the aluminum flange that is behind the rotor that sits higher then the rotor by about 1.5 inches. A few simple passes with the sand paper will remove the brake dust and and that part will shine just like new - an extra nice touch since you have such nice see through open rims.
Thanks for the comments, much appreciated
#9
03-17-2014, 07:24 PM
Join Date: Nov 2006
Location: Glasgow, Scotland UK
Posts: 47,303
Received 9,005 Likes
on
4,113 Posts
Had my car in at The Jag Specialist in Doncaster yesterday for the following work......
Rear wishbone bushes replaced.......
Rear shocker bushes replaced........
Cat flexi pipe repair passenger side repaired....
Bonnet switch bypassed ( bonnet open messages and car alarm sounding randomly ).....
New rear brake pads supplied / installed
The car was then tracked straight and true, all good.
She ran like a champ all the way home, actually seemed slightly more power, better economy and most importantly no diesel fumes in the cabin.......well pleased.
Saw nearly 40mpg on the way home as an average, and that was with some fairly long term spirited sessions too, and around 700 miles out of the tank.
Thank you to Chris and Craig at The Jag Specialist
#10
03-17-2014, 07:48 PM

I did a brake fluid flush and rear pad change at the weekend but was still undecided on caliper colour.
Having seen the gloss black has made up my mind it's the one.
Graham
The following users liked this post:
JimC64 (03-17-2014)
#11
03-17-2014, 08:45 PM
Join Date: Nov 2006
Location: Glasgow, Scotland UK
Posts: 47,303
Received 9,005 Likes
on
4,113 Posts
I wonder if they'll be done in time for the meet, so you can show them off?
By the way, I think Peter is drooling at the thought of seeing your car and has expressed an interest in a test drive.....rofl
Only 11 days away now, so getting close
#13
03-18-2014, 03:09 AM
After seeing the gleaming black pair at the top of the thread, I'd better throw a bucket of water over mine this weekend or it won't be allowed in the same car park.
Graham
#14
03-23-2014, 12:17 AM
Join Date: Nov 2006
Location: Glasgow, Scotland UK
Posts: 47,303
Received 9,005 Likes
on
4,113 Posts
Wheel well liners done.......
Had the car lifted at each corner to give a little more room to work.
I used an APC and a dish brush to loosen and remove any dirt / grease build up then rinsed and dried.
Afterwards a generous spray of Wet n Black then worked in with a sponge and buffed off to leave a nice black glossy clean finish.
This is really set off when the car is clean, alloys done and tyres blacked, really adds another dimension.
I really need to try and get a few pics of the upgraded exhaust finishers as they really do make a big difference to the look of the rear, maybe tomorrow all being well.
Just a little under a week now to the meet
#15
03-23-2014, 11:01 AM
Join Date: Nov 2006
Location: Glasgow, Scotland UK
Posts: 47,303
Received 9,005 Likes
on
4,113 Posts


#17
03-23-2014, 06:29 PM
Join Date: Nov 2006
Location: Glasgow, Scotland UK
Posts: 47,303
Received 9,005 Likes
on
4,113 Posts
to be fair I didn't get to spend as much time as I'd like on them, but. still got a 100% improvement.
I used Sonax FULL EFFECT wheel cleaner ( I believe Pinnacle Advanced wheel cleanr concentrate is similar ) and sprayed it on liberally.
this basically dissolves / liquifies the brake dust / dirt / grime and using a 2"paint brush I agitated this with warm water.....the wheels come up almost as good as new inside n out.
It really does make a difference when looking at a clean wheel, painted hubs / calipers AND clean wheels on the inside too.
The cleaned / blackened wheel wells complete the look of that area.
#18
03-23-2014, 06:59 PM
#19
03-23-2014, 07:42 PM
Join Date: Nov 2006
Location: Glasgow, Scotland UK
Posts: 47,303
Received 9,005 Likes
on
4,113 Posts
Lol...I know, I did it just to get you going Cambo.
Seriously though, a little light hearted fun and gives the boy racers something to think about ( those that don't know Jags ).....is it, isn't it?
Any Jag owner in the know knows what it is...
The upside is it adds many horses and a nice little splash of colour to the rear
#20
03-24-2014, 12:28 PM
Join Date: Nov 2006
Location: Glasgow, Scotland UK
Posts: 47,303
Received 9,005 Likes
on
4,113 Posts

The following users liked this post:
Don B (04-24-2014)