HOW TO: XJ X350 door actuator repair
#1
 12-11-2014, 08:24 PM

Join Date: Dec 2014
Location: Gold Coast, Australia
Posts: 34
Likes: 0
Received 45 Likes
on
16 Posts
The front passenger door of my right hand drive (Australian) 2006 XJR had an intermittent unlocking failure. It would lock consistently, but frequently fail to unlock when the central locking dash button was pressed. In this case, I was able to resolve the failure by lubricating the door latch actuator internal mechanism. Unfortunately, lubrication requires removal of the actuator from the car and partial disassembly.
These procedures apply equally well for replacement of the actuator (part numberC2C30696?) if it is not to be reconditioned.
Removal and replacement is performed with the car battery connected because power is required during these processes. This is a relatively easy job and does not require any special tools and equipment other than the following:
male torx drivers with ratchet
screw drivers
small pick
long cable ties
lubricant grease
clean rag
Allow about an hour for actuator removal, half an hour for replacement and another hour if the actuator is to be disassembled, lubricated and re-assembled.
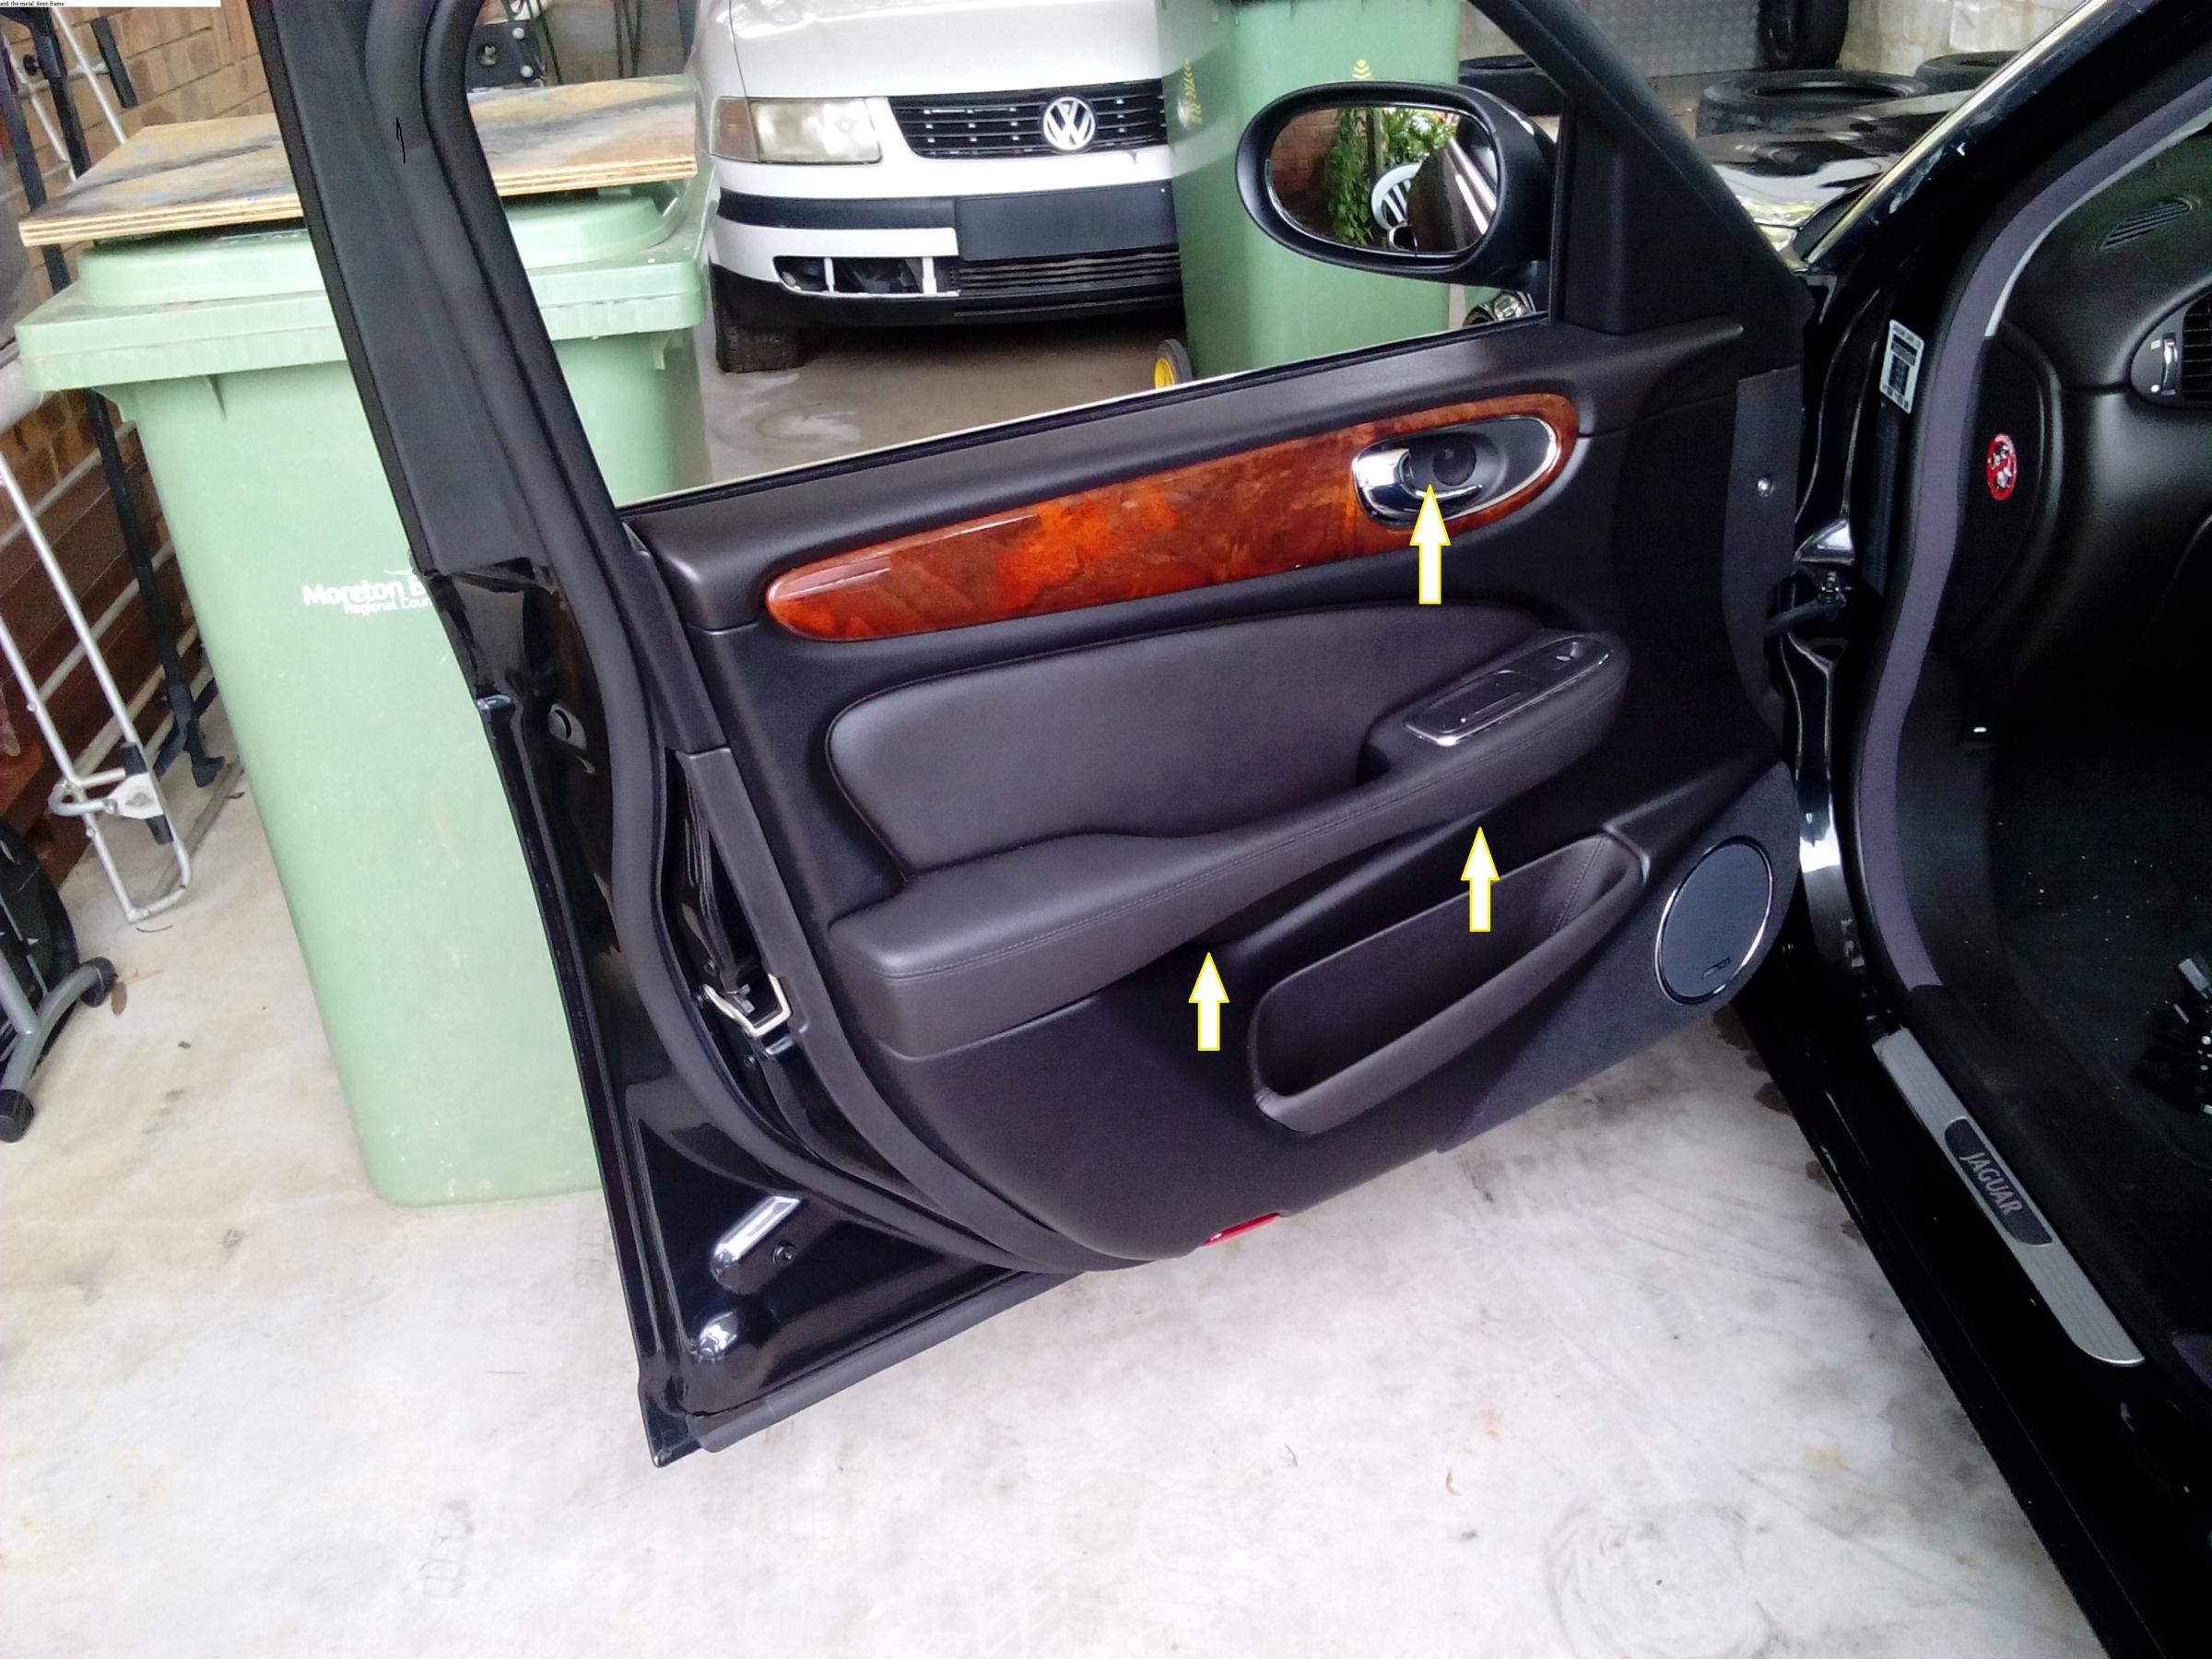
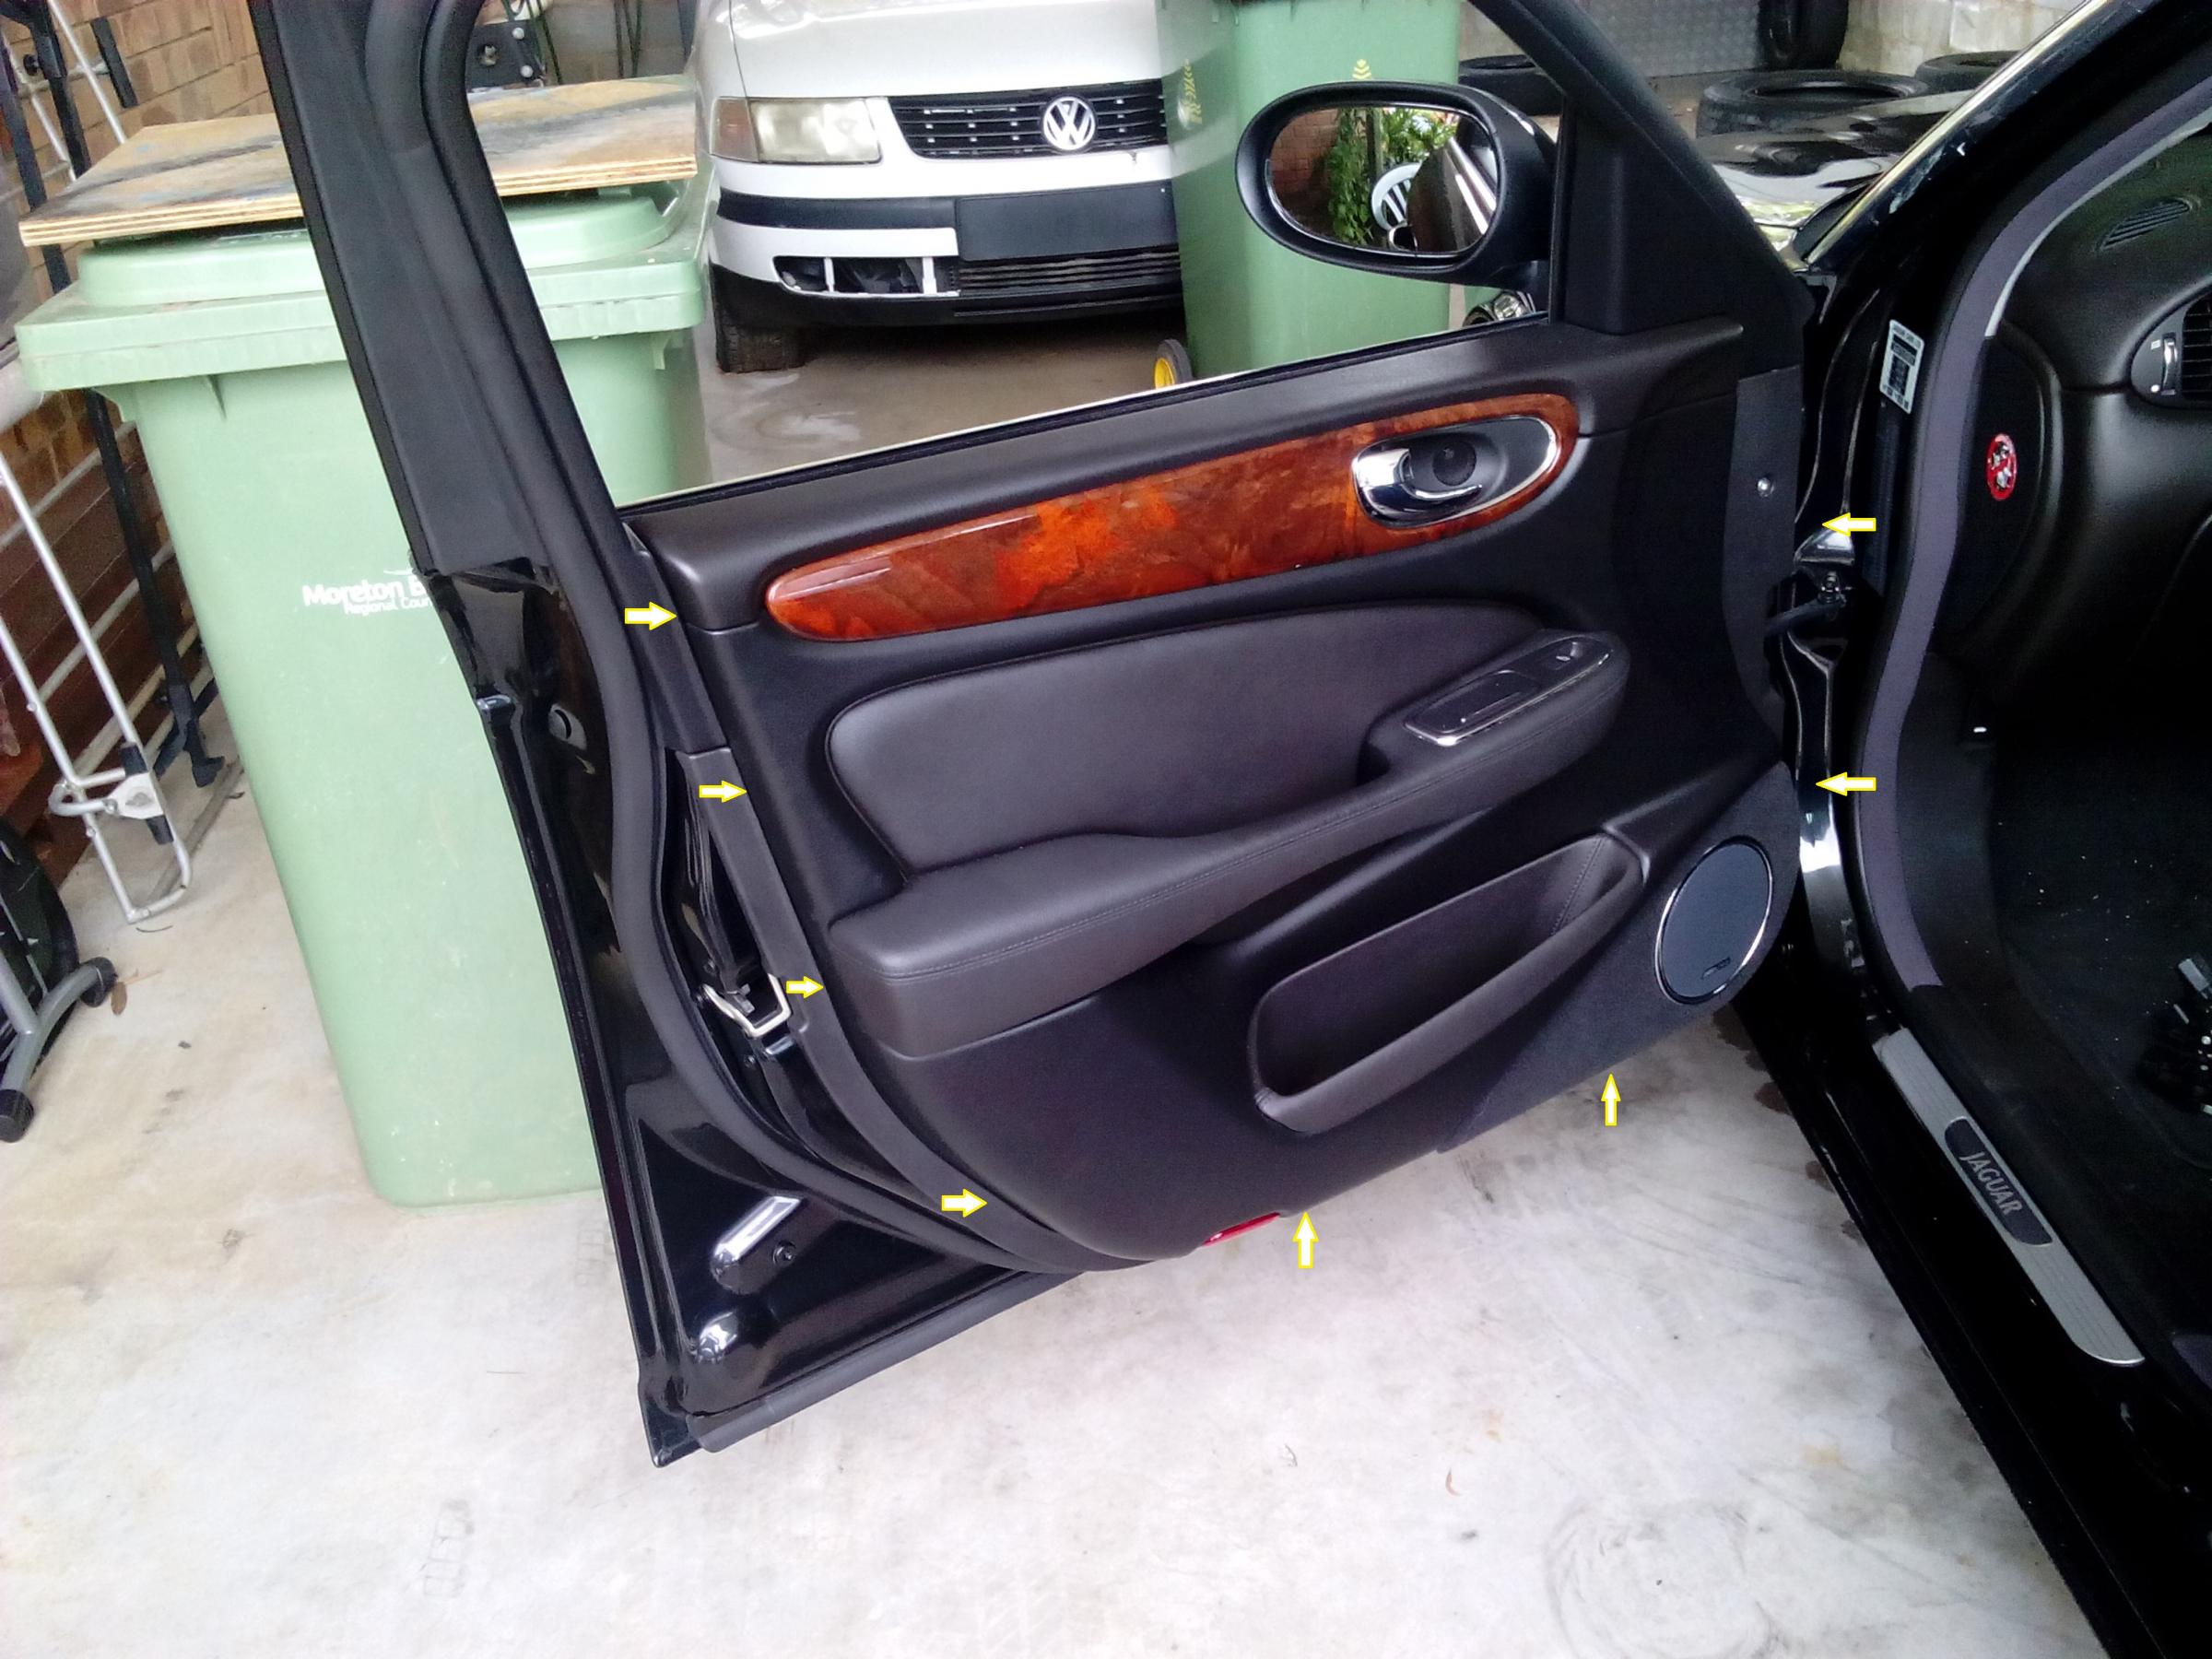
Step 1Remove the door card
From within the door lever recess, remove the small round plastic cover with a pick, then the small torx screw underneath. From under the door armrest, remove the 2 torx screws.
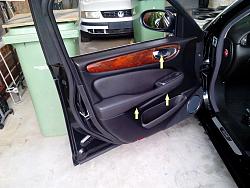
Lever off the door card, by inserting a large flat-bladed screwdriver in the gap under the edge of the door card at the positions shown, starting at the door bottom edge and working your way up both sides as the clips release

These are solid clips and will not break or pull out of the door card. Support the door card while disconnecting the wiring loom plug inside. Release the cable from the internal door lever. Set the door card aside.
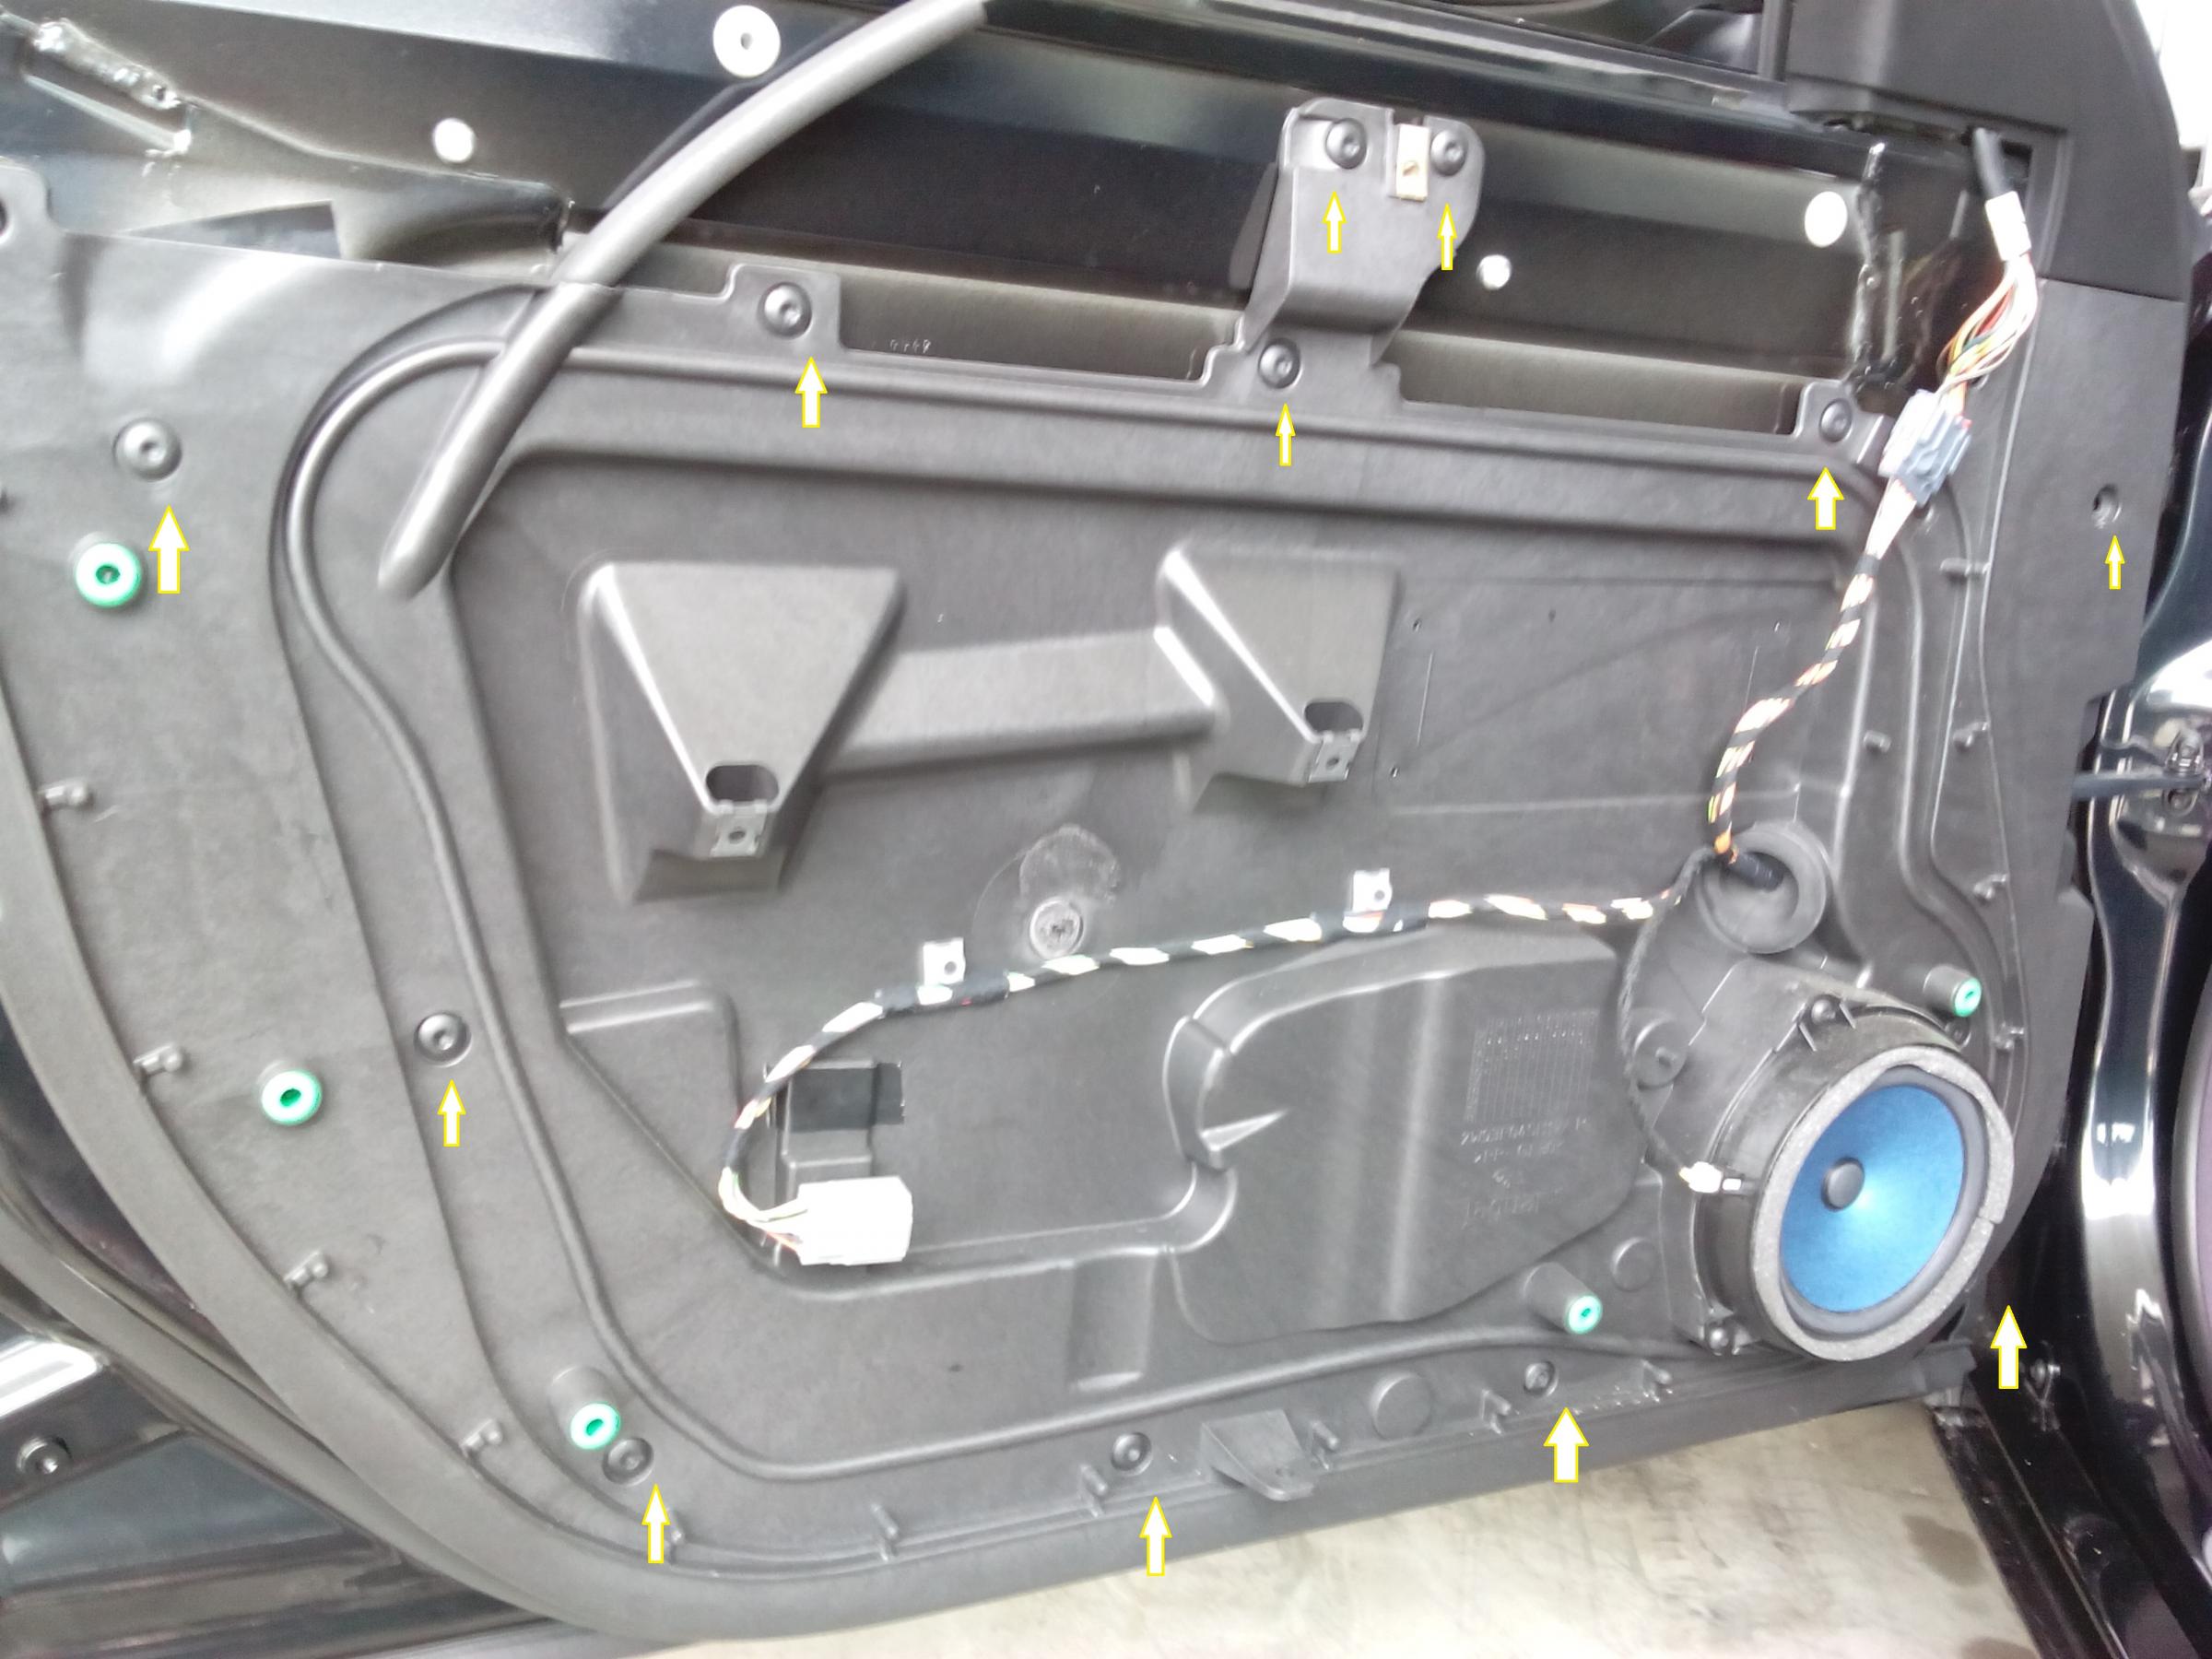
Step 2Remove the inner plastic door cover
Remove the torx screws retaining the cover.
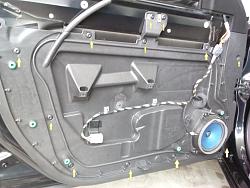
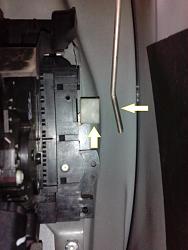
Do not disconnect the wiring loom plug (to maintain power to the window winder and actuator). Simply swing the door cover up out of the way and tie it to the window frame with a large cable tie
Note the position of the cable tie and also the internal door lever cable and the window glass support strut.
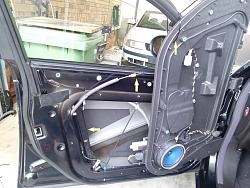
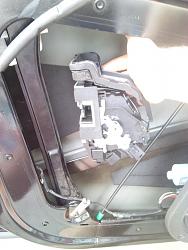
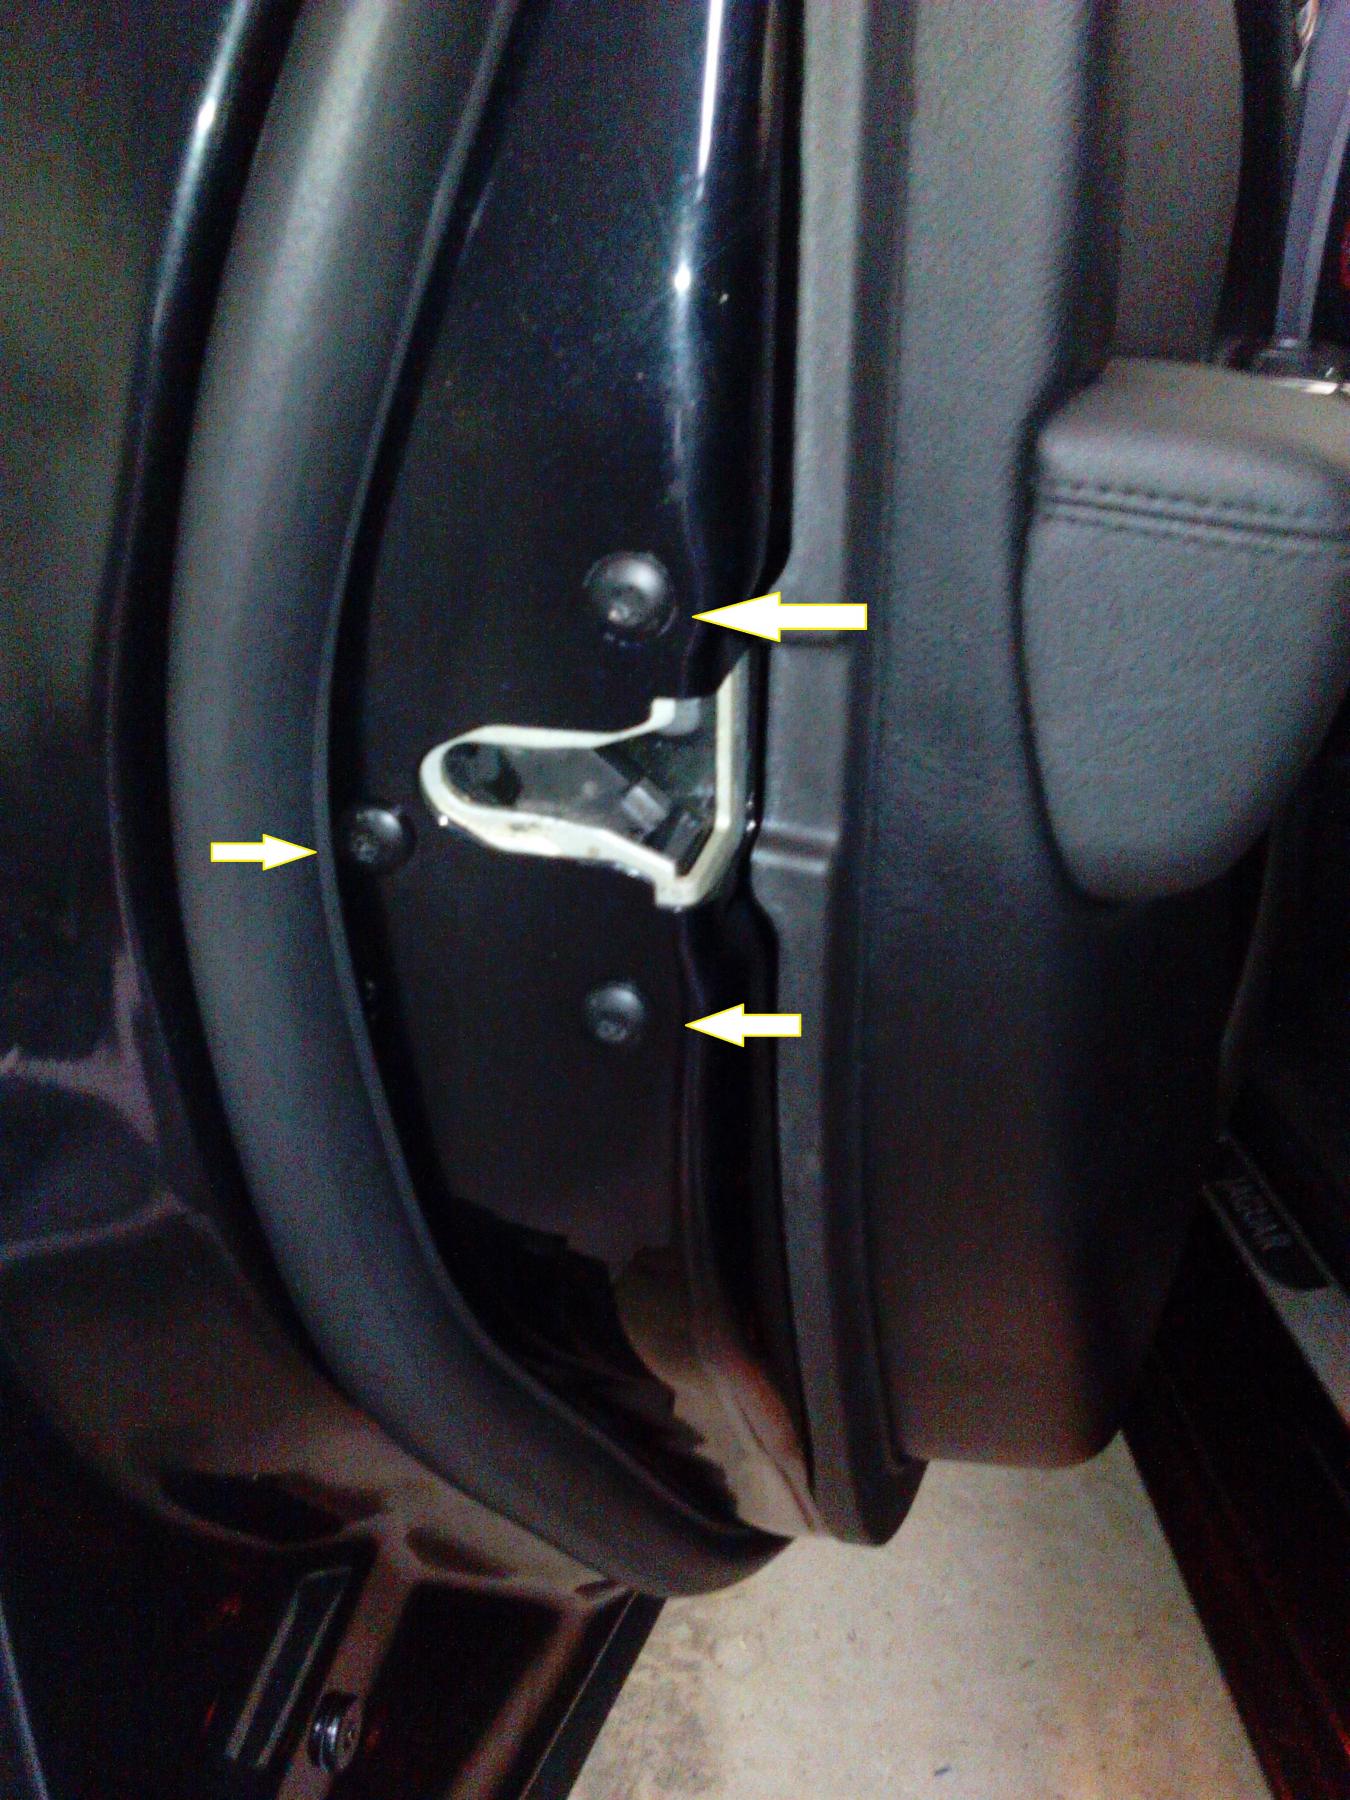
Step 3Remove the actuator
Wind up the window most of the way, remembering the cable tie! From the outside edge of the door, remove the 3 torx screws retaining the actuator.
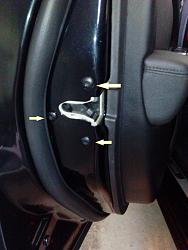
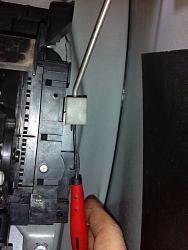
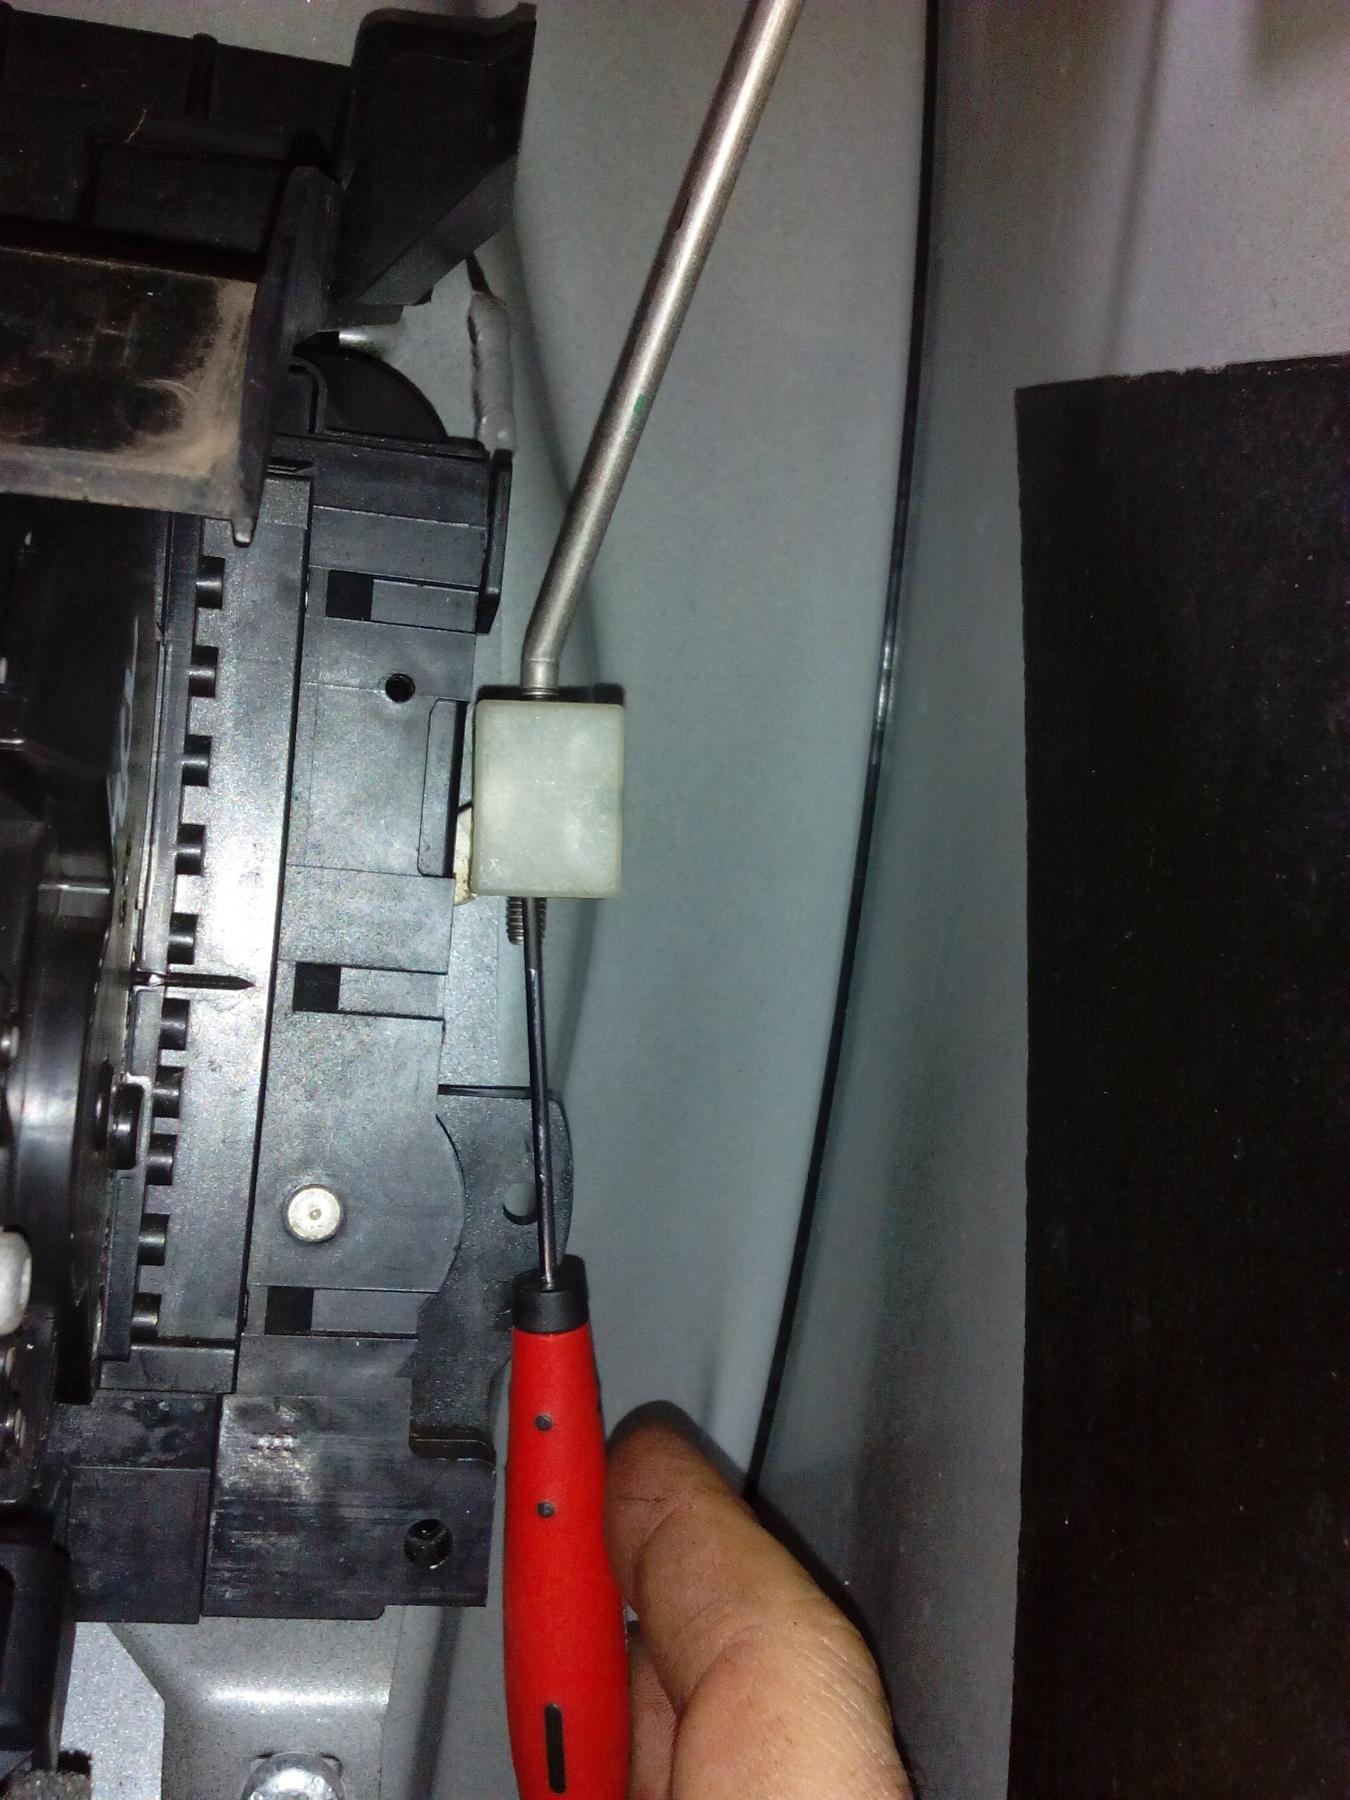
When the actuator is unbolted, reach inside the door frame and disconnect the external door lever rod from the actuator, by levering off the white clip with a small screwdriver.
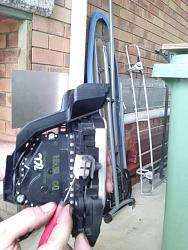
Disconnect the two wiring loom plugs. Re-route the cable for the internal door lever behind the window glass support strut. Slide the actuator out behind the window glass support strut. It is a fairly tight fit.
Step 4 Open the actuator housing (if actuator is to be repaired rather than replaced)
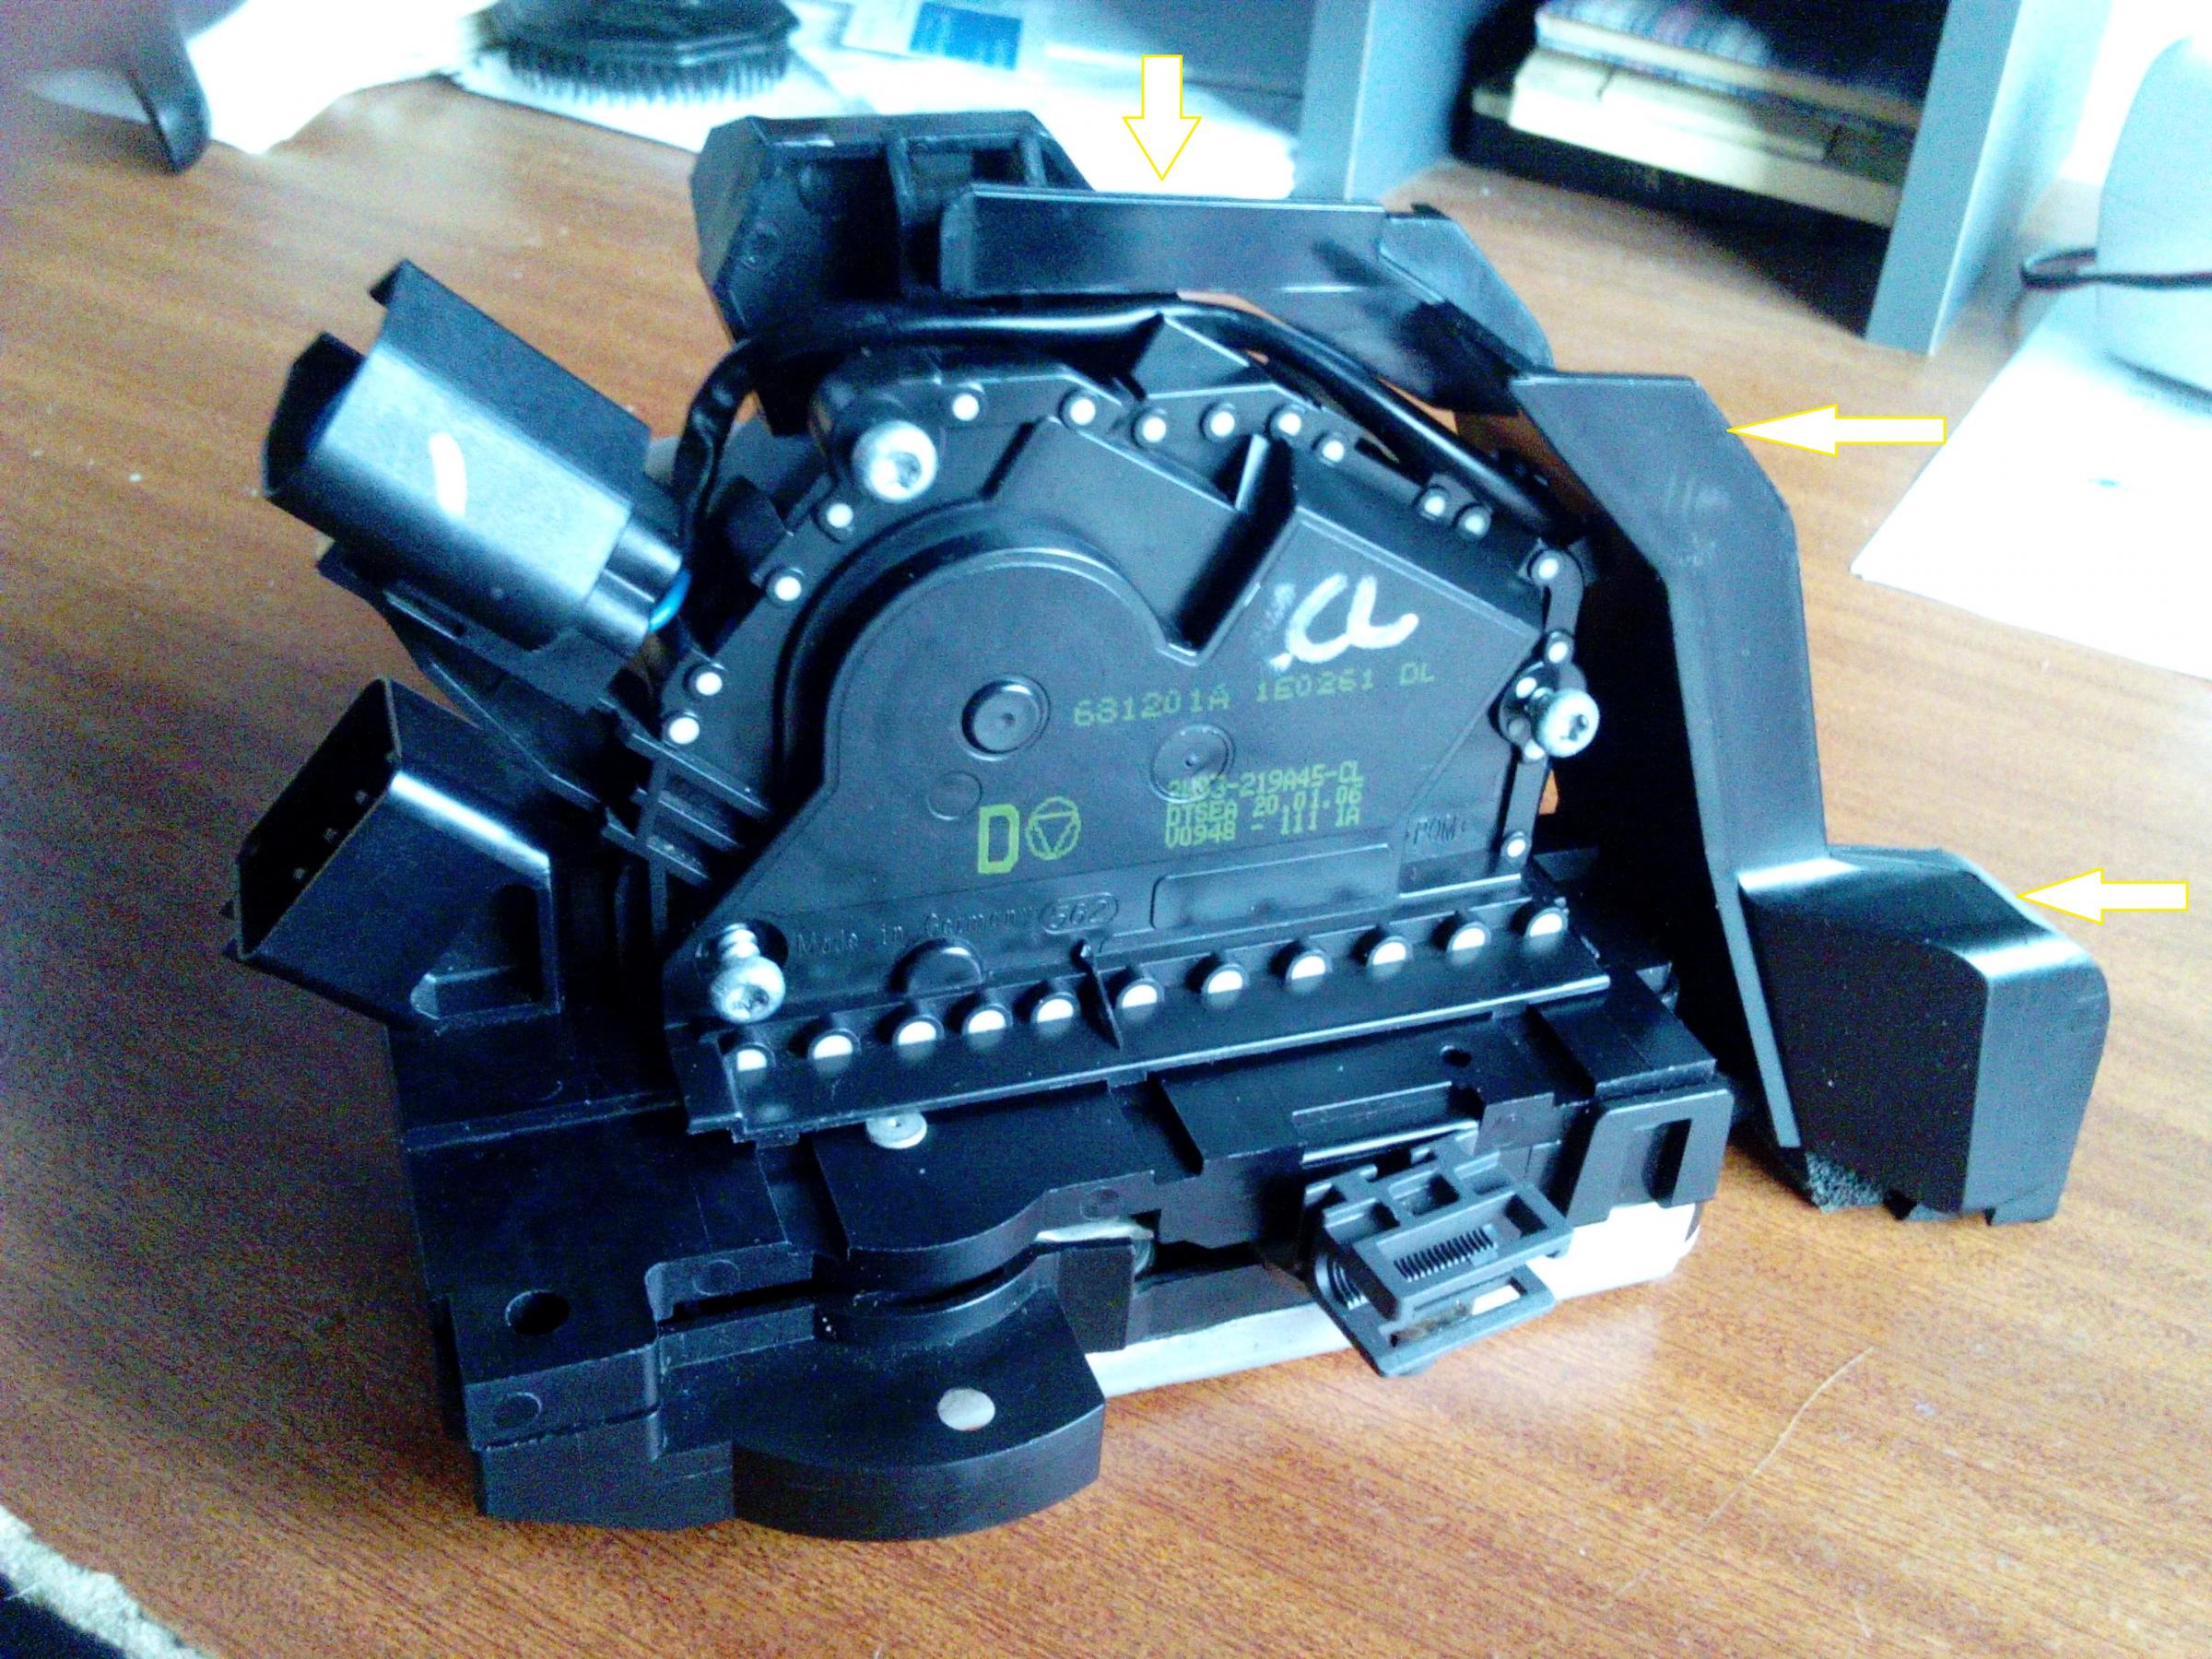
Remove the moisture shield. It is retained by clips on the top and right side of the housing.
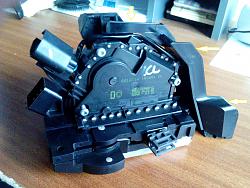
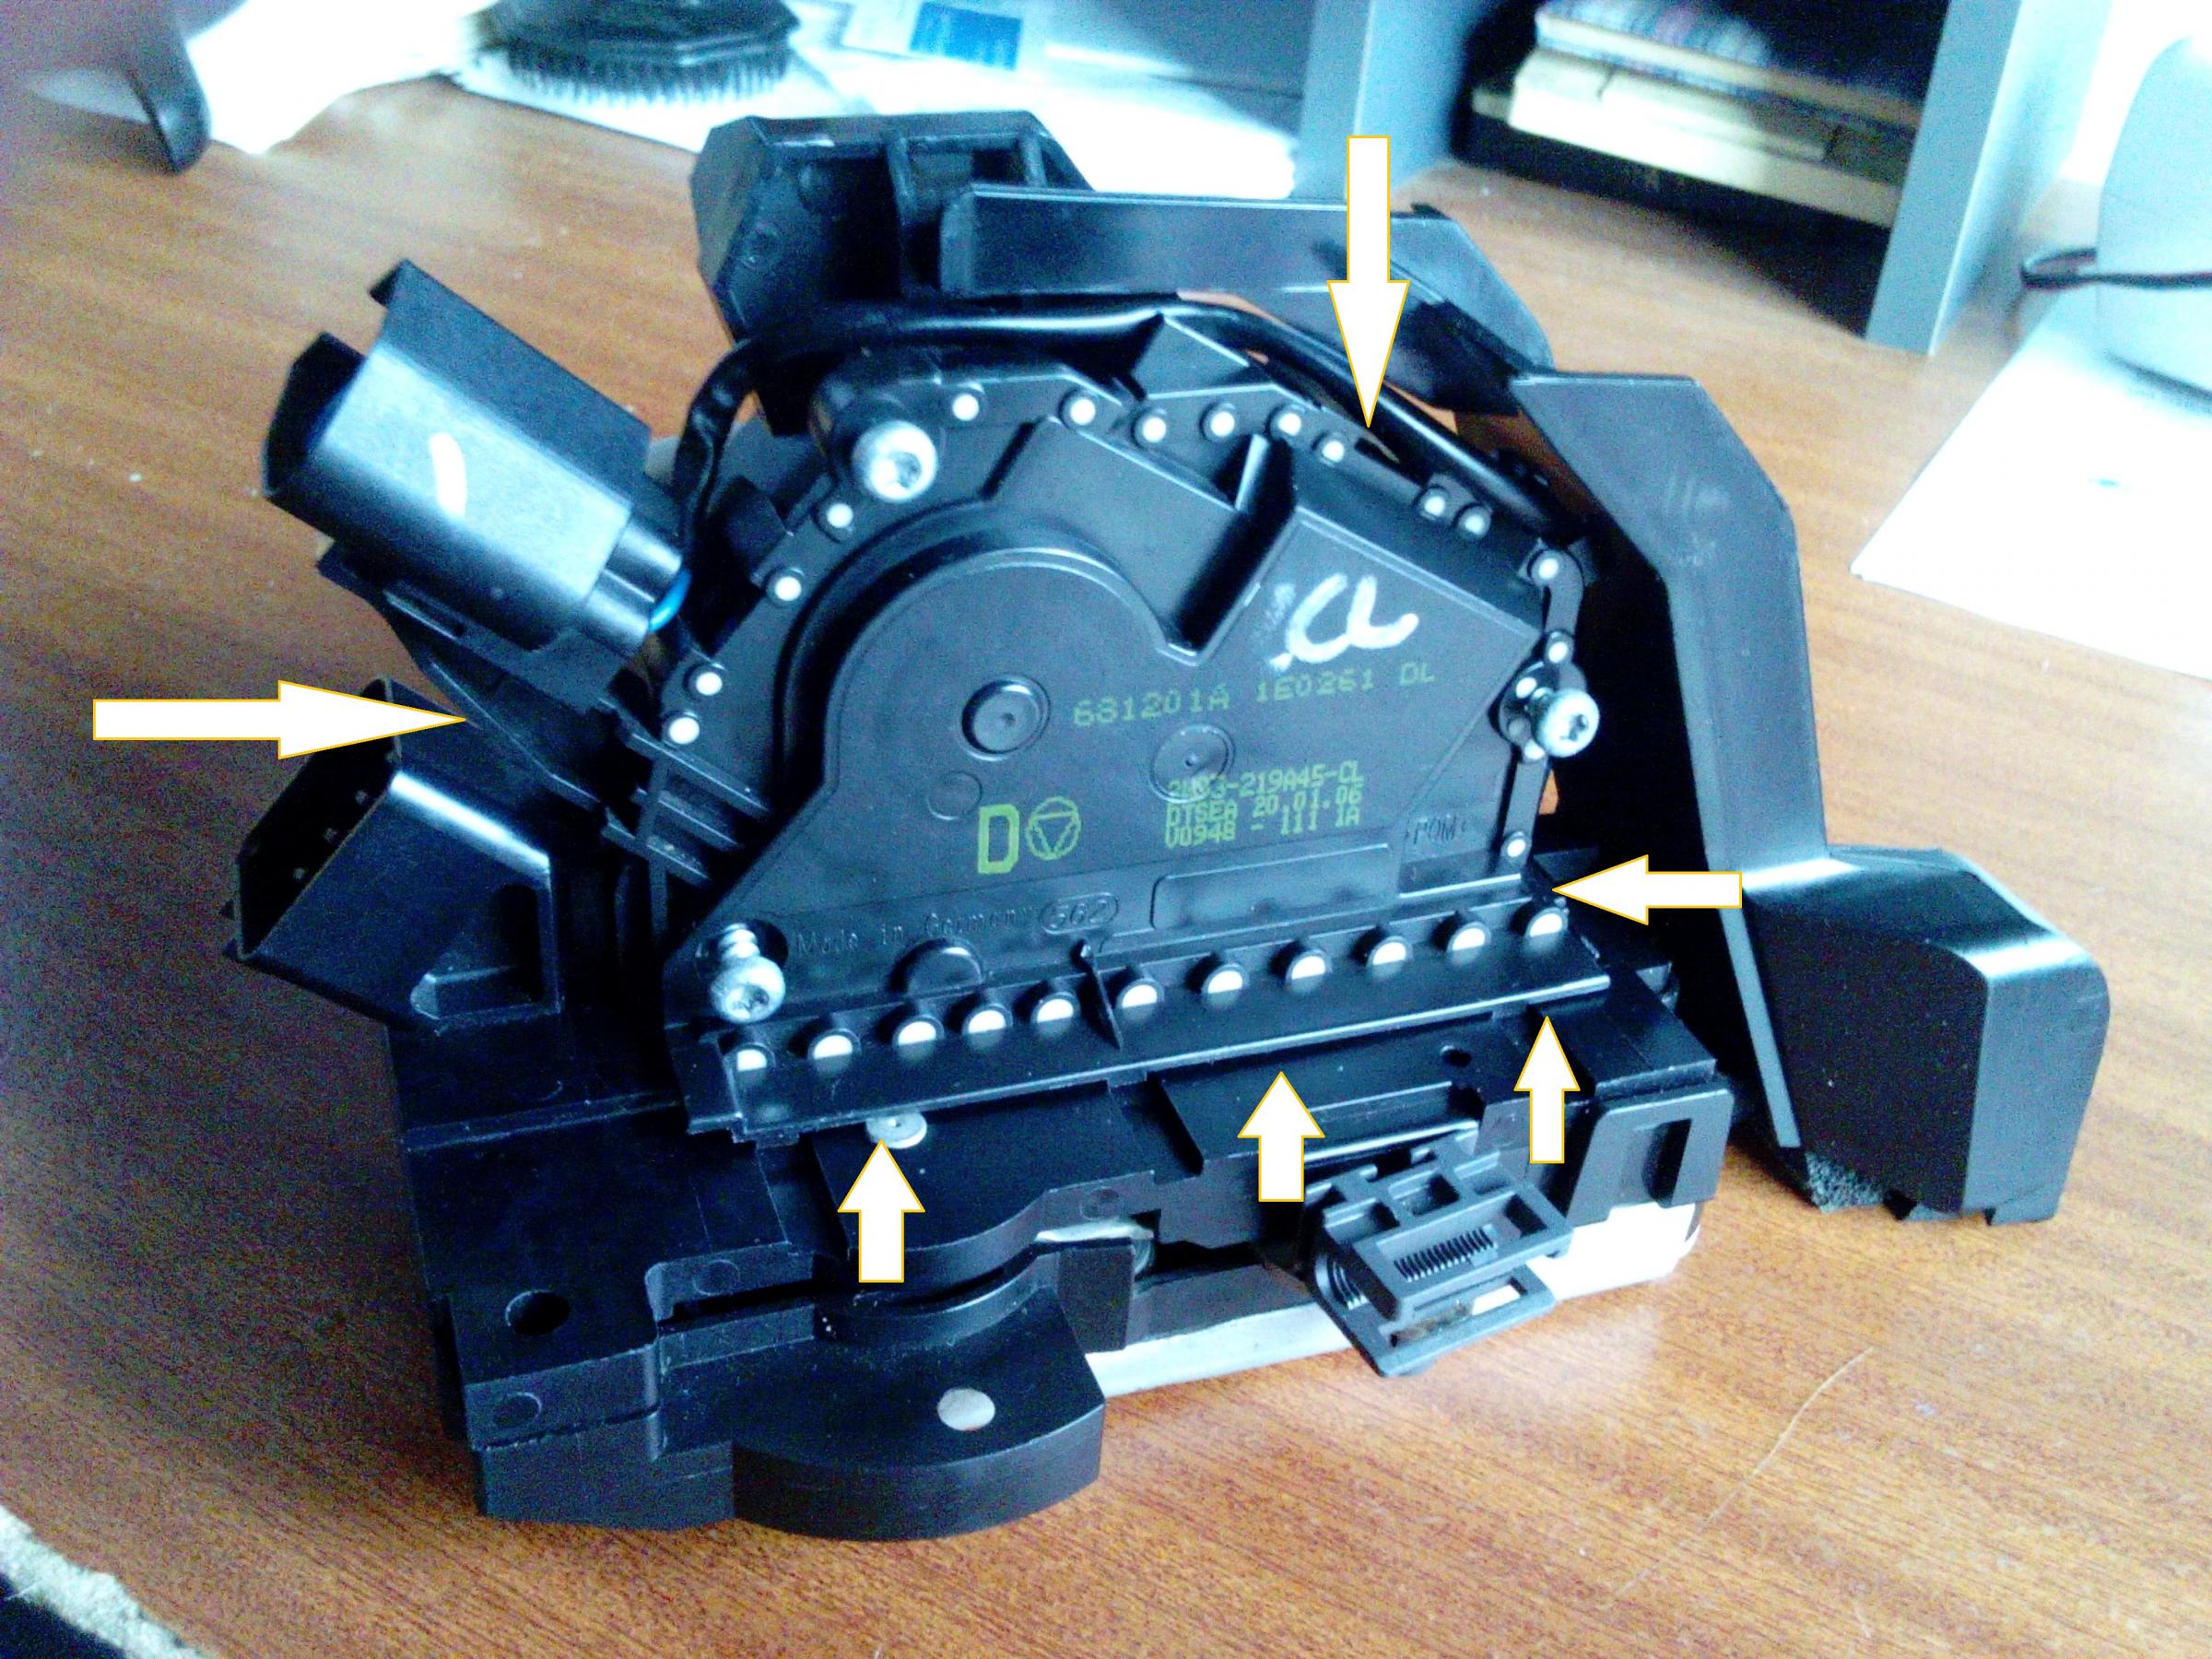
Remove the 3 torx screws retaining the cover to the actuator housing.
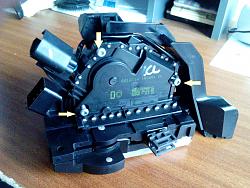
Remove the cover by releasing the large clips on the top right and top left of the housing. Along the bottom edge, insert and slide a small flat-bladed screw driver between the cover and housing, until the 3 lower clips are also released. The cover will then come off easily.

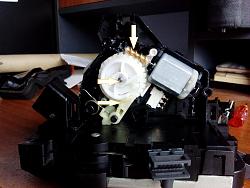
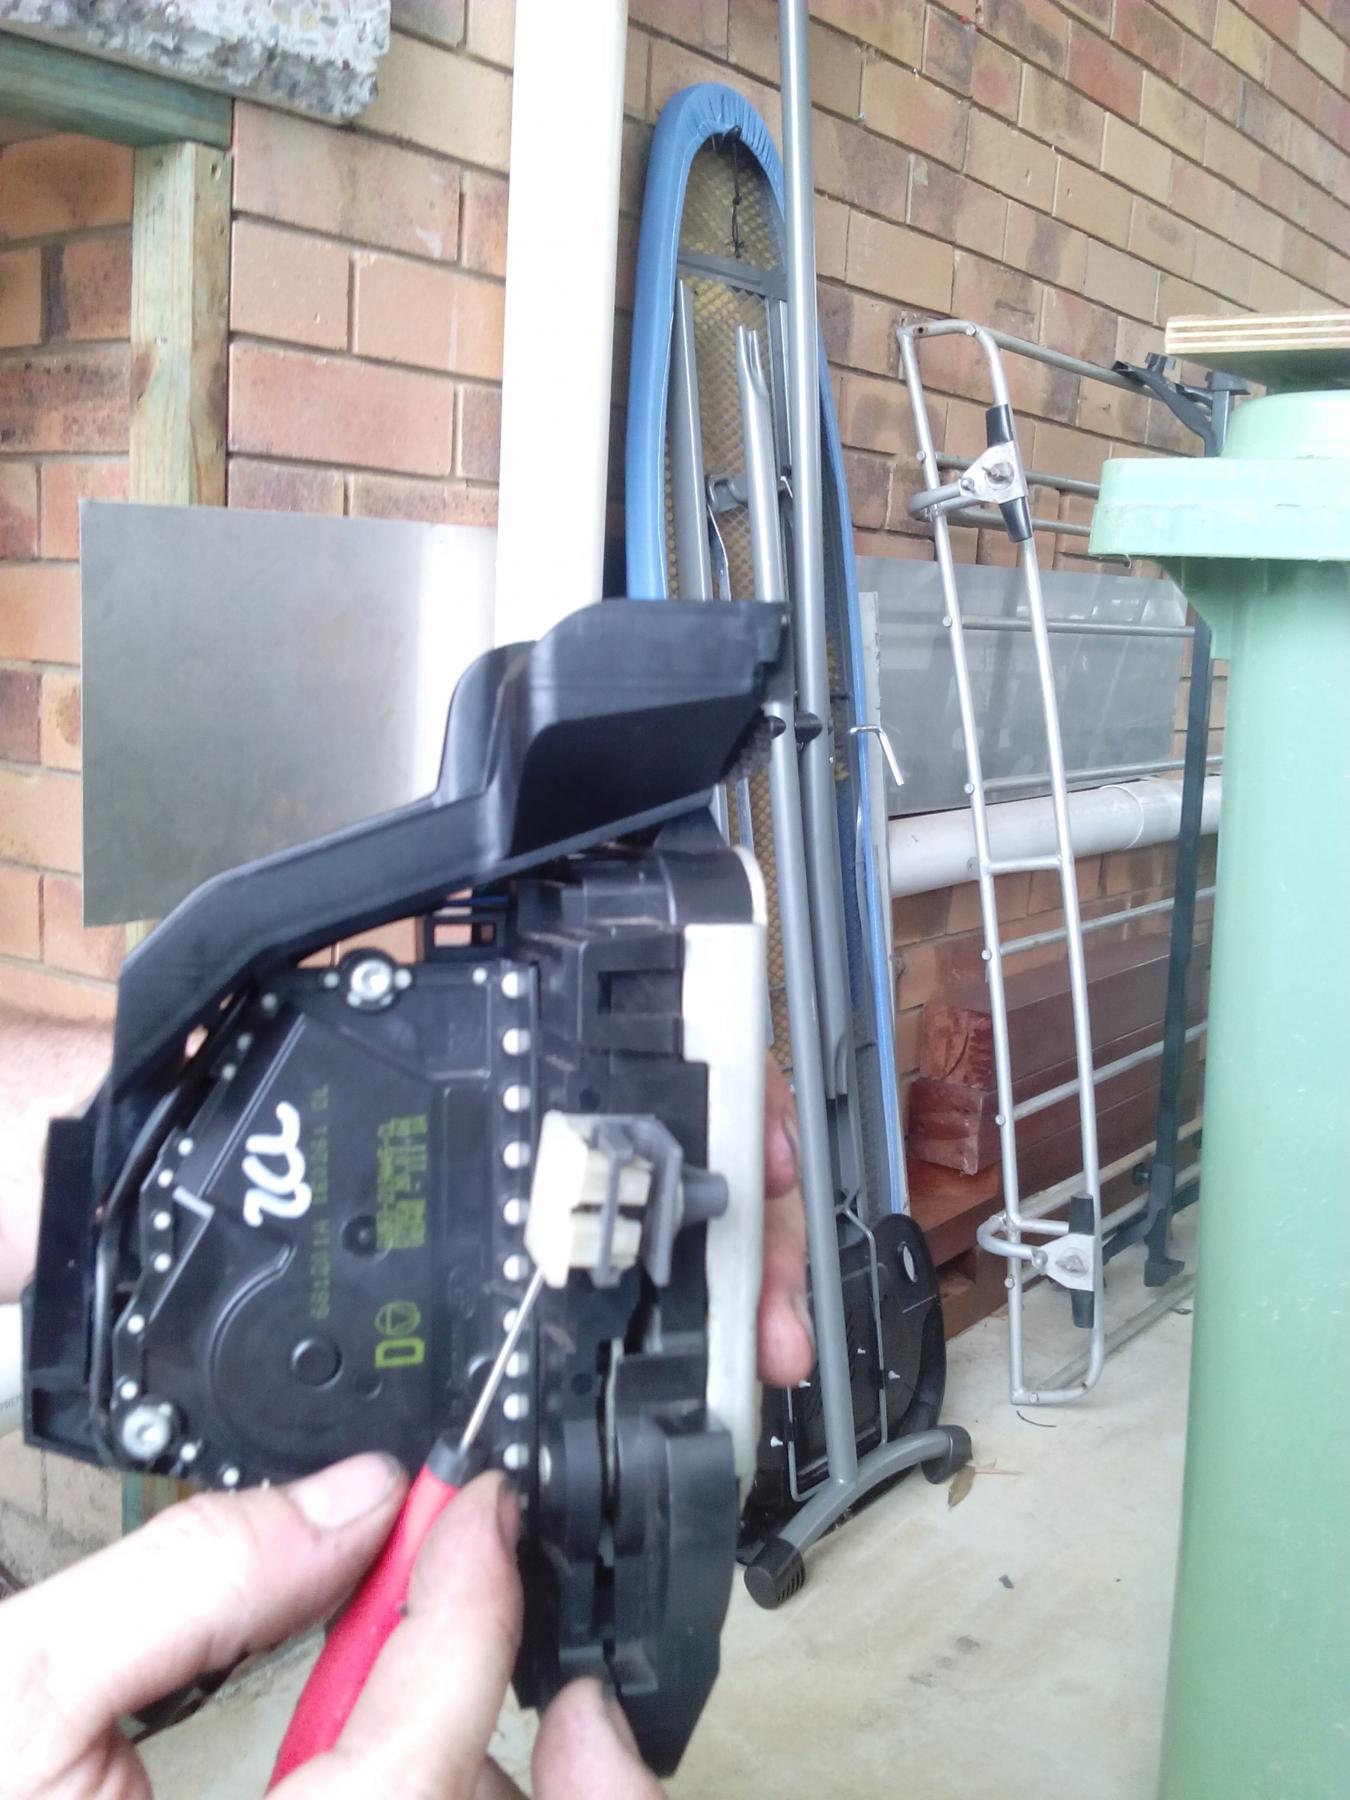
Step 5 Examine the actuator to determine cause of faulty operation
Once the cover was removed, I examined the internal mechanism for failed components but found none. The mechanism basically consists of a motor driving a rotating cam gear, which locks and unlocks the actuator latch. The motor is powered from pins 5 and 6 in the 8 pin female socket. Polarity reversal is used to reverse the motor for locking/unlocking operations. A 3 pin micro switch switches the current from pin 5 to the motor. The mechanism is designed to interrupt current to the motor during part of the unlocking operation during which it ‘free-wheels’ for some as yet unknown reason, possible to reduce noise and vibration? Using a 12v power supply, I confirmed the fault symptoms, by operating the actuator to lock, by applying positive current to pin 5 and negative current to pin 6 and then reversing polarity to unlock. The actuator can also be connected to the cars wiring loom plugs for this process. Before applying power, clamp the motor in its open housing to prevent its escape.
I concluded that the unlocking operation was failing because of excessive friction in the mechanism, stopping travel during ‘free-wheeling’. The unpowered free-wheeling phase relies on the mechanism to be correctly lubricated.
Step 6 Lubricating the actuator
Remove the actuator cam wheel and grease its bottom side cam groove as well as the components as shown on its top side with lithium or other plastic-safe grease. Note that the amount of grease is critical. Too much will increase friction rather than reduce it. Add/remove grease as required and test the actuator to ensure it operates correctly, before replacing in the car.
Actuator reassembly and car re-installation is the reverse of steps 1 to 4.
Good luck and please let me know of any errors or omissions.
These procedures apply equally well for replacement of the actuator (part numberC2C30696?) if it is not to be reconditioned.
Removal and replacement is performed with the car battery connected because power is required during these processes. This is a relatively easy job and does not require any special tools and equipment other than the following:
male torx drivers with ratchet
screw drivers
small pick
long cable ties
lubricant grease
clean rag
Allow about an hour for actuator removal, half an hour for replacement and another hour if the actuator is to be disassembled, lubricated and re-assembled.
Step 1Remove the door card
From within the door lever recess, remove the small round plastic cover with a pick, then the small torx screw underneath. From under the door armrest, remove the 2 torx screws.
Lever off the door card, by inserting a large flat-bladed screwdriver in the gap under the edge of the door card at the positions shown, starting at the door bottom edge and working your way up both sides as the clips release
These are solid clips and will not break or pull out of the door card. Support the door card while disconnecting the wiring loom plug inside. Release the cable from the internal door lever. Set the door card aside.
Step 2Remove the inner plastic door cover
Remove the torx screws retaining the cover.
Do not disconnect the wiring loom plug (to maintain power to the window winder and actuator). Simply swing the door cover up out of the way and tie it to the window frame with a large cable tie

Note the position of the cable tie and also the internal door lever cable and the window glass support strut.
Step 3Remove the actuator
Wind up the window most of the way, remembering the cable tie! From the outside edge of the door, remove the 3 torx screws retaining the actuator.
When the actuator is unbolted, reach inside the door frame and disconnect the external door lever rod from the actuator, by levering off the white clip with a small screwdriver.

Disconnect the two wiring loom plugs. Re-route the cable for the internal door lever behind the window glass support strut. Slide the actuator out behind the window glass support strut. It is a fairly tight fit.

Step 4 Open the actuator housing (if actuator is to be repaired rather than replaced)
Remove the moisture shield. It is retained by clips on the top and right side of the housing.
Remove the 3 torx screws retaining the cover to the actuator housing.

Remove the cover by releasing the large clips on the top right and top left of the housing. Along the bottom edge, insert and slide a small flat-bladed screw driver between the cover and housing, until the 3 lower clips are also released. The cover will then come off easily.
Step 5 Examine the actuator to determine cause of faulty operation
Once the cover was removed, I examined the internal mechanism for failed components but found none. The mechanism basically consists of a motor driving a rotating cam gear, which locks and unlocks the actuator latch. The motor is powered from pins 5 and 6 in the 8 pin female socket. Polarity reversal is used to reverse the motor for locking/unlocking operations. A 3 pin micro switch switches the current from pin 5 to the motor. The mechanism is designed to interrupt current to the motor during part of the unlocking operation during which it ‘free-wheels’ for some as yet unknown reason, possible to reduce noise and vibration? Using a 12v power supply, I confirmed the fault symptoms, by operating the actuator to lock, by applying positive current to pin 5 and negative current to pin 6 and then reversing polarity to unlock. The actuator can also be connected to the cars wiring loom plugs for this process. Before applying power, clamp the motor in its open housing to prevent its escape.
I concluded that the unlocking operation was failing because of excessive friction in the mechanism, stopping travel during ‘free-wheeling’. The unpowered free-wheeling phase relies on the mechanism to be correctly lubricated.
Step 6 Lubricating the actuator
Remove the actuator cam wheel and grease its bottom side cam groove as well as the components as shown on its top side with lithium or other plastic-safe grease. Note that the amount of grease is critical. Too much will increase friction rather than reduce it. Add/remove grease as required and test the actuator to ensure it operates correctly, before replacing in the car.

Actuator reassembly and car re-installation is the reverse of steps 1 to 4.
Good luck and please let me know of any errors or omissions.
Last edited by Don B; 12-12-2014 at 11:42 PM. Reason: Forum feedback
The following 23 users liked this post by henry crun:
AD2014 (12-08-2015),
ayavner (01-01-2016),
brittunculus (03-05-2015),
Clamdigger (12-12-2015),
clivedavies (12-07-2015),
and 18 others liked this post.
#2
12-12-2014, 10:47 AM
The following 2 users liked this post by Revonok:
clivedavies (03-20-2016),
eliotb (03-01-2024)
#3
12-12-2014, 01:55 PM


Join Date: Feb 2014
Location: Crossroads of America
Posts: 19,391
Received 12,735 Likes
on
6,379 Posts
Henry,
Thanks for the excellent and informative "How To." The rest of us will benefit for years to come.
Just one tip I would add: petroleum-based grease can cause some plastics to deteriorate over time, so it would be a good idea to use a lithium, silicone or otherwise plastic-safe grease.
Thanks again for taking the time to prepare and share this very helpful tutorial!
Cheers,
Don
Last edited by Don B; 03-10-2022 at 11:35 AM.
The following users liked this post:
AD2014 (12-08-2015)
#4
12-12-2014, 02:21 PM
Veteran Member
#5
12-12-2014, 08:00 PM
Veteran Member
Join Date: Nov 2006
Location: Glasgow, Scotland UK
Posts: 47,303
Received 9,005 Likes
on
4,113 Posts
The following users liked this post:
lcmjaguar (12-13-2014)
#7
12-07-2015, 09:38 AM

Henry,
Having done this task on my '07 XJ8L over the weekend I would like to add a few comments.
After removing the 4 or so door panel screws, I was initially putting the pry tool between the aluminum door and the inner door panel. That was futile as its held in place by the dozen or so torx in step 2. After looking at the pictures again I put the pry tool between the two door panels and the fasteners popped off quickly and without damage just as you stated.
In step 3, you're missing the actuator rod that runs from the exterior key tumbler to the actuator. Once the actuator is unbolted from the door and it drops, the strain on the key rod tells the car to do an 'all open' for doors and sunroof. I discovered this as I had my hands and drop light inside the door frame as I watched in horror as the window came down. I was able to escape damage other than my window glass coming off its lower track frame. For this reason I would highly recommend you disconnect the battery and then reconnect as needed for diagnosing.
I was unable to get the exterior handle lever rod off as you show without potential damage so I elected to remove the rod from the exterior handle and then take out the actuator and remove the rod & re-install the rod. Once out I noticed my assembly has a red locking tab that makes getting the rod out impossible. The rod on the actuator has a plastic stud with 2 wings that need to be compressed to release and there was no access to do so as long as the actuator was in the door.
Once the latch actuator was out and on the bench, I was able to understand how the lock feature works. My issue is the key fob won't lock or unlock the car but you can do so with the key in exterior hole. I applied 12VDC from a power supply to pins 5 & 6 reversing polarity and got nothing.
Tonight I'll attempt to disassemble the actuator and see whats not working inside. I can also confirm that pins 5&6 are the correct pins once I get it taken apart.
Jeff
Last edited by Don B; 12-07-2015 at 09:53 AM.
Trending Topics
#8
12-07-2015, 07:22 PM
#9
12-08-2015, 10:21 AM
Mag,
My symptoms were the key fob would not unlock the drivers door but the other doors would unlock with the fob. If you insert the key into the drivers door exterior lock assembly the lock/unlock functions all worked properly.
The 12V motor is dead on my latch assembly. $146 from local dealer, C2C30694. Should have a new one in a few days.
Jeff
#11
12-10-2015, 12:36 AM
Join Date: Dec 2014
Location: Gold Coast, Australia
Posts: 34
Likes: 0
Received 45 Likes
on
16 Posts
Hi jefgreen.
Sorry to hear that you struck some unexpected difficulties following this procedure, expecially the 'global unlocking' scare. I apologise for some confusion here. I wrote this procedure for the passenger door (left front door for right hand drive cars). The Australian X350 front passenger door has no key access and hence no key actuator rod, which explains why I was unaware of it.
Your driver's door actuator will also have at least one additional micro switch inside it, which means that pins 5 and 6 may not necessarily be the appropriate motor drive electrical connections either. Therefore, I would suggest re-testing your actuator motor from any 12v source (if its not too late to avoid replacement).
I should have emphasized the left/right door difference, expecially when posting on the US forum! Anyway, good job on removing your actuator despite the confusion.
Henry

#13
12-16-2015, 11:38 AM
No worries Henry, I've worked on cars long enough to know that disconnecting the battery is always prudent, that mistake was on me.
And I did confirm via a ohm meter that pins 5 & 6 are correct for the 12V feed for a US drivers door.
Sadly, replacement of the actuator didn't fix my fob locking problem, so more investigation is needed. Haven't had a chance to look into it since last week. I noticed my drivers rear view mirror no longer works either, door module maybe?
Jeff
#14
12-31-2015, 09:14 AM
Fuse 28 was blown, which powers DDM (driver door module) and climate control. Having replaced the fuse all seems to be working now.
So my theory is latch assembly failed, which may have resulted in blown fuse. Or its possible that while fiddling around inside the door with the battery connected I blew the fuse too. I tested the original latch assembly outside of the car and it was dead. After latch replacement I noticed the puddle lamp and drivers mirror were no longer working either. And my climate control would no longer regulate temp. I assumed climate control and drivers door woes were separate issues. Having reached a point of frustration I brought it to dealer and prepared for the worst. After a day they were stumped but called back an hour later to announce fuse 28 was the culprit. $120 for labor to diagnose and $4 for fuse.
I've since found web references to fuse assignment, which I wish I had looked for before I brought it the dealer as they would have been useful information.
Jeff
#15
03-18-2016, 03:47 PM

Excellent post! Thanks! I am wondering if the speaker cover can be removed without removing the door panel (2005 XJ8L with Alpine audio). Does anyone have any idea? My only real concern about removing the door panel is getting it put back together without any squeaks or rattles, so if the speaker cover can be removed on its own, I'd prefer that. I've got front driver's door (US) and rear passenger door speakers out and I want to check the connections and see if another speaker works. Seems to be a common problem with XJ350s. I'm thinking the way I've played my music, I probably melted the voice coils! Long live Geddy, Neil, and Alex!
Also, does anyone know if the Alpine door speakers front and back are the same? If so, I'll move the front passenger to the rear passenger and buy replacements for both front speakers. It's a great stock system when it's all working!
Thanks!
Tony
Also, does anyone know if the Alpine door speakers front and back are the same? If so, I'll move the front passenger to the rear passenger and buy replacements for both front speakers. It's a great stock system when it's all working!
Thanks!
Tony
#16
03-19-2016, 07:35 PM
Join Date: Dec 2014
Location: Gold Coast, Australia
Posts: 34
Likes: 0
Received 45 Likes
on
16 Posts
Hi Tony.
I doubt that the speaker covers can be removed separately from the outside of the door panel, but I don't know for sure. The door panel is quite securely attached, so you can rest assured that removal and replacement will not leave any squeaks or rattles. I assume that front and rear door speakers are identical, but I don't know for sure.
I doubt that the speaker covers can be removed separately from the outside of the door panel, but I don't know for sure. The door panel is quite securely attached, so you can rest assured that removal and replacement will not leave any squeaks or rattles. I assume that front and rear door speakers are identical, but I don't know for sure.
#17
04-24-2016, 02:51 AM
Junior Member
Join Date: Mar 2016
Location: Kuwait City
Posts: 29
Likes: 0
Received 0 Likes
on
0 Posts
Hi henry crun
I see you've spent a lot of time diagnosing & repairing your JXR door lock problem so I was hoping you would be able to help me troubleshoot mine.
I have a 2004 XJR, bought two weeks ago, and I've noticed a strange behavior of my driver's (LHD, Middle East) door lock.
The thing is I can't open my door from the inside using the handle (neither big nor small) once the automatic central locking locks all the doors.
So, if I've already switched the engine off, I can either unlock the doors by pressing the unlock button on the fob or by reaching over to the passenger door handle to unlock the door. If the engine is still running I can also use the lock/unlock button on the entertainment unit's top button row.
My door handle unlocks all doors before the automatic central locking kicks in - engine running or not.
Basically all locking/unlocking options work except pulling the handle on my door, once all the doors have been centrally locked by the system.
The mechanics here in Kuwait possess a quite rudimentary knowledge of modern cars and prefer to keep replacing parts until the right one does the job, so I would really like to hear your opinion of the symptom described, before I fork out hundreds of $$$ to repair this (I still hope) minor issue.
#18
04-24-2016, 02:42 PM
Join Date: Dec 2014
Location: Gold Coast, Australia
Posts: 34
Likes: 0
Received 45 Likes
on
16 Posts
Hi brokic
My guess is that your drivers inside door handle micro switch has failed. Such a failure would explain why your door can be opened manually (by the direct mechanical linkage between the inside door handle and door latch) and also by the other inside door handles (which send current to all door actuator motors from their individual micro switches). The lock/unlock button on your entertainment unit's top button row should also send current to your drivers door actuator motor.
Unfortunately, your drivers door micro switch resides inside the door latch actuator, which must be removed from inside your door. I have no experience with micro switch repair/replacement; the conventional resolution is to replace the actuator.
Good luck!

#20
04-24-2016, 09:55 PM
Junior Member
Join Date: Mar 2016
Location: Kuwait City
Posts: 29
Likes: 0
Received 0 Likes
on
0 Posts
Thanks to both Aussie comrades for your suggestions.
I will try first to remove the door card to look for the detached cable., hoping I will not have to replace the actuator.
I am not very familiar with electronic door locking systems, so I would appreciate if you could educate me a bit on the following:
If the micro-switch is faulty, how my door handle unlocks the driver's and all other doors for approx. 10 seconds after the engine is started and BEFORE I move the gear lever from P to D and all doors get automatically locked?
Once all the doors have been automatically locked my door handle does not open anything, neither while the engine is running, nor when it is switched off - irrespective of the gear lever position.
The same question goes in the case of the detached cable