When you click on links to various merchants on this site and make a purchase, this can result in this site earning a commission. Affiliate programs and affiliations include, but are not limited to, the eBay Partner Network.
Both of our rear side marker lamps failed due to water ingress and the resulting corrosion, so I ordered new lamps from jaguarmerriamparts.com for $31.85 each.
Replacing the lamps is relatively easy, but since questions about this job are posted from time to time, especially about how to remove the lamps, I thought I'd document the process with photos. The procedure is similar whether you're replacing the lamps or just the bulbs, which on our car are W5W-2825. The procedure is also similar for both the front and rear lamps.
For our U.S.A. spec 2004 XJR, the Right lamp is part number C2C2049, the Left lamp is C2C2050. Check the Electronic Parts Catalog for the part numbers appropriate for your model and region, which may be different. Though not shown in the photo below, the new lamps come complete with the bulb sockets/electrical connectors.
Fellow member Luke2004xjr discovered that the bulb socket for these lamps is the same as for a VW Golf/Jetta sidemarker, and is available individually under the VW part number 1H0 -949-111 or 1H0949111. I ordered a pair from vwpartsnation.com for $12.62 each plus shipping to service our front lamps before water does them in:
Apply two layers of masking tape or painter's tape to protect the chrome trim, then use a plastic trim tool to carefully pry the wide end of the lamp outward. You may be able to get away with using a wide flat-bladed screwdriver, but you risk damaging the chrome trim.
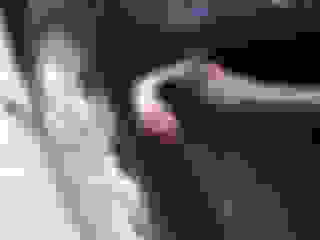
There are two spring clips on the top edge of the lamp (arrows). The clips will either slide out gracefully, or catch on the edge of the bumper cover. If they catch, just continue prying. The clips will bend, but can be reshaped before reinstallation.
The electrical connector is too large to fit through the narrower end of the opening, so slide the lamp toward the wide end. You may have to work the connector past an obstruction inside the bumper cover.
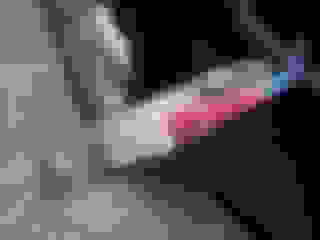
This lamp is damaged in two ways. The top edge of the red plastic is chipped, probably due to an incorrect attempt to remove the lamp by the previous owner. Furthermore, the bulb was either positioned incorrectly or vibrated into contact with the plastic lamp housing. The heat of the bulb melted a hole in the housing (arrow), allowing water to enter freely.
To disconnect the combination bulb socket/electrical connector from the lamp, twist counter-/anti-clockwise about 1/8 of a turn.
Note the corrosion in the bulb socket. Ugly!
To disconnect the socket from the harness, just depress the wire bail and separate the parts. Note the same ugly corrosion in the electrical connector.
To properly clean the harness connector, the red retainer-insulator must be removed. Use a small flat-bladed screwdriver to very carefully pry it out of the connector. Pry with your screwdriver at several different points to spread the stress and reduce the possibility of deforming or cracking the retainer.
The female terminals in the harness connector are a little difficult to clean. A small wire brush is useful. I also like a tool called a Nick Sander, designed for preparing finish chips for touch-up paint. The plastic handle holds a bundle of glass fibers that protrude from the end. The glass fibers can reach into the connector to scrub away corrosion without scratching the metal contacts. The protruding length of the fibers can be extended to reach more deeply into the connector by rotating the ribbed cap on the end of the tool.
Flush the connector thoroughly with zero-residue electric contact cleaner spray. Depending on how badly a connector is corroded, you may need to scrub it again with the wire brush or Nick Sander and repeat the spray flush until the connector is truly clean.
When the connector is clean and the electric contact cleaner spray has thoroughly evaporated, reposition the red retainer and carefully press it into place.
I found it easier to connect the socket to the harness first, then install the socket in the lamp. The O-ring on the new lamp was already lubricated, but I applied a little more di-electric grease to help seal out water, and also applied enough grease to the outside of the socket connector both to seal out water and to ease future disconnection for bulb replacement.
Note that due to the shape and placement of the tabs, the socket can only be installed in one orientation.
Note that the lower edge of the lamp (right) has plastic retaining tabs, while the upper edge has metal spring clips.
If possible, tilt the lamp to clip the plastic tab over the lower edge of the opening in the bumper cover and align the end stud with the square hole in the chrome trim, then carefully press the top edge of the lamp home. If you can't get the lower edge to clip on, just carefully align the lamp and press it straight in. Follow up by carefully pressing the positions of both lower plastic tabs and both metal clips to ensure the lamp is fully seated and secure.
Let there be light! The procedure for servicing or replacing the front side marker lamps is similar.
My female plugs (the black plug that you cleaned so nicely) are corroded so badly that they are basically just falling part. I can't find replacements for them anywhere. I'm told I have to buy the entire harness for the car.
Any ideas? If I could just find the plugs with a short pigtail I would splice them in...
All four of mine were so rusted that the plugs and sockets were unusable. I went to Auto zone and bought four generic sockets and just spliced them in. Cost less than $20.00 to fix all four. Brandon
All four of mine were so rusted that the plugs and sockets were unusable. I went to Auto zone and bought four generic sockets and just spliced them in. Cost less than $20.00 to fix all four.
Brandon,
Any chance you could post a photo of the sockets you used?
I suspect replacement electrical connectors could be purchased from a vendor like Summit Racing or DIY Auto Tune, or maybe even a Ford dealer. I suspect the connectors are probably used on Ford cars as well.
The new lamps come with the bulb socket so if your harness connector can be cleaned you'll be fine.
Cheers,
Don
Ohhh! So only $32 for the lamp & the socket? I was just about to order 1 on eBay which had the lamp, bulb & socket & it's $49. $32 sounds much better if that's the case!..
Ohhh! So only $32 for the lamp & the socket? I was just about to order 1 on eBay which had the lamp, bulb & socket & it's $49. $32 sounds much better if that's the case!..
That's right, Marque, and jaguarmerriamparts.com is an actual Jag dealer in Kansas.
Don B
thanks for the great write up. I in fact was working on the same issue on my front left side light, exactly the same problem. looking for the connector at the end of the wiring harness. I have a broken piece of the bulb socket in it and am not sure how well I will be able to clean it up. Worth taking off the red cover as you illustrated in your photos to try to remedy.
Has anyone found a source for the black connector on the end of the wiring harness? Its Tyco part number 1337900-1. I found a source in the UK.
Thank you for the detailed description. I am in the process of transferring my 2004 Jag XJ8 to Maryland and that requires an inspection which picked up the corrosion of the left front side marker and right rear side marker lamp sockets. They have a tight timeline once you get the vehicle inspected to have the repairs completed. The jaguarmerriamparts.com site doesn't offer expedited shipping - I called and confirmed.
Can I get some recommendations on other alternative sites that would carry these assemblies where I could get them shipped via 2-day express delivery? I'm checking with the local dealers as well.
I replaced a rear one on my 06 XJ8L and it was $90 from the dealer!
Also, on your last step. I found it easier to insert the narrow end (with the white clip part) into more of the middle of the opening, and then slide it toward the narrow end - then pushing the wide end into the retained position. Being extra careful not to scratch the chrome piece that the light housing is narrowly just above.
Hi 200Volts,
The website I mentioned, jaguarmerriamparts.com, is the parts department of the Jaguar dealer in Merriam, Kansas, who sells parts online at discounted prices. Their price was $31.85 each. It's a pity you had to pay so much.
The reason I opted to press the lamp straight in rather than sliding it in is that, due to the design of the spring clips on the top of the lamp, if the lamp is moved sideward into the opening there is a risk that the end of the clip on the narrow end will slip up above the edge of the opening and come to rest on the backside of the bumper cover, instead of snapping into its proper position with its bent end sprung against the underside of the top edge of the opening. When installed correctly, the lamp should be easy to remove, but one of our old lamps had been installed by the sliding method and the spring clip was caught, so the only way to remove the lamp was to pull so hard that the hooked clip bent backward until it would finally pass through the opening. Pressing the lamp straight in until it snaps should reduce the risk of this problem.
Thank you for the detailed description. I am in the process of transferring my 2004 Jag XJ8 to Maryland and that requires an inspection which picked up the corrosion of the left front side marker and right rear side marker lamp sockets. They have a tight timeline once you get the vehicle inspected to have the repairs completed. The jaguarmerriamparts.com site doesn't offer expedited shipping - I called and confirmed.
Can I get some recommendations on other alternative sites that would carry these assemblies where I could get them shipped via 2-day express delivery? I'm checking with the local dealers as well.
Thank you.
Hi FL04XJ8,
You might try forum sponsors SNG Barratt, Jagbits and Coventry West, along with Welsh Enterprises and Terry's Jaguar Parts, but I suspect any of them will have to order the lamps from the Jaguar North America warehouse in New Jersey just as jaguarmerriamparts would do. Your most expeditious route will probably be to order them through a local Jaguar dealer in Maryland, which should reduce the delivery time.
Thank you so much for the post, instructions and photos. The red lens fell off as we drove off the dealer lot, we have a new light assembly coming soon and these instructions will be exactly what we need to replace ours. Thanks again!!
I also have noted the heat damage and cracking of the reflector. Mine were only slightly cracked, so I squeezed silicone sealer into the cracks to keep the water out. This has been working okay and I have not blown any bulbs since making this repair.
I noted that the w4w bulbs specified were very bright and got really hot. So I replaced them with some 194 instrument panel bulbs, which do not get nearly as hot. I expect that with the 194s, new marker lights would probably last the car's lifetime without damage. You may want to consider this. The 194s are more than bright enough.
For those who need to change the wire end connector the following may be helpful.
This repair was done several years ago at a Jag dealer using 2 very fine female slide on connectors for the socket end. I found something similar at my local NAPA Canada store. The outer sheath is heat shrink tubing. Connecting to the wiring harness uses butt splices and heat shrink.
Corrosion and failure with these lights, particularly in a wet areas is a chronic problem so need to be looked at as part of regular maintenance.
Using 194 bulb is a good idea as it puts out slightly less heat or possibly an LED. Also the bulb holder socket is readily available from VW P/No 1HO-949-111, I just purchased 2 for $20.57 Can (Approx $16US).
I hope you fine this helpful.
________________________
The following 6 users liked this post by Black Rupert:
anindyam (04-24-2015),Don B (04-24-2015),EssOess (04-27-2015),lcmjaguar (04-24-2015),Sean W (10-18-2015),XJRay (04-27-2015) and 1 others liked this post. (Show less...)
What a great thread. I'm in the process of replacing the last of my corroded side markers (right front) with the vw part. When I got the 07 xj 3 weeks ago I had no light in any of the 4 side markers or license plate lights. I checked fuses first. No problem there. Then found the corrosion. Still no light though in any of the side markers or license plate lights. I only have one bulb that I'm sure is strong but no light there either. I'll put in all new bulbs this weekend but then I'm out of ideas. Any suggestions?
 10-08-2014, 09:12 PM