My free XJ40: 3.6l - 4.0l swap
#1
 01-02-2017, 08:54 PM


So I figured Id start a thread to help myself document my process, and help others who may want to do the 4.0l swap in their early XJ40s.
This started when my boss gave me his 89 XJ40. A complete stranger walked into work and gave him the car. It ran like crap, some quick diagnosis led us to believe the headgasket was gone. My boss then insisted to drive the car for another year and a bit before giving it to me.
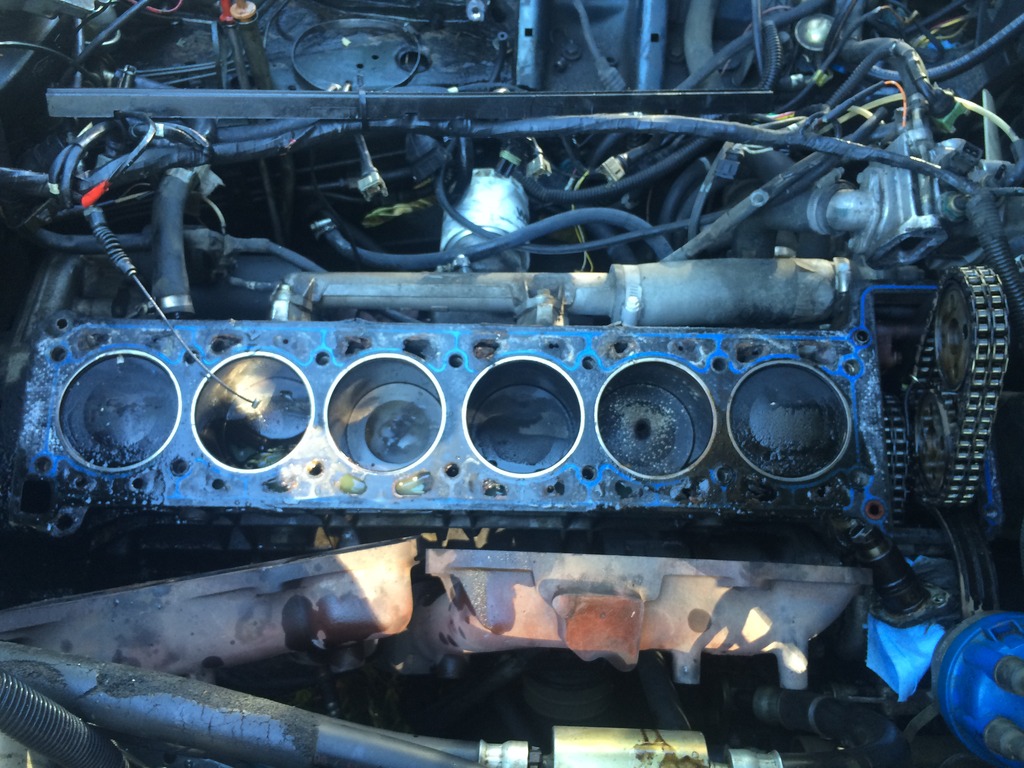
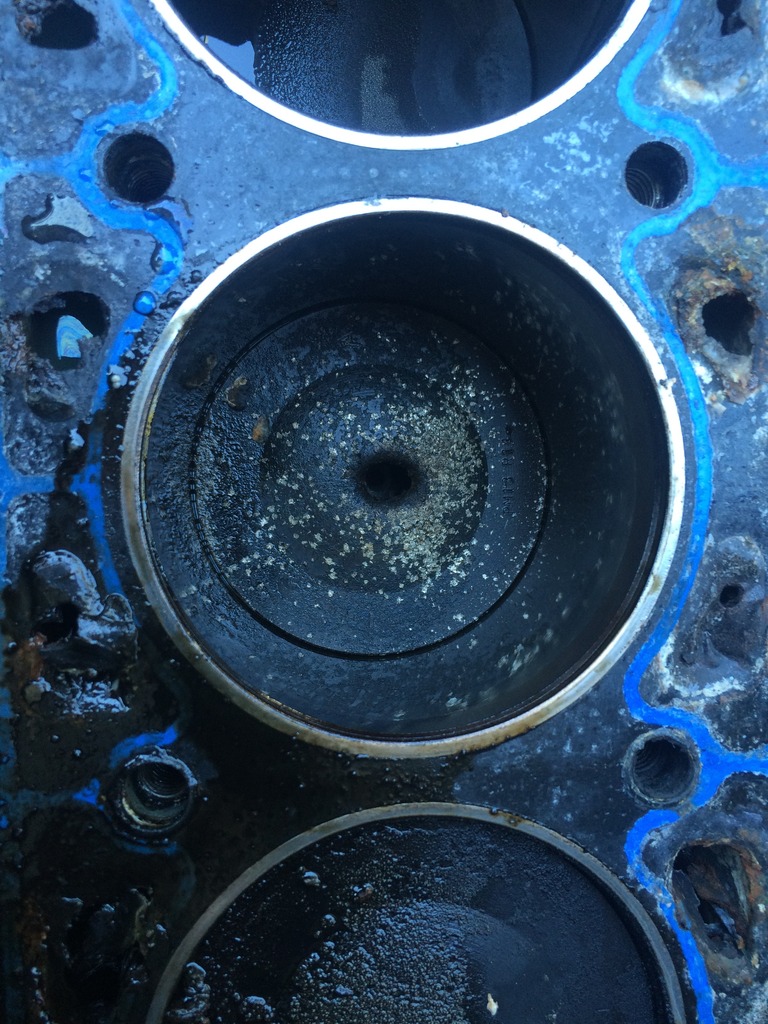
Upon dissassembly I found that not only was the headgasket gone, #2 piston had a hole in it, and it had one for a long time. Im suprised this thing was still running when I got my hands on it.
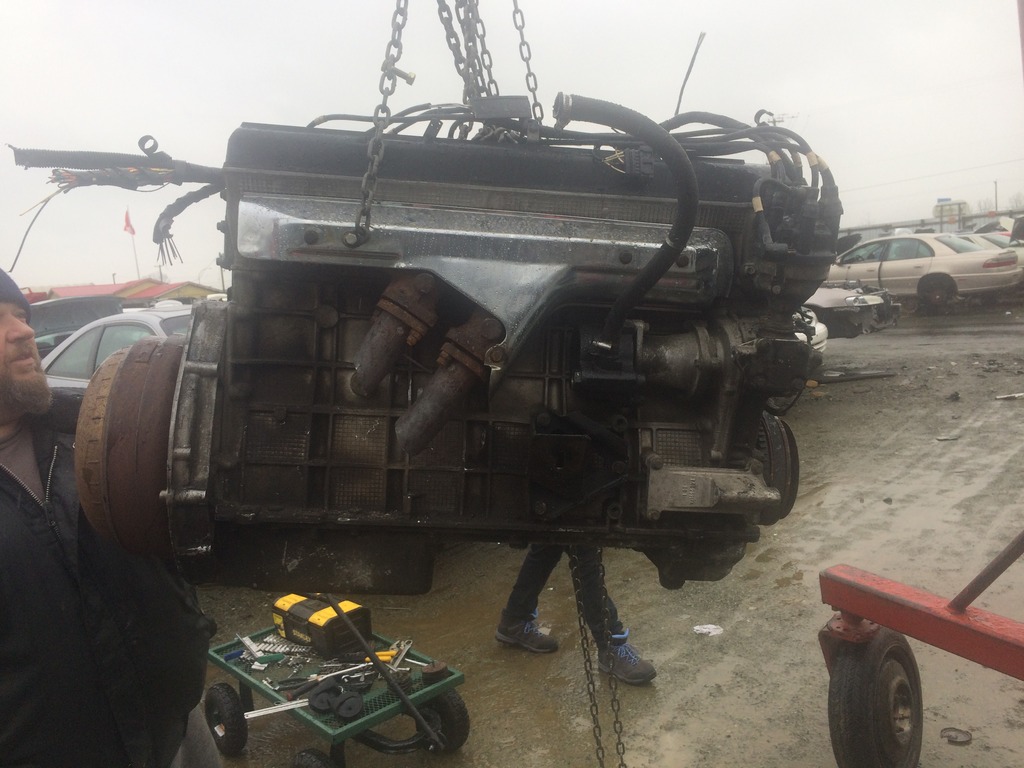
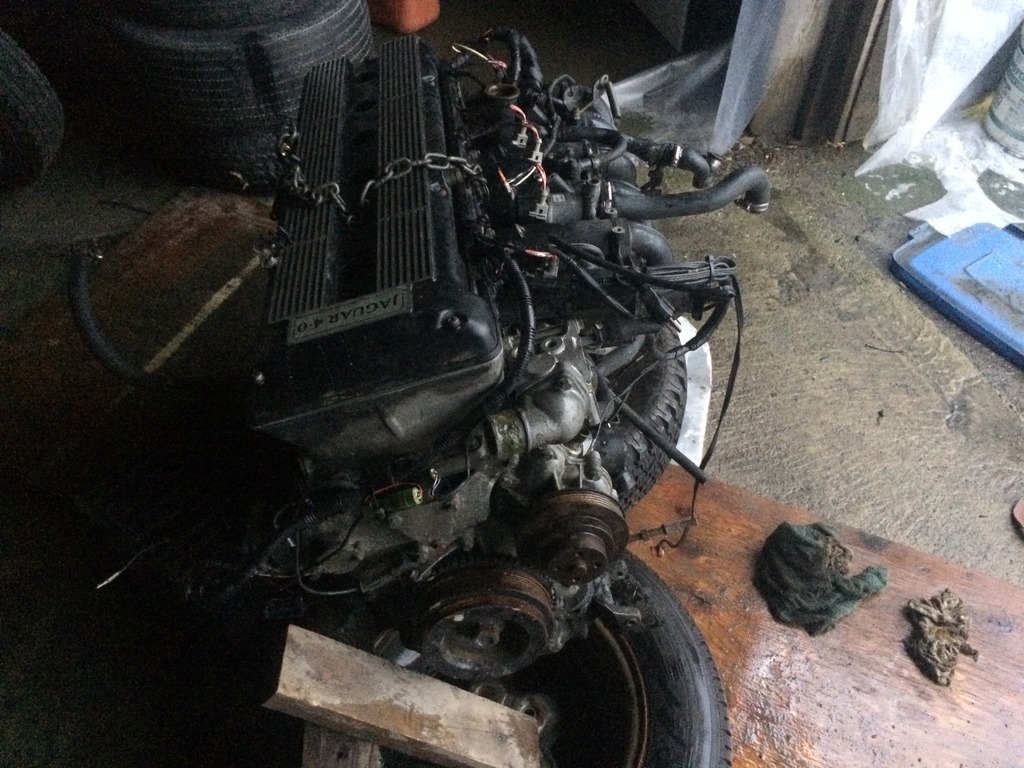
The car has 290,000 kms on it, and everything is in excellent shape apart from the engine. I was pricing out my options, and found that AJ6 rebuild parts are hard to find, and expensive when you can. I couldnt even find main bearings. I breifly thought about a V8 conversion, but that would have put me in the same cost bracket as the AJ6 rebuild. The car sat for several months, then about a month ago the local wrecking yard got a 93 in with the 4.0l with about 120,000 kms on it. I waited a few more weeks untill the wrecking yard put engines on special, for $149.95. This past weekend myself, my father, and my girlfriend went and saved that 4.0l from its eventual fate in the crusher

SO my ultimate goal is to help give some clear insight into doing the swap for others who are considering it, as in my research I havent found anything definitive. One thing I know for sure is the 3.6 PCM wont properly run the 93 up injectors, but from what Ive read will run the 92 down injectors, something about the spray pattern. Other than that, I will be overcoming problems as they arise. I will also be converting to Vacuum boost on the brakes, and since my car already has been converted to standard rear suspension, I can eliminate the hydraulic system.
I hope to have some more updates soon, as long as the snow melts...
This started when my boss gave me his 89 XJ40. A complete stranger walked into work and gave him the car. It ran like crap, some quick diagnosis led us to believe the headgasket was gone. My boss then insisted to drive the car for another year and a bit before giving it to me.
Upon dissassembly I found that not only was the headgasket gone, #2 piston had a hole in it, and it had one for a long time. Im suprised this thing was still running when I got my hands on it.


The car has 290,000 kms on it, and everything is in excellent shape apart from the engine. I was pricing out my options, and found that AJ6 rebuild parts are hard to find, and expensive when you can. I couldnt even find main bearings. I breifly thought about a V8 conversion, but that would have put me in the same cost bracket as the AJ6 rebuild. The car sat for several months, then about a month ago the local wrecking yard got a 93 in with the 4.0l with about 120,000 kms on it. I waited a few more weeks untill the wrecking yard put engines on special, for $149.95. This past weekend myself, my father, and my girlfriend went and saved that 4.0l from its eventual fate in the crusher


SO my ultimate goal is to help give some clear insight into doing the swap for others who are considering it, as in my research I havent found anything definitive. One thing I know for sure is the 3.6 PCM wont properly run the 93 up injectors, but from what Ive read will run the 92 down injectors, something about the spray pattern. Other than that, I will be overcoming problems as they arise. I will also be converting to Vacuum boost on the brakes, and since my car already has been converted to standard rear suspension, I can eliminate the hydraulic system.
I hope to have some more updates soon, as long as the snow melts...
#2
01-03-2017, 12:09 AM


Join Date: Feb 2014
Location: Crossroads of America
Posts: 19,381
Received 12,725 Likes
on
6,373 Posts
We will anxiously await updates!
A few thoughts off the top of my head:
The issue with the injectors is that the '92 and earlier are the older single pintle type. The '93 and later are the dual orifice type with a double spray pattern aimed onto the backs of the inlet valves for better efficiency. As a result, the fuel flow rate of the later injectors is actually a little lower than the earlier injectors, 210 cc/minute compared to 240 cc/minute for the earlier ones. So the fuel mapping in the PCM (ECM or engine control module in Jaguar terminology) is different. That may not be a major problem, you just might not get optimum fuel economy, or you might have problems with rich running.
There may be issues such as electrical connectors for things like the crankshaft position sensor (CPS), Idle Air Control Valve (IACV) and alternator, which is a higher amperage unit on the '93. The fuel pipe connections may be different: on the '93 they're the Ford-type quick-connect style but I can't remember if they're similar on the '88. The '93 has an EGR valve and a carbon canister fuel vapor EVAP system, but I can't recall whether the '88 has either.
Another issue that comes to mind is the transmission, which in the '93 is the electronically controlled ZF 4HP24, but in the earlier cars is the hydromechanically controlled 4HP22. The '93 engine may bolt up to the earlier gearbox, but since the later engine produces more horsepower and more torque, you may have trouble with rough gearshifts. Also, on the '93 kickdown is managed by an electrical switch, but on the earlier cars is done via a mechanical cable.
The differential in the '93 is probably a 3.58:1 ratio, but in the '88 it is probably a 2.88:1, so you won't get the full measure of better acceleration from the 4.0L engine, but you'll have a wonderful highway cruiser that will go 70 turning just 2,000 rpm.
You'll have to figure things out as you go, but it sounds like you have the right skills!
Looking forward to your next report.
Cheers,
Don
Last edited by Don B; 06-17-2017 at 07:07 PM.
The following 2 users liked this post by Don B:
93SB (01-09-2017),
MountainMan (09-24-2017)
#3
01-03-2017, 12:23 AM
Thanks!
I wound up coming across a fellow selling parts who put a 94 motor in his 92 car, he said all he did was change the intake using his 92 intake on the 94 motor and it ran just like normal. I see part numbers for injectors are the same from 1988-1992, so the 3.6 and 4.0 injectors up to 1992 are the same. A 3.6 ECM may not be optimal for a 4.0 motor, but I imagine the 02 sensor should read if its going lean, and adjust injector pulse width, to a point atleast.
I have harnesses from both cars so should I come across any different connectors I can change them. From pulling the 4.0 out of the 93, the fuel line connections at the rail are the same as my 89, but that shouldnt be a problem since I plan to use the 3.6 intake.
As for the transmission possibly shifting harshly, Im hoping its something that I can live with, or reduce with some careful throttle adjustments around shift points.
#4
01-03-2017, 12:24 AM


Veteran Member
#5
01-03-2017, 07:29 AM

#6
01-03-2017, 11:50 AM
Join Date: Feb 2014
Location: Crossroads of America
Posts: 19,381
Received 12,725 Likes
on
6,373 Posts
The following 2 users liked this post by Don B:
93SB (01-09-2017),
MountainMan (09-24-2017)
#7
01-03-2017, 01:25 PM

I think I would start with the 3.6 intake manifold on the 4.0. It will already be setup for the 4HP22 and you can play around with different injectors if you need to.
The MAFS should get you real close even with the smaller fuel delivery injector but you can get 1990-92 used injectors as well as trying the green band 1993/94 injectors.
Keeping the 3.6 intake will keep the electrical connectors the same and you can keep the 3.6 CKPS and mount it on the 4.0.
The engine management should be able to compensate for the 400 CCs of increased displacement. That should really be the only difference between the engines.
Keep the 4.0 manifold so if you want to start swapping connectors and get into more modifications, you can do that later. Get the engine running without too much modification just to see if more work is justified.
bob
Last edited by motorcarman; 01-03-2017 at 01:27 PM.
The following 3 users liked this post by motorcarman:
Trending Topics
#8
01-03-2017, 03:07 PM
Yea Bob, thats the plan, to use the 3.6 intake and injectors. After road testing Ill see if any modification is required. According to my part numbers all the injectors are the same from 88-92, 3.6 or 4.0. 1993 and up they used the dual pintle with a different spray pattern, Im fairly certain the 3.6 PCM wont run those injectors efficiently.
#9
01-03-2017, 04:05 PM
Join Date: Feb 2014
Location: Crossroads of America
Posts: 19,381
Received 12,725 Likes
on
6,373 Posts
Welcome to Jag-lovers - Members Photo Viewing Page
For comparison of your 3.6L injectors, find the Bosch or Lucas part number molded into the bodies of the injectors and look up the fuel flow rate at websites like these:
https://www.injectorrx.com/bosch-fuel-injectors/
http://www.fuelinjector.citymaker.com/Fuel_Injector_Flow_Rates.html
Stan Weiss' - Electronic Fuel Injector (EFI) Flow Data Table
Another issue I thought of with using the later injectors with the '88 ECM is that prior to '93 the injectors were low impedance and the drive signal was peak/hold. In '93 the injectors were changed to high impedance and the drive was changed to a saturated signal.
I think you're on the right track!
Cheers,
Don
Last edited by Don B; 01-03-2017 at 10:51 PM.
The following 2 users liked this post by Don B:
93SB (01-09-2017),
MountainMan (09-24-2017)
#10
01-03-2017, 08:56 PM
#11
01-06-2017, 08:43 PM
Well I got a good deal on a used Vacuum booster from an 84 XJS. $40 and it came with the pedal tower and a fairly recently replaced master cylinder (I need that for my Ford Cortina so bonus)
Had some free time at work today so I sanded it down and gave it a couple coats of paint.
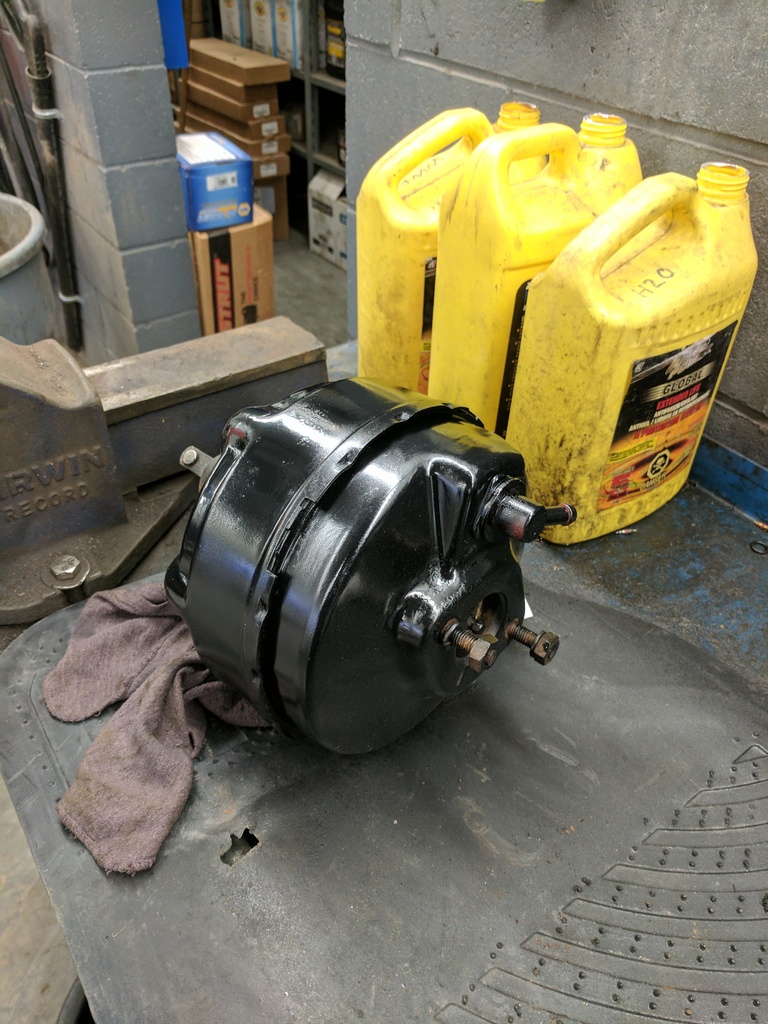
For those who have done it, are there any modifications that need to be done to the pedal rod?
Had some free time at work today so I sanded it down and gave it a couple coats of paint.

For those who have done it, are there any modifications that need to be done to the pedal rod?
#12
01-07-2017, 09:25 PM
If it's the same booster as the Series III XJ6 then you should be fine. I fabricated my adapter plate from 1/4" thick aluminum plate and it all worked out fine. Assuming you have a LHD vehicle then it'll be a tight squeeze fitting the stock coolant tank. I repositioned the rearward bracket about an inch and a half further forward (measure carefully before fixing the bracket) and I just kept the lower (shock tower bracket) where it was and used some flat steel with a few holes drilled in it to extend that mounting point forward. You'll also have to trim some metal off the top area where the shock tower is to clear the tanks bottom side. To keep things from rubbing against the inner fender I used a few inches of foam weatherstripping tape I got from my local Home Depot. Don't forget that you'll have to adjust your brake light switch (best done before everything is tightened down). Good luck on the conversion!
The following 2 users liked this post by 95Leaper:
davidsxj40 (01-09-2017),
Don B (01-07-2017)
#13
05-13-2017, 10:39 PM
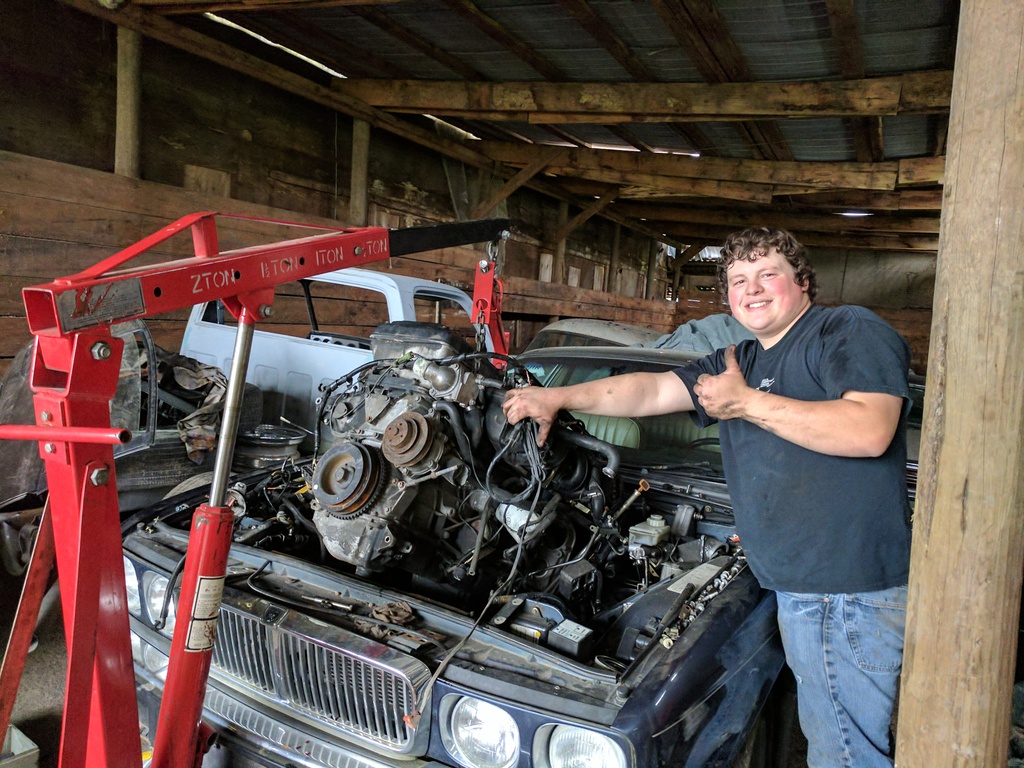
It's been awhile. The soft ground the car was sitting on made it difficult to pull it around to an area we could remove the engine. The ground dried out enough to do that last weekend and today we got the old engine and trans out as an assembly. It's alot easier to get at the bellhousing bolts with the lump out of the car.
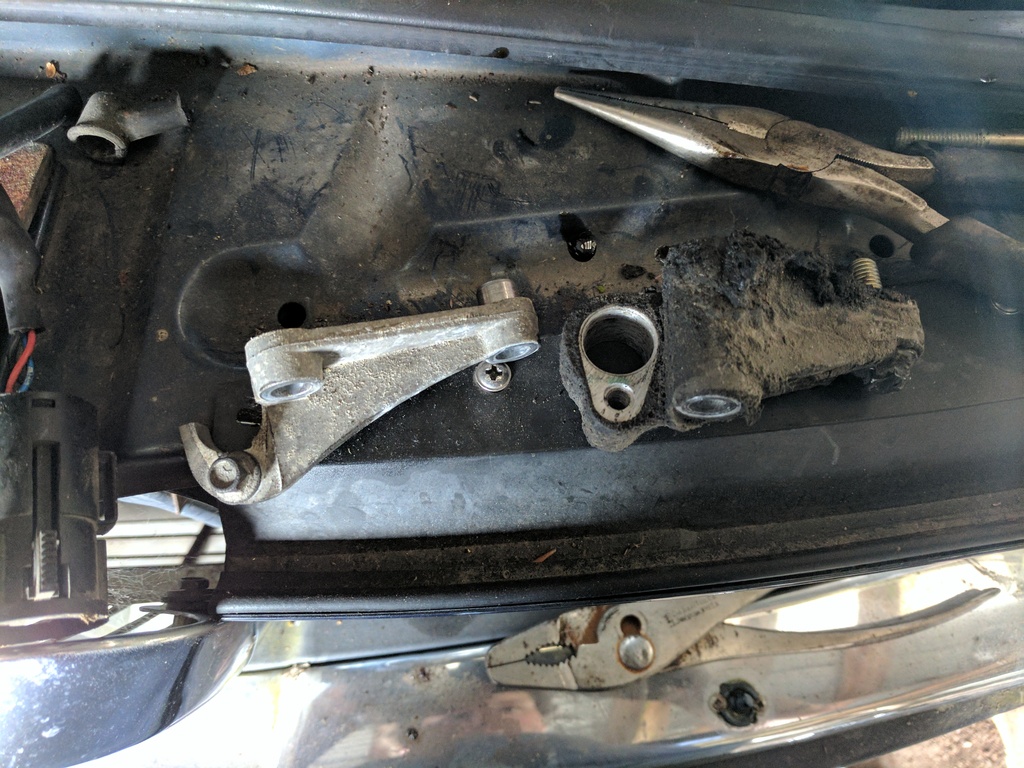
I forgot to grab a picture, but with the engine out Inoticed a broken part on my AC. Just Infront of the firewall on the passenger side (LHD) there's an aluminum block where both AC hoses pass through. On the bottom of that block there's a brass colored pot of some sort. On my car it's broken. Any idea what it is?
I forgot to grab a picture, but with the engine out Inoticed a broken part on my AC. Just Infront of the firewall on the passenger side (LHD) there's an aluminum block where both AC hoses pass through. On the bottom of that block there's a brass colored pot of some sort. On my car it's broken. Any idea what it is?
#14
05-13-2017, 11:14 PM
Join Date: Feb 2014
Location: Crossroads of America
Posts: 19,381
Received 12,725 Likes
on
6,373 Posts
From your description, I suspect it is the expansion valve, part 2 in the diagram below:

Cheers,
Don
The following users liked this post:
MountainMan (09-24-2017)
#16
05-14-2017, 07:10 AM
Join Date: Feb 2014
Location: Crossroads of America
Posts: 19,381
Received 12,725 Likes
on
6,373 Posts
Cheers,
Don
The following users liked this post:
MountainMan (09-24-2017)
#17
06-03-2017, 09:56 PM
Well the engine is in, it's sitting on its mounts. I'm taking the trans mount plate to work with me to clean up and maybe paint so the trans just has wooden blocks under the tailshaft housing.
2 things that disappointed me. I forgot to bolt on the starter while the engine was out (not super terrible but it's definitely easier to do with the engine out) and I broke the plastic nib at the transmission end of the kickdown cable, which has caused a leak. I hope that piece gets replaced with the cable, cause I can get a new cable locally suprisingly...

2 things that disappointed me. I forgot to bolt on the starter while the engine was out (not super terrible but it's definitely easier to do with the engine out) and I broke the plastic nib at the transmission end of the kickdown cable, which has caused a leak. I hope that piece gets replaced with the cable, cause I can get a new cable locally suprisingly...


The following 5 users liked this post by davidsxj40:
93SB (06-18-2017),
BigAlum058 (10-12-2017),
Don B (06-03-2017),
frenchfairplaydriver (06-07-2017),
motorcarman (06-04-2017)
#18
06-17-2017, 06:56 PM
Well as of today the driveshaft is bolted back up, trans mount is back in (all the rubber isolators we're in suprisingly good shape), and I swapped around some of the small parts that were different between the 89 and the 94 motors.
i thought I took more pictures than this though. The crank sensor brackets are different, the 94 bracket on the left and the 89 bracket is the much greasier one on the right. The sensors appear to be the same but I used the sensor and bracket that were original to the car, as I know it was working.
On the front crank pulley, the tone ring for the sensor is about twice as thick on the 89 engine as opposed to the 94 engine. But it still appears to be centered under the sensor when the 89 bracket is bolted on the 94 motor. We will see how it works when I try to fire it I suppose.
The alternator brackets are different as well and I had to swap the 89 bracket onto the 94 motor.
And the pulley on the 94 motor for the water pump and alternator have an extra rib or 2. I'm not going to worry about this too much.
i thought I took more pictures than this though. The crank sensor brackets are different, the 94 bracket on the left and the 89 bracket is the much greasier one on the right. The sensors appear to be the same but I used the sensor and bracket that were original to the car, as I know it was working.

On the front crank pulley, the tone ring for the sensor is about twice as thick on the 89 engine as opposed to the 94 engine. But it still appears to be centered under the sensor when the 89 bracket is bolted on the 94 motor. We will see how it works when I try to fire it I suppose.
The alternator brackets are different as well and I had to swap the 89 bracket onto the 94 motor.
And the pulley on the 94 motor for the water pump and alternator have an extra rib or 2. I'm not going to worry about this too much.
The following 3 users liked this post by davidsxj40:
#19
06-17-2017, 07:13 PM
Join Date: Feb 2014
Location: Crossroads of America
Posts: 19,381
Received 12,725 Likes
on
6,373 Posts
The crank sensor brackets are different...[snip] On the front crank pulley, the tone ring for the sensor is about twice as thick on the 89 engine as opposed to the 94 engine. But it still appears to be centered under the sensor when the 89 bracket is bolted on the 94 motor. We will see how it works when I try to fire it I suppose.
The alternator brackets are different as well and I had to swap the 89 bracket onto the 94 motor.
And the pulley on the 94 motor for the water pump and alternator have an extra rib or 2. I'm not going to worry about this too much.
The alternator brackets are different as well and I had to swap the 89 bracket onto the 94 motor.
And the pulley on the 94 motor for the water pump and alternator have an extra rib or 2. I'm not going to worry about this too much.
You're making progress!!!
The reason for the extra ribs on the belt and the revised CPS tone ring/reluctor is that in 1993 a new higher-amperage alternator was introduced, which required the extra drive belt width. The pulleys were revised accordingly and the CPS bracket was redesigned to center the sensor over the tone ring.
Cheers,
Don
The following 3 users liked this post by Don B:
#20
06-19-2017, 12:52 AM
Hi David,
You're making progress!!!
The reason for the extra ribs on the belt and the revised CPS tone ring/reluctor is that in 1993 a new higher-amperage alternator was introduced, which required the extra drive belt width. The pulleys were revised accordingly and the CPS bracket was redesigned to center the sensor over the tone ring.
Cheers,
Don
The following users liked this post:
BigAlum058 (10-12-2017)