Console-ation FAQ
#21
Join Date: Jul 2012
Location: Walnut Creek, California
Posts: 6,796
Received 2,399 Likes
on
1,880 Posts
Could it be that the ignition must be on for the Opti to light up??
If, I should've known that it was, my apologies.
I made a couple of little vises for soldering. One uses wooden clothes pins screwed to a block of scrap wood, and the other a pair of alligator clips on bent clothes hanger wire. Very useful when I did the original lumping".
Carl
If, I should've known that it was, my apologies.
I made a couple of little vises for soldering. One uses wooden clothes pins screwed to a block of scrap wood, and the other a pair of alligator clips on bent clothes hanger wire. Very useful when I did the original lumping".
Carl
#22
Join Date: Mar 2014
Location: Tehama County, California, USA
Posts: 25,185
Received 8,950 Likes
on
5,295 Posts
#23
Join Date: Mar 2014
Location: Tehama County, California, USA
Posts: 25,185
Received 8,950 Likes
on
5,295 Posts
I discovered a couple things today:
The Opticell power goes through a 15A fuse, #7, by the driver's knees. It was OK.
There are 3 wires on the dimmer. The power and dash lights are next to each other. The third wire (red/white) goes through the dimmer bypassing the rheostat (it's never dimmed) and from there travels through a bundle with many other wires to the light. I didn't know that; whenever I've had the dimmer apart I've put it back the way I found it, always wondered what the 3rd wire was for. When I 'tied' the others together for lights I neglected to include the 3rd wire in the circuit. There is power to the Opticell now.
The 3.5 watt LED I listed above is insufficient for the Opticell. Illumination was better with the OEM 5 watt incandescent bulb. What I would like to have is one of those 9 element flashlight heads. I stuck one in there just to check, and it worked Really Good and the physical size is Perfect! But I don't have the skills to convert one of those. So the search continues.
I got the LED "replacements" for the pillar lights, what a disappointment! Each 'bulb' contains 6 individual LEDs with tiny lenses to focus their light forward. For their size they're quite bright, and they might be OK for glove box but they're Not enough for courtesy lights. I had better light from the incandescents. I don't think it's gonna work for the map light either; simply not enough photons produced. The search continues there too.
In fact, the only LED success I have really had was LED replacements for the 1156 backup lights. Boy Howdy are they bright!! I think they're 23 watts! And White instead of yellow. I'll Like those the first time I flip them on! I mentioned I'm going to run them through a switch in the ash tray because the Backup switch isn't activated in Reverse.
(';')
Last edited by LnrB; 12-19-2014 at 07:20 PM.
The following users liked this post:
john_cook12 (12-19-2014)
#25
Join Date: Jan 2014
Location: Delaneys Creek,Qld. Australia
Posts: 28,379
Received 6,317 Likes
on
4,367 Posts
I got the LED "replacements" for the pillar lights, what a disappointment! Each 'bulb' contains 6 individual LEDs with tiny lenses to focus their light forward. For their size they're quite bright, and they might be OK for glove box but they're Not enough for courtesy lights. I had better light from the incandescents. I don't think it's gonna work for the map light either; simply not enough photons produced. The search continues there too.
(';')
(';')
Edit: No markings on them at all, I know the po got them off ebat. (Xenon white LED's) First pic has the defuser on , secoud doesn't.
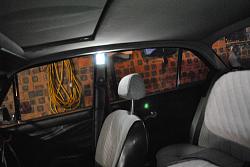
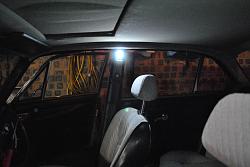
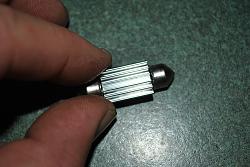
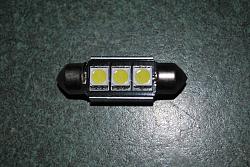
See link below, mine measure about 35mm.
2X 36mm 3 LED 5050 SMD Xenon White Festoon Error Free CAR Auto Light Bulb NEW | eBay
Last edited by o1xjr; 12-19-2014 at 05:15 AM.
The following users liked this post:
LnrB (12-19-2014)
#26
Join Date: Mar 2014
Location: Tehama County, California, USA
Posts: 25,185
Received 8,950 Likes
on
5,295 Posts
#27
Join Date: Mar 2014
Location: Tehama County, California, USA
Posts: 25,185
Received 8,950 Likes
on
5,295 Posts
I haven't given up yet. Clarke has posted a link to LEDs that seem to be Just Right for my needs for pillar lights.
I'll keep looking for an Opticell replacement, I'll post my findings.
(';')
#28
If they are the T10 or 5W5 type then these are pretty good.
2 x T10 Car Wedge LED CREE White Q5 Reverse Backup Light Bulb 7W DC 12V 30V C1MY | eBay
The front bit is a bit longer though, and most of the light is directed forward. I can't remember the set up in the opticell.
2 x T10 Car Wedge LED CREE White Q5 Reverse Backup Light Bulb 7W DC 12V 30V C1MY | eBay
The front bit is a bit longer though, and most of the light is directed forward. I can't remember the set up in the opticell.
#29
Join Date: Mar 2014
Location: Tehama County, California, USA
Posts: 25,185
Received 8,950 Likes
on
5,295 Posts
If they are the T10 or 5W5 type then these are pretty good.
2 x T10 Car Wedge LED CREE White Q5 Reverse Backup Light Bulb 7W DC 12V 30V C1MY | eBay
The front bit is a bit longer though, and most of the light is directed forward. I can't remember the set up in the opticell.
2 x T10 Car Wedge LED CREE White Q5 Reverse Backup Light Bulb 7W DC 12V 30V C1MY | eBay
The front bit is a bit longer though, and most of the light is directed forward. I can't remember the set up in the opticell.
Thank you, Anjum, but I already found those at my local O'Reilly parts store as a straight across replacement for 1156 single element bulbs. They're 23watts! and will Certainly give me enough light to see what I'm backing into. I'm thinking 7watts just wouldn't be enough.
(';')
#30
Join Date: Mar 2014
Location: Tehama County, California, USA
Posts: 25,185
Received 8,950 Likes
on
5,295 Posts
Continuing the search for an LED replacement for the Opticell, I found a rather loooong thread beginning in November 2011 over in Jag Lovers(JagFORUM Logon).
Members there had also been disappointed with the offerings of V12s.com but someone found an alternative site, BA9S 5 SMD LED 1.5 Watt 12VDC - Automotive LED Lights - LEDLight the product of which pleased him very much.
I have ordered a couple of these (even though I only 'need' one) and will report back when they arrive and I've installed one.
(';')
Last edited by LnrB; 12-21-2014 at 02:01 AM.
#31
Join Date: Mar 2014
Location: Tehama County, California, USA
Posts: 25,185
Received 8,950 Likes
on
5,295 Posts
This morning in the mail I got the LEDs I ordered a few days ago from
BA9S 5 SMD LED 1.5 Watt 12VDC - Automotive LED Lights - LEDLight
Each unit consists of 5 individual LEDs that are configured in such a way that they take full advantage of the Opticell reflector. I put in the incandescent bulb and then this one to test how much heat was generated, almost None with the LED!
Not only that, the 5 together are VERY bright! On this bright day, in the shop without lights but full North facing natural light, I can see the heater controls when I turn the lights on.
The Ing and Lights are less bright but that's not surprising given the inverse square law of electromagnetic energy (all forms of radiation including light): For double the distance from the light source, the light falling on a surface is divided by 4. The Lights and Ign switches are about twice the distance from the Opticell as the heater controls so it follows they are only about 1/4 as bright. I don't mind that, because it's obvious if I have the ignition or lights on. But it's not obvious where the heater controls are set.
I understand on that Jag Lovers thread I posted, (I gave the wrong address BTW, try this; jag-lovers.org/av.php?1501608n10) that some people found ways to install micro lights in the Ign and Light switch covers. I have no intention of doing that.
(';')
Last edited by LnrB; 12-28-2014 at 02:30 PM.
#32
Join Date: Jul 2012
Location: Walnut Creek, California
Posts: 6,796
Received 2,399 Likes
on
1,880 Posts
#33
Join Date: Mar 2014
Location: Tehama County, California, USA
Posts: 25,185
Received 8,950 Likes
on
5,295 Posts
Thank you, Carl,
Among other interests I dabble in astronomy; hence my familiarity with the inverse square law.
There was heavy frost on the rear window of the van this morning. I imagine some plants finally bit the dust, and hopefully the mosquitoes and gnats.
(';')
Among other interests I dabble in astronomy; hence my familiarity with the inverse square law.
There was heavy frost on the rear window of the van this morning. I imagine some plants finally bit the dust, and hopefully the mosquitoes and gnats.
(';')
Last edited by LnrB; 12-28-2014 at 07:20 PM.
#34
Join Date: Mar 2014
Location: Tehama County, California, USA
Posts: 25,185
Received 8,950 Likes
on
5,295 Posts
I nearly missed the mail today! I would have had to wait another day if I hadn't thought of it this afternoon.
The LED pillar lights have arrived! They're a bit blue and that doesn't enhance my yellowish interior a bit! But they're certainly bright enough so I can find the key hole in the dark. I imagine the map light will be bright enough to even read a map! Now that I know what they are, I might look for a warm white as opposed to these cool whites.
They're the Cutest things! 3 LEDs mounted on a little PC board which in turn is mounted on a heat sink! Total length, 35mm. (They require 1/2 inch breathing space behind them which is no problem in either application where I plan to use them.) Unlike other LEDs, these have no polarity. Husband says they've put a bridge rectifier in the circuit so they'll work either end up.
I misunderstood the packing arrangement. There are 2 bulbs in each package, but I missed that little detail, so I ordered 3 to be sure I had one for the map light. I received 3 packages of 2 lights each; 6 lights.
This was truly an international transaction. I bought them from eBay in Oz (the link Clarke posted earlier); they were shipped from Guangzhou Province in China, to California in Merca, for the princely sum of $3.65 US of which $1.35 was shipping!!
A few pictures below for your entertainment.
(';')
Last edited by LnrB; 12-31-2014 at 09:29 PM.
#35
Join Date: Mar 2014
Location: Tehama County, California, USA
Posts: 25,185
Received 8,950 Likes
on
5,295 Posts
I was crawling around under Nix yesterday, cleaning up some other stuff, and it occurred to me I had the Perfect opportunity to find if I have evaporator drains or not.
I found 2 fittings like the one pictured, one on each side of the transmission tunnel; I can see the other one, just can't get a decent picture of it. However, you can see there are no tubes like so many others have asked about when they find them, "What are these tubes hanging down under my Xj6?" I knew some time ago I didn't have those.
There doesn't appear to have ever been any liquid dripping from either of these, both are dry and dusty around them just as you see here.
I've been sure since I read about evaporator drains that this is the reason my driver floor was such a mess.
I haven't stuck a wire up there to see if they're plugged, but the tube is so short I'm a bit afraid of shoving it up into the cavity and losing it forever.
Thoughts?
(';')
#36
I thought I had replied in this thread but I resolved my poor Opticell lighting, (actually it was resolved for me by Mike Eck of Jaguar Clock). Mike is an electronics wizard and Jaguar collector, what can I say.
he made a LED array of 7 powerful LEDs mounted on a circuit board inside the Opticell unit and now even the Headlights switch symbols can be seen at night.
The Headlights switch is the farthest / longest fiber optic cable from the Opticell unit, so if you can make that one real bright, just imagine the others.
you might write to him and ask if he will make you the same thing he did for me. You'll have to send him your Opticell unit per the pictures below.
jaguarclock.com
The following 2 users liked this post by Jose:
Giovanni LiCalsi (02-07-2015),
LnrB (02-05-2015)
#37
Join Date: Mar 2014
Location: Tehama County, California, USA
Posts: 25,185
Received 8,950 Likes
on
5,295 Posts
#38
Join Date: Mar 2014
Location: Tehama County, California, USA
Posts: 25,185
Received 8,950 Likes
on
5,295 Posts
I first saw this over in the XJS section I think it was, but I can't find it now to give that member credit. If you happen to fall by and recognize this as your idea just chime in.
Everyone knows the stock center vent in the Xj6 series is mostly useless because the vast majority of cold air is directed into the back seat, where only Korean midgets or very small children are able to sit in relative comfort.
I saw that someone closed off the center portion of that vent by making a small box and directing air into the louvers of the end portions of that vent. This would also have the effect of directing more air to the side vents at the ends of the dash. It seemed like a Capital idea so I stole it.
Not wanting to make a permanent modification in case I don't like the outcome I got a center vent from a SIII to butcher. Not to worry, it had several broken links in its own center section so there was no loss when I broke them all out and smoothed the sides with an aluminum file. But I was on a roll that evening so I didn't get any pictures of the louver-less center portion or the process making it that way. Sorry.
Measurements of the center portion as follows:
Width; 4-3/4 inches (120mm)
Height;1-7/8 inches (50mm)
Depth; 1-3/4 inches (44mm)
With these measurements I made a box from a heavy cereal box and bent it over a straight edge until it fit snugly in the hole; second picture below.
Then I sprayed it gloss black and let it dry for several days until well cured.
I got some black felt from a craft store, cut it to the sizes of the sides and back of the box, glued it to the box with black weather strip adhesive ONE PANEL AT A TIME (be sure to leave space for folding or the felt lined box won't fit into the vent), folded it up and glued the felt lined box into the vent, again with weather strip adhesive.
If you've never used The Black Death be aware you must be careful or you'll have it All Over Everything including your hands, work area and project.
The finished vent is pictured third. It will Just hold my phone.
(';')
The following users liked this post:
ukborn (12-18-2023)
#39
Join Date: Jan 2014
Location: Delaneys Creek,Qld. Australia
Posts: 28,379
Received 6,317 Likes
on
4,367 Posts
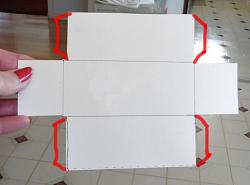
Or for real strength you could drill and rivet the tabs. A bit of overkill for a phone holder but the next owner might want to store something heavy there.
But I am in packaging and presentation for a job.
............and you don't have enough to do already
Last edited by o1xjr; 02-28-2015 at 07:56 AM.
#40
1) you could also have sprayed it with "flock paint" which is what Jaguar used in the glove box and center console tray, a sprayable finish that looks and feels like felt but is called "flock", although the felt is thicker and "cozier".
2) why are you looking for evaporator drains? do you have moisture or water in the floor carpet along with a strange moldy odor? the problem might not be the evaporator draining, but a removable panel under the carpet, located on the side of the transmission tunnel very near the accelerator pedal. This panel is removable to access the band adjustment of the transmission. There is or might be another panel on the opposite side, passenger side. All Jaguars have them. These panels need to be caulked, then screwed in place. To see them you have to raise the capet, then raise the yute insulation, a very smelly job for which I would use a respirator filter so I don't end up breathing centuries old bacteria like Carter did in Tut's tomb. If the caulking has dried out, water and engine fumes come into the cabin. Simple as that. To fix it, remove the panel and renew the caulking bead around the panel, you can use silicone caulking, something that does not harden but remains flexible and is water-proof.
2) why are you looking for evaporator drains? do you have moisture or water in the floor carpet along with a strange moldy odor? the problem might not be the evaporator draining, but a removable panel under the carpet, located on the side of the transmission tunnel very near the accelerator pedal. This panel is removable to access the band adjustment of the transmission. There is or might be another panel on the opposite side, passenger side. All Jaguars have them. These panels need to be caulked, then screwed in place. To see them you have to raise the capet, then raise the yute insulation, a very smelly job for which I would use a respirator filter so I don't end up breathing centuries old bacteria like Carter did in Tut's tomb. If the caulking has dried out, water and engine fumes come into the cabin. Simple as that. To fix it, remove the panel and renew the caulking bead around the panel, you can use silicone caulking, something that does not harden but remains flexible and is water-proof.
The following users liked this post:
smith356 (02-28-2015)

