
Yet Another Floor Pan Adventure FAQ
#61
 12-22-2014, 12:18 AM

Veteran Member

#62
12-22-2014, 01:55 AM


Join Date: Mar 2014
Location: Tehama County, California, USA
Posts: 25,154
Received 8,931 Likes
on
5,283 Posts
I actually took a welding class in college (acetylene) and did very well (got an A) even though it was a Red Neck area, I was the only girl in class and the boys were just waiting for me to blow the place up.
I think hammer welding would be a little tough in this confined area. It sounds like too much work anyway. I'm only a woman, ya know!

(';')
#63
12-22-2014, 03:19 AM

Senior Member
just go for it!! Stitch or seam weld with the mig (wire feed) welder.
With a bit of practice on the scrap metal you'll soon get the hang of it. In that area don't worry too much about distortion (tack the panel first, stitch a bit and go to a different location and stich a bit more etc) or the look of the welds. (they can always be dressed down with a flap disk on an angle grinder if desired).
There's some excellent guides to welding on MIG Welding Forum if you need guidance.
The following users liked this post:
LnrB (12-22-2014)
#64
12-22-2014, 06:32 AM

Join Date: Jan 2014
Location: Delaneys Creek,Qld. Australia
Posts: 28,379
Received 6,317 Likes
on
4,367 Posts
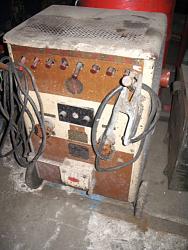
It came out of my brothers panel shop in 1993 when he closed the doors and headed for a retail career. Go figure!
No idea if it is stick or wire feed, just grabbed it because it might be useful one day. Hasn't been moved in 21 years. (I lie, we moved from our old house to this one 17 years ago), it obviously was moved then.

#65
12-22-2014, 10:11 AM

Veteran Member
Join Date: Jul 2012
Location: Walnut Creek, California
Posts: 6,796
Received 2,399 Likes
on
1,880 Posts
Looks like a stick welder to me. I had an ancient Craftsman that looked a lot like that.
Best for heavier stuff. I used mine to finish a partial trailer frame that I bought for the 25 Ford 16" wheels for my project of the time. Also modified a saw stand to be my "bash bench". Striking the arc was the hardest part. Pre self darken helmet days.
I did learn that warming the metal with my torch prior to trying to weld made the arc much easier to get going and stay going. I was always on the hot just short of burn stage.
Plums: Are you referring to a "spot welder". To my knowledge they need acess from both sides. A "C" shaped hot end.
Sorta the same for hammer welding. Need acess to the backside for the dolly to back the hammer taps. Best for panel welding to reduce the amount of grinding to get the seam to go away. Ands as to panel distortion as well.
On LnrB's floor not there.
And, LnrB, as you have done it, t will come back. Red necks are good folks.
Gotta wrestle with the answer machine/phone. Power out the other day messed it up.
Way more complex to program than anyone needs!!
Happy Holidays to all.
Carl
#66
12-22-2014, 10:54 AM
Join Date: Mar 2014
Location: Tehama County, California, USA
Posts: 25,154
Received 8,931 Likes
on
5,283 Posts
I know that, Carl, some of them raised me.
It's just that some of the guys in that class were threatened by my presence. It didn't help their security any that I could handle a torch better than some of them, even though most came from farm backgrounds just like I did.
Those who weren't threatened were fascinated. I always wore full make-up and earrings (BOTH of them) because some thought I might be confused which half of the species I belonged to. That continues today in my work.
Doug (Dleit53), anjum, Carl and all the rest, thank you for your encouragement. anjum, thank you for the link.
I have a lot of cleaning of the sill to do yet before I even start welding as it's still covered with old adhesive and krud. I have a welding blanket on the list for the next time I'm in town.
The sun has come up shifted toward blue this morning (instead of that feeble red), this first day after the Winter Solstice, so bright it hurts the eyes. The sky is clear, it hasn't rained for at least 12 hours, I'm so far behind in my work it will be next year before I'm caught up. I'm off to gather some natural photons on my light starved retinas and work off some of this Cabin Fever. I'll see y'all later.
(';')
#67
12-22-2014, 12:42 PM
Senior Member
Just come back from a holiday in Mauritius myself, the weather here is a shock to the system!!
If you haven't already, get an automatic darkening helmet, they are ridiculously cheap nowadays.
I find that some good strong portable lights and a LED head torch attached to the helmet helps as well.
Welding gloves, an old leather jacket, leather boots, head cover and thick jeans are essential for me as I'm a wimp when it comes to getting red hot metal on my skin!!! I look a bit like Darth Vader on a bad day. Could do with his leather trousers as well.
Don't wear any earrings myself though.
#68
12-22-2014, 01:20 PM
Veteran Member
Join Date: Jul 2012
Location: Walnut Creek, California
Posts: 6,796
Received 2,399 Likes
on
1,880 Posts
Anjum:
1. Proper gear is important. I have a pair of leather gloves, actually gauntlets as they extend up the arm. Also useful in I pruning my wild black berry thicket!!
2. I used to have a foam type jacket. Very warm, but quite flammable. Not good.
3. Never went for the "neck chains" aka "necklaces that some males sported decades ago. and, surely not earrings!!!
4. Decades ago, my very conservative dad and I were in a line for cafeteria food, I think. A critter was in front of us. Long locks and necklace and earrings. "Dad, is that a guy or a gal?". Priceless response: "I don't know son, I'd have to drop it's drawers to tell".
Try as I might, men is men and women is women, and never the twain shall merge!!!
Carl
#69
12-22-2014, 05:29 PM

Just as a further note to welding: try it for sure, you'll find it to be a lot easier than people make it out to be. The method that all are speaking of to replicate the factory spot weld (as applied by induction using a "C" shaped device) can be replicated by doing a plug weld. Essentially offer up the panel to a clean base metal and either drill a hole (1/8" or there abouts) through both layers or just the top layer, then fill in the hole using gas shielded wire feed (mig) with a spray transfer. The use of a dissimilar metal on the back side will reduce, and possibly prevent, burn through. A copper or aluminum plate (copper is best, aluminum is fine). The CU or AL plates also serve as a heat sync therefore dissipating the heat of the weld metal input. Try it out. And it's best to practice on the same gage as the production work that you will be doing on the car, and in the same position. It's no good to become proficient performing a weld on the bench in a horizontal position only to then lay on your back under the car and try to weld overhead. These are just my thoughts and from my experience trying to do the same things you are contemplating. (and being a certified welding inspector helps too)
The following users liked this post:
LnrB (12-22-2014)
#70
12-22-2014, 07:59 PM
Join Date: Mar 2014
Location: Tehama County, California, USA
Posts: 25,154
Received 8,931 Likes
on
5,283 Posts
I find that some good strong portable lights and a LED head torch attached to the helmet helps as well.
Welding gloves, an old leather jacket, leather boots, head cover and thick jeans are essential for me as I'm a wimp when it comes to getting red hot metal on my skin!!! I look a bit like Darth Vader on a bad day. Could do with his leather trousers as well.
Don't wear any earrings myself though.
The method that all are speaking of to replicate the factory spot weld (as applied by induction using a "C" shaped device) can be replicated by doing a plug weld. Essentially offer up the panel to a clean base metal and either drill a hole (1/8" or there abouts) through both layers or just the top layer, then fill in the hole using gas shielded wire feed (mig) with a spray transfer. The use of a dissimilar metal on the back side will reduce, and possibly prevent, burn through. A copper or aluminum plate (copper is best, aluminum is fine). The CU or AL plates also serve as a heat sync therefore dissipating the heat of the weld metal input.
Try it out. And it's best to practice on the same gage as the production work that you will be doing on the car, and in the same position. It's no good to become proficient performing a weld on the bench in a horizontal position only to then lay on your back under the car and try to weld overhead.
These are just my thoughts and from my experience trying to do the same things you are contemplating. (and being a certified welding inspector helps too)
(';')
#71
12-22-2014, 09:00 PM
Senior Member
Can one of you experts tell me if my floor pans are stock or if its been messed with by the PO?
On the 1st pic (front passenger pan), I see a couple of strange looking drain holes with a raised lip and there is also a seam that appears to run along the left edge. Three of the 4 pans are painted black, and one is grey (to me the grey one looks stock)
The other pic is the rear driver side floor pan. At the edge (towards the seat) there are these metal "buttons" with the X on it. I pried one off to see what this is all about, and essentially its got some prongs to be a press fit. What's the story here?
Thanks
#72
12-22-2014, 09:32 PM
Join Date: Mar 2014
Location: Tehama County, California, USA
Posts: 25,154
Received 8,931 Likes
on
5,283 Posts
Warlock, I'm certainly not an expert but I'll tell you how my floors are. Your passenger pan looks just like mine does, threaded hole and all. I'm certain mine were never replaced or even repaired. I have No idea what these holes were for but my original driver side pan had a couple of those too, one at the rear.
I've not had my back floors uncovered to the pans because the padding was glued to the floor and stuck Really well. That told me there was no rust there because if there had been the rust would have come right up with the padding like it did when I took the driver floor apart.
(';')
I've not had my back floors uncovered to the pans because the padding was glued to the floor and stuck Really well. That told me there was no rust there because if there had been the rust would have come right up with the padding like it did when I took the driver floor apart.
(';')
#73
12-26-2014, 11:10 AM
Veteran Member
Join Date: Jul 2012
Location: Walnut Creek, California
Posts: 6,796
Received 2,399 Likes
on
1,880 Posts
Well, welding is welding, or is it?
In 1952, I and a lot of others went to Germany from New York aboard a WWII vintage attack transport. The General Stuart. We second Lieutenants got four bunk "cabins". I recall laying in my bunk at night. It was December and the North Atlantic was more than choppy. Bow up, than whammo, then down! and from time to time, shudder as the single screw came out of the water and then back down.
And, I contemplated the vertical weld in front of my eyes. Much better than I could ever do, but, definitely quite imperfect. Welding was on my mind as I left a project at home with a considerable amount of welding. Some seams quite decent, others not so much. "Z" job on a 34 vintage frame destined for a roadster. My "accomplices" didn't finish it??? Well, on off to the Air Force and the other not so inclined.
Oxy acetylene was my speed at the time.
Carl
#74
12-26-2014, 10:46 PM
Join Date: Mar 2014
Location: Tehama County, California, USA
Posts: 25,154
Received 8,931 Likes
on
5,283 Posts
Well, welding is welding, or is it?
In 1952, I and a lot of others went to Germany from New York aboard a WWII vintage attack transport. The General Stuart. We second Lieutenants got four bunk "cabins". I recall laying in my bunk at night. It was December and the North Atlantic was more than choppy. Bow up, than whammo, then down! and from time to time, shudder as the single screw came out of the water and then back down.
And, I contemplated the vertical weld in front of my eyes. Much better than I could ever do, but, definitely quite imperfect. Welding was on my mind as I left a project at home with a considerable amount of welding. Some seams quite decent, others not so much. "Z" job on a 34 vintage frame destined for a roadster. My "accomplices" didn't finish it??? Well, on off to the Air Force and the other not so inclined.
Oxy acetylene was my speed at the time.
Carl
In 1952, I and a lot of others went to Germany from New York aboard a WWII vintage attack transport. The General Stuart. We second Lieutenants got four bunk "cabins". I recall laying in my bunk at night. It was December and the North Atlantic was more than choppy. Bow up, than whammo, then down! and from time to time, shudder as the single screw came out of the water and then back down.
And, I contemplated the vertical weld in front of my eyes. Much better than I could ever do, but, definitely quite imperfect. Welding was on my mind as I left a project at home with a considerable amount of welding. Some seams quite decent, others not so much. "Z" job on a 34 vintage frame destined for a roadster. My "accomplices" didn't finish it??? Well, on off to the Air Force and the other not so inclined.
Oxy acetylene was my speed at the time.
Carl
When I was a little kid my dad used to tell a story about during the Regan administration when the President wanted to refit a couple WWII era aircraft carriers, no one in the trade knew how to weld 16 inch-thick plate. It had become a lost skill.
Daddy's story was that the Gov't "recommissioned" a bunch of retirees, brought them to the shipyards where they taught a much younger generation the skill of welding Enormously thick steel plate.
That may or not be a true story, my dad was quite fond of telling outrageous stories about any politician who happened to cross his mind at the moment. I never learned how to tell which were true (I later learned that some were) and which were pure fabrications.
(';')
#75
12-26-2014, 10:58 PM
Join Date: Mar 2014
Location: Tehama County, California, USA
Posts: 25,154
Received 8,931 Likes
on
5,283 Posts
I have a welding blanket (It's Pretty!), I have more grinding wheels, Nix is draped against sparks and anything else that might be flying around inside the car.
I only have to flatten the old welds (grind them off) at the front of the floor where the new pan will meet the old, wash off the old adhesive from the sill area and I'm ready to go.
I hope to start grinding off the lumps tomorrow.
(';')
I only have to flatten the old welds (grind them off) at the front of the floor where the new pan will meet the old, wash off the old adhesive from the sill area and I'm ready to go.
I hope to start grinding off the lumps tomorrow.
(';')
#76
12-30-2014, 05:53 PM
Veteran Member
It came out of my brothers panel shop in 1993 when he closed the doors and headed for a retail career. Go figure!
No idea if it is stick or wire feed, just grabbed it because it might be useful one day. Hasn't been moved in 21 years. (I lie, we moved from our old house to this one 17 years ago), it obviously was moved then.
Attachment 103277
No idea if it is stick or wire feed, just grabbed it because it might be useful one day. Hasn't been moved in 21 years. (I lie, we moved from our old house to this one 17 years ago), it obviously was moved then.
Attachment 103277
The GF's Dad reckons it could be a Vintage Hobart Arc Welder that could be worth quite a few bob!
#77
12-30-2014, 06:03 PM
Veteran Member
I have a welding blanket (It's Pretty!), I have more grinding wheels, Nix is draped against sparks and anything else that might be flying around inside the car.
I only have to flatten the old welds (grind them off) at the front of the floor where the new pan will meet the old, wash off the old adhesive from the sill area and I'm ready to go.
I hope to start grinding off the lumps tomorrow.
(';')
I only have to flatten the old welds (grind them off) at the front of the floor where the new pan will meet the old, wash off the old adhesive from the sill area and I'm ready to go.
I hope to start grinding off the lumps tomorrow.
(';')
More covering needed before you start Welding.
Mig Welding sparks go everywhere! including the Roof Lining and I would hate to see any burn marks on that lovely Connoly Hide.
Door Cards/Rear Seats etc.
The following users liked this post:
LnrB (12-31-2014)
#78
12-30-2014, 06:29 PM
Veteran Member
Husband is on a roll so I'm standing back out of his way. He's gone about as far as he can now before I clean up stuff.
We have very strict separation of responsibilities at our house; I clean, he dirties.
He cut until he struck solid steel. Some fabricating needs done before the pan can be welded in obviously, but I'm greatly encouraged that the rot stops where it's relatively easily dealt with.
(';')
We have very strict separation of responsibilities at our house; I clean, he dirties.
He cut until he struck solid steel. Some fabricating needs done before the pan can be welded in obviously, but I'm greatly encouraged that the rot stops where it's relatively easily dealt with.
(';')
Going by the Photo, the steel that you are proposing to Weld the Floor Pan to, doesn't look anywhere clean enough for Welding.
If it isn't clean and bright, you or whoever is doing the Welding will almost certainly find that this is a problem and won't give you the perfect Weld that you are looking for.
Mig is not as forgiving as Arc/Stick Welding, which would not be suitable for this application.
This is what the 'Pro's' use, have you got any of these?
They fit most Angle Grinders and come in a variety of grades, they are simply the best thing, since they started slicing sliced bread and will rip through rust and just about anything else.
Where they will also leave you with the Perfect Finish for Mig.
5 FLAP DISCS CHOOSE: 40/80 Grit Fits Angle Grinder Wheel 4.5" 115mm Sanding Disk | eBay
Last edited by orangeblossom; 12-30-2014 at 06:32 PM.
The following users liked this post:
LnrB (12-31-2014)
#79
12-30-2014, 06:42 PM
Those flappy wheels are really quite good for metal prep, paint/rust removal and post weld grinding. They are very easy to control and don't take off too much per pass like a grinding wheel does. I'm trying to upload an image of a flappy wheel that I had lying around. It's a spin on versus just the wheel that requires the use of the collars.
The following 2 users liked this post by weattg44:
LnrB (12-31-2014),
orangeblossom (12-30-2014)
#80
12-30-2014, 07:27 PM
Veteran Member
Those flappy wheels are really quite good for metal prep, paint/rust removal and post weld grinding. They are very easy to control and don't take off too much per pass like a grinding wheel does. I'm trying to upload an image of a flappy wheel that I had lying around. It's a spin on versus just the wheel that requires the use of the collars.
I managed to pick one up in the Boxing Day sales, which makes cleaning anything down a real cinch!
Even when running at full speed, these discs are very controllable and as you say do not take very much off (unless you want to)

