I have now removed my transmission
#1
 12-28-2014, 06:48 AM


there are a few threads here and other sites covering my progress to date, but i thought i would homologate them into this one
around Easter i fully stripped and rebuilt a 3 speed GM400 auto gearbox for my 1989 V12 XJS
this was extensively covered on this site and shouldn't be hard to find, and at the beginning of December i SORN's the XJS , got her up on jacks etc and started the removal process of my faulty gearbox, this has been covered in another thread, but not easy to find , so to surmise below
car is now 1 mtr in the air on axle stands and ramps with several other axle stands ready to ' catch ' if required, rather that than be squashed :?
so with the car in the air, the front wheels are off , everything looks really good with some very minor bits to paint black to keep on top of things
the full exhaust system has been removed from the collector pipes backwards, the heat shield is out from under the middle and the prop shaft has been undone from the diff end ,
next will be to support the gearbox, and remove the gearbox mount, then the prop shaft will come out, i have a brand new prop shaft from jaguar to refit 8)
then remove all attachments to the gearbox ( vac pipe , kick down switch connector, selector cable and fill pipe tube along with the oil cooler pipe connections ,
then the front torque converter cover to allow access to the flywheel attachment bolts ,
only spending a couple of hours each evening taking it slowly and methodically
so , i now have the sensor and sensor mounting plate ( marelli ) removed from in front of the gearbox
the gear selector cable, the kick down switch connection , a heat shield , module vac pipe and drained the transmission fluid and removed all of the sump bolts , to allow the maximum amount of fluid to drain...
the transmission cooler pipes need to be undone from the box ,
next will be to remove the starter motor and get a jack under the gearbox ( with sump refitted ) and remove the gearbox support , i will also have to place a jack or axle stand under the back of the engine to stop it rocking backwards once the gearbox mount is removed
getting there slowly
gearbox is now supported on a low scissor gearbox jack, and the engine is supported on a beam using the wing drains as support and chains onto the lifting eyes of the engine ,
the rear gearbox support has been removed , and then the prop shaft ,
the starter motor is out and the bolts for the torque converter have been removed using a 15mm socket on a short knuckle bar and turning the fly wheel with a large screwdriver on the teeth against the case , very fiddly and time consuming.....
talking of the starter motor, as she is a 1989 car she has as standard the gear reduction starter motor fitted, the top bolt is different from the bottom bolt, and you need a 12 point 7/16 socket to be able to remove it , while on your back, looking over the gearbox in a cold garage, still, its cheaper than paying someone else to get cold doing the work.....
one thing i did find to my horror was the rear gearbox to prop shaft flange bolts were all loose !! , there are nylon nuts on each bolt , but each bolt was not tight by 1mm or so , resulting in a sloppy fitting prop shaft that would knock when picking up the drive , especially reverse, but worse than that the fixing bolt holes have become elongated ( by 1mm or slightly less ) rendering the flanges useless, luckily i have a brand new prop shaft, and my rebuilt transmission has a perfectly good flange plate , so no panics , but i will need four new bolts , and they are a fiver each....ah well
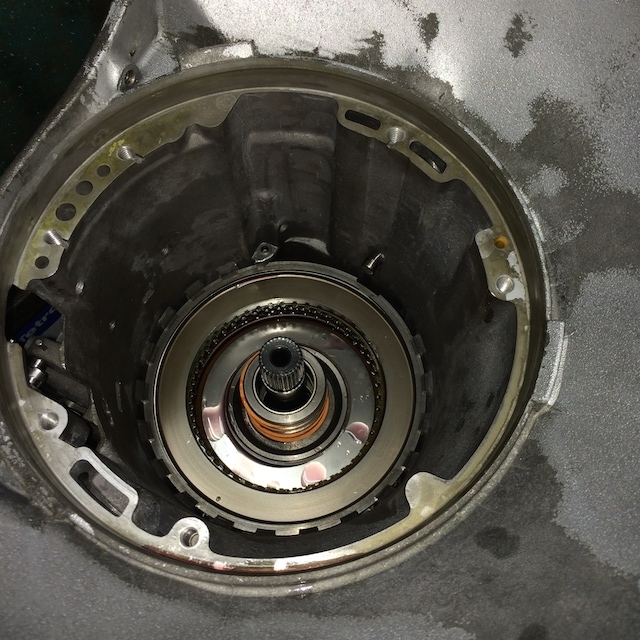
all thats left now is to remove the gearbox to engine block bolts and remove from the car
and today i have successfully removed the gearbox from the engine and out from under the car
this went fairly easy but did have a few fiddly bits to contend with , firstly the top oil cooler pipe, the dip stick gets in the way , but is a pig to get to the fixings and pull from the sump , that provided better access to the top cooler union which thankfully came undone very easily , then i was onto the bell housing bolts holding the transmission to the block
there are 8 bolts, all 9/16 , i had to use every 3/8 extension bar i could find to make a tool around 1mtr long, pass this over the whole length of the transmission and use the ' force ' to locate the bolt head and undo each one blind, took about 45 mins, the transmission was supported on a scissor jack and strapped to it for safety , the bell housing was then wiggled away from the block with a gentle pry , and off the locating pegs she popped, and a controlled lowering to the ground on the jack
thats that stage done, i will take some pics later but not a lot to show and its very tight down there for working
on the whole i am very pleased with the way it has gone so far, very little corrosion ( nothing really ) to deal with and other than the loose drive plate flange no damage either, so a quick clean up and the replacement box should pop in without trouble , but with a big dose of the force to find the bolt holes, lol
wish me luck
BB
around Easter i fully stripped and rebuilt a 3 speed GM400 auto gearbox for my 1989 V12 XJS
this was extensively covered on this site and shouldn't be hard to find, and at the beginning of December i SORN's the XJS , got her up on jacks etc and started the removal process of my faulty gearbox, this has been covered in another thread, but not easy to find , so to surmise below
car is now 1 mtr in the air on axle stands and ramps with several other axle stands ready to ' catch ' if required, rather that than be squashed :?
so with the car in the air, the front wheels are off , everything looks really good with some very minor bits to paint black to keep on top of things
the full exhaust system has been removed from the collector pipes backwards, the heat shield is out from under the middle and the prop shaft has been undone from the diff end ,
next will be to support the gearbox, and remove the gearbox mount, then the prop shaft will come out, i have a brand new prop shaft from jaguar to refit 8)
then remove all attachments to the gearbox ( vac pipe , kick down switch connector, selector cable and fill pipe tube along with the oil cooler pipe connections ,
then the front torque converter cover to allow access to the flywheel attachment bolts ,
only spending a couple of hours each evening taking it slowly and methodically
so , i now have the sensor and sensor mounting plate ( marelli ) removed from in front of the gearbox
the gear selector cable, the kick down switch connection , a heat shield , module vac pipe and drained the transmission fluid and removed all of the sump bolts , to allow the maximum amount of fluid to drain...
the transmission cooler pipes need to be undone from the box ,
next will be to remove the starter motor and get a jack under the gearbox ( with sump refitted ) and remove the gearbox support , i will also have to place a jack or axle stand under the back of the engine to stop it rocking backwards once the gearbox mount is removed
getting there slowly
gearbox is now supported on a low scissor gearbox jack, and the engine is supported on a beam using the wing drains as support and chains onto the lifting eyes of the engine ,
the rear gearbox support has been removed , and then the prop shaft ,
the starter motor is out and the bolts for the torque converter have been removed using a 15mm socket on a short knuckle bar and turning the fly wheel with a large screwdriver on the teeth against the case , very fiddly and time consuming.....
talking of the starter motor, as she is a 1989 car she has as standard the gear reduction starter motor fitted, the top bolt is different from the bottom bolt, and you need a 12 point 7/16 socket to be able to remove it , while on your back, looking over the gearbox in a cold garage, still, its cheaper than paying someone else to get cold doing the work.....
one thing i did find to my horror was the rear gearbox to prop shaft flange bolts were all loose !! , there are nylon nuts on each bolt , but each bolt was not tight by 1mm or so , resulting in a sloppy fitting prop shaft that would knock when picking up the drive , especially reverse, but worse than that the fixing bolt holes have become elongated ( by 1mm or slightly less ) rendering the flanges useless, luckily i have a brand new prop shaft, and my rebuilt transmission has a perfectly good flange plate , so no panics , but i will need four new bolts , and they are a fiver each....ah well
all thats left now is to remove the gearbox to engine block bolts and remove from the car
and today i have successfully removed the gearbox from the engine and out from under the car
this went fairly easy but did have a few fiddly bits to contend with , firstly the top oil cooler pipe, the dip stick gets in the way , but is a pig to get to the fixings and pull from the sump , that provided better access to the top cooler union which thankfully came undone very easily , then i was onto the bell housing bolts holding the transmission to the block
there are 8 bolts, all 9/16 , i had to use every 3/8 extension bar i could find to make a tool around 1mtr long, pass this over the whole length of the transmission and use the ' force ' to locate the bolt head and undo each one blind, took about 45 mins, the transmission was supported on a scissor jack and strapped to it for safety , the bell housing was then wiggled away from the block with a gentle pry , and off the locating pegs she popped, and a controlled lowering to the ground on the jack
thats that stage done, i will take some pics later but not a lot to show and its very tight down there for working
on the whole i am very pleased with the way it has gone so far, very little corrosion ( nothing really ) to deal with and other than the loose drive plate flange no damage either, so a quick clean up and the replacement box should pop in without trouble , but with a big dose of the force to find the bolt holes, lol
wish me luck
BB

#3
12-28-2014, 09:00 AM
Veteran Member
Sorry for chiming in here...
#4
12-28-2014, 09:29 AM
as i have already rebuilt a GM400 box, what is the point ?
that and finding a ' good ' one that won't need a rebuild ( that ANY used box will need ) and i don't really care about MPG , i don't think its something i need/want to do
BB
#5
12-28-2014, 05:01 PM


Veteran Member
Join Date: Mar 2008
Location: Pacific Northwest USA
Posts: 24,743
Received 10,757 Likes
on
7,101 Posts
No, not the same size and not a direct bolt-in. But there are 'conversion kits' out there with the parts you'd need for installation.
Cheers
DD
#6
12-28-2014, 05:15 PM
Veteran Member
Join Date: Mar 2008
Location: Pacific Northwest USA
Posts: 24,743
Received 10,757 Likes
on
7,101 Posts
What car is your replacement 400 out of? The only reason I ask is it was around 1989-ish that Jaguar tweaked the 400 a wee bit: different (higher) shift points and perhaps a couple other enhancements that's I've forgotten.
Cheers
DD
#7
12-29-2014, 04:05 AM
the replacement box was out of a similarly aged car, in fact i think it was six months newer and 30k miles less on the clock , so should be a perfect match ,
i have done some slight modifications as in an adjustable vac modulator, removed one of the valve springs and ' adjusted ' the amount of ball bearings in the valve assembly , so its not fully stock,
this should be enough without installing a shift kit , which i might build up my removed box as , now i have the knowledge, lol
BB
Trending Topics
#8
12-29-2014, 04:25 AM
i have just realised i have not put up my GM400 rebuild thread on this particular site,
so please bear with me , as i will repost the info below from day one
picture heavy :-
my plan was always to restore the car structurally , cosmetically and then mechanically, as required
the engine was always good , and the gearbox ' worked ' , but always gave me a rumble is first and second, but nice and quiet in top ( third ) , conclusion was that the first gear bearing and the engine braking band was toast , amongst other issues , but still , as i said ....functional
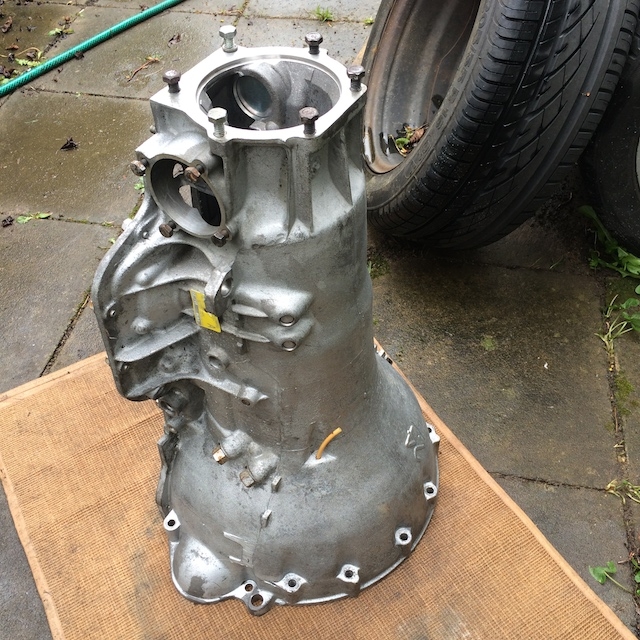
its a 3 speed automatic GM400 or known globally as a TH400 Hydromatic , this box was used in literally millions of cars from 1964 onwards , and changed little till 1998
this week i picked up an ebay bargain gearbox , albeit with a 6 hour round trip to get it , i then proceeded to my local gearbox guru or assessment and a price to fit it into my car , this is not a cheap process, though quite simple in theory , and something i would do given a ramp etc ,
the conclusion was that the ebay bargain was also stuffed , but in a different way , in that the friction material was burned and residue was in the sump , and the oil was also burned , so needs a partial rebuild to make it reliable , but bearings etc were ok
all in all it needs �1500 to sort it by a gearbox shop , thats everything, removal , rebuild, testing and refitting, along with a guarantee , but this is not in the budget at the moment ,
with this in mind, i am going to rebuild the spare unit myself , i feel its well within my capabilities ,given decent instruction etc , you would be surprised how may in the US build their own boxes in exactly the same way
rebuild kits start at �100 and go to about �250 for the ' best ' kits , i will be aiming to the middle quality kits giving me all the parts i need , i have a rebuild manual on the way , once i have digested its contents i will buy the kit and take apart the spare box, i plan to fully document this process, and even if it fails i will have learned something, lol
wish me luck
BB :shock:
so please bear with me , as i will repost the info below from day one
picture heavy :-
my plan was always to restore the car structurally , cosmetically and then mechanically, as required
the engine was always good , and the gearbox ' worked ' , but always gave me a rumble is first and second, but nice and quiet in top ( third ) , conclusion was that the first gear bearing and the engine braking band was toast , amongst other issues , but still , as i said ....functional
its a 3 speed automatic GM400 or known globally as a TH400 Hydromatic , this box was used in literally millions of cars from 1964 onwards , and changed little till 1998
this week i picked up an ebay bargain gearbox , albeit with a 6 hour round trip to get it , i then proceeded to my local gearbox guru or assessment and a price to fit it into my car , this is not a cheap process, though quite simple in theory , and something i would do given a ramp etc ,
the conclusion was that the ebay bargain was also stuffed , but in a different way , in that the friction material was burned and residue was in the sump , and the oil was also burned , so needs a partial rebuild to make it reliable , but bearings etc were ok
all in all it needs �1500 to sort it by a gearbox shop , thats everything, removal , rebuild, testing and refitting, along with a guarantee , but this is not in the budget at the moment ,
with this in mind, i am going to rebuild the spare unit myself , i feel its well within my capabilities ,given decent instruction etc , you would be surprised how may in the US build their own boxes in exactly the same way
rebuild kits start at �100 and go to about �250 for the ' best ' kits , i will be aiming to the middle quality kits giving me all the parts i need , i have a rebuild manual on the way , once i have digested its contents i will buy the kit and take apart the spare box, i plan to fully document this process, and even if it fails i will have learned something, lol
wish me luck
BB :shock:
#9
12-29-2014, 04:27 AM
#10
12-29-2014, 04:28 AM
a small but important upgrade to the box update........
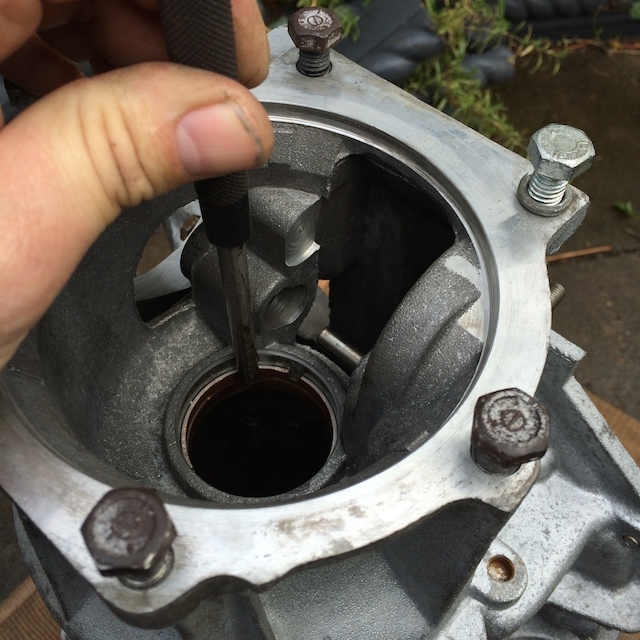
as this box is a mechanical speedo version , taking the pickup from the rear of the box just before the box extension , and my car being an electronic speedo from the diff , i needed to alter the casting,
searching the Heritage parts site, i discovered that they sold a ' tapered blank ' , i put two and two together and bought two of these blanks , lol, but at �0.19 each , it wasn't too much of a punt ,lol
well, 24 hours after the order, the parts were in ( along with a snap ring kit, and a spacer i also needed )
and then home to see if what i bought was what i needed
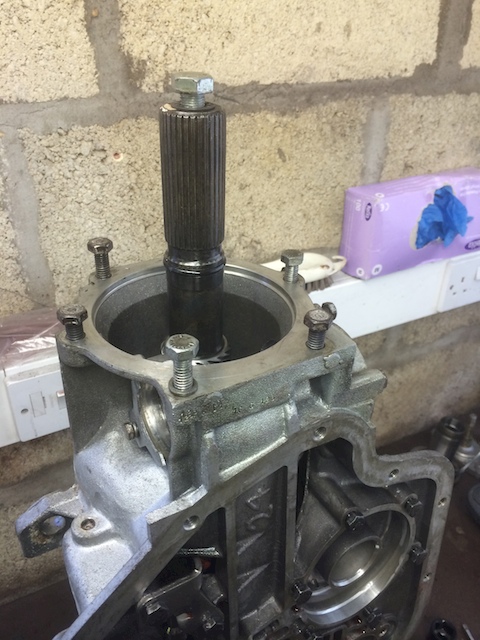
the speedo pickup , and the open hole can be seen in the first two pictures in this thread
this is the plug fitted in the speedo pickup aperture , simple drift fit until the sound changes from a thud to a ping, and then its fully home
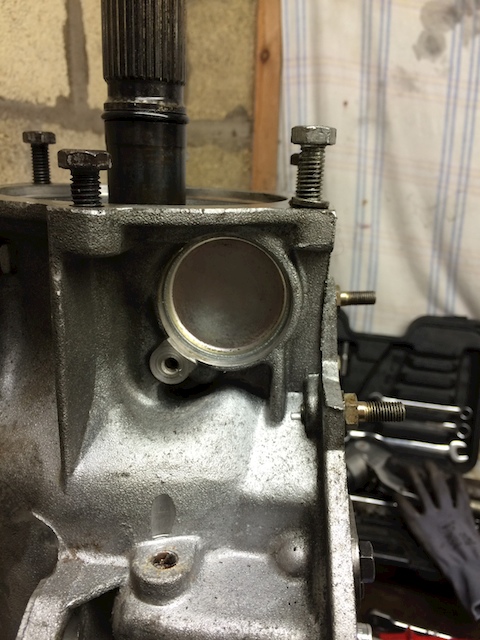
3352 by MyPix
BB
btw , have now found the chrome sump for �29 all in..............
as this box is a mechanical speedo version , taking the pickup from the rear of the box just before the box extension , and my car being an electronic speedo from the diff , i needed to alter the casting,
searching the Heritage parts site, i discovered that they sold a ' tapered blank ' , i put two and two together and bought two of these blanks , lol, but at �0.19 each , it wasn't too much of a punt ,lol
well, 24 hours after the order, the parts were in ( along with a snap ring kit, and a spacer i also needed )
and then home to see if what i bought was what i needed
the speedo pickup , and the open hole can be seen in the first two pictures in this thread
this is the plug fitted in the speedo pickup aperture , simple drift fit until the sound changes from a thud to a ping, and then its fully home
3352 by MyPix
BB
btw , have now found the chrome sump for �29 all in..............
#11
12-29-2014, 04:29 AM
still waiting for the refurb kit from America , expecting it tomorrow
so while i was bored , i refurbished the torque converter ,

3377 by MyPix
as far as i know, the internals are fine and will get a good flush off the car, but the outside has only got to smell moisture and rusts making it look bad, so i painted it like the Americans do !
BB
so while i was bored , i refurbished the torque converter ,
3377 by MyPix
as far as i know, the internals are fine and will get a good flush off the car, but the outside has only got to smell moisture and rusts making it look bad, so i painted it like the Americans do !
BB
#12
12-29-2014, 04:30 AM
so , the kit has arrived, and i even bought a second kit on ebay because it was very cheap......
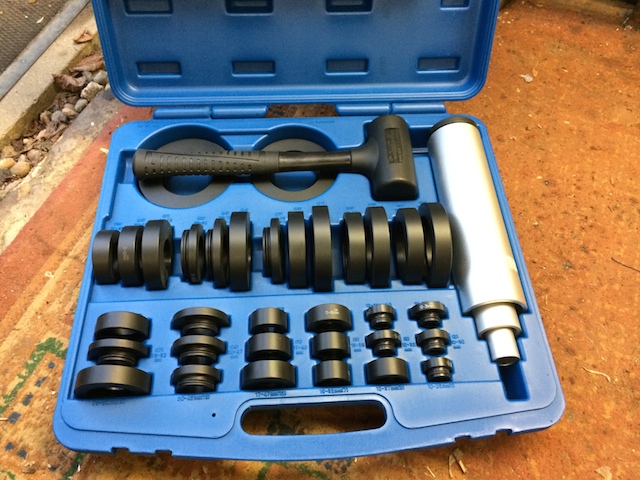
i have also treated myself to some new workshop equipment including a bush and bearing drift set , and a full set of digital callipers and dial gauges and magnetic stand
3462 by MyPix
new copper alloy bush and gearbox end extension seal bashed home, lol , that bit can now be put to one side,

3461 by MyPix
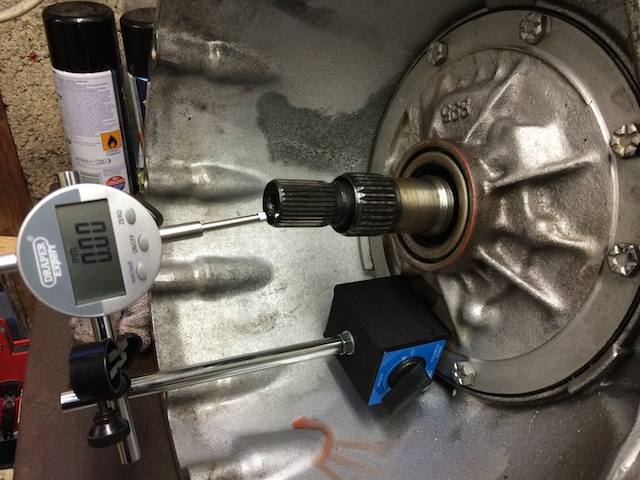
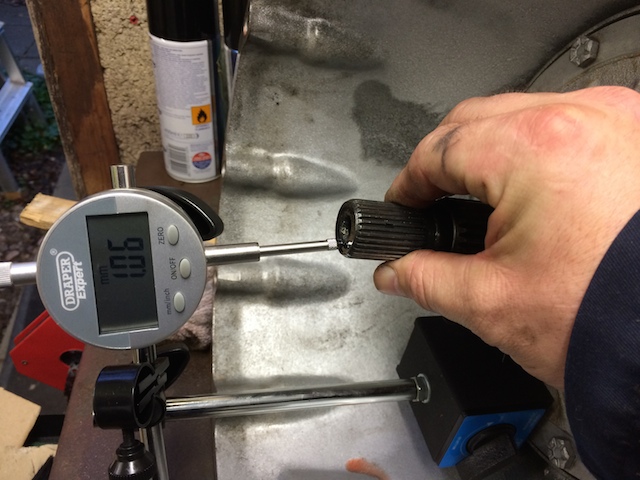
measuring the original end float of the pump in the box,i could tell by the feel it was way too much , but i needed to know how much so i can get the correct shims to bring it back to tolerance , its suppose to be between 15 and 30 thou , 0.72mm max( 30 thou )
this is setup and zero'd prior to measuring, the electro magnetic base makes everything steady
3463 by MyPix
as you can see , its way out, but is a starting point , all new components should bring it back a little, and then a shim will bing it to tolerance
3464 by MyPix
and for those still thinking in the stone age........ :P ( that should read a max of 0.030 , not 0.0415 :shock: )
3465 by MyPix
with the end float measured , i could proceed with stripping out the internals, this means removing the pump on the front, its in there tight but Jaguar kindly threaded two of the bolt holes to a assist, a puller would work but i only had metric threads, so i bashed it with a nylon hammer until it gave up , and then pulled it over the inner drive shaft ,
3466 by MyPix
i then removed as per my instruction book ( another thing i had to buy ) all the internal clutches and drive section, this is them all on the rolling trolly ( christmas present ) ready for inspection , cleaning and then rebuild before installing back in the case
3467 by MyPix
and thats it, a fully stripped case ready for jet washing and rebuilding

3468 by MyPix
a quick inspection of the friction material showed definite burning as a dark brown/black ring on the dark red friction surface, i will take a pic , but its too late now
thanks for hanging in there , but i can't just say i took it to bits and put it back together , lol
BB
i have also treated myself to some new workshop equipment including a bush and bearing drift set , and a full set of digital callipers and dial gauges and magnetic stand
3462 by MyPix
new copper alloy bush and gearbox end extension seal bashed home, lol , that bit can now be put to one side,
3461 by MyPix
measuring the original end float of the pump in the box,i could tell by the feel it was way too much , but i needed to know how much so i can get the correct shims to bring it back to tolerance , its suppose to be between 15 and 30 thou , 0.72mm max( 30 thou )
this is setup and zero'd prior to measuring, the electro magnetic base makes everything steady
3463 by MyPix
as you can see , its way out, but is a starting point , all new components should bring it back a little, and then a shim will bing it to tolerance
3464 by MyPix
and for those still thinking in the stone age........ :P ( that should read a max of 0.030 , not 0.0415 :shock: )
3465 by MyPix
with the end float measured , i could proceed with stripping out the internals, this means removing the pump on the front, its in there tight but Jaguar kindly threaded two of the bolt holes to a assist, a puller would work but i only had metric threads, so i bashed it with a nylon hammer until it gave up , and then pulled it over the inner drive shaft ,
3466 by MyPix
i then removed as per my instruction book ( another thing i had to buy ) all the internal clutches and drive section, this is them all on the rolling trolly ( christmas present ) ready for inspection , cleaning and then rebuild before installing back in the case
3467 by MyPix
and thats it, a fully stripped case ready for jet washing and rebuilding
3468 by MyPix
a quick inspection of the friction material showed definite burning as a dark brown/black ring on the dark red friction surface, i will take a pic , but its too late now
thanks for hanging in there , but i can't just say i took it to bits and put it back together , lol
BB
#13
12-29-2014, 04:31 AM
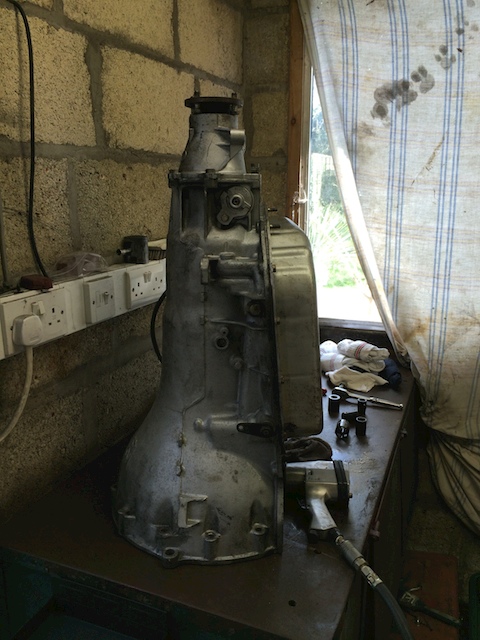
so , today i degreased and then jet washed the transmission case, and then used the air line to blow out the water from all the nooks and crannies . the case can look like its still dirty , but that is silver paint over cast aluminium thats all.
3473 by MyPix
next is to drive out the rear case bushing using a hardened steel punch being careful not to score the case ,
3470 by MyPix
removed bushing

3471 by MyPix
new bushing drifted in with my set and using a little thread lock to set the bushing in the case , as they can spin out causing issues , excess thread lock was then wiped away.

3472 by MyPix
next is the kick down connector , cleaned up and a new seal with a little petroleum jelly to aid installation , its popped into the case , old seal is next to it , which was hard....

3474 by MyPix
installed , simple push fit,

3480 by MyPix
next is the manual shift case seal , its shown on another set of drifts for smaller items,
3476 by MyPix
set into case

3477 by MyPix
then the park brake pawl , just cleaned up , spring fitted and connecting rod and lever fitted , along with the manual gear selector cam

3481 by MyPix
selector cam
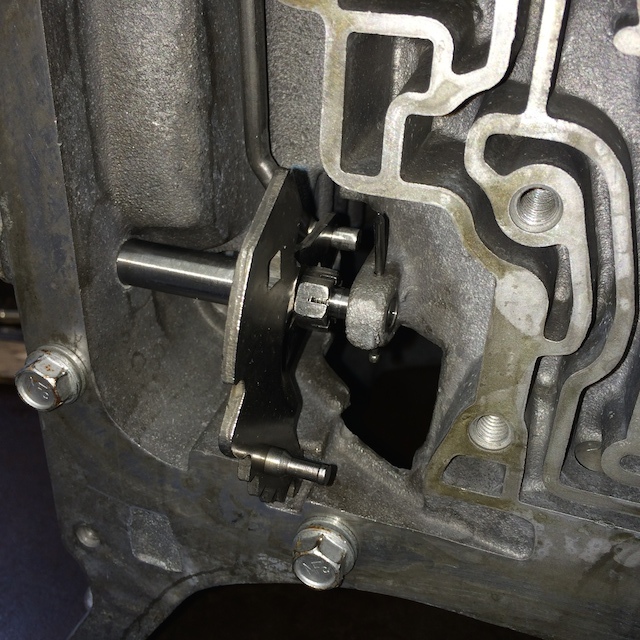
3482 by MyPix
all in situ

3483 by MyPix
thats it for this weekend as the F1 GP is on soon
oh , i did say i would show you what a burned clutch looked like
3479 by MyPix
BB
3473 by MyPix
next is to drive out the rear case bushing using a hardened steel punch being careful not to score the case ,
3470 by MyPix
removed bushing
3471 by MyPix
new bushing drifted in with my set and using a little thread lock to set the bushing in the case , as they can spin out causing issues , excess thread lock was then wiped away.
3472 by MyPix
next is the kick down connector , cleaned up and a new seal with a little petroleum jelly to aid installation , its popped into the case , old seal is next to it , which was hard....
3474 by MyPix
installed , simple push fit,
3480 by MyPix
next is the manual shift case seal , its shown on another set of drifts for smaller items,
3476 by MyPix
set into case
3477 by MyPix
then the park brake pawl , just cleaned up , spring fitted and connecting rod and lever fitted , along with the manual gear selector cam
3481 by MyPix
selector cam
3482 by MyPix
all in situ
3483 by MyPix
thats it for this weekend as the F1 GP is on soon
oh , i did say i would show you what a burned clutch looked like
3479 by MyPix
BB
#14
12-29-2014, 04:32 AM
so, its sunday , the F1 GP is over, and i got bored, lol
so i decided to refurbish the final drive section of the box, this is the output shaft planet and sun gearing stripped down

3512 by MyPix
old bushing removed, and new one installed

3513 by MyPix
not very complicated , so with new bushings and new o-rings installed,and a new silencer ring , along with new torrington bearings lubricated its popped back together ready for the next part
3514 by MyPix
planet gear housing bushing removed and new one fitted with some lock tight, and then a new sprag one way roller fitted ( can be seen in next picture )
3515 by MyPix
then , with the rear band soaked in ATF and fitted into the case, the whole final drive section is dropped into the case with the middle sun gear fitted , ready for the centre support , this is in bits on the bench ready for rebuild in the next instalment , lol
3516 bMyPix
BB ( i must be mad..... )
so i decided to refurbish the final drive section of the box, this is the output shaft planet and sun gearing stripped down
3512 by MyPix
old bushing removed, and new one installed
3513 by MyPix
not very complicated , so with new bushings and new o-rings installed,and a new silencer ring , along with new torrington bearings lubricated its popped back together ready for the next part
3514 by MyPix
planet gear housing bushing removed and new one fitted with some lock tight, and then a new sprag one way roller fitted ( can be seen in next picture )
3515 by MyPix
then , with the rear band soaked in ATF and fitted into the case, the whole final drive section is dropped into the case with the middle sun gear fitted , ready for the centre support , this is in bits on the bench ready for rebuild in the next instalment , lol
3516 bMyPix
BB ( i must be mad..... )
#15
12-29-2014, 04:33 AM
so , the next instalment
the central support refurbishment, this is a drum with a spring valve inside and a large bushing in the centrall shaft , new seals to the piston , new torrington bearings, new bushings and all put back together with a ' brass ' thrust washer rather than an original plastic one,
3531 by MyPix
up the other way showing the four slip seals, the piston is mounted under the spring retainer , , the new bushing was pushed in with my 12 tonne press, as its about 100mm long,

3534 by MyPix
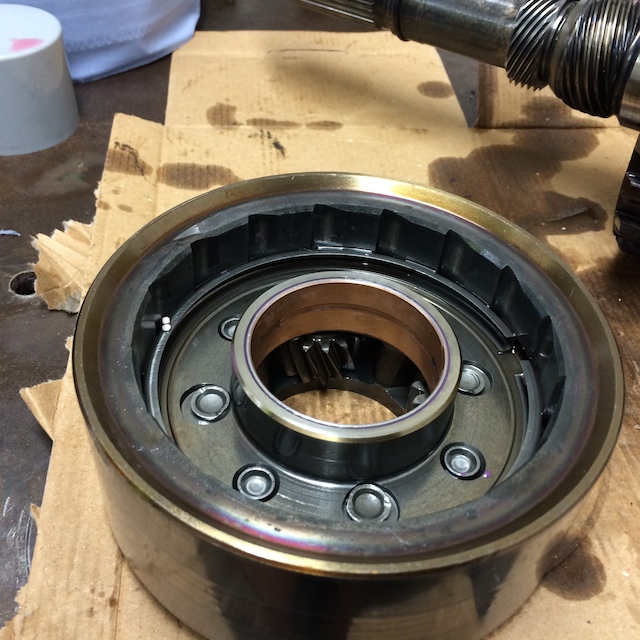
then this whole unit is dropped into the case making sure its seated correctly and the oil supply holes are in the right place and the chamfered retaining ring is snapped in making sure its the right way up

3535 by MyPix
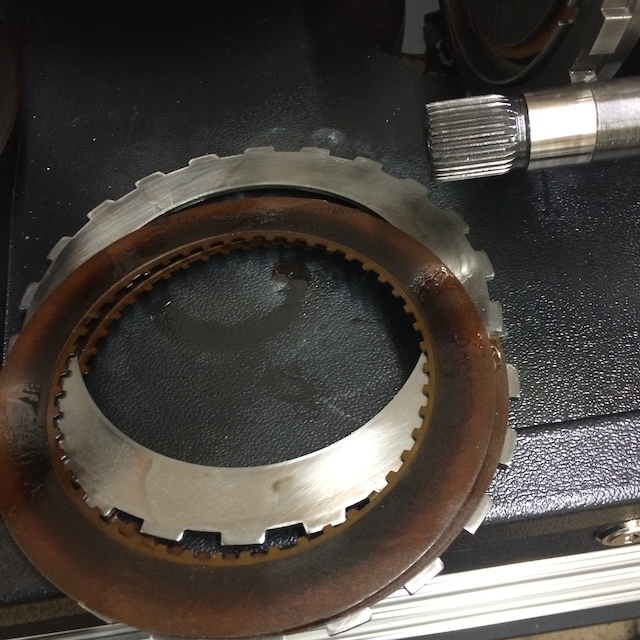
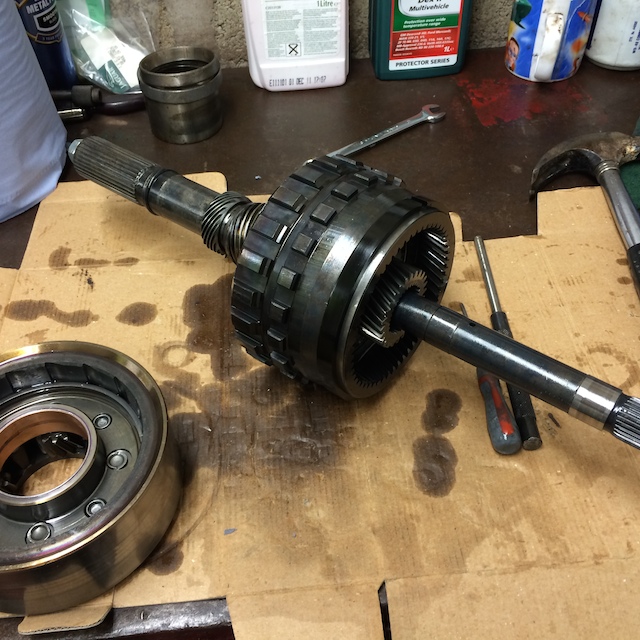
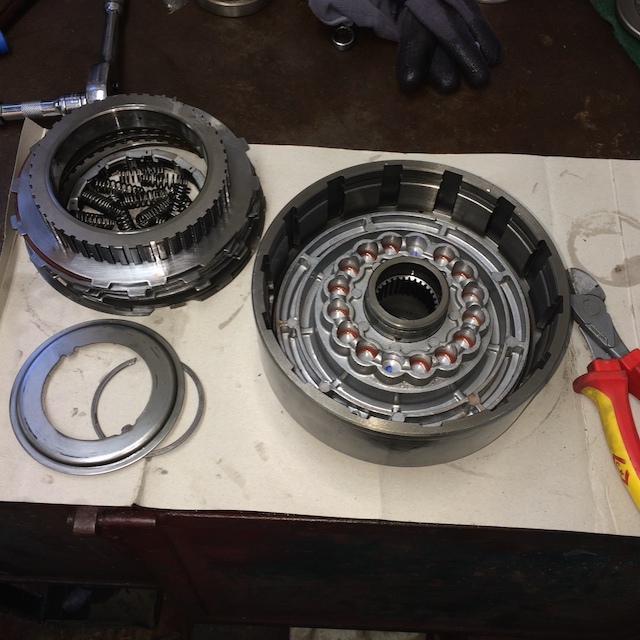
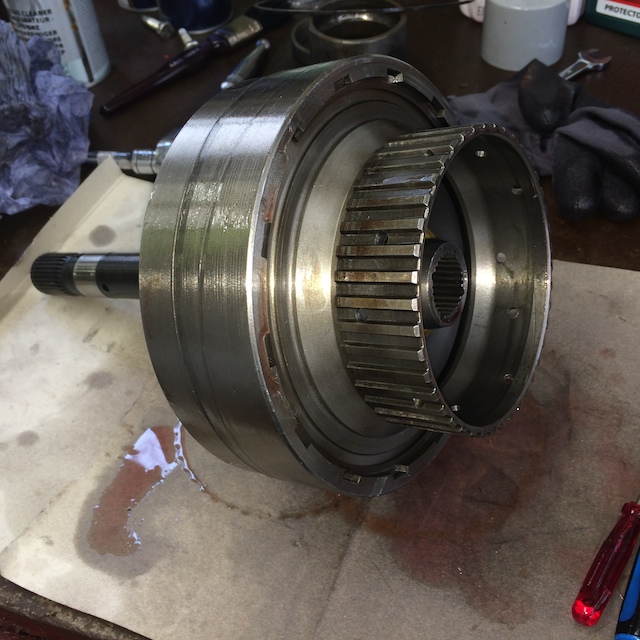
then the first of the steel clutch sections is dropped in,

3540 by MyPix
followed by a friction plate and then a steel and friction plate etc , and then finally the thick retainer followed by a snap ring

3539 by MyPix
i have upgraded from a three clutch to four clutch system for a more positive gear change , and a quicker change , friction material soaking in ATF before being installed

3538 by MyPix
and finally all stacked up and held in with a snap ring,
3541 by MyPix
BB
the central support refurbishment, this is a drum with a spring valve inside and a large bushing in the centrall shaft , new seals to the piston , new torrington bearings, new bushings and all put back together with a ' brass ' thrust washer rather than an original plastic one,
3531 by MyPix
up the other way showing the four slip seals, the piston is mounted under the spring retainer , , the new bushing was pushed in with my 12 tonne press, as its about 100mm long,
3534 by MyPix
then this whole unit is dropped into the case making sure its seated correctly and the oil supply holes are in the right place and the chamfered retaining ring is snapped in making sure its the right way up
3535 by MyPix
then the first of the steel clutch sections is dropped in,
3540 by MyPix
followed by a friction plate and then a steel and friction plate etc , and then finally the thick retainer followed by a snap ring
3539 by MyPix
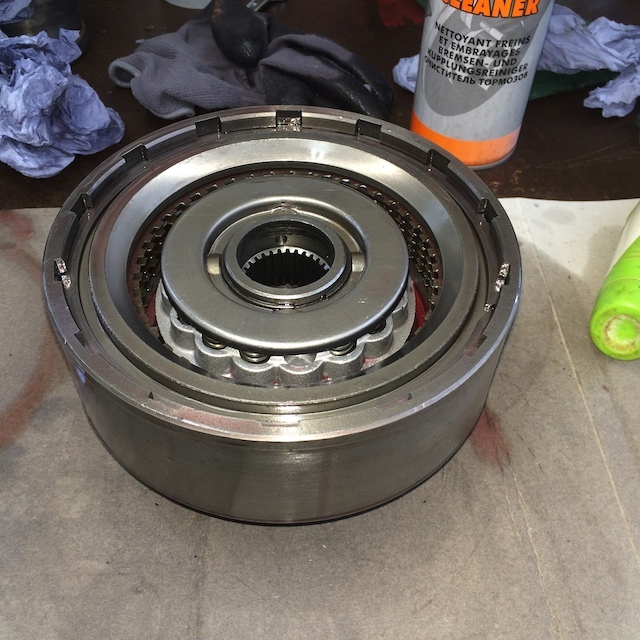
i have upgraded from a three clutch to four clutch system for a more positive gear change , and a quicker change , friction material soaking in ATF before being installed
3538 by MyPix
and finally all stacked up and held in with a snap ring,
3541 by MyPix
BB
#16
12-29-2014, 04:34 AM
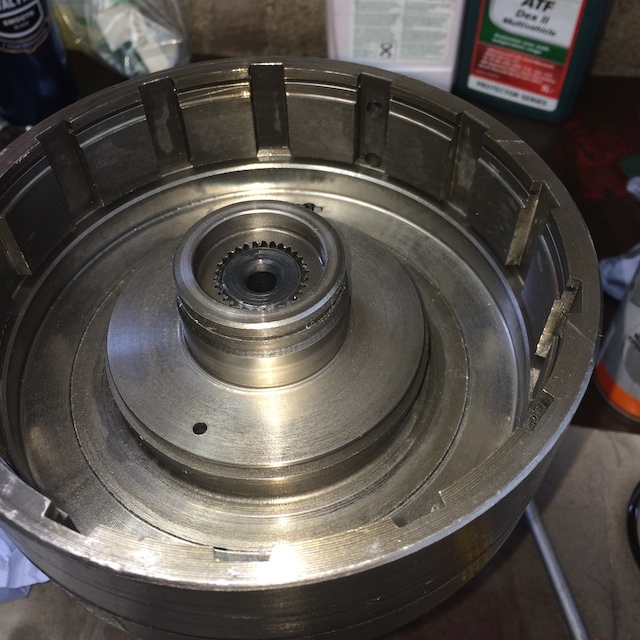
right. onto business ,
the next step was to re-bush the central drive , and install it into the central support ,
central shaft,

3920 by MyPix
new bushes installed ,

3921 by MyPix
installed into the into the central carrier with the clutch pack already installed

3922 by MyPix
fully installed and located in the main sun gear lower in the box along with the front band

3923 by MyPix
next was to disassemble the intermediate clutch ,
3929 by MyPix
i had to think of a way to compress the valve springs to remove the cir clip retaining the collar ,
so i cut up an old welding wire spool that is made of heavy duty abs , allowing me to access the clip while compressed

3924 by MyPix
the component parts of the clutch ,
3927 by MyPix
removing the valve from the drum , showing the seal

3928 by MyPix
then it was a full clean , install new seals all round and build back up ,
3929 by MyPix
and installed in the case
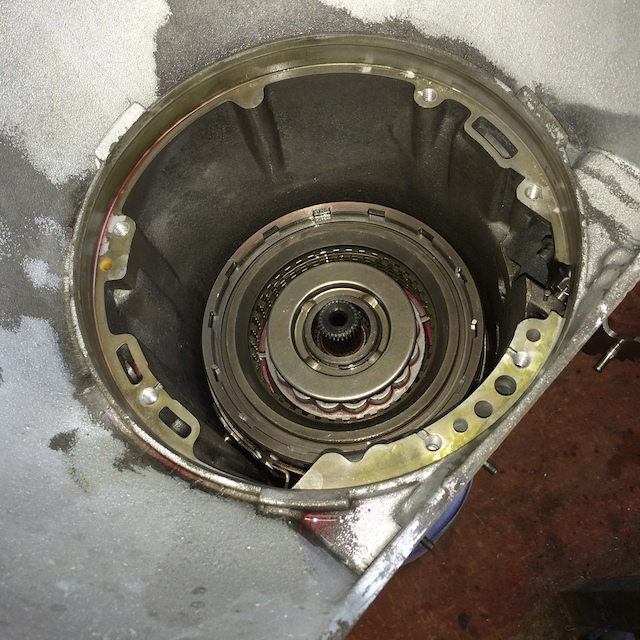
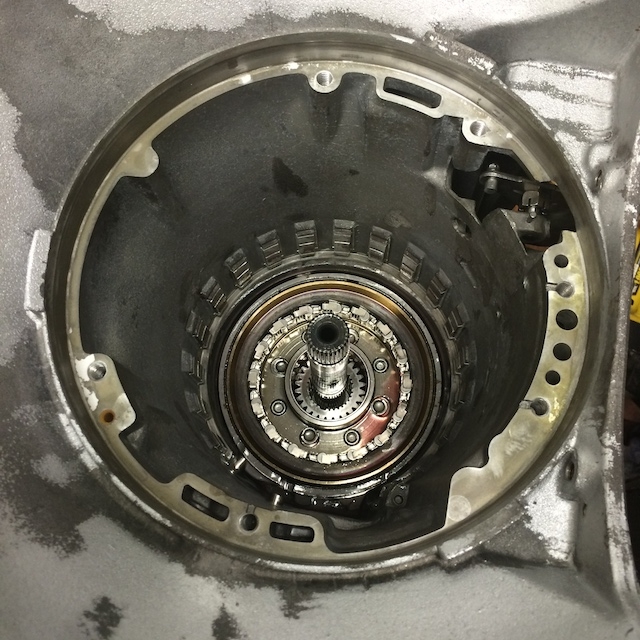
3930 by MyPix
onto the front drum , pretty much the same as the intermediate drum in process, but this has the main drive shaft installed
3931 by MyPix
retaining ring removed

3932 by MyPix
and disassembled for cleaning and new seals

3933 by MyPix
3935 by MyPix
new seal installed

3936 by MyPix
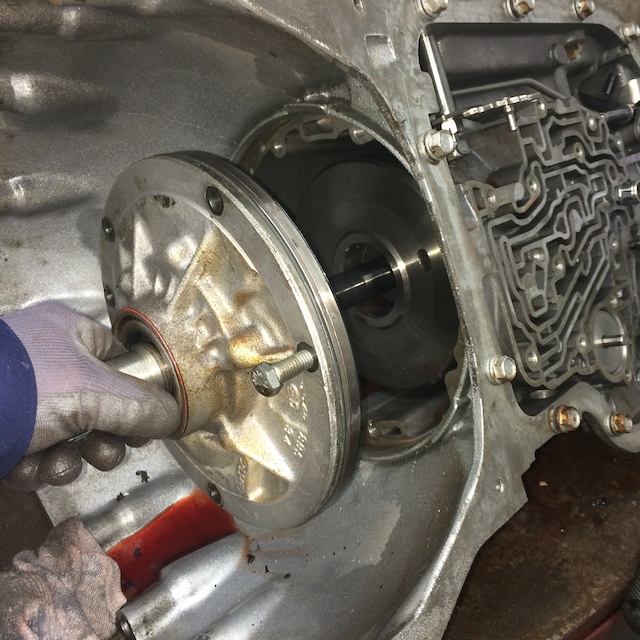
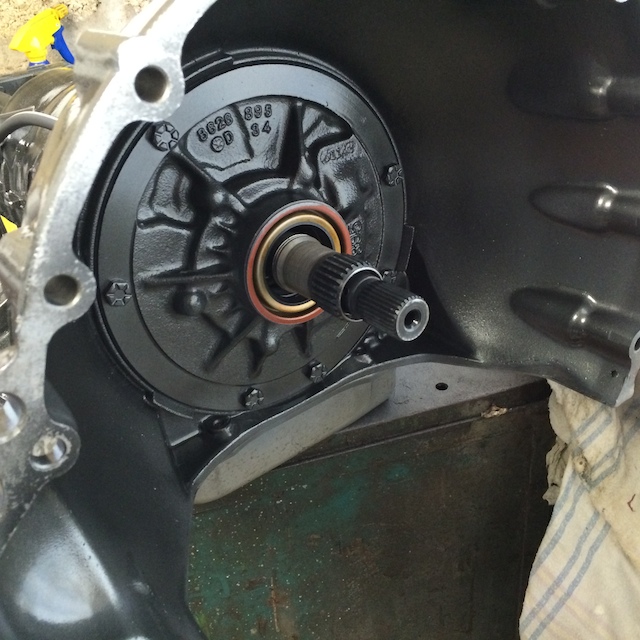
and all put back together and dropped into the case, final thing was the pump , as i was very messy , and concentrating, i forgot to take any pictures, lol, but the pump is the disc shaped item in this picture
3467 by MyPix
remove all the front bolts, and separate, inspect for condition, and replace internal seals, while assuring correct alignment when putting back together , and then drop into the case, you then have to check the end float, and remove for adjustment if required using the pre made shims in the pack
BB
the next step was to re-bush the central drive , and install it into the central support ,
central shaft,
3920 by MyPix
new bushes installed ,
3921 by MyPix
installed into the into the central carrier with the clutch pack already installed
3922 by MyPix
fully installed and located in the main sun gear lower in the box along with the front band
3923 by MyPix
next was to disassemble the intermediate clutch ,
3929 by MyPix
i had to think of a way to compress the valve springs to remove the cir clip retaining the collar ,
so i cut up an old welding wire spool that is made of heavy duty abs , allowing me to access the clip while compressed
3924 by MyPix
the component parts of the clutch ,
3927 by MyPix
removing the valve from the drum , showing the seal
3928 by MyPix
then it was a full clean , install new seals all round and build back up ,
3929 by MyPix
and installed in the case
3930 by MyPix
onto the front drum , pretty much the same as the intermediate drum in process, but this has the main drive shaft installed
3931 by MyPix
retaining ring removed
3932 by MyPix
and disassembled for cleaning and new seals
3933 by MyPix
3935 by MyPix
new seal installed
3936 by MyPix
and all put back together and dropped into the case, final thing was the pump , as i was very messy , and concentrating, i forgot to take any pictures, lol, but the pump is the disc shaped item in this picture
3467 by MyPix
remove all the front bolts, and separate, inspect for condition, and replace internal seals, while assuring correct alignment when putting back together , and then drop into the case, you then have to check the end float, and remove for adjustment if required using the pre made shims in the pack
BB
#17
12-29-2014, 04:36 AM
right ,
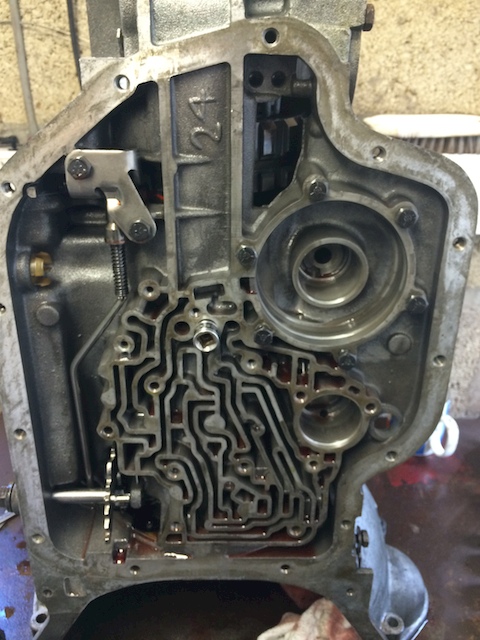
with all the spiny things shoved into the case, its time for the valve block , the bit that sits over the filter when looking at it in the car, the valve block is the brains of the system , and controls the pressures and flows of the fluid within the case, there are several different types , Jaguar used the manual select first and second gear and full auto , but there were safety features to stop the box from being damaged, so even if you selected first , the box would change up if IT felt it needed to , these can be over ridden by altering the valve block setup with modifications and different valve block paper gasket sets ,
i have stuck with a stock setup , well almost , as i have an adjustable modulator , and removed the accumulator assist spring within the valve block for this function , and also some of the fluid check ***** have been omitted ,
this is the valve block with its component parts removed ready for cleaning

4018 by MyPix
this is the valve block with all the parts refitted from the previous picture, its a simple clean and check , lubricate and reassemble task , you can just see the pistons within the block in place

4001 by MyPix
next is the accumulator piston for the front band , with the adjustable vacuum modulator you can omit the spring, this makes for a slightly crisper shift , these are the component, a new teflon seal was fitted prod to fitting

4002 by MyPix
this picture shows where the spring should go , i did not fit this spring, it is a widely accepted modification to improve response
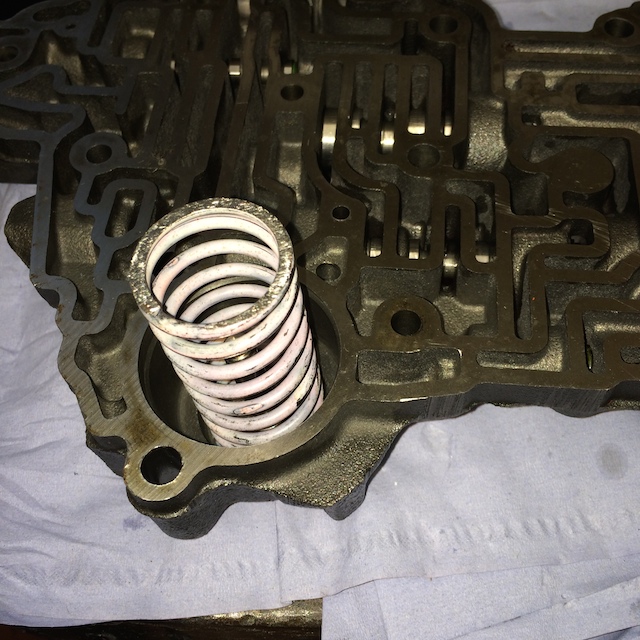
4003 by MyPix
then its the fluid check ***** , these are simple ball bearings of a certain size, six are normally fitted for ' comfort ' two are the minimum required for race shifting at full pressures, i opted for five check ***** in the locations shown
4000 by MyPix
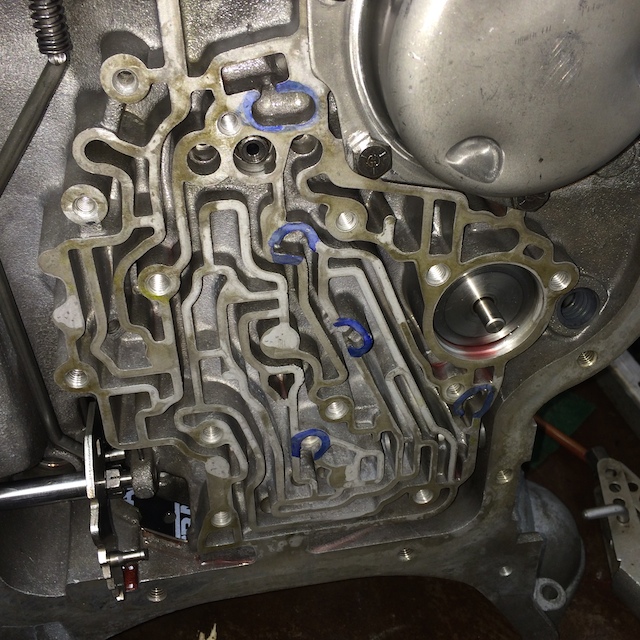
next is to offer up the gasket set and spacer plate, along with the detent solenoid which is for the kick down function , this was all placed on the case and held in place while the detent solenoid was tightened down
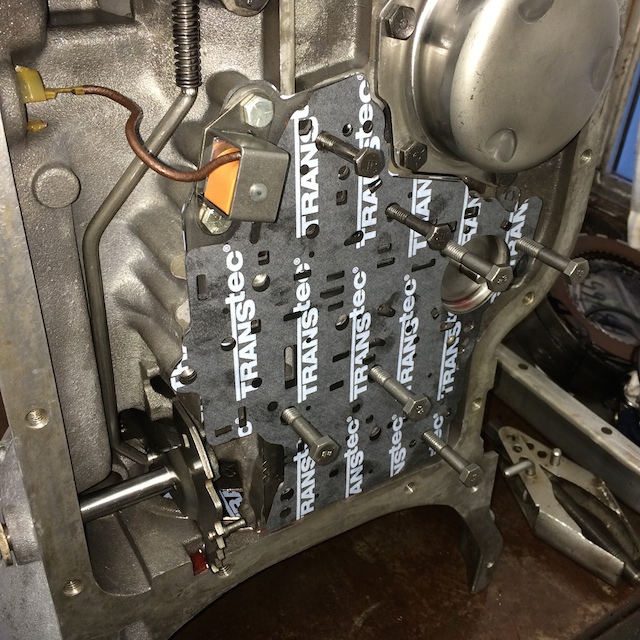
4005 by MyPix
i then removed the bolts that are protruding and offered up the valve block while locating the two top oil flow pipes to the case, and the manual select valve onto the manual shifter cam with the spring retainer in place

4010 by MyPix
next is the oil pickup tube, its common practice to install this tube with two O rings fitted to ensure correct pickup , belt n braces and all that.......

4011 by MyPix
and then its the filter

4012 by MyPix
4013 by MyPix
i then temporarily fitted the sump pan using a lesser cork gasket , i plan to paint the case and fit a nice chrome ' finned ' sump , but the original one will stop things getting damaged for now
BB
with all the spiny things shoved into the case, its time for the valve block , the bit that sits over the filter when looking at it in the car, the valve block is the brains of the system , and controls the pressures and flows of the fluid within the case, there are several different types , Jaguar used the manual select first and second gear and full auto , but there were safety features to stop the box from being damaged, so even if you selected first , the box would change up if IT felt it needed to , these can be over ridden by altering the valve block setup with modifications and different valve block paper gasket sets ,
i have stuck with a stock setup , well almost , as i have an adjustable modulator , and removed the accumulator assist spring within the valve block for this function , and also some of the fluid check ***** have been omitted ,
this is the valve block with its component parts removed ready for cleaning
4018 by MyPix
this is the valve block with all the parts refitted from the previous picture, its a simple clean and check , lubricate and reassemble task , you can just see the pistons within the block in place
4001 by MyPix
next is the accumulator piston for the front band , with the adjustable vacuum modulator you can omit the spring, this makes for a slightly crisper shift , these are the component, a new teflon seal was fitted prod to fitting
4002 by MyPix
this picture shows where the spring should go , i did not fit this spring, it is a widely accepted modification to improve response
4003 by MyPix
then its the fluid check ***** , these are simple ball bearings of a certain size, six are normally fitted for ' comfort ' two are the minimum required for race shifting at full pressures, i opted for five check ***** in the locations shown
4000 by MyPix
next is to offer up the gasket set and spacer plate, along with the detent solenoid which is for the kick down function , this was all placed on the case and held in place while the detent solenoid was tightened down
4005 by MyPix
i then removed the bolts that are protruding and offered up the valve block while locating the two top oil flow pipes to the case, and the manual select valve onto the manual shifter cam with the spring retainer in place
4010 by MyPix
next is the oil pickup tube, its common practice to install this tube with two O rings fitted to ensure correct pickup , belt n braces and all that.......
4011 by MyPix
and then its the filter
4012 by MyPix
4013 by MyPix
i then temporarily fitted the sump pan using a lesser cork gasket , i plan to paint the case and fit a nice chrome ' finned ' sump , but the original one will stop things getting damaged for now
BB
#18
12-29-2014, 04:36 AM
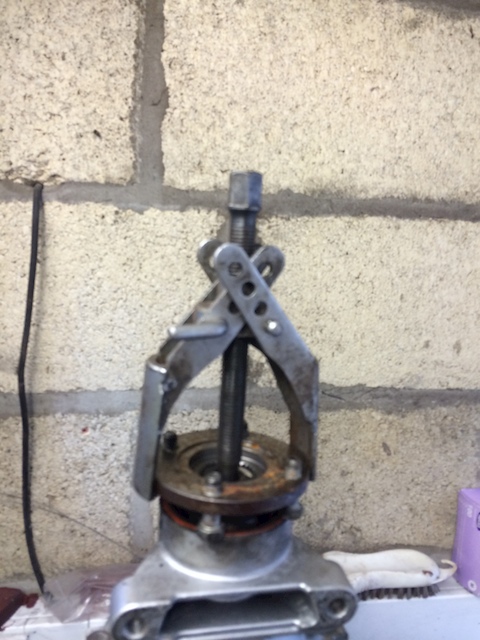
with the work bench cleared and cleaned ( a bit ) it was time to check the end float of the rebuilt box
this time i sat the whole box on the bench resting on the pan , and set the dial gauge on the bench its self

4020 by MyPix
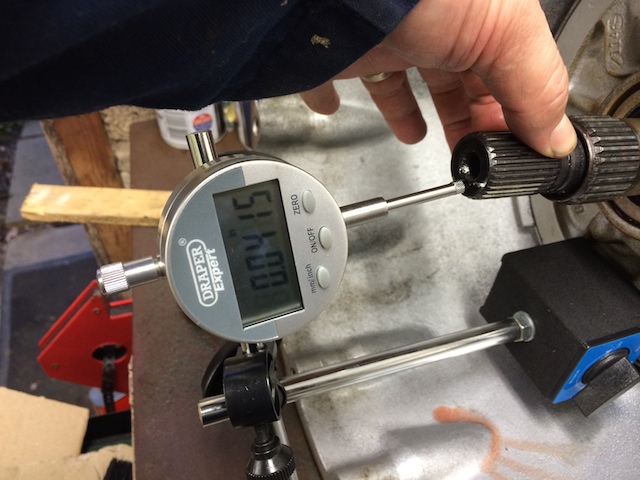
i chose a new shim to reduce the overall play i had to start with before the stripdown as mentioned in the first post, but it was not however enough , i then chose another shim, which was too much , in fact there was no movement at all , lol
the kit supplies you with eight shims of differing thickness just for this task , i finally chose the correct shim , the thing is replacing the shim means removing the pump from the case each time, then tightening it down each time to check the end flood
but i eventually ended up with this

4014 by MyPix
tolerance is between 15 and 30 thou , as you can see , i got it to 16.5 thou , so not bad for a home build i think , lol
BB :mrgreen:
this time i sat the whole box on the bench resting on the pan , and set the dial gauge on the bench its self
4020 by MyPix
i chose a new shim to reduce the overall play i had to start with before the stripdown as mentioned in the first post, but it was not however enough , i then chose another shim, which was too much , in fact there was no movement at all , lol
the kit supplies you with eight shims of differing thickness just for this task , i finally chose the correct shim , the thing is replacing the shim means removing the pump from the case each time, then tightening it down each time to check the end flood
but i eventually ended up with this
4014 by MyPix
tolerance is between 15 and 30 thou , as you can see , i got it to 16.5 thou , so not bad for a home build i think , lol
BB :mrgreen:
#19
12-29-2014, 04:38 AM
time for a bit of bling after the rebuild , found some spare paint on the shelf , so i degreased the box , masked up certain parts and holes, and primed the case in grey primer, then a colour coat of Graphite Grey , and a top coat of Gloss lacquer
what do you think ?
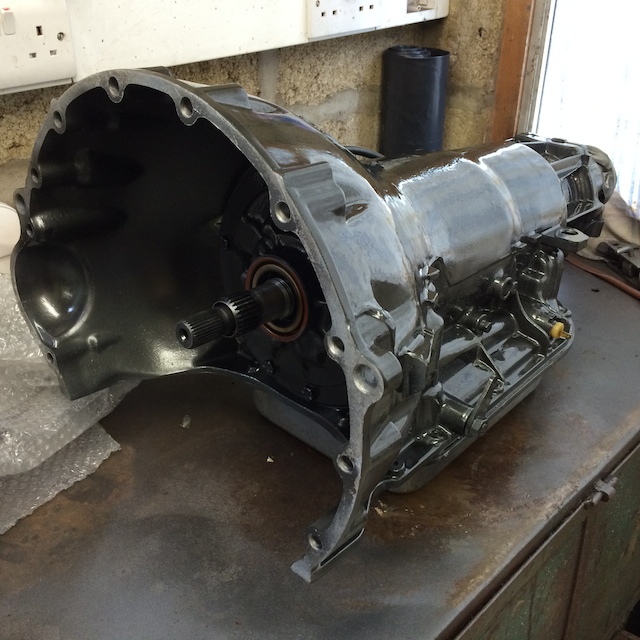
4039 by MyPix
4035 by MyPix
4034 by MyPix
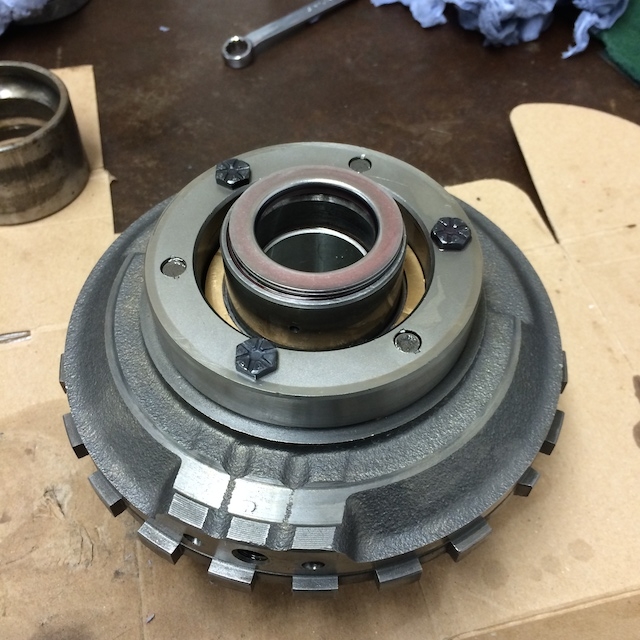
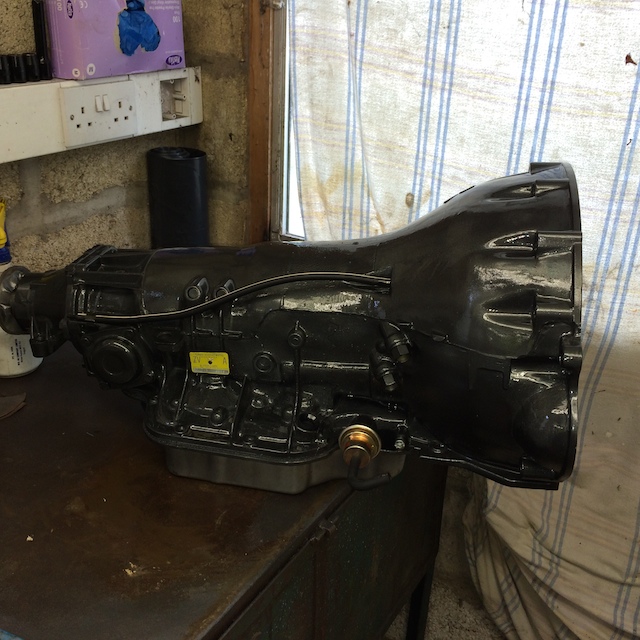
I then fitted some ancillary parts like the top case breather pipe , the adjustable Vacuum modulator , and the dip stick bung , i refurbished the modulator bracket and couldn't resist installing a polished allen bolt to secure it , rather than the rusty original bolt........ :roll:
and removed the tape form the masked up parts
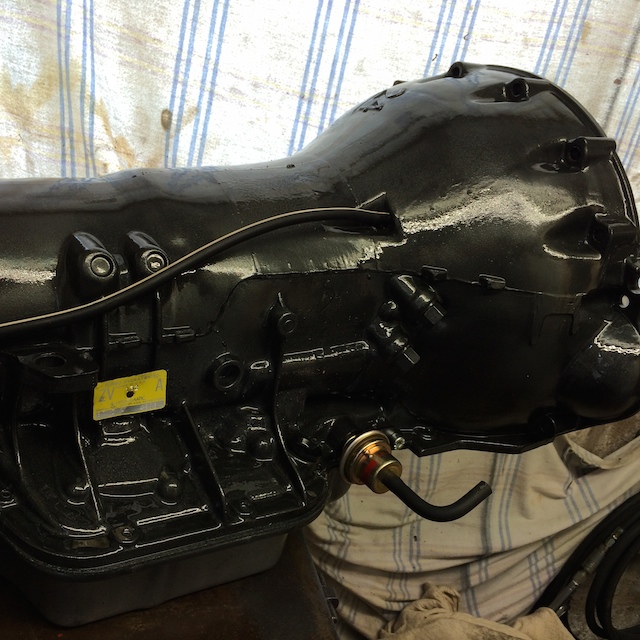
4037 by MyPix
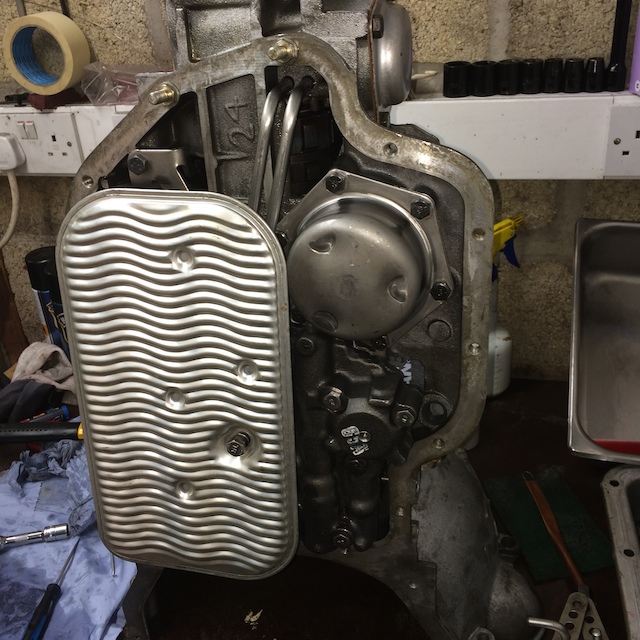
i have ordered a chrome finned sump , and will fit that just before installation to the car , as i dont want to damage it humping it around ,
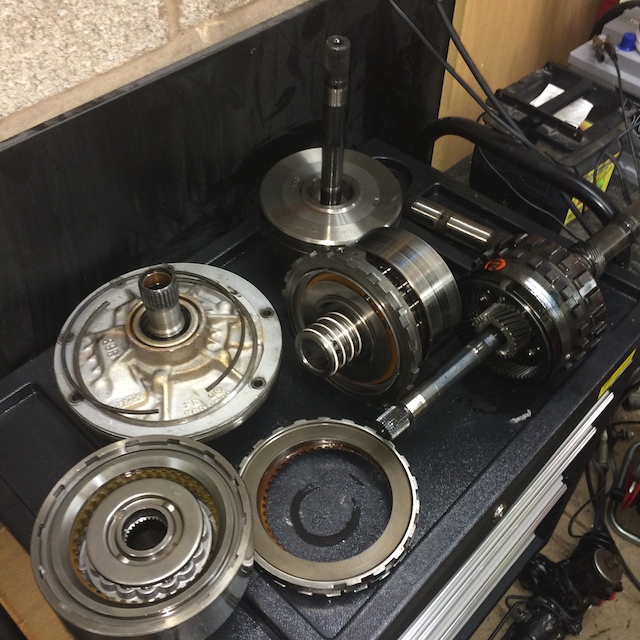
the picture below shows all the parts removed from the box for the rebuild , some will be thrown , but a fair few will be kept , dont ask why , i dont know myself :|
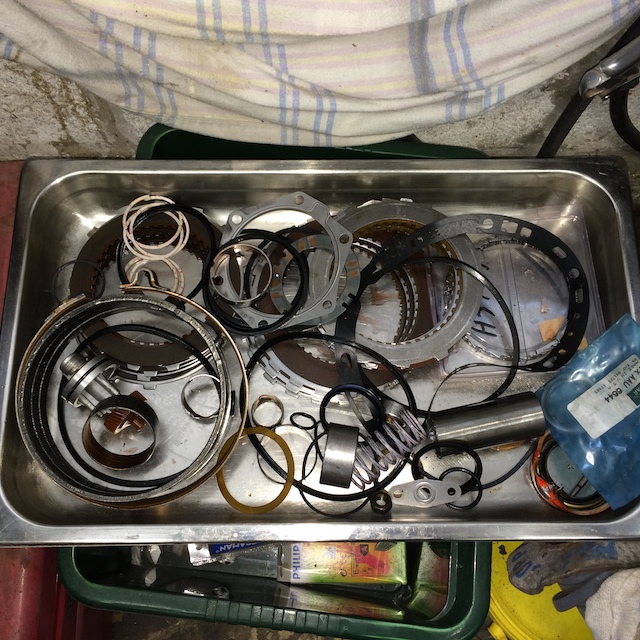
4040 by MyPix
i still need to flush the torque converter before fitting it to the transmission , guess what, pictures to follow , lol
BB
what do you think ?
4039 by MyPix
4035 by MyPix
4034 by MyPix
I then fitted some ancillary parts like the top case breather pipe , the adjustable Vacuum modulator , and the dip stick bung , i refurbished the modulator bracket and couldn't resist installing a polished allen bolt to secure it , rather than the rusty original bolt........ :roll:
and removed the tape form the masked up parts
4037 by MyPix
i have ordered a chrome finned sump , and will fit that just before installation to the car , as i dont want to damage it humping it around ,
the picture below shows all the parts removed from the box for the rebuild , some will be thrown , but a fair few will be kept , dont ask why , i dont know myself :|
4040 by MyPix
i still need to flush the torque converter before fitting it to the transmission , guess what, pictures to follow , lol
BB