1989 XJ-S, a renovation project, epilogue
#21
 07-22-2016, 12:27 AM

Well, made some false starts, but yesterday did some sourcing, and this morning emptied the tank, and removed all fuel components in the trunk.
Sub-tank and strainer came out dirty, but noting dramatic.
With all components and parts out, I am considering how to treat the steelwork there.
It is all dry, but paint is gone over large parts, specially under the sub-tank.
Not really rusty, but not the way it should be.
I will install new carpet (the old parts came out really dirty), so I guess it does not really have to be red again.
Rust converter? underbody protector?
The following users liked this post:
orangeblossom (10-12-2016)
#22
07-22-2016, 03:42 AM


Veteran Member
I suggest that it is probably best to thoroughly clean it all up and see what is there. If the remaining paint is well attached, just scuff it up with coarse paper or a flap wheel sort of thing, then treat it with decent resistant paint eg POR15 or Rust Bullet or similar. The body colour paint from a rattle can over the top. If not, get it down to bare metal and treat with a rust killer/preventer something like Aquasteel (which I am a great fan of), and then paint with POR15 type stuff, and body colour on top.
Glad you are getting stuck in. Do you plan on removing the main tank and R&R that while you are in there, particularly underneath it?
Greg
Glad you are getting stuck in. Do you plan on removing the main tank and R&R that while you are in there, particularly underneath it?
Greg
The following users liked this post:
orangeblossom (10-12-2016)
#23
07-22-2016, 04:28 AM
Thanks Greg, it is drying from cleaning now, will see how it shows up tomorrow.
Perhaps your suggestion on just repainting is the right way to go.
I have no experience with rust killer, but if not for the trunk, I am sure I will be experienced by the time I have finished the foot wells .
.
Tomorrow I will remove the protection plate which separates the tank from the trunk, and have a peek behind it how things look.
Compared to many horror stories I have read, the fuel system looked pretty decent so far, I have some hope I can leave the tank in.
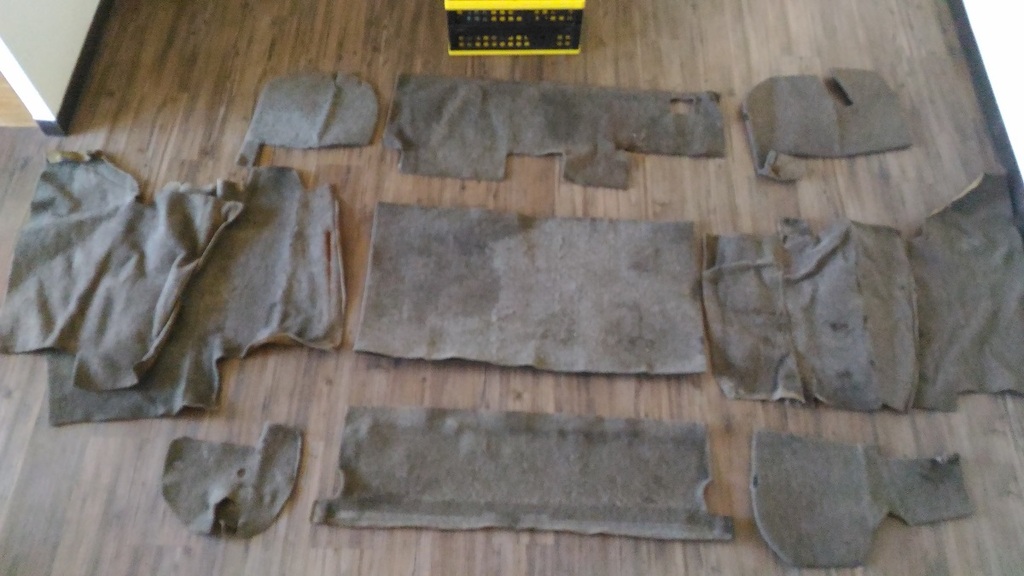
Finally, just labelled all trunk lining.
As you can see, it looks beyond cleaning, so I will just store it till I can use them as a rough mould for the new carpet.
But that will be 2017 ...
Perhaps your suggestion on just repainting is the right way to go.
I have no experience with rust killer, but if not for the trunk, I am sure I will be experienced by the time I have finished the foot wells
.Tomorrow I will remove the protection plate which separates the tank from the trunk, and have a peek behind it how things look.
Compared to many horror stories I have read, the fuel system looked pretty decent so far, I have some hope I can leave the tank in.
Finally, just labelled all trunk lining.
As you can see, it looks beyond cleaning, so I will just store it till I can use them as a rough mould for the new carpet.
But that will be 2017 ...
The following 2 users liked this post by ericjansen:
Daim (10-09-2016),
orangeblossom (10-12-2016)
#24
10-09-2016, 03:20 AM
I am working in the B2 parking garage in my apartment building, and it simply proved to be too hot to work over the summer period.
Not so much the heat itself, but profound sweating within a minute, bothering at everything you do, very very disturbing.
So instead of struggling, I used the last 2 months to finish up other stuff, loosing 7 kg so far (easier to get in and out the trunk, really!), and finish up my XJ8.
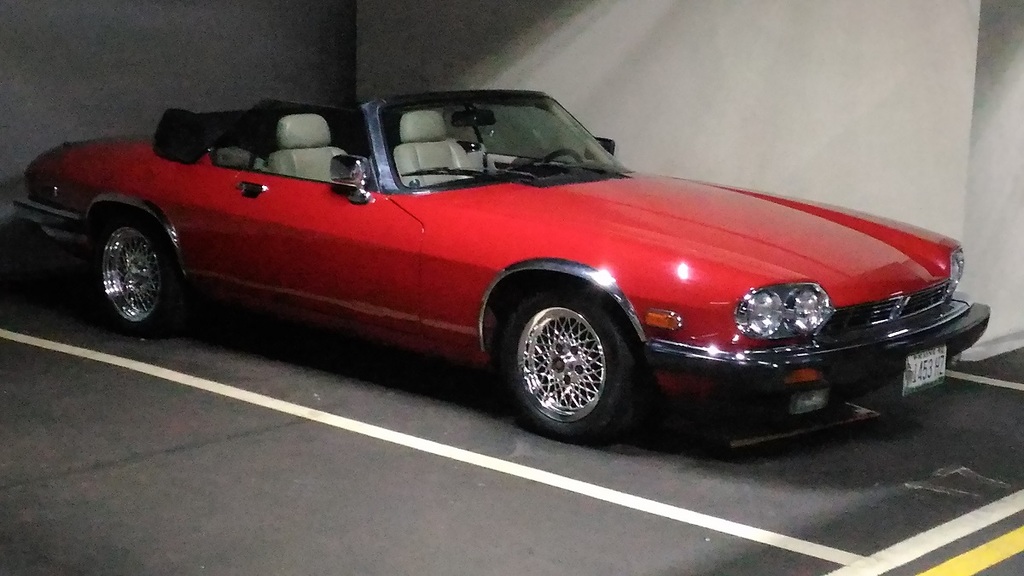
Made a new, and more comfortable start the last week, and to boost the spirits, first cleaned and polished the car.
After all, what is better to look at for inspiration during a coffee break?
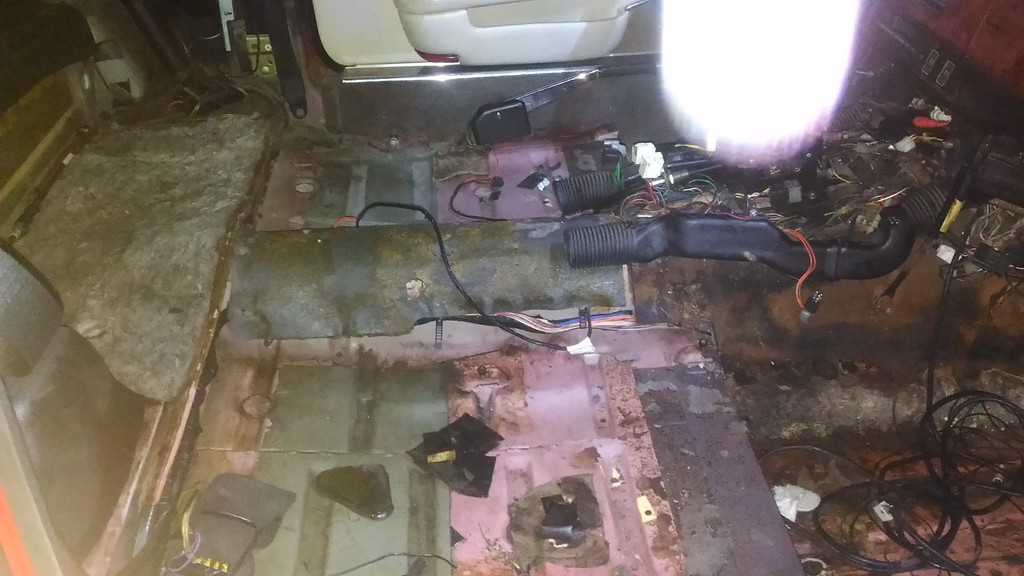
After that, finished up the trunk, straightened the floor (strange fold), removed rust and repainted everything, and reinstalled the fuel system after cleaning and repainting all the components.
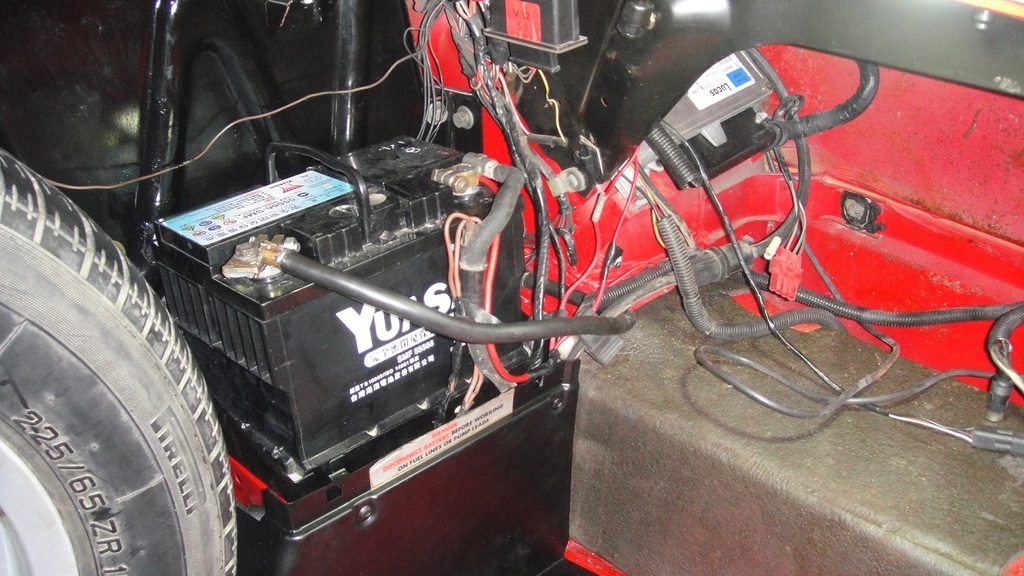
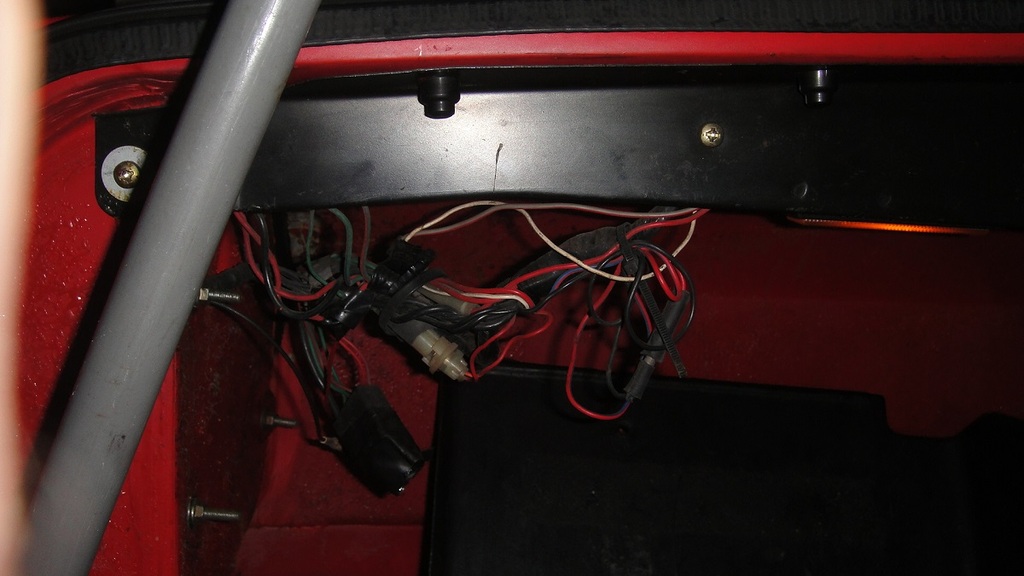
All is left to do there is going through the spaghetti of non-original wires (hence the temporary installation of the battery parts).
It is a combination of aftermarket stuff (like for a removed DVD player), but I also see some power lines going to the front, so I am a bit careful in cutting happily away �.
Studying the electric diagrams right now.
I also started to slowly remove the interior, especially to get rid of all the remaining carpets.
They are plain dirty, they have been moist, and they stink.
In general, the bad smell is a whole lot less than before, but I will be praising the day the interior smells of new carpets and leather again.
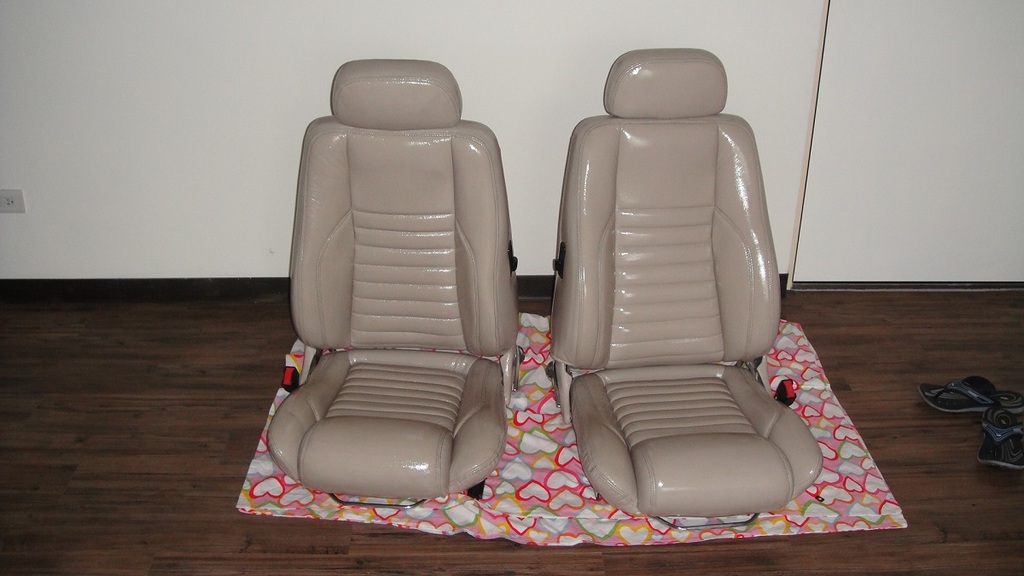
I will try to clean up stuff before storing, so I yesterday cleaned up the seats, and put some heavy duty leather grease on them to survive the storage period.
I will need to clean the sliding mechanism, and check the backrest mechanism of the passenger seat, as it sometimes slips, but for the rest these seats are not too bad.
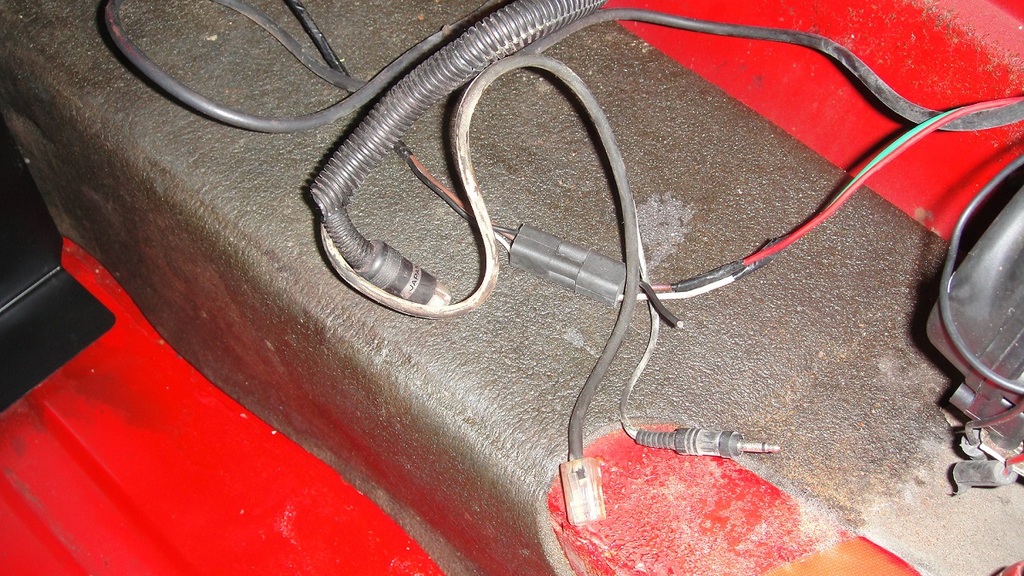
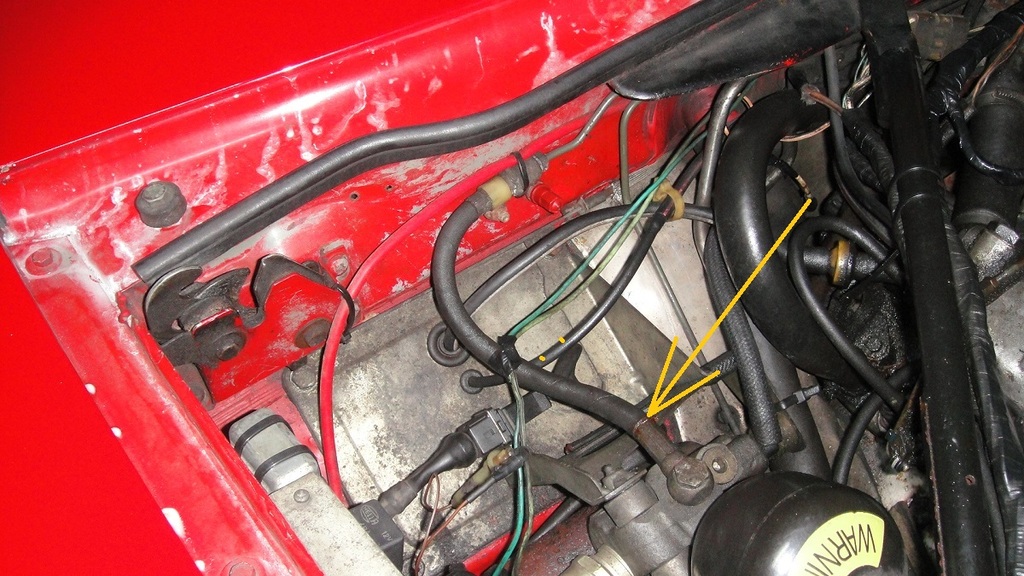
Finally, without having run the engine since June, it stil spun a new leak next to the reservoir.
Seems the pressure builds as soon as I turn the contact, what is this?
Not so much the heat itself, but profound sweating within a minute, bothering at everything you do, very very disturbing.
So instead of struggling, I used the last 2 months to finish up other stuff, loosing 7 kg so far (easier to get in and out the trunk, really!), and finish up my XJ8.
Made a new, and more comfortable start the last week, and to boost the spirits, first cleaned and polished the car.
After all, what is better to look at for inspiration during a coffee break?

After that, finished up the trunk, straightened the floor (strange fold), removed rust and repainted everything, and reinstalled the fuel system after cleaning and repainting all the components.
All is left to do there is going through the spaghetti of non-original wires (hence the temporary installation of the battery parts).
It is a combination of aftermarket stuff (like for a removed DVD player), but I also see some power lines going to the front, so I am a bit careful in cutting happily away �.
Studying the electric diagrams right now.


I also started to slowly remove the interior, especially to get rid of all the remaining carpets.
They are plain dirty, they have been moist, and they stink.
In general, the bad smell is a whole lot less than before, but I will be praising the day the interior smells of new carpets and leather again.

I will try to clean up stuff before storing, so I yesterday cleaned up the seats, and put some heavy duty leather grease on them to survive the storage period.
I will need to clean the sliding mechanism, and check the backrest mechanism of the passenger seat, as it sometimes slips, but for the rest these seats are not too bad.

Finally, without having run the engine since June, it stil spun a new leak next to the reservoir.
Seems the pressure builds as soon as I turn the contact, what is this?

The following users liked this post:
Sarc (10-10-2016)
#25
10-09-2016, 03:26 AM

The following users liked this post:
ericjansen (10-09-2016)
#26
10-09-2016, 04:15 AM
Veteran Member
Eric
Congrats on getting started again, and on losing the kilos! That hose is part of the high pressure system which makes the ABS brake anti-lock system work. It has clearly failed at the joint between the metal fixing to the ABS unit and the flexible part of the hose. It seems as if the hose is still available as a spare part JLM1462, see no. 12 on this diagram:

Link here:
Brake Pipes-Front-Anti Lock Brake System - Parts For XJS from (V)139052 to (V)179736 | Jaguar Classic Parts UK
Remember that if you remove this part (rather than your garage doing so) be CAREFUL so as not to spill brake fluid everywhere. It is also a possibility that a decent hydraulic hose place might to be able to rebuild it for you using high pressure hose that is resistant to brake fluid.
It might be a good plan to PM Orangeblossom for advice before actually removing/undoing anything, as he is quite an expert on rebuilding these systems. Bleeding the brake system, which will probably be needed after having replaced this part, is a whole special procedure on ABS equipped cars, so apart from Orangeblossom, PJTS1 is also worth contacting as he is very knowledgeable about this aspect, besides many other things XJS.
Greg
Congrats on getting started again, and on losing the kilos! That hose is part of the high pressure system which makes the ABS brake anti-lock system work. It has clearly failed at the joint between the metal fixing to the ABS unit and the flexible part of the hose. It seems as if the hose is still available as a spare part JLM1462, see no. 12 on this diagram:
Link here:
Brake Pipes-Front-Anti Lock Brake System - Parts For XJS from (V)139052 to (V)179736 | Jaguar Classic Parts UK
Remember that if you remove this part (rather than your garage doing so) be CAREFUL so as not to spill brake fluid everywhere. It is also a possibility that a decent hydraulic hose place might to be able to rebuild it for you using high pressure hose that is resistant to brake fluid.
It might be a good plan to PM Orangeblossom for advice before actually removing/undoing anything, as he is quite an expert on rebuilding these systems. Bleeding the brake system, which will probably be needed after having replaced this part, is a whole special procedure on ABS equipped cars, so apart from Orangeblossom, PJTS1 is also worth contacting as he is very knowledgeable about this aspect, besides many other things XJS.
Greg
The following users liked this post:
ericjansen (10-09-2016)
#28
10-10-2016, 07:32 AM
Veteran Member
Whilst you're at it, you might as well change the pressure bubble thing. They are available (Golf III uses the same Teves system)...
The following 2 users liked this post by Daim:
ericjansen (10-11-2016),
P.L (10-28-2016)
#29
10-10-2016, 09:16 AM

Veteran Member
Join Date: Jul 2012
Location: Walnut Creek, California
Posts: 6,796
Received 2,399 Likes
on
1,880 Posts
Wow, that car sure does look nice. Gleaming red, oh yeah!!!
Inspires one to make up for the tough hidden stuff.
As to the carpet???? Just mebbe, they can be cleaned,
possibly redyed and reused. Probably a stretch...
Drying out in the sun gets them not only dry, but
bakes out all or some of the musty stink. Then, scrub
with a foamy domestic carpet shampoo and a stiff brush.
Some anti pet odor stuff also works. I know about that!!
If they did not disintegrate, spray them with rattle
can carpet dye. Good enough for that beauty, probably not, but..
A good auto upholstery shop can make a set, local pricing
is the variable...
In my past rusty part rejuvenations, I've used an encapsulater, the Rustoleum prier, and then a color coat. Most came out well.
Fortunately rust has not been an issue in my Jaguar or Jeep.
I don't mean to be a jinx. But, in view of the carpet stuff, what might be under the fuel tank???
Oh, The ground cable clamp and the routing of the cable
would concern me...
Are any of those loose leads "hot" at any time??? Tape them off or track them down and remove them.
Sounds like humidity is an issue in your "shop"!! Stay hydrated....
Carl
The following 2 users liked this post by JagCad:
ericjansen (10-11-2016),
orangeblossom (10-12-2016)
#30
10-10-2016, 12:05 PM
Veteran Member
The following 2 users liked this post by Sarc:
ericjansen (10-11-2016),
orangeblossom (10-12-2016)
#31
10-11-2016, 11:07 PM
There is nooo way these go back into the car, everrrr
.
Frankly, I see some (probably an understatement ..) bears on the road to recovery, but re-doing the interior is not one of them.
I am a person who can't work in a mess, so I am continuing to remove the interior, so I will have a clean chassis as a base.
The hydraulic pump is leaking and about empty now, with most of the oil in the carpets.
I will tomorrow clean up the oily mess it created, then remove the pump and the cylinders for a rebuilt later on.


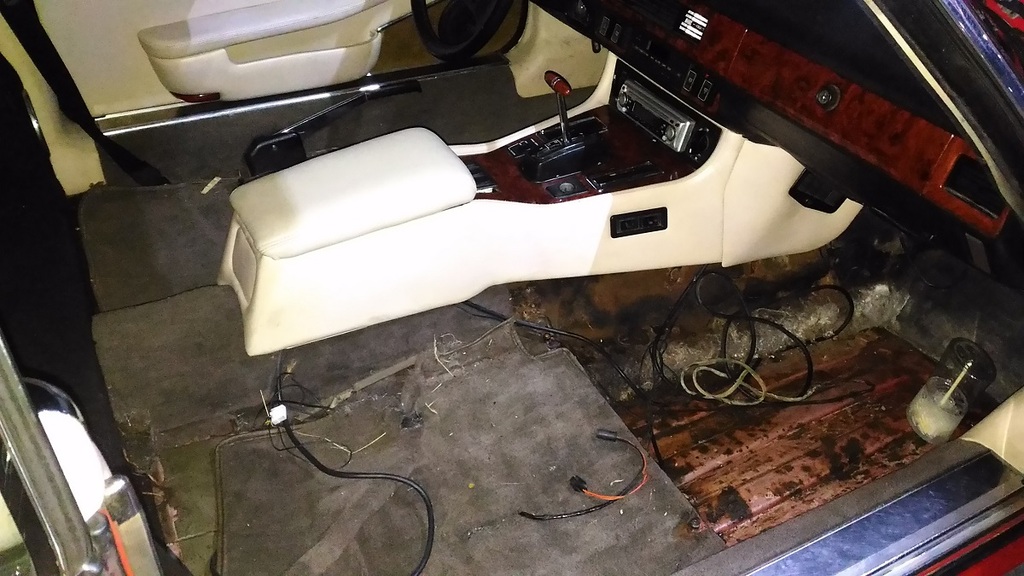
Also traced most of the electric spaghetti to be from a (now gone) CD or DVD player, and after market speakers.
I thought I had seen some bad install work, but the way they cut, spliced and butchered the original wiring in this car is shocking.
Anyway, most of the redundant wires are gone, all I have to do is restore and secure some of the original wiring, also a job for tomorrow.
I am also having some questions, but will get to that later.


The following 2 users liked this post by ericjansen:
Greg in France (10-12-2016),
orangeblossom (10-12-2016)
#33
10-12-2016, 05:05 AM
I got several, but one question at the time :
I am removing the center tunnel console.
I got the front panels off (the ones with the ventilation vents), I got the switches out (glued into the wood, an other f*^$ up) and the 2 screws removed, and I got the 4 screws under the armrest storage out.
I also have the radio out, and the ventilation knobs off.
I know there is a screw under the plastic cover held by the friction lock to loosen the ski-slope, however, how do I remove that one without breaking the plastic? I presume it is held by that small lock only, but I find no way to flip it out. I read some ppl broke it, so I stopped trying.
: I am removing the center tunnel console.
I got the front panels off (the ones with the ventilation vents), I got the switches out (glued into the wood, an other f*^$ up) and the 2 screws removed, and I got the 4 screws under the armrest storage out.
I also have the radio out, and the ventilation knobs off.
I know there is a screw under the plastic cover held by the friction lock to loosen the ski-slope, however, how do I remove that one without breaking the plastic? I presume it is held by that small lock only, but I find no way to flip it out. I read some ppl broke it, so I stopped trying.
Last edited by ericjansen; 10-12-2016 at 05:11 AM.
#34
10-12-2016, 05:44 AM
Veteran Member


#36
10-12-2016, 09:00 AM
Veteran Member
Eric
That piece does NOT have to be removed to remove the console. Leave it alone! The consoled comes out at a unit. There should be central fixings you will find by removing the ashtrays, also there is a fixing each side at the rear bottom behind the front seat (which you may have to move forward to see). I think this will do it. BUT you must unscrew the gear lever crosspiece (it comes into two halves) and then with the BATTERY DISCONNECTED, you can ease up the entire console and pull off the various connectors to any switchgear, cigar lighter etc, before removing the entire console fully, wood and all. I seem to remember you may find two self tappers behind the fascia too that hold that end of the console. You could have done this and not removed the switches, by the by.
Yes, you do unscrew the two nuts on the heater control centres to remove the fascia panel, which has VERY flimsy fibre optic lights sources to it, so be careful as you go.
Good luck
greg
Last edited by Greg in France; 10-12-2016 at 09:03 AM.
#37
10-12-2016, 10:18 PM
That plastic bit you speak of is only held by the catch insert and a self tapper each side (which l think you already have removed) Just pry the catch itself out.
#38
10-12-2016, 10:23 PM
Yeah, I had everything loose, removing the radio facia exposed the last 2 screws.
I still think it is easier to first get the wooden ski-slope out, but it worked with some careful moving around.
Just the 4 electric connectors of the seat heater switches did not disconnect, so after 1/2 hour of unsuccessful attempts, I took them apart, and could slide them through their opening piece by piece.
It is further absolute incredible how this car is butchered over the years.
I have a thousand different fasteners by now, not one the same ...
Everything is broken, scratched, loose, fitted wrongly, cut in pieces, held together by tape, installed in white sealer, whatever ...
I got the electrics in the trunk sorted and organised, but removing the console this morning exposed an other spaghetti of cut and spliced wires, mainly for the radio I presume. Need to sort that out an other day.
Anyway, I am slowly getting where I want to be this week.
Will remove the last pieces of carpet tomorrow, remove the roof hydraulics, then give everything a good and careful wash, so that at least things are clean.
After that, I will move an other compartment and start in the engine bay.
Next question; I presume the door sill covers are the same principle as my XJ8? Screwed into the sill from the top, then covered with that shiny alloy cover-plate?
If so, running fish-line under that plate to break the double sided tape, remove the coverplate and expose the screws?
Or am I wrong?
I still think it is easier to first get the wooden ski-slope out, but it worked with some careful moving around.
Just the 4 electric connectors of the seat heater switches did not disconnect, so after 1/2 hour of unsuccessful attempts, I took them apart, and could slide them through their opening piece by piece.

It is further absolute incredible how this car is butchered over the years.
I have a thousand different fasteners by now, not one the same ...
Everything is broken, scratched, loose, fitted wrongly, cut in pieces, held together by tape, installed in white sealer, whatever ...
I got the electrics in the trunk sorted and organised, but removing the console this morning exposed an other spaghetti of cut and spliced wires, mainly for the radio I presume. Need to sort that out an other day.
Anyway, I am slowly getting where I want to be this week.
Will remove the last pieces of carpet tomorrow, remove the roof hydraulics, then give everything a good and careful wash, so that at least things are clean.
After that, I will move an other compartment and start in the engine bay.
Next question; I presume the door sill covers are the same principle as my XJ8? Screwed into the sill from the top, then covered with that shiny alloy cover-plate?
If so, running fish-line under that plate to break the double sided tape, remove the coverplate and expose the screws?
Or am I wrong?
Last edited by ericjansen; 10-12-2016 at 10:31 PM.
#40
10-13-2016, 01:54 AM
Veteran Member