When you click on links to various merchants on this site and make a purchase, this can result in this site earning a commission. Affiliate programs and affiliations include, but are not limited to, the eBay Partner Network.
Hello All,
Not much of a soft introduction but it seems like as good a time as any to end my Lurking and come out of the shadows to share a photo-rich thread of a (2500 miles thus far) successful head gasket replacement for my 1993 XJS 4.0 auto coupe. For me the 4.0 is a clever engine, and is largely neglected compared to the V12 performance and support network, so for my fellow XJS 4.0 enthusiasts, here you go.
The job was done in about 3 weeks of after-work time in my garage, carefully assessing just what went wrong and being overly cautious to get it right the first time on the way back together. Also stretching the timeline were the slow-to-come decisions to replace more and more parts as I went along "since I'm in here.."
The failure started with what felt like a vacuum leak; a little bit of a rough idle which "went away" when revved, but over a few weeks deteriorated into greater and greater power loss and eventually (1/2 mile from my house, thank goodness) a smoke screen worthy of a Bond movie.
Only a few images to start with to test interest, but there are hundreds of close-ups and other descriptive shots which I hope to share.
I've owned the XJS since 73k miles (acquired with clean body but admittedly blank history at a price that was precisely my target, in my favorite color and model year) and recently turned over 103k when the gasket gave out.
The car is in the garage, having limped the half-mile since the "Event," exhaust tips smoking with the dreaded hot sweet smell of coolant in the cylinders.. but which cylinders?? Step one was to remove the spark plugs and test each pot for water. At this point I knew the head was coming off, so the real garage prep began. I set up a clean table, bagged the already-numbered plug wires and needlessly labeled the distributor cap (it only fits in one position).
A quick screwdriver-down-the-spark-plug-hole-test confirmed cylinder 2 was full of coolant, with residual coolant cyl 3.. in suspicion confirmed; the head was coming off. Up went the car, and draining of the oil and coolant commenced.
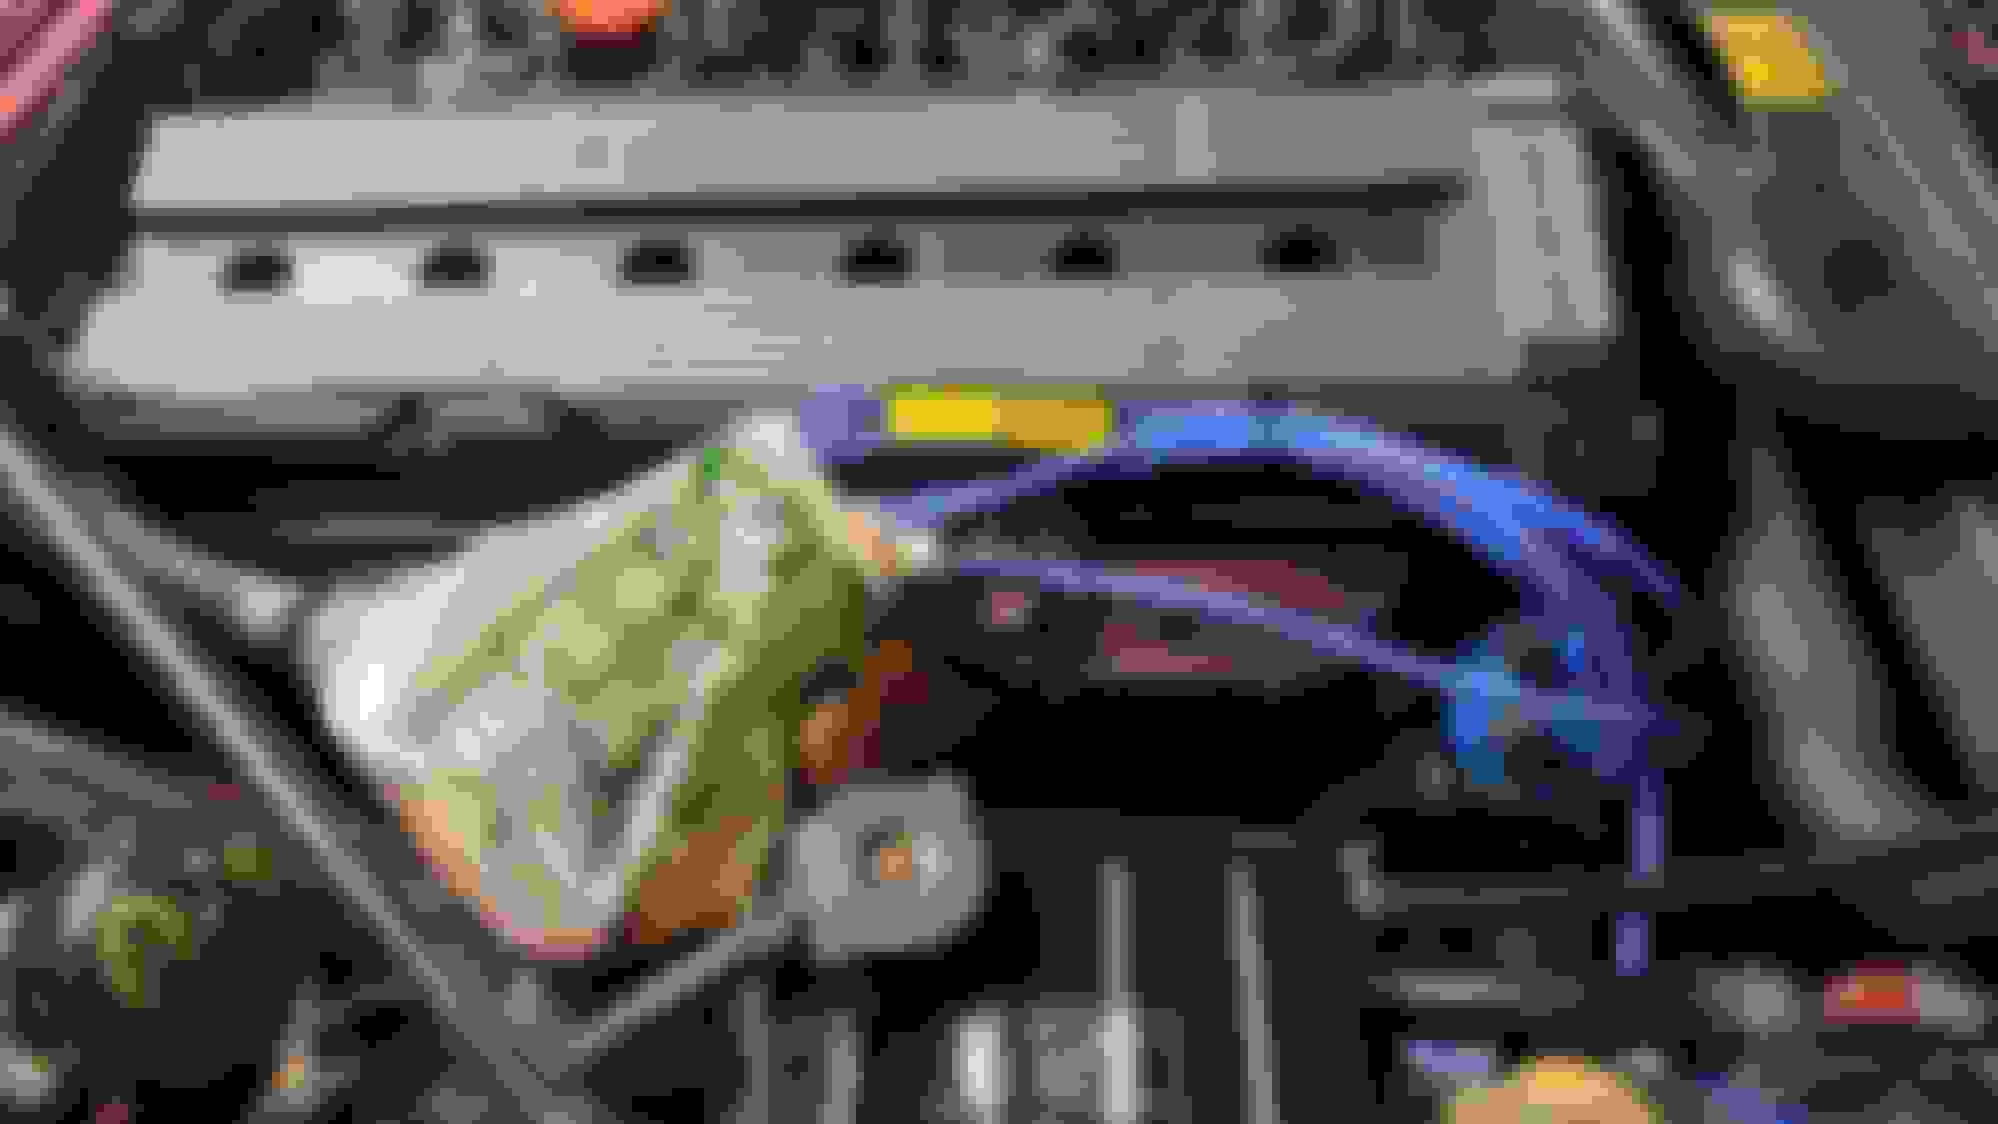
More prep; I made sure to put tape on all the electrical connectors on the intake manifold - I started to label them, but each one is a unique connector, or very specifically placed on the wiring loom, so not much actual labeling is required here, just the "flag" of white tape so I didn't forget that connector whenever it ended up getting re-assembled.
Next was the Cam Cover to begin the tear-down process. I had wanted to replace the cam cover gasket for some time as the og one was dried, cracked and starting to seep near the back of the engine. The Intake tubing, Cam Cover and EGR valve were the first items to make it to the staging table and scratched the surface of the fancy innards of the big 6; revealing the hand-made markings indicating TDC. (Aligned *****-punch marks on the cam shaft, cam-cap, and cam sprocket flange.)
The Intake manifold was next to be unbolted and broken loose from the head. The cam sprockets managed to get removed without having their photo taken, since that's a job that's just as oily as it is nerve-wracking. The tensioner comes out first, then the sprockets were removed and placed on the staging table in their proper orientation. The exhaust and intake sprockets are identical so it doesn't matter at all which goes on which cam as long as the installation is done correctly .. more on that later.
Day one comes to an end.. Good night fair maiden..
With the sprockets off, tensioner removed and chain bunched on top of the mid-timing sprocket at the top of the block, a car-friendly neighbor was summoned to help lift the head off the block. It's heavy! And having the cams still installed, there were valves in the open position so I couldn't risk fudging the removal and bend one in the process.
Yes, at this point the staging table was looking more like a parts pile
The head was stored this way very temporarily, bridging 2x4s to give the valves room to hang freely before being removed (to replace the valve seals)
So What Lies Beneath!? Stay tuned for the next post. (I promise it'll take less than a week next time)
I tried a complete rebuild of the straight six all be it from an XJ40 and found the head was nice to work on and no parts issues.
The block however was a different story due to parts being more difficult to optain, the piston rings it would appear are actualy no longer available anywhere. At that point while looking for said rings i came across a V12 XJ-S for renovation so put the straight six back together and put her back on the road without anything more than a head skim and a clean of all the head parts.
Keep up the good work and as always lots of pics go down well here
Got 2 of these motors, again, like newbound7 they're in my XJ40's - I'll be pulling the head off the parts car next month so appreciate the blow-by-blow w/pics!
1.. 2.. 3.. HEAVE!
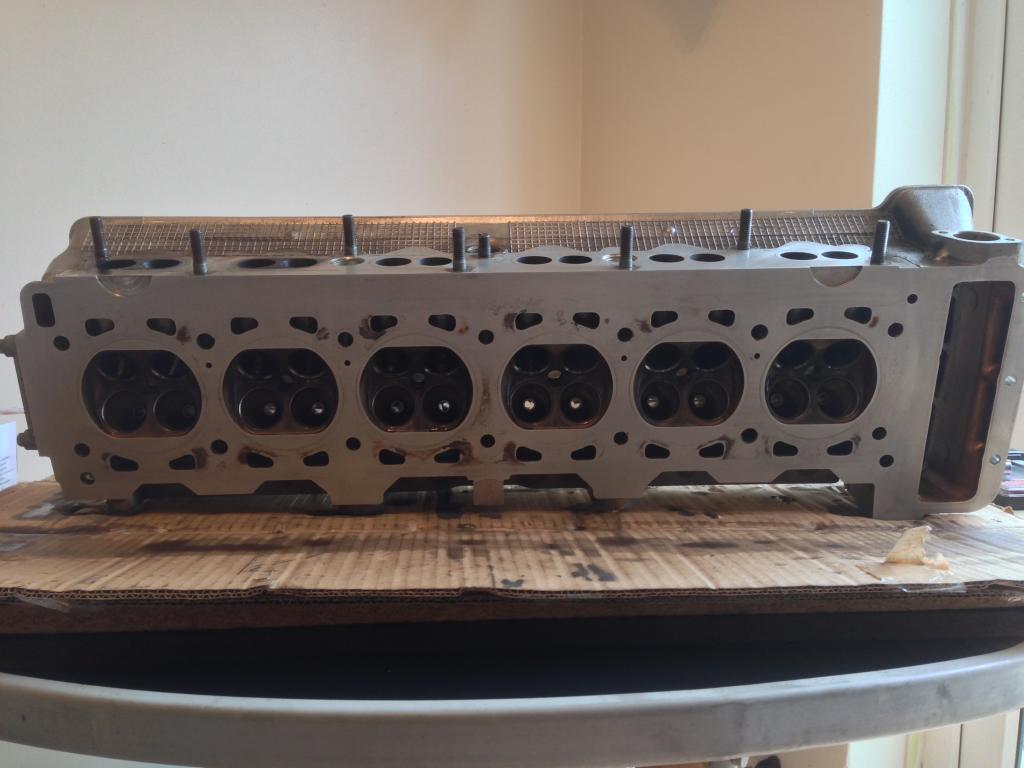
and with that the head assembly was separated from its beloved block for the first time in 23 years. After doing a two-man-shuffle with my neighbor to get around the car to place the head on the staging table, I cautiously approached the beheaded Jaguar to assess the damage. What a relief to see an obvious failure of the head gasket between cylinder 2 and 3, accompanied by multiple fatigued areas around 2,5 and 6. The right hand side of compression rings 2, 5, & 6 had been damagingly soaking in oil from the 100k mile exhaust valve seals, and were no longer adhered to the composite section of the gasket. (I'm sure removing the head physically separated them, but the fact they came apart at all tells me the gasket was ripe for replacement.)
Its embarrassing how much this gap made the car feel like it had a vacuum leak. I kept searching the outside for chewed up or dried-out hoses, but the whole time the problem was growing deep inside the engine.
Notice the totally separated compression ring and resulting failed coolant passages on cyl 2 in the top right corner below.
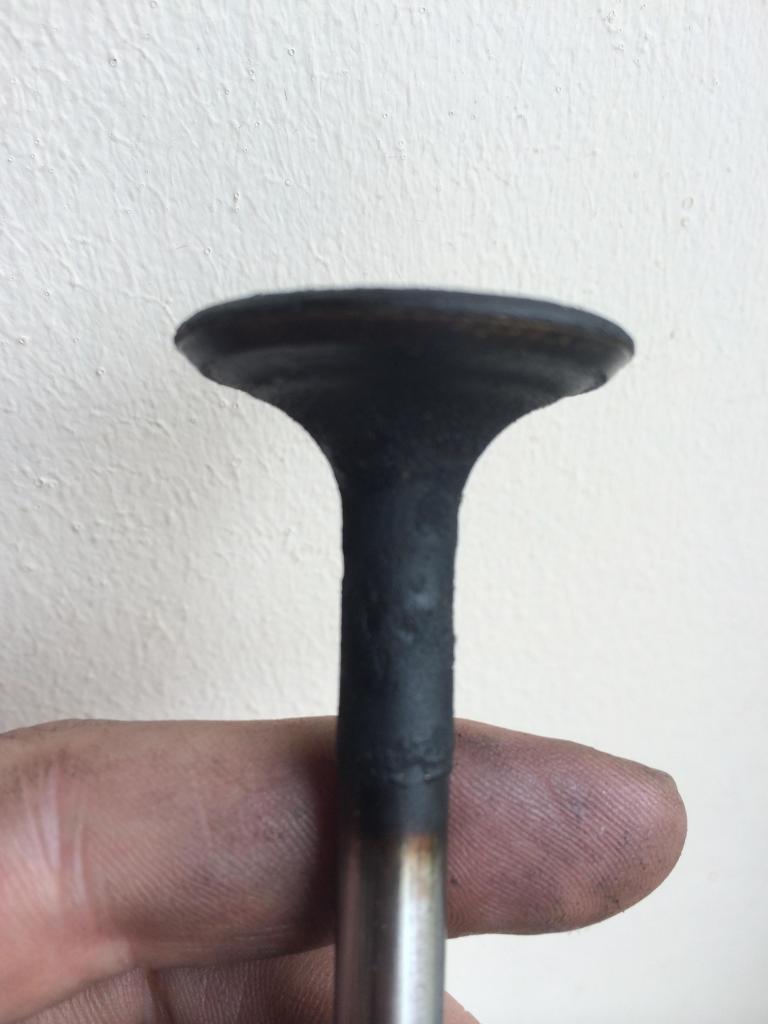
The head on the staging table, intake cam and followers removed. I was anxious to get new valve seals in there as soon as I could.
Close-up of the valve spring retainers in the follower cylinder. check the tolerances of the followers to each cam lobe, and extract them with a pen magnet before handling the head without the cam in place.
The cam followers "buckets" on the timing table with their respective shims still held in place by motor oil.
The complete Intake Valve Train arranged on the timing table.
The teardown of the head would soon commence but now was the time to start assessing all the other parts that would be replaced now that the massive head was no longer soaking up engine bay space. The next installment will show more valve train parts, the in-car process of cleaning the block deck and pistons, and an inspection of the head mating surface.
I wonder how long it will be before our 94 XJS 4.0L with 100K+ miles will need
a top end refurb. It does the "generate smoke screen" on startup if not started
every few days now. A sign of worn valve seals I'm told.
Nice, very careful and instructing job with all these pics.
I also have to contemplate a head removal on my AJ6 in some time from now to refurb worn valve seals (luckily there is no head gasket gone for the time beeing).
Thank you for sharing and waiting for the continuation!
btw, what are these wheels you put on your car?
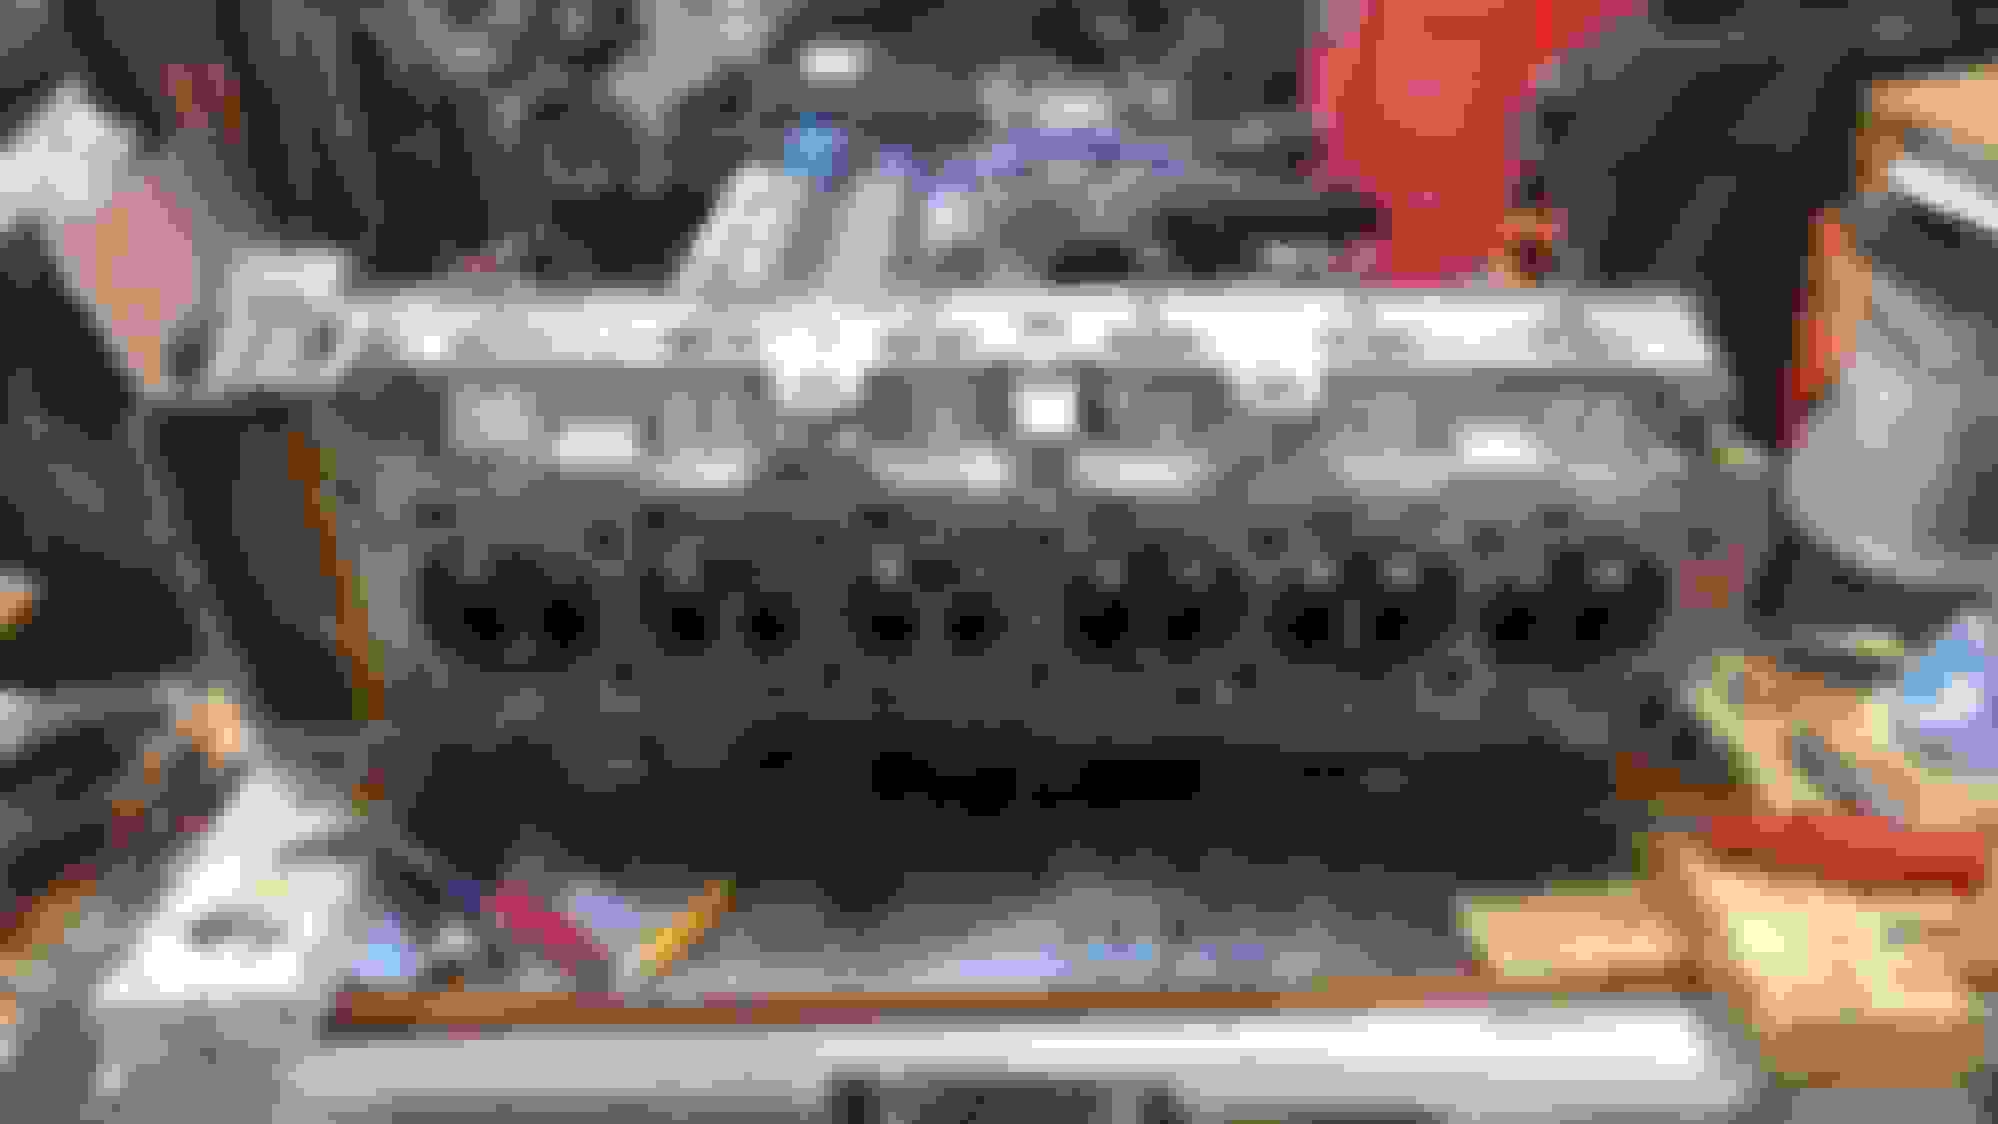
Although the block deck and piston tops would need their fair share of attention, I concentrated on the head to make sure it wasn't flawed beyond use, and out of pure curiosity for how Jag put together a "modern" straight 6.
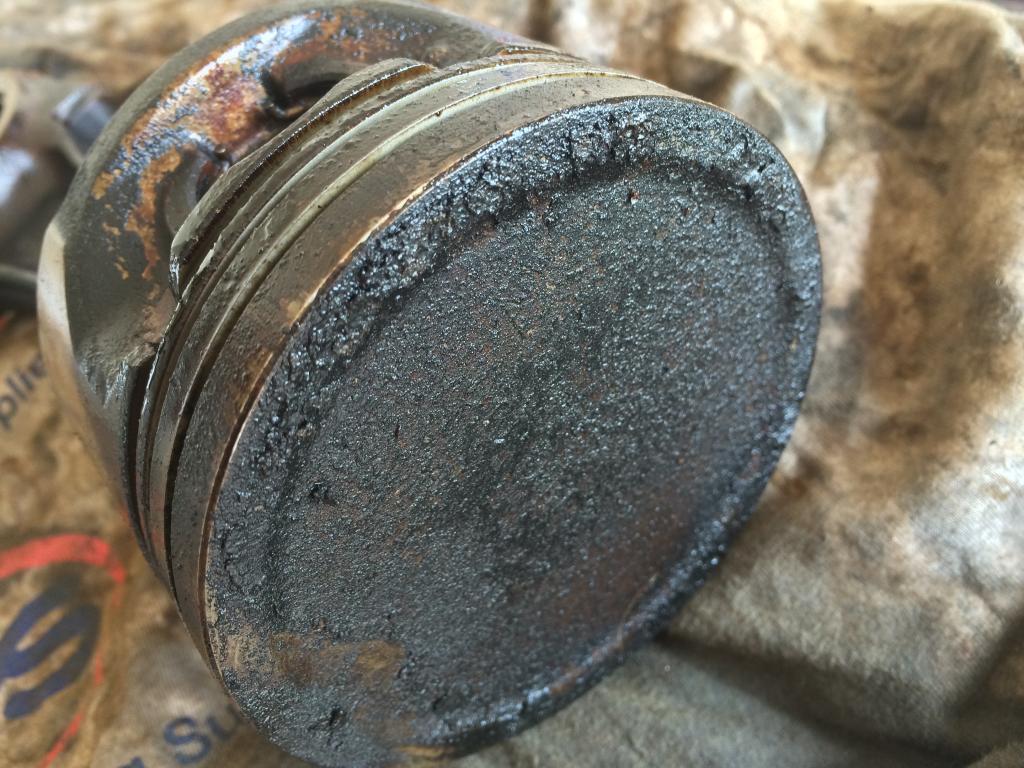
The pistons showed lots of carbon buildup, and the scoring mark left from the burned-through head gasket is quite visible. Also noteworthy is the "high temp wash" Cyl 2 and 3 endured from the short drive with coolant rushing through them..
The head on the table with the intake valves removed for a good cleaning, and more importantly, to get new valve seals in place. This shot shows the valve spring compressor (lower right) which resembles the Jaguar tool at a fraction of the price - a nice C clamp type which allows for precise compression of the spring to release the keepers. With the cam follower style valve train, the springs are set deep inside those precisely machined follower guide cylinders, so the risk of scratching those walls is a reality.. Use caution - I would definitely say removing the head and compressing the valves this way is the best way to do it (and the Jaguar recommended way to do it)
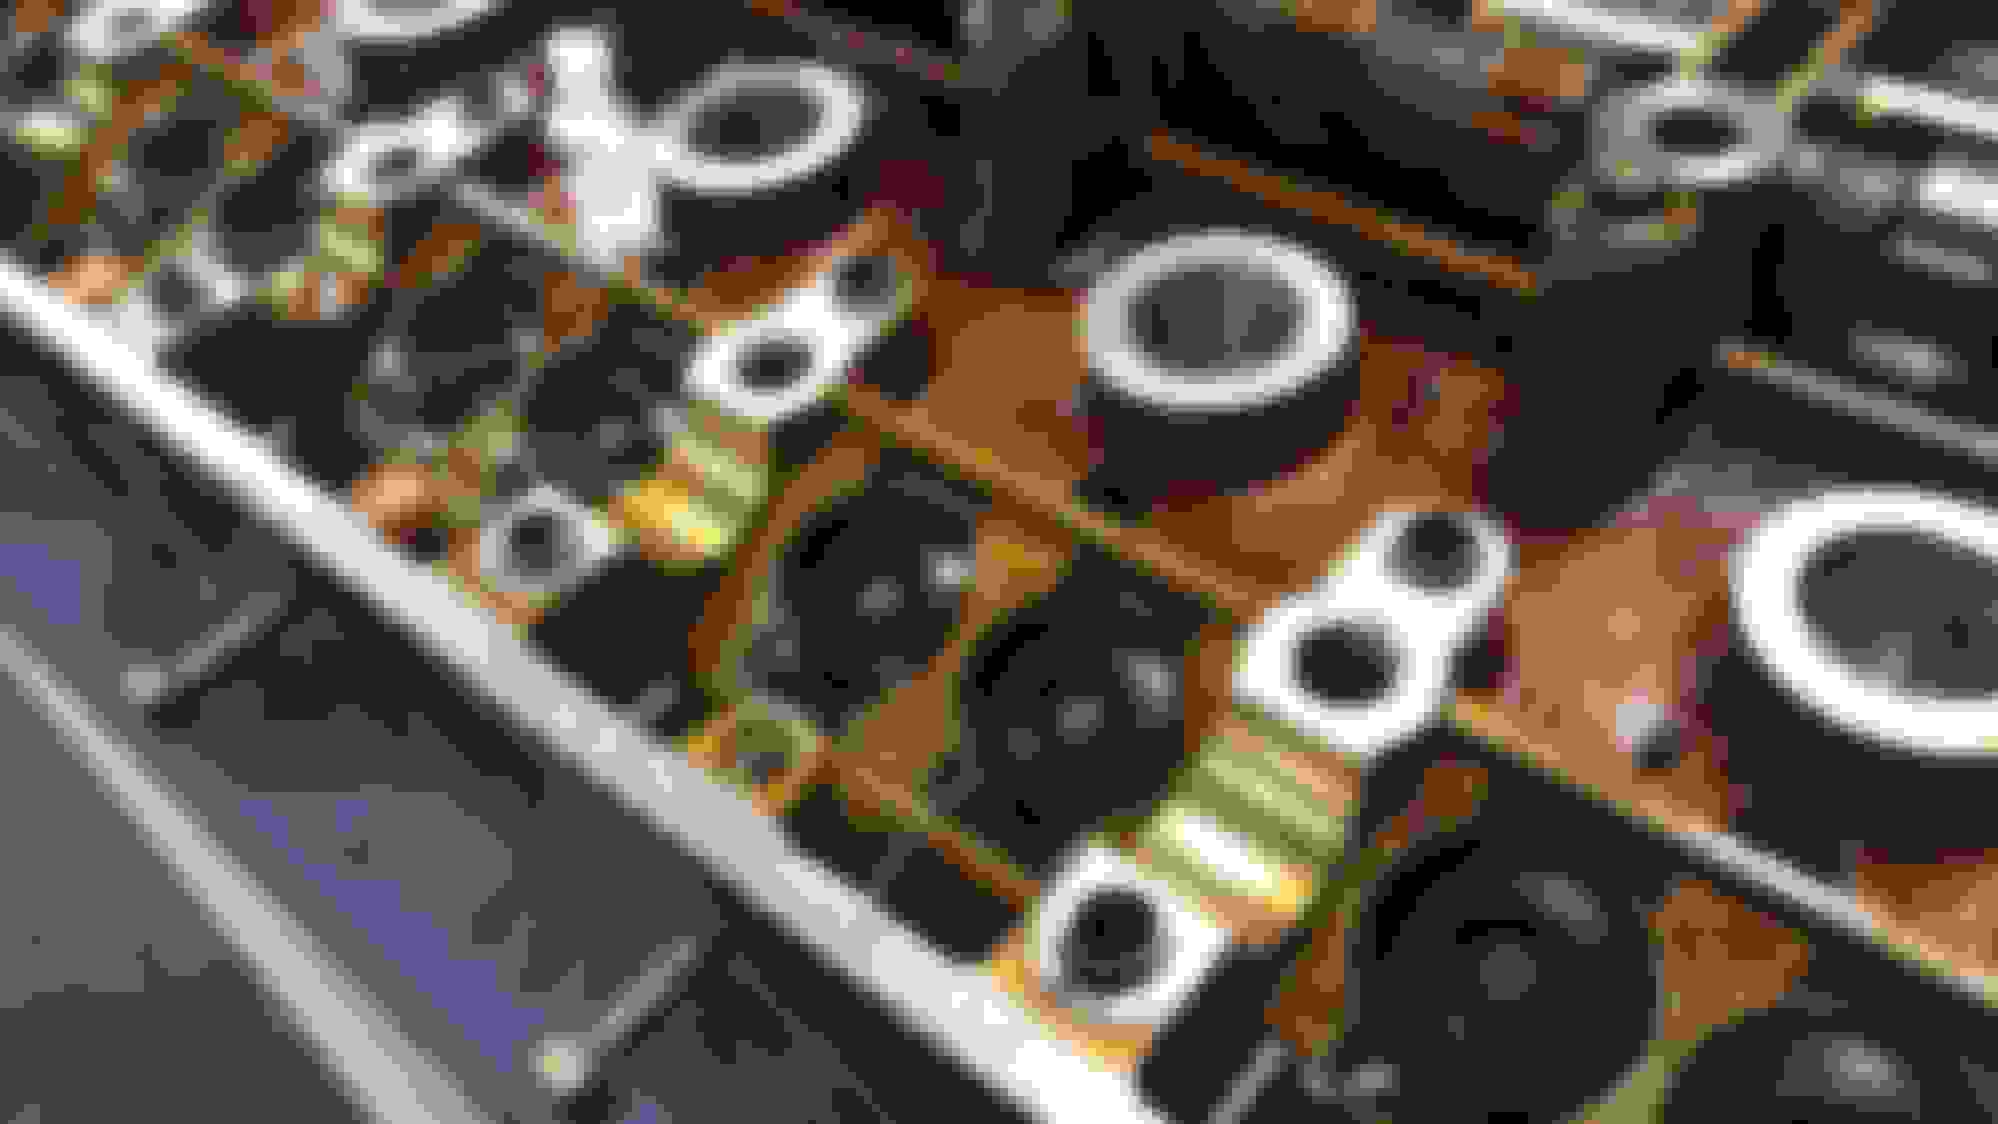
Next out was the Exhaust side valve train. So here on my Timing Table sits the complete valve train and cams. This type of space cannot be stressed enough for a rebuild that includes any sort of peace-of-mind. Each component is arranged just as it came out of the engine, and just as it shall be returned; as this was not a "remanufacture" build and I was not going to re-cut valve seats etc, it's recommended to return each part to it's original position on it's original cylinder. Makes sense. The tiniest parts here - the keepers - were the only parts I mixed up in a parts cleaner bath.
A nice surprise was that the cam caps were numbered (hopefully from the factory) so it's nearly impossible to mess up their position.
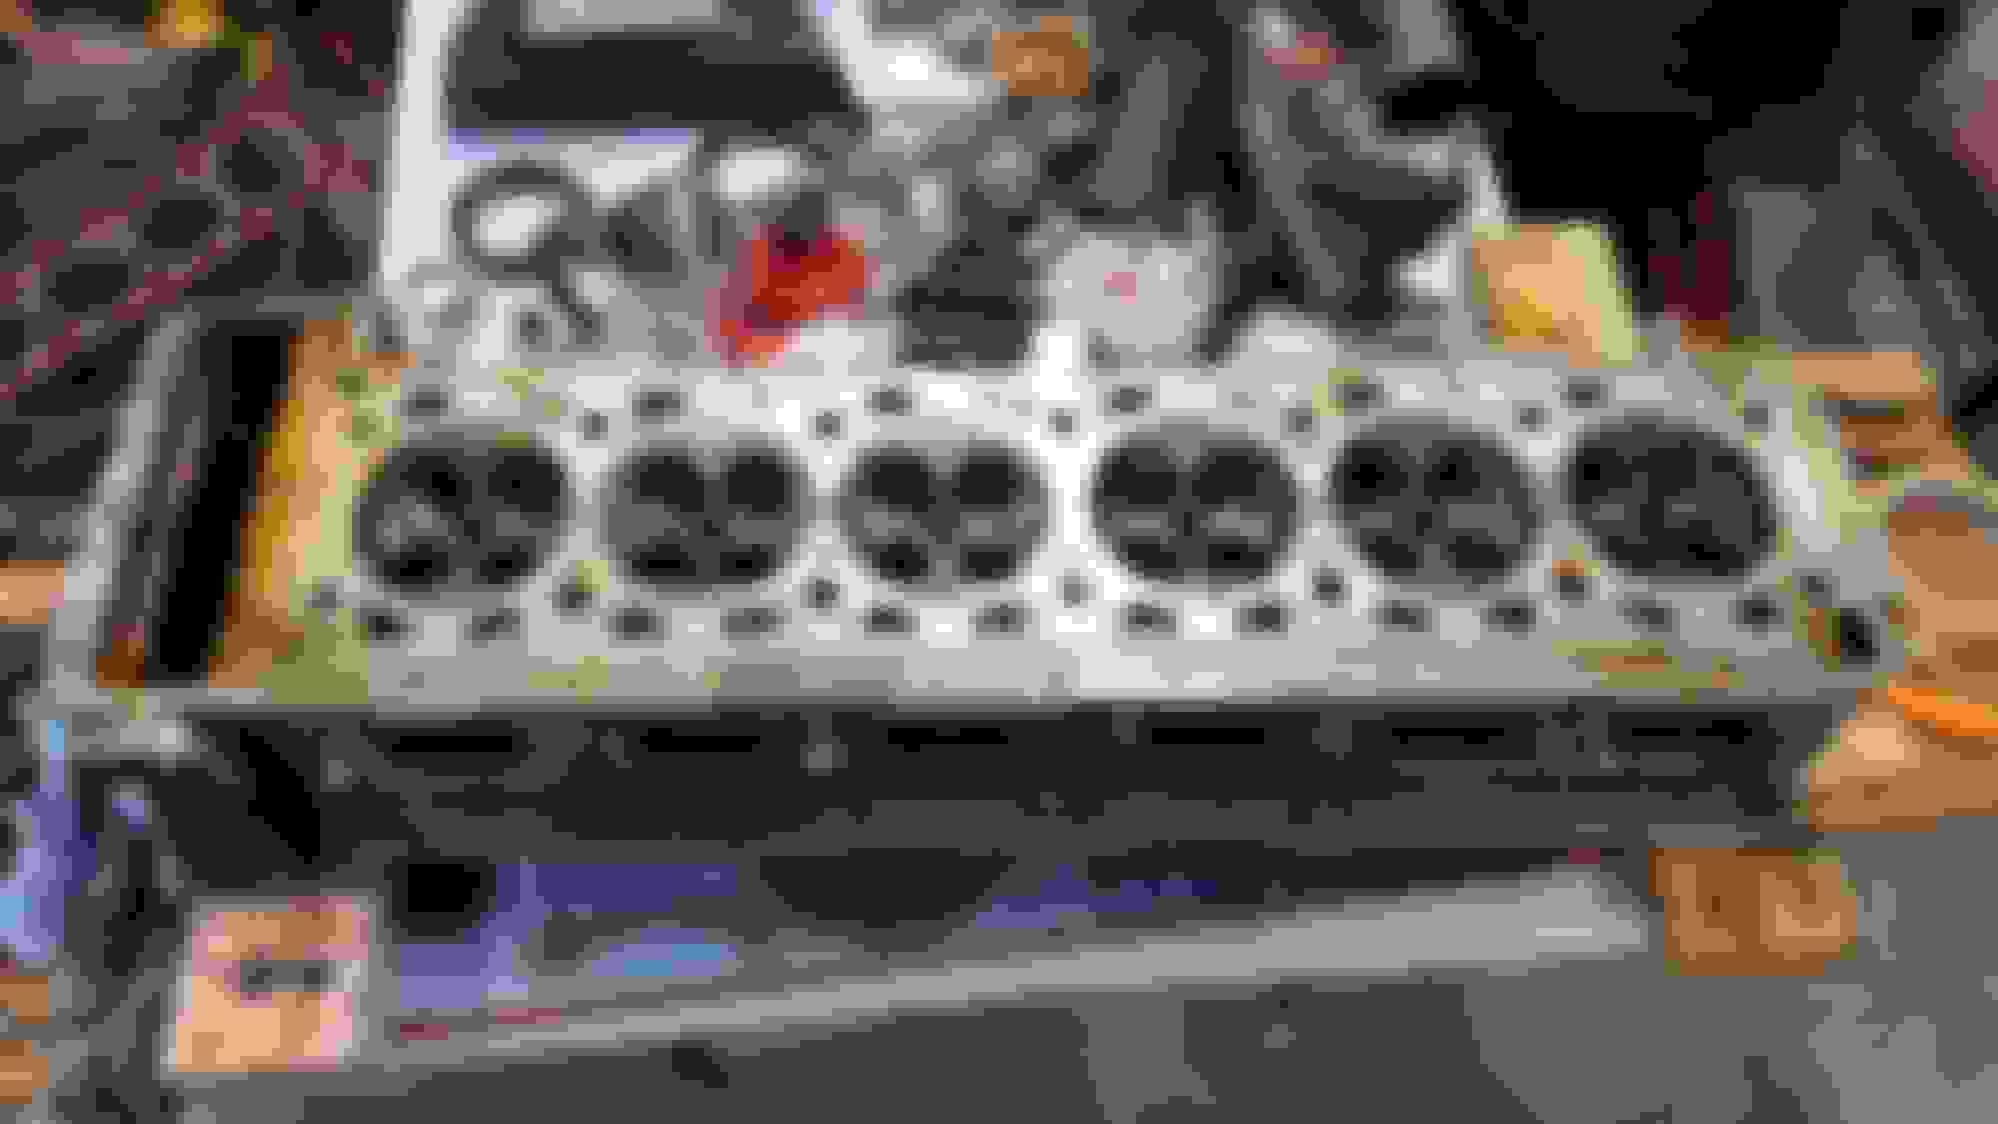
With that, the combustion chamber inspection started, flipping the head belly up! There was a good bit more buildup than I was hoping to see, especially in cyl 6 but it was afterall a 100k mile engine..
The gasket scraper and dental pick were my two most commonly used tools on the early stages of the combustion chamber cleaning.. The screwdriver was for flaking off the bigger chunks of grease and road grime from the outer surfaces of the head. A couple overnight spray-soakings of engine degreaser helped speed up the process without actually soaking the head.
It helped to keep a mill-file handy for the gasket scraper- I was sure to keep the business end SUPER sharp with a clean edge to avoid gouging the mating surfaces.
On the backside of the engine (right against the firewall when installed) I found a most perplexing engineering decision: a single block-off plate with oil on one side and coolant on the other... separated only by a thin bead of 23 year old hylosil. Back away .. nothing to see here..
More progress with a small soft wire brush and some carb-cleaner for the nooks and crannies of the combustion chambers had the head looking better, although there were some oddities across the mating surface.
The Main Attraction:
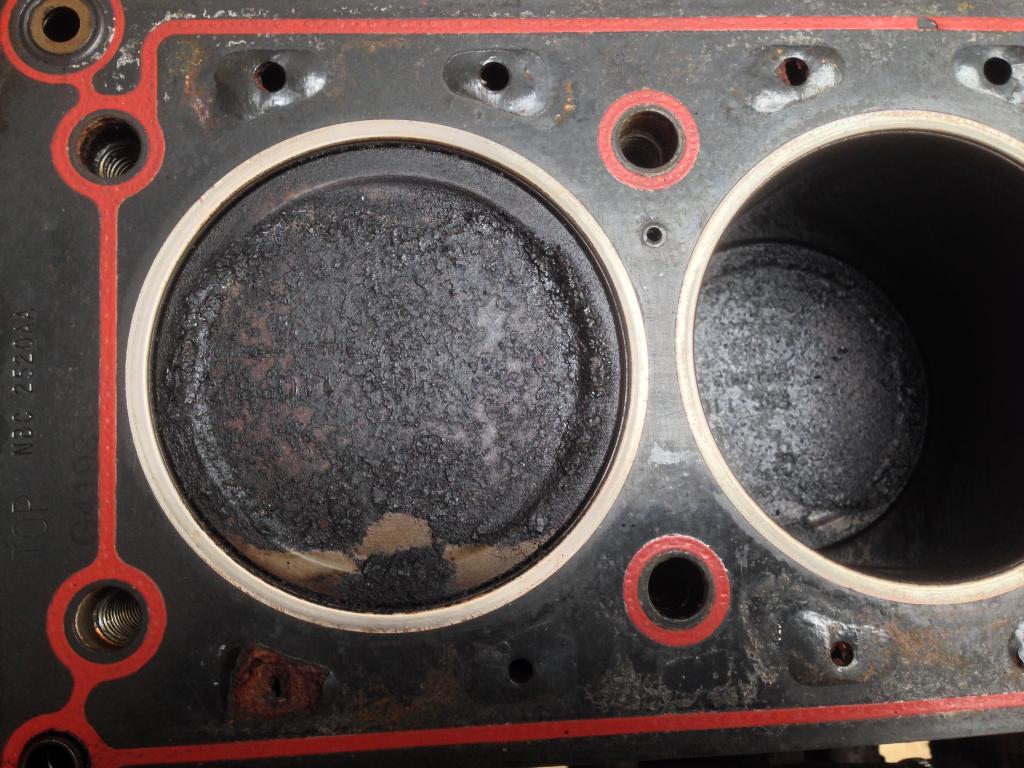
Exactly at the location the head gasket failed was this tiny nick in the surface, I really can't tell if it was a casting flaw or an assembly mistake (was something dropped on the head during assembly?) I had nothing to do with it but one thing was for certain: it needed tending to, whatever it was.
The second point of interest were these rough "pockets" around the exhaust side coolant passages. I checked out some replacement heads and the mating surface on the 1994 model year had the full size triangular hole in all 4 positions around each cylinder- a direct reflection of the block. The 1993, like this one, had 3 triangular holes and one smaller round hole, as shown here. Interesting..
While it seems unlikely, one thing that crossed my mind was that a previous owner used hard or acidic water resulting in corrosive pockets on the mating surface, but more likely it was an area that was supposed to be machined differently, and this head made it down the line with a "good enough" stamp on it. These areas were not directly connected to the failure points, so maybe they're alright- they just made me leary from a sealing perspective.
If there was another AJ6 4.0 rebuild thread on the entire internet, I'd love to see what that mating surface looks like..
Next up: weighing my options, and cleaning up the valves and block.
Last edited by MojotronGT; 08-20-2016 at 11:29 PM.
It does the "generate smoke screen" on startup if not started
every few days now. A sign of worn valve seals I'm told.
My car let out a puff on just about every startup- a few things I had read convinced me that the 4.0 didn't have valve seals on the exhaust side installed from the factory- so I thought maybe they were just missing.. They were indeed installed, just old and over-cycled.
For the most part, I like this engine, but one really annoying point is that the head bolts go through the cam caps, and the cams must be removed to get down to the seals. The head bolts are of course TTY (torque-to-yield; one time use only) so you might as well do the head gasket while you're replacing the head bolts, to replace the valve seals...
I also have to contemplate a head removal on my AJ6 in some time from now to refurb worn valve seals (luckily there is no head gasket gone for the time beeing).
btw, what are these wheels you put on your car?
On the first point, see above reply to the Scarboroughs.. Sorry.
Regarding the Wheels, they're BMW "style 32" 17x9s: upgrade options from the early 2000s 5 series "sport" or "touring" trim. On the bimmers, the fronts were 17x8 and rears were 17x9. I bought four "rear" wheels to increase my pawprint at all 4 corners. The 5 series is the only recent bimmer with a hub diameter as large as the Jag's: 74mm. I did have to roll my rear fenders to fit everything together right... but that's another thread.
The change in stability is astonishing compared to the big bubbly 15" stock tires, which are very limited in selection and are not available with modern performance treads. The tires are Continental Extreme Contacts, but despite the name, I think they have a pretty restrained tread pattern and the dry cornering / wet overall performance is miles above the tires I had on before.
Very interesting and acute observations of your head.
I am surprised to see that apparently the triangular channels were modified going from the 93 AJ6 to the 94.
The casting flaw or nick between cyls 2 and 3 may well be was responsible for the failure of the gasket (although it was assessed as good enough at the time).
The pockets you observe are strange. If I am not wrong, the AJ6 was prone to head gasket failure. Would such pockets not be uncommon in the casting and deemed acceptable if not connected, easing though an eventual failure of the gasket ?
On the first point, see above reply to the Scarboroughs.. Sorry.
Regarding the Wheels, they're BMW "style 32" 17x9s: upgrade options from the early 2000s 5 series "sport" or "touring" trim. On the bimmers, the fronts were 17x8 and rears were 17x9. I bought four "rear" wheels to increase my pawprint at all 4 corners. The 5 series is the only recent bimmer with a hub diameter as large as the Jag's: 74mm. I did have to roll my rear fenders to fit everything together right... but that's another thread.
The change in stability is astonishing compared to the big bubbly 15" stock tires, which are very limited in selection and are not available with modern performance treads. The tires are Continental Extreme Contacts, but despite the name, I think they have a pretty restrained tread pattern and the dry cornering / wet overall performance is miles above the tires I had on before.
And I love the look.
Beautiful car and beautiful tires, too; Well, I just cannot say enough about these Continental Extreme Contacts DWS 06 tires. My '94 kitty has the XK8 Revolver wheels with (until recently) the Pirelli Pzeros, but after 15 years it was time to ditch the old tires. The profile reduction from having switched from the old 15� Lattice wheels to the 17� Revolvers had, no doubt, affected ride comfort, so now was the time to resolve this and, luckily, somebody suggested the perfect (Continental) solution. Not only the ride has significantly improved, but my other old problem was resolved, as well, which was the poor power steering assist that ended the minute I drove the car off with the new tires, like for a miracle. Now, steering the car is nice and comfy, just perfect and to think that I was even inquiring about switching to a different P/S pump to resolve the problem, jeez. I believe it is these tires cross pattern tread what does the trick, which is probably helped by a different compound, as well� I can't say enough how much better the overall driving feels, plus, again, the tires look awesome. BTW, do the standard growler center caps fit the BMW wheels?
Some ten years back, I had the puff of smoke problem, which was kind of embarrassing when it happened at the car show, so I decided to get it fixed. I�m not much of an engine tear down mechanic, so I paid for the job. The head was totally refurbished with all new seals, including valve stem seals (puff of smoke), plus a heavy duty head gasket just to make sure that it is up to the increased compression from the nitrous injection. I�m attaching some pics for comparison.
And, while the car was at the shop (at the motorsports complex in the Las Vegas Motor Speedway) a guy from the race shop next door suggested to do a porting/polishing job, explaining that they had one of the very best guys in the head porting business in their team and that �it would make a nice difference to this pretty Jag�. Of course, the cost was piling up, but I couldn�t resist that kind of sales pitch, so I basically took his word and went for it with the addition of a fuel injection system refurbishing, might as well take advantage of their special flow bench. Power increase? Yes, it does put a smile in your face, but only at higher rpm's. However, the reality is, in my kitty�s case, that this performance upgrade's merit got totally overwhelmed -and was almost forgotten about- once I connected the nitrous equipment back; it's a different movie...
Thanks for the kind words, and WOW! That is some quality work- thanks for sharing.. this thread will be more targeted at the garage dweller/DIY crowd such as myself. I get the feeling there's as much invested in that rebuild/port polish/nitrous job as there is in my entire car, kudos to you for being in a position to not need to do it yourself!
While in the same family, the tires I went with are the Extreme contact DW (no S {no snow}) as I decided the 4x4 truck will be officially for snowy-day duty. The DW has the restrained tread appearance I was referring to - I actually find the DWS to be a little visually busy, but that's the nature of an All-Season vs a Summer tire.
Reinaldo, is your engine a 94 AJ6 or an AJ16? (I see the pattern of four triangular holes around each cylinder)
Did you also notice "pockets" on the surface of the block or not when the head gasket was removed?
Reinaldo, is your engine a 94 AJ6 or an AJ16? (I see the pattern of four triangular holes around each cylinder)
Did you also notice "pockets" on the surface of the block or not when the head gasket was removed?
My kitty is a US market '94 with "late" AJ6 engine, as it was manufactured in Feb. of 1994 and I believe it was about mid 1994 when they switched to the AJ16 engine.
In regards to the pockets, I couldn't say because at the time I didn't have a reason to visually check for something specific, since the only obvious issue was the valve stem seals (smoke puff). They did not report to me any other unusual findings, plus they told me they were taking pictures, but it would've been nice to rather have some 200 pictures taken. Oh well. -- BTW, at that time my business travel schedule was awful, plus I live in LA and not in Vegas.
OP this is normal for your cylinder head to look like this after a gasket failure. I've changed loads.
Your corrosion around the coolant passages is also normal.
Get the head skimmed by a machine shop.
Clean and lap the valves in whilst it's all apart.
 08-08-2016, 09:34 AM