Caliper Removal XJS V12 What's The Best Way?
#21
 09-18-2016, 12:51 AM


Veteran Member
Join Date: Mar 2008
Location: Pacific Northwest USA
Posts: 24,743
Received 10,757 Likes
on
7,101 Posts
Did yours actually have the *caliper* shims? Or are you thinking of the steering arm shim that always falls out when the caliper is removed?
Although mentioned in the manuals I've never seen a Jag with the former but all the (non-tampered-with) ones have had the latter.
Anyhow, to answer your question, I suppose Jaguar was allowing for the possibility that some parts might not be accurately machined....which, real world, apparently wasn't much of an issue as far as caliper mounting was concerned. More puzzling to me is why, after umpteen years, the didn't specify that the steering arms be made a bit thicker so as to eliminate the need to shim them !
Cheers
DD
Last edited by Doug; 09-18-2016 at 08:24 AM. Reason: sp
#22
09-18-2016, 01:11 AM
Veteran Member
Join Date: Mar 2008
Location: Pacific Northwest USA
Posts: 24,743
Received 10,757 Likes
on
7,101 Posts
Just a quick point. Following all the grief I had, I did a bit of searching and bought a tin of this stuff:
https://www.silmid.com/products/moly...500gm-tin.aspx
Absolute MAGIC on bolt shafts, spark plug threads etc etc. Forget copperslip use this stuff. A bit pricey mind, but really worth it.
Greg
https://www.silmid.com/products/moly...500gm-tin.aspx
Absolute MAGIC on bolt shafts, spark plug threads etc etc. Forget copperslip use this stuff. A bit pricey mind, but really worth it.
Greg
For those wanting anti-seize protection with less expense I suggest a dab of regular hi-temp wheel bearing grease. Most of us already have tub sitting on our workbench. It's has served the purpose perfectly well for me over a period of decades
 .
. If you wanna get fancy, try this:
https://www.amazon.com/Sta-Lube-Mari.../dp/B000KKLLPS
It is very tacky (you almost can't wipe it off your hands!) and, near as I can tell, no amount of water can ever wash it away. 1001 uses on an automobile! I'm not sure about heat resistance specs, though, so that would merit research before using it in a very high heat application.
I do use true anti-seize on spark plugs, though. That's my little spending splurge
Cheers
DD
The following users liked this post:
Greg in France (09-18-2016)
#23
09-18-2016, 07:04 AM


Veteran Member
 this is the one that requires shimming at follows:
The bolt first goes through the steering arm
Then the caliper
Then threads into the upright (the casting that holts the stub axle etc)
The Jaguar assembly procedure is to:
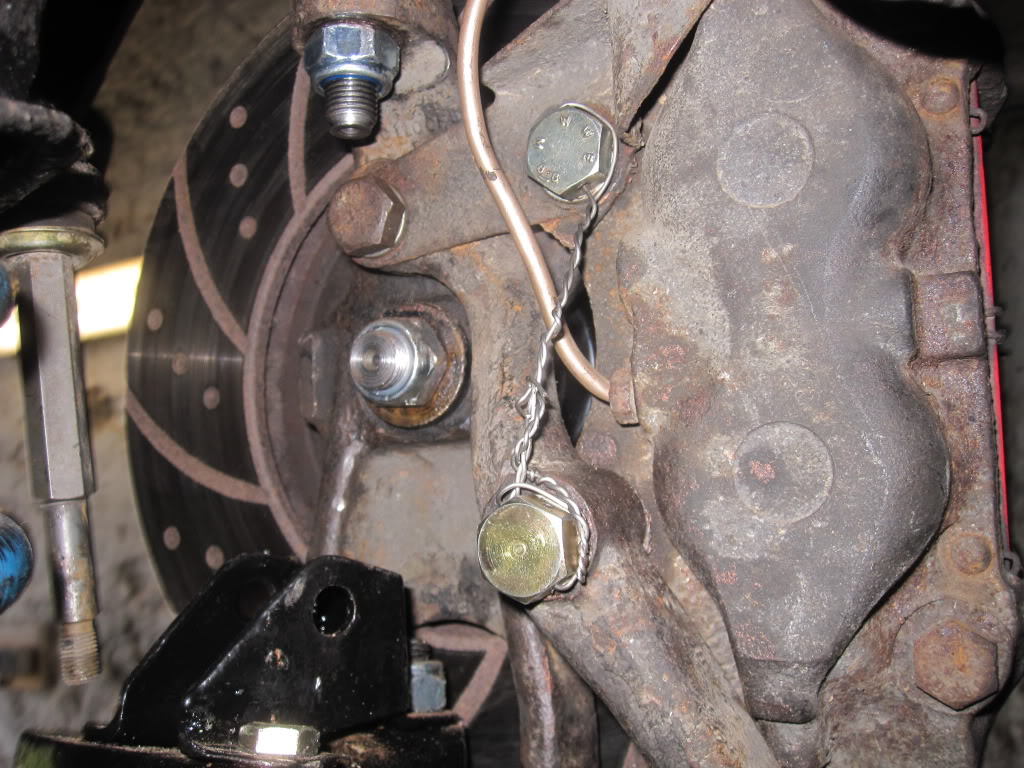
- Attach the steering arm by the top left bolt in the photo, the UNwired one,
- Then thread in the TOP wired bolt through the caliper and into the upright
- Then thread in the bottom wired bolt through the steering arm, the caliper and into the upright
- Do up the top two bolts enough to be firm, BUT NOT the bottom wired bolt, this is just threaded in so everything is correctly positioned but NOT tightened at this stage
- Now, focussing on the LOWER bolt, place a feeler gauge between the steering arm and the caliper body, ie just underneath the steering arm between it and the caliper, and measure the gap there. You will almost certainly find one of a few thou, maybe 20 or 30 thou.
- Now comes the tricky part, you have to get a shim or shims into this gap to fill it. I loosen all the bolts and either use U-shaped shims shoved in the gap from the top, or washer-like ones and encourage them to stay in the gap while you thread the bolt into place.
- Then tighten all up and lockwire (or Loctite or both !) as you choose.
The following 3 users liked this post by Greg in France:
#24
09-18-2016, 09:53 AM
Veteran Member
#25
09-18-2016, 11:13 AM
Veteran Member
No, it should not. I have dispensed with the dust shields, but there is one piece of them it is necessary to retain, the thick bracket attached to the flimsy shields, which holds the flexible/caliper joint. This is the piece that you see under the top two bolts. Even if that shield's fixing holes extended to the bottom bolt, which I have forgotten if they do or not, they would not be between the arm and the caliper; but under the bolt castellation, and if they were where the shims should go, they would be far too thick for safety (read on):
The reason for the shim often being necessary between the arm and the caliper on the bottom bolt is that, unless the three mating surfaces the three bolts' concerned do up against (ie Steering arm/upright; caliper/upright, steering arm/caliper/upright) cumulatively produce three bolting-up surfaces that are all in precisely the same plane, the steering arm will be very slightly deformed (ie bent) when the three bolts are torqued up. This, it has been claimed has caused failure of the steering arm, however unlikely such a huge forging might be to fail, apparently it can.
If your car had no shim in the position described, then it is perfectly possible that by luck, no shim was needed, or (however unlikely and I cast no aspersions on your guy) that the person who actually fitted the assembly did not fit the assembly correctly. This also is a more frequent occurrence than you might think.
Greg
The following 3 users liked this post by Greg in France:
#26
09-18-2016, 12:02 PM
Veteran Member
The following users liked this post:
Greg in France (09-18-2016)
#27
09-18-2016, 08:40 PM

Junior Member
#28
09-19-2016, 01:29 AM
Veteran Member

#29
09-19-2016, 01:47 AM
Veteran Member
Daim
I am not quite sure which part you are asking about as I am not sure which graphic you have posted as the numbering is different. but if you mean the shims, they are part number 24 in this graphic (21 in yours):

http://www.jaguarclassicparts.com/uk...-axle-carrier4
Your part No 17 (no. 20 or no. 21 in my diagram above) is just a washer and it is shown as being round the top left bolt as shown in my photo. The bolt that has the shim is bolt numbered 19 above (16 in your diagram) the bottommost wired bolt in my photo. What is missing from the diagram is the caliper itself, which goes between the arm and the upright. The bottom hole in the upright (the one with No. 15 pointing at it above) has the bottom caliper fixing hole against it, then the shim (No 24) then the arm. The arm passes to the front side of the top caliper wired bolt, as is shown in my photo in an earlier post.
It is because the arm is attached to the upright directly at its top fixing point, then to the upright with the caliper sandwiched between it and the upright at its lower fixing point, that without shimming you cannot guarantee the two fixings will be in the same plane, as the caliper casting would have to be very precisely machined and trial fitted several times to ensure all were aligned. Then as soon as a new caliper was fitted you would be back to square one. The shim is the easiest way to overcome the problem - given the design of the upright and the caliper and steering arm fixing holes in it, that is!.
Greg
I am not quite sure which part you are asking about as I am not sure which graphic you have posted as the numbering is different. but if you mean the shims, they are part number 24 in this graphic (21 in yours):
http://www.jaguarclassicparts.com/uk...-axle-carrier4
Your part No 17 (no. 20 or no. 21 in my diagram above) is just a washer and it is shown as being round the top left bolt as shown in my photo. The bolt that has the shim is bolt numbered 19 above (16 in your diagram) the bottommost wired bolt in my photo. What is missing from the diagram is the caliper itself, which goes between the arm and the upright. The bottom hole in the upright (the one with No. 15 pointing at it above) has the bottom caliper fixing hole against it, then the shim (No 24) then the arm. The arm passes to the front side of the top caliper wired bolt, as is shown in my photo in an earlier post.
It is because the arm is attached to the upright directly at its top fixing point, then to the upright with the caliper sandwiched between it and the upright at its lower fixing point, that without shimming you cannot guarantee the two fixings will be in the same plane, as the caliper casting would have to be very precisely machined and trial fitted several times to ensure all were aligned. Then as soon as a new caliper was fitted you would be back to square one. The shim is the easiest way to overcome the problem - given the design of the upright and the caliper and steering arm fixing holes in it, that is!.
Greg
Last edited by Greg in France; 09-19-2016 at 02:05 AM.
#30
09-19-2016, 04:58 AM
Veteran Member
#31
09-19-2016, 06:19 AM
Veteran Member
While trying to remove the 2 1/4" nut off the rear hub on a 1969 VW transporter I put an 8 foot hard iron pipe on a 3/4" drive breaker bar. That nut had been there for 30 years unmolested. That torqued rust sprung me off like a diving board. I decided I'd had enough and got the acetylene out. Blew off enough nut to expose a 1/4 inch of the hub shaft. I put the 8' breaker bar back in and... The damn thing threw me out in the yard again! Now that's some structurally sound German corrosion! Not like this Chinese corrosion you get nowadays.
#32
09-19-2016, 08:36 PM
Junior Member
Did yours actually have the *caliper* shims? Or are you thinking of the steering arm shim that always falls out when the caliper is removed?
Although mentioned in the manuals I've never seen a Jag with the former but all the (non-tampered-with) ones have had the latter.
Anyhow, to answer your question, I suppose Jaguar was allowing for the possibility that some parts might not be accurately machined....which, real world, apparently wasn't much of an issue as far as caliper mounting was concerned. More puzzling to me is why, after umpteen years, the didn't specify that the steering arms be made a bit thicker so as to eliminate the need to shim them !
Cheers
DD
#33
09-20-2016, 01:24 AM
Veteran Member
While trying to remove the 2 1/4" nut off the rear hub on a 1969 VW transporter I put an 8 foot hard iron pipe on a 3/4" drive breaker bar. That nut had been there for 30 years unmolested. That torqued rust sprung me off like a diving board. I decided I'd had enough and got the acetylene out. Blew off enough nut to expose a 1/4 inch of the hub shaft. I put the 8' breaker bar back in and... The damn thing threw me out in the yard again! Now that's some structurally sound German corrosion! Not like this Chinese corrosion you get nowadays.
Greg
Greg

Thread
Thread Starter
Forum
Replies
Last Post
Currently Active Users Viewing This Thread: 1 (0 members and 1 guests)