LS3 Conversion Diary
#61
 11-16-2016, 08:00 AM

Veteran Member
 I hope it is nearly running!
#62
11-16-2016, 08:30 AM

Yes Daim, but progress has been slow. I allow them to de-prioritize my work and do quick in-and-out jobs first to get a discount on labor.
Sorry it has been so long since an update, but there just has not been much to say. Mostly time consuming but straightforward electrical work. The only issue encountered recently is the AC bracket. On the LS3 it is mounted on the bottom of the accessories bracket area, which is not an option here, and we have tried several relocation options so far and not quite found the right fit yet. Not that big of a deal, but a lot of trial and error, with the expected time lags in ordering new ones to try and returning the old ones.
Another thing that is taking longer than it should, is that the place that is custom cutting my driveshaft has still not delivered it after two weeks. Granted we have not been pressuring them since that is not holding anything else up.
As a cost update, I have paid my mechanic $3,000 so far in labor, and that will be less than half of what I ultimately owe. That puts my current costs at $16,142.
On the upside, the engine is scheduled to be actually turned over this weekend. Yay.
The following users liked this post:
ronbros (11-19-2016)
#63
11-16-2016, 10:13 AM
Veteran Member
#64
11-17-2016, 09:44 AM

Sponsor
This is Andrew from Jaguar Specialties and I too have been keeping an eye on this project, answering occasional questions from Robert and his mechanic/shop. I wanted to add a couple of comments regarding the latest updates, mostly just to clarify for those just getting acquainted to this LS-XJS approach.
1) Driveshaft- for as long as time, GM has used transmissions that use a slip-in driveshaft yoke that can slide in and out of the tailhousing some as the (solid) rear axle goes up and down. Probably 99.9% of all Jaguar conversions used these type of transmissions (be they T350, T400, T2004R, T700R4, 4L60E, etc.,). Making up a driveshaft for these applications is child's play- we use a standard GM front yoke, a steel tube of a particular diameter, standard U-joints, and a specific rear flange to connect to the Jag diff (all of this info is part of our manual). The unit is made up by a driveline shop and then installation takes 15 min. Starting with the 6L80E (6 speed automatic), GM went to a different format that uses the more modern Jurid-style (rubber) couplings at both ends- transmission and diff- and that's how Robert's transmission is. This requires the slip joint (expansion/contraction) to be in the middle of the driveshaft, not at the front as before for conversions. As a side note, the XJS' original V12 drivehaft was configured in much the same way- flange at each end with a slip joint in the middle. So in Robert's case, his "new" driveshaft will actually be very similar in format to the XJS original.
2) AC and accessories- As part of packaging of various LS engines into the newer Camaro, Cadillac CTS-V, and Pontiac G8 sedans, GM revised the LS front accessory drive brackets and parts (including the water pump) back towards the front of the block for more room in front of the engine. One of the conversations Robert and I had early on when considering this engine for this car was that we likely would have to deal with some tweaking of our conversion parts due to this (keep in mind that our kits were designed several years earlier than Robert's engine- and accessory drive- even appeared on the scene). Our kit would accommodate, without modifications or rework, 95+% of the standard GM accessory drive schemes out there that customers would use in their Jags (98-02 Camaro, GM trucks etc.,.) . And that is how it has remained, with very little call to accommodate these new accessory schemes in the Jag application. However, that need will increase as these engines become more and more affordable. In that regard, we have already started design projects to make our parts more compatible with the later accessory drives.
Back to Robert's accessory situation here, the beauty of the LS engines is that everything is interchangeable and one possibility that he and I discussed is the approach 98-02 Camaro owners take when putting an LS3 back into their (originally LS1 powered) cars, and that is to reuse their early (98-02) Camaro accessory drive. These parts are cheap (an alternator brand new is something like $65, water pump new is $95, etc.,.), available, and are a bolt on option here requiring no fiddling. This is a common swap, well understood, and a workable solution available this minute, if needed. And of course that accessory drive works flawlessly with our LS-XJS kit parts.
Robert has a great project here that will yield a great car. However, everyone needs to be clear that this drivetrain package, the LS3-6L80E, while still an LS, is significantly different in a variety of key ways to the more typical LS1 or LS2 car or 4.8-5.3-6.0 truck packages used by 97% of our customers. For the LS3 install here, I am not at all surprised by any of the issues that have come up- Robert and I discussed each and every one before one screw was turned and that there would likely need to be some custom work here and there. I am pleased that so far it has gone very smoothly, and I look forward to continuing to assist as needed going forward.
Anyway, I wanted to be sure that all was clear, and I hope I answered more questions than I triggered.....
Andrew
Jaguar Specialties
Last edited by JaguarSpecialties; 11-18-2016 at 08:41 AM.
The following users liked this post:
ronbros (11-19-2016)
#65
11-17-2016, 03:21 PM
Veteran Member
Wow that's almoIt double what my 6.7L V12 is costing,althout you will more power... Cthan add up quickly.
#66
11-18-2016, 08:21 AM
Sponsor
I have also been watching your 6.7L build thread- very interesting.
But aren't you providing all the labor for this yourself, so there is no actual labor cost?? You are doing fabulous work here but if you had a shop doing this for you wouldn't this cost thousands and thousands more $$$ ????
Robert's cost estimate includes labor- a shop is putting the car together for him.....
When talking about costs (and nothing more than that) I just wanted to be sure we were comparing apples and apples- parts AND labor here to be talking about the same thing....
Thanks,
Andrew
Jaguar Specialties
The following users liked this post:
ronbros (11-19-2016)
#67
11-19-2016, 02:05 PM

Veteran Member
Join Date: Jul 2010
Location: Austin tx and Daytona FL.
Posts: 7,362
Received 1,231 Likes
on
939 Posts
Jag Specials, good to know about that change drivshaft for 6L80e , i suppose ,for less NHV stuff!
could the trans output case be changed ,and use a slip joint as has been a GM thing since 1930s, i know alot of euro cars use the rubber thingy, but with big torque and super grip tires they seldom workout satisfactory!
i use an Aluminum single piece driveshaft on my XJS V12, 700R4 with kit!
just a thought on it.
Last edited by ronbros; 11-19-2016 at 02:07 PM.
#68
11-19-2016, 02:46 PM
Veteran Member
I have also been watching your 6.7L build thread- very interesting.
But aren't you providing all the labor for this yourself, so there is no actual labor cost?? You are doing fabulous work here but if you had a shop doing this for you wouldn't this cost thousands and thousands more $$$ ????
Robert's cost estimate includes labor- a shop is putting the car together for him.....
When talking about costs (and nothing more than that) I just wanted to be sure we were comparing apples and apples- parts AND labor here to be talking about the same thing....
Thanks,
Andrew
Jaguar Specialties
But aren't you providing all the labor for this yourself, so there is no actual labor cost?? You are doing fabulous work here but if you had a shop doing this for you wouldn't this cost thousands and thousands more $$$ ????
Robert's cost estimate includes labor- a shop is putting the car together for him.....
When talking about costs (and nothing more than that) I just wanted to be sure we were comparing apples and apples- parts AND labor here to be talking about the same thing....
Thanks,
Andrew
Jaguar Specialties
So yes I have I have done some of the labour.


#70
11-25-2016, 03:13 PM
Veteran Member
#71
11-26-2016, 03:39 AM
Veteran Member
#72
11-26-2016, 10:03 AM
I did not realize the 6 cylinder hood had more clearance. I thought the hood stayed pretty consistent throughout the years.
The following users liked this post:
Daim (11-26-2016)
#73
11-26-2016, 10:08 AM

Veteran Member
Join Date: Jul 2012
Location: Walnut Creek, California
Posts: 6,796
Received 2,399 Likes
on
1,880 Posts
1. Looks like it belongs there.
2. Yeah, the bonnet clearance point occurred to me as well. But, perhaps it is a depth perception thing because of the camera rather than metal on metal.
3. Brings back memories of my LT1 into XJ wuzza 6!
4. In other forum, a lister reported his swap of an LS1 into an XJ, After solving the sump issue, it went well. But, on driving it, he was disappointed. Lack of power???
Oh, someone suggested an age old check. Does the pedal to the metal fully open the throttle butter flies? In his case, no!!!
Adjusted and was delighted.
Carl
Carl
#74
11-26-2016, 11:23 AM
Veteran Member
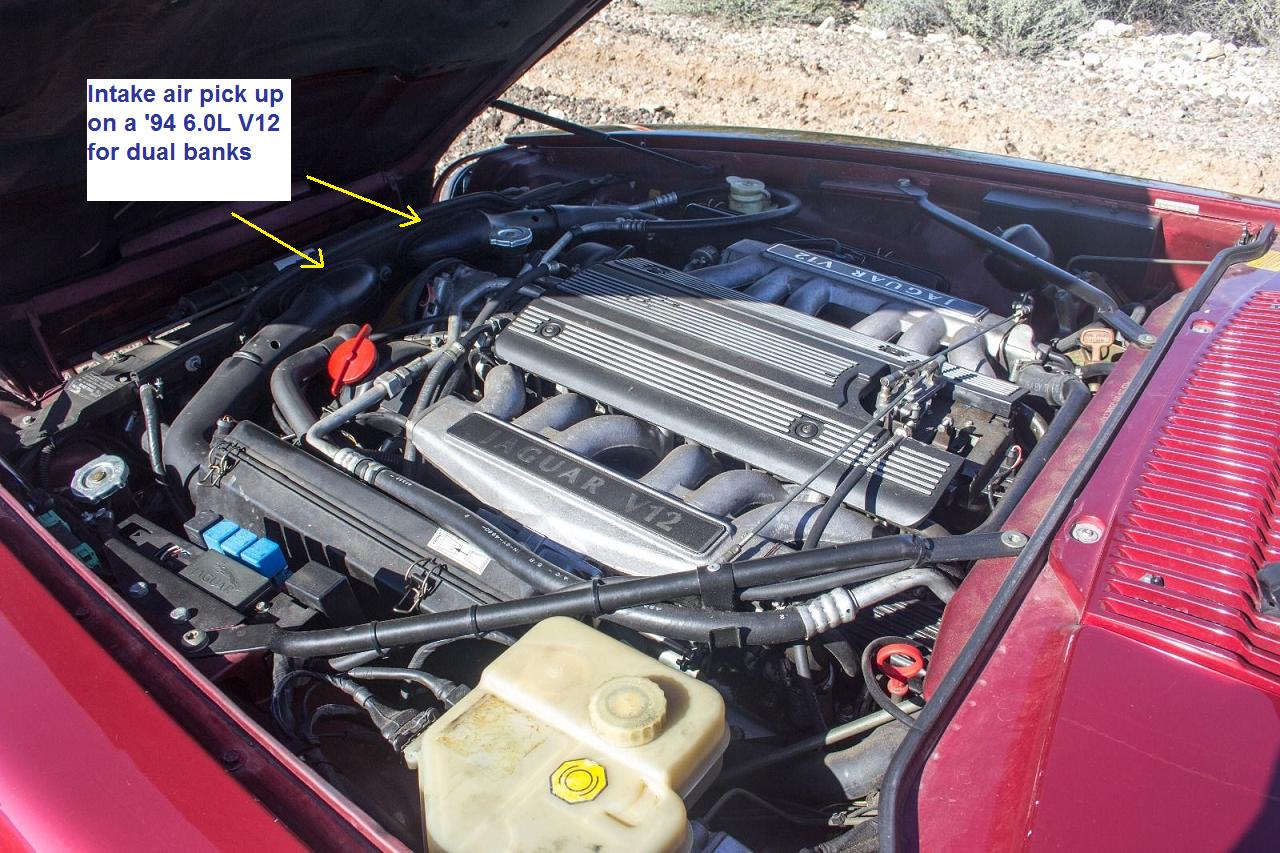
Later V12s got the 6 cylinder hood and sucked air in from above the rad rather than from inside the engine bay...

The following users liked this post:
rsmithline (11-30-2016)
#75
11-30-2016, 08:33 AM
A way you could make a good cold air intake would be to fit a 6 cykinder hood/bonnet and use the factory radiator bracket (top) to drain air straight from in front of the radiator and use a straight line connection to the throttle body... If you know what I mean...
Later V12s got the 6 cylinder hood and sucked air in from above the rad rather than from inside the engine bay...
Later V12s got the 6 cylinder hood and sucked air in from above the rad rather than from inside the engine bay...
Does anyone have a picture of the 6 cylinder hood versus the 12 cylinder hood? No amount of Google searching has found anything.
#76
11-30-2016, 09:25 AM
Veteran Member
The following 2 users liked this post by Daim:
rsmithline (11-30-2016),
someguywithajag (12-01-2016)
#77
12-22-2016, 10:15 AM
Quick update...
Cutting down the driveshaft did not work. Need a custom aluminum driveshaft made. $1200
Even though my engine came with a computer and harness, it needs to be modified with a custom harness and reprogrammed to ignore a lot of the security features. Another $1200.
Also dropped another $1200 in labor to my mechanic.
Total - $3600
Running total - $19,742
Last edited by rsmithline; 12-22-2016 at 10:19 AM.
The following users liked this post:
ronbros (12-22-2016)
#78
12-22-2016, 11:34 AM
Veteran Member

#80
12-22-2016, 01:12 PM
I will let Andrew explain why. While it was explained to me and made sense, I did not understand well enough to repeat it accurately.
EDIT: Incidentally, my mechanic keeps telling me that all of the issues that we are hitting are entirely due to the LS3. He could have been done with an SBC conversion months ago at half the price.
Last edited by rsmithline; 12-22-2016 at 01:18 PM.
The following users liked this post:
ronbros (12-22-2016)