Making a new Injector Harness for the H.E
#81
 12-07-2016, 04:56 PM


A special request: I am about 1 day away from fitting my harness. I know we have touched on it briefly earlier on in the thread but would be keen to hear where you guys attached yours if you in fact moved it out the Vee.
I can recall some guys have tied it to the fuel rails and others sitting on the intake manifold. I am probably going to do either or (not too many choices really). One thing for sure is it isnt going back in the Vee!
Also pictures of your set up would be greatly appreciated.
Cheers again guys!
I can recall some guys have tied it to the fuel rails and others sitting on the intake manifold. I am probably going to do either or (not too many choices really). One thing for sure is it isnt going back in the Vee!
Also pictures of your set up would be greatly appreciated.
Cheers again guys!
The following users liked this post:
orangeblossom (12-07-2016)
#82
12-07-2016, 06:40 PM
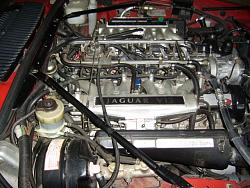
Mine went under the inlets, basically on top of the camcovers, so out of sight, and the pigtails simply went to each injector.
It sits there, not secured in any way, it just behaves itself.
These are some snaps of the engine, but you cannot see that loom at all, which was my plan anyway. Same as ALL the wiring coming onto the engine from the rear.
It sits there, not secured in any way, it just behaves itself.
These are some snaps of the engine, but you cannot see that loom at all, which was my plan anyway. Same as ALL the wiring coming onto the engine from the rear.


The following 2 users liked this post by Grant Francis:
orangeblossom (12-08-2016),
paulyling (12-07-2016)
#83
12-07-2016, 07:26 PM
The following 2 users liked this post by paulyling:
Grant Francis (12-08-2016),
orangeblossom (12-08-2016)
#84
12-08-2016, 02:21 AM


Veteran Member
Grant is someone who maintains his cars to a standard few if any can match. In his case out of sight is NOT out of mind, whereas in my case it often is. Anywhere is better than screwed to the V bottom; but in my case I opted for the rail fixing when I renewed my injector loom, so every now and then I can give it a bit of a pull and see how crisp it has become. Something [/boast on] that I am far less concerned about than I used to be since I have now got so much better airflow under the bonnet; having replaced the old bonnet insulation with much thinner and much better stuff, and reduced the height of the radtop panel lip [/boast off].
The following 3 users liked this post by Greg in France:
#85
12-08-2016, 02:41 AM
Veteran Member
Hi Grant
That looks really neat, would I be able to do that with my existing Injector Harness or would I need to make one with longer wires?
Also when I was changing the Spark Plugs, I saw a 'Braided Wire' in the bottom of the Vee, what does that do and should I move it out the way or just leave it alone?
That looks really neat, would I be able to do that with my existing Injector Harness or would I need to make one with longer wires?
Also when I was changing the Spark Plugs, I saw a 'Braided Wire' in the bottom of the Vee, what does that do and should I move it out the way or just leave it alone?
The following 2 users liked this post by orangeblossom:
Grant Francis (12-08-2016),
paulyling (12-08-2016)
#87
12-08-2016, 04:12 AM
Mine went under the inlets, basically on top of the camcovers, so out of sight, and the pigtails simply went to each injector.
It sits there, not secured in any way, it just behaves itself.
These are some snaps of the engine, but you cannot see that loom at all, which was my plan anyway. Same as ALL the wiring coming onto the engine from the rear.
Attachment 139914
Attachment 139915
It sits there, not secured in any way, it just behaves itself.
These are some snaps of the engine, but you cannot see that loom at all, which was my plan anyway. Same as ALL the wiring coming onto the engine from the rear.
Attachment 139914
Attachment 139915
Greg sounds like wise counsel also mate. Do you have some under the bonnet pics of your EFI harness? You also mentioned about the under bonnet insulation. I have seen that being renewed in a few of the threads recently. It must be a sign for me to change out also. I don't suppose you have a link or part number by any chance? I saw a real beaut one the other day on this forum with a leaper printed on it.
O.B your too kind mate. Cheers. Your progress with Cherry Blossom has inspired me greatly. Hope you UK winter
The following 2 users liked this post by paulyling:
Grant Francis (12-08-2016),
orangeblossom (12-08-2016)
#88
12-08-2016, 04:46 AM
Hi Grant
That looks really neat, would I be able to do that with my existing Injector Harness or would I need to make one with longer wires?
Also when I was changing the Spark Plugs, I saw a 'Braided Wire' in the bottom of the Vee, what does that do and should I move it out the way or just leave it alone?
That looks really neat, would I be able to do that with my existing Injector Harness or would I need to make one with longer wires?
Also when I was changing the Spark Plugs, I saw a 'Braided Wire' in the bottom of the Vee, what does that do and should I move it out the way or just leave it alone?
I reckon the pigtails may be long enough. Bottom of V to injector, is close to up top to the side, to the injector.
My ONE concern is that when/if you start moving that thing the insulation will crack, and that will end that exercise with conviction.
The following 2 users liked this post by Grant Francis:
orangeblossom (12-08-2016),
paulyling (12-08-2016)
#89
12-08-2016, 04:55 AM
Everything comes in from the rear on mine. I rewired the whole engine bay that way. The resistor pack and other electrickey is outside the engine bay, in the opening behind the panel behind the RHF wheel.
The Ign AMP is out the front, the wires run up the RH inner wing, around the back, and into where they are needed.
The cruise bellows is in the panel in front of the RHF wheel.
The fuel filter is under the bonnet, stops smells in the boot.
Lots of little "Grant" things as I went, NO plan, just pissed at the mess that was under there, and just ONE wire at a time, and with the old attitude, "why the hell is this like this, there must be a better way".
Took me 3 weeks in total in 1996, never touched any of it since.
The following 3 users liked this post by Grant Francis:
#90
12-08-2016, 05:02 AM
Veteran Member
The following 2 users liked this post by orangeblossom:
Grant Francis (12-08-2016),
paulyling (12-08-2016)
#91
12-08-2016, 08:37 AM
Veteran Member
Do you have some under the bonnet pics of your EFI harness? You also mentioned about the under bonnet insulation. I have seen that being renewed in a few of the threads recently. It must be a sign for me to change out also. I don't suppose you have a link or part number by any chance? I saw a real beaut one the other day on this forum with a leaper printed on it
I used this stuff, the cheapest of the real nitrile rubber and ally ones. Dead easy to fit, really good self adhesive for a change, just do not start it until a couple of inches aft of the radtop panel lip.
https://www.amazon.co.uk/Silent-Coat...ds=silent+coat
If you ever do change the insulation, it is worth whipping off the radtop panel and cutting 8 or 10 mm of the lip top.
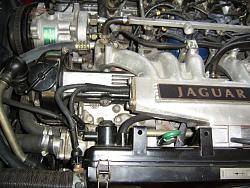
Snaps attached FYI. The injector harness just ties to the fuel rail as you find it convenient. No nearly as uncluttered as Grant's solution, but easier for mere mortals to do and look after! The braided outers in the pic are nothing to do with the injector loom, which is OEM, from the days when they were still available and I could afford a new one!
Greg
Last edited by Greg in France; 12-08-2016 at 08:41 AM.
The following 2 users liked this post by Greg in France:
orangeblossom (12-08-2016),
paulyling (12-08-2016)
#92
12-08-2016, 03:22 PM
The guy in the USA who made them sadly died not that long ago.
I used this stuff, the cheapest of the real nitrile rubber and ally ones. Dead easy to fit, really good self adhesive for a change, just do not start it until a couple of inches aft of the radtop panel lip.
https://www.amazon.co.uk/Silent-Coat...ds=silent+coat
If you ever do change the insulation, it is worth whipping off the radtop panel and cutting 8 or 10 mm of the lip top.
Snaps attached FYI. The injector harness just ties to the fuel rail as you find it convenient. No nearly as uncluttered as Grant's solution, but easier for mere mortals to do and look after! The braided outers in the pic are nothing to do with the injector loom, which is OEM, from the days when they were still available and I could afford a new one!
Greg
Question for you Greg: Are you sure you don't have a relative named George in France by any chance? Mate looking at both engine bays (your pic and the magazine article below) I see those same beautiful red cam covers and also the same use of red and yellow cable ties.
A coincidence? I think you two guys would have alot in common!
Either way those cam covers look amazing (red is my fav colour)


It says he is from Le Creusot, France. Even gives thanks to a "Grant" at the end lol!
The following users liked this post:
orangeblossom (12-08-2016)
#93
12-09-2016, 04:15 AM
Well I progressed steadily today:
Cleaned out any extra gunk left in the Vee as best I could and started placing the ignition leads in place:


Then it was time to start fitting back the throttle capstan pieces:

Then the coil and friends

Some final tidying up of the wires floating around there:

Blue Spaghetti:

Now time to Fit the harness. There she is. 2 weeks worth of work:

Laid it over first to try and get a scope of where to fit it. Unfortunately I didn't make it long enough to do the WoOz method so I went with tying it to the fuel rails:

Gave each connector a spray and scrub to ensure the contacts were shiny before I plugged each bosch plug in:


Same the other side and she was done!

Now...
Time to make final checks and turn the key......no go! What? Bugger! What could it be? Wait....think simple. The ignition would turn on the accessories but wouldn't crank the engine. Got my son to turn the key whilst I watched battery voltage. As soon as he tries to start the voltage dipped to about 10 Volts. Ok. Flat battery. My cheap trickle charger wasn't any good.
 up my good pal 34by151 to borrow his jump starter and bulk battery charger.
Came back home. Tried again, this time with his jump starter. Ok the engine started.....for 1 second then cut out. Bugger.
Placed the battery on bulk charge. Left it on until it went to float. Tired again. The engine cranks for a few seconds then cuts out. Crap!
That is the point when I realised there is something I have not put back right. The battery must be ok if it was able to supply the amps to the starter motor to crank the engine right? Even it if only turned a few turns?
Crap...I am sad . I wanted her to run before I go back to
  and before the Gremlins start school holidays. I have to walk away and contemplate whilst drinking some amber fluid
  . Maybe it will come to me in the morning....


To be continued.....
Cleaned out any extra gunk left in the Vee as best I could and started placing the ignition leads in place:
Then it was time to start fitting back the throttle capstan pieces:
Then the coil and friends
Some final tidying up of the wires floating around there:
Blue Spaghetti:
Now time to Fit the harness. There she is. 2 weeks worth of work:
Laid it over first to try and get a scope of where to fit it. Unfortunately I didn't make it long enough to do the WoOz method so I went with tying it to the fuel rails:
Gave each connector a spray and scrub to ensure the contacts were shiny before I plugged each bosch plug in:
Same the other side and she was done!
Now...
Time to make final checks and turn the key......no go! What? Bugger! What could it be? Wait....think simple. The ignition would turn on the accessories but wouldn't crank the engine. Got my son to turn the key whilst I watched battery voltage. As soon as he tries to start the voltage dipped to about 10 Volts. Ok. Flat battery. My cheap trickle charger wasn't any good.
Came back home. Tried again, this time with his jump starter. Ok the engine started.....for 1 second then cut out. Bugger.
Placed the battery on bulk charge. Left it on until it went to float. Tired again. The engine cranks for a few seconds then cuts out. Crap!
That is the point when I realised there is something I have not put back right. The battery must be ok if it was able to supply the amps to the starter motor to crank the engine right? Even it if only turned a few turns?
Crap...I am sad
To be continued.....
Last edited by paulyling; 12-09-2016 at 04:18 AM.
The following users liked this post:
orangeblossom (12-09-2016)
#94
12-09-2016, 04:26 AM
The following 2 users liked this post by Grant Francis:
orangeblossom (12-09-2016),
paulyling (12-09-2016)
#95
12-09-2016, 04:45 AM
Veteran Member
Hi Bro
Could it be something to do with the wires that you cut off the end of the loom plug, that you thought you didn't need?
Or could you have done what I did and put the wrong plug in the wrong Coil/Transformer
My Marelli has Two of those Transformer 'thingys' just in front of the Capstan, not sure if the lucas is the same?
When I swapped those Transformer Plugs around, She just Started Instantly.
Just a shot in the dark on my part.
The following users liked this post:
paulyling (12-09-2016)
#96
12-09-2016, 05:01 AM
O.B cheers mate. I have the single coil set up in mine now. Can't go wrong with mine, it just has a hole for the plug on the coil and the lead goes to the middle of the dizzy cover. I also triple checked that all my plugs went back the correct way. As for the plug made sure to trace it out and confirmed it just went to earth or chassis ground.
This may be a clue: After it runs for a brief few seconds the engine smells like exhaust emissions. Maybe thats just normal but I don't know......I want to cry
Last edited by paulyling; 12-09-2016 at 05:28 AM.
The following users liked this post:
orangeblossom (12-09-2016)
#97
12-09-2016, 05:55 AM
Well I have spent the last hour probing around that engine bay trying to see anything out of place. Nothing but....I did find another nasty. This was probably there before I started this task but that tube going to the bottom of the dizzy next to the vaccum advance has a bloody hole in it!
Is this the tube going back to the ECU? It is the one between 1 and 2 o'clock in this picture (the tube is pulled back in the photo)

Crikey!


edit:
Nevermind. It just goes to this little filter and then goes no where. Can anybody explain what this used to be for?

Is this the tube going back to the ECU? It is the one between 1 and 2 o'clock in this picture (the tube is pulled back in the photo)
Crikey!
edit:
Nevermind. It just goes to this little filter and then goes no where. Can anybody explain what this used to be for?
Last edited by paulyling; 12-09-2016 at 06:01 AM.
#98
12-09-2016, 06:10 AM
Veteran Member
That broken tube and the filter is the inlet side of the dizzy ventilation, and the tube goes to the spigot on the dizzy side at the bottom. Then another tube comes out the top and goes to the inlet manifold. Best to change them for silicone tubes when you have a moment. The filter just filters the ingoing air so no rubbish enters the dizzy.
AS OB said, try putting back the earth wire as it was and plug in that plug and try to start it again. Grant meant, ignition on, engine NOT running or turning, use you mitt to turn the capstan and carefully listen for ONE injector click.
Greg
AS OB said, try putting back the earth wire as it was and plug in that plug and try to start it again. Grant meant, ignition on, engine NOT running or turning, use you mitt to turn the capstan and carefully listen for ONE injector click.
Greg
The following 2 users liked this post by Greg in France:
Grant Francis (12-09-2016),
paulyling (12-09-2016)
#99
12-09-2016, 06:23 AM
Veteran Member
The following 2 users liked this post by Greg in France:
Grant Francis (12-09-2016),
paulyling (12-09-2016)
#100
12-09-2016, 06:40 AM
I assume too much, OOPS.
Yes, Ign ON, engine OFF. Rotate that throttle capstan as if you are taking off from a standing start very quickly. You should hear the injectors "click" once as you do this.
I also agree with the OLD ECU, just to put the car as near to how it was before you started the work. That 16CU may be a dud, and you could be messing forever.
Not sure which plug it is you cut wires from, but again, I would try and return it as it was, just to eliminate any possibility.
That resistor pack plug cleaning is also a must do.
The following users liked this post:
paulyling (12-09-2016)