Repairing The Teves ABS Actuator/Master On 1990 XJS V12 With Photos
#1
 04-13-2015, 06:48 AM

The Problem:
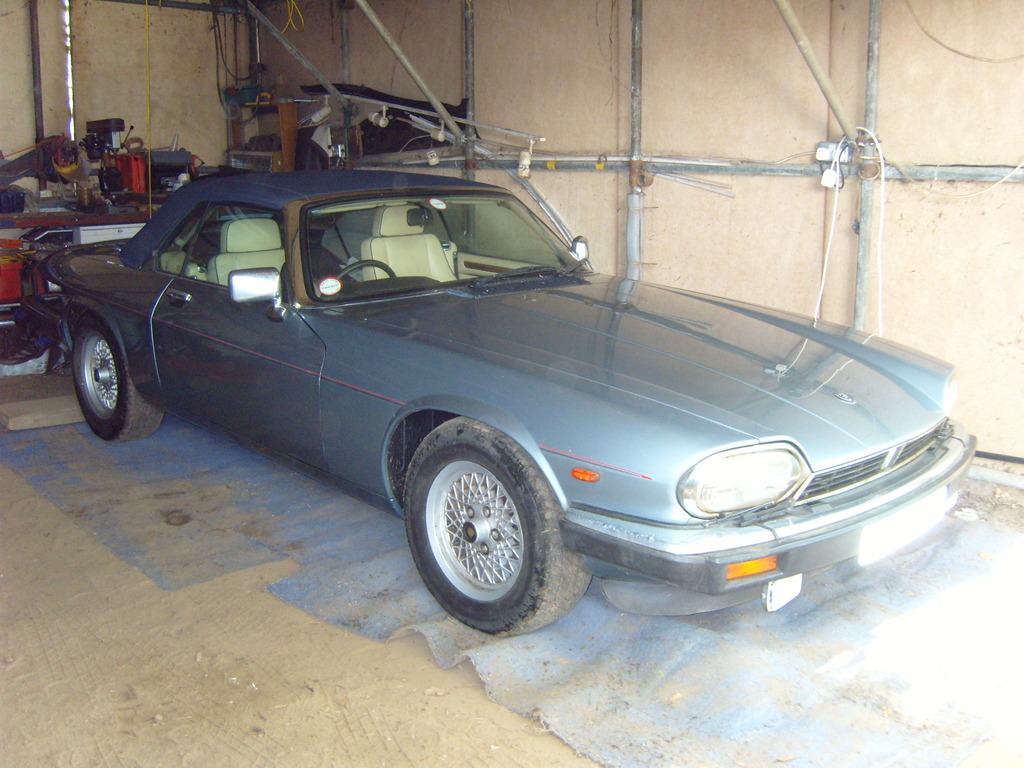
After changing the Brake Pads on my 1990 XJS V12 'The Ice Princess'
Suddenly and without warning, the Car would dive to the right when under Braking!
Very, Very, Scarey as it only happened now and again, when you were least expecting it to happen.
The Cause:
Almost certainly self inflicted, by levering back the Brake Pads with a screw driver, in order to take the old Pads out and put the new ones in, without undoing the Bleed Nipples first.
Pretty much standard practice on lots of other Cars but failure to open those Bleed Screws on an XJS can end in disaster, as fluid is forced the wrong way up the System.
Which can and did in my case, wreck the inner workings of the ABS maybe by blocking one of the Valves with fluid containing contaminates, where not being an expert, I can only guess that this was the cause of the problem.
Although I phoned round everywhere, no one seemed to know the cause of the problem and suggested one of the Calipers might be sticking, which was almost impossible, as I'd just put New ones on.
Plan 'B' was to buy a Brand New Actuator but they were talking Telephone numbers on the price, with the cheapest quote for a New one �1,000 and that is in the unlikely event that anybody could find one!
One of those firms I contacted quoted me �2,000 and that was just for the part without fitting it on and so resigned to the fact that She would be off the road for quite some time.
'The Ice Princess' was stored in my Garage, under cover for the past 12 years! Not too much of a problem, as I had another XJS to use.
But quite recently a couple of Forum Members, had the same trouble with their Cars as I did with mine but unlike me they managed to rebuild the ABS and am pleased to say that their Cars are now back on the road.
In view of the success they had, I thought that I would also try and fix mine, as even though I'm not a Mechanic or very mechanically minded there was really nothing that was going to stop me now.
Which in point of fact was the whole problem!
But first I had to Start 'The Ice Princess' after 12 years of standing and never started up in all that time!
All though it was pretty traumatic in every possible way, Long story short, I put on a battery, turned the Key and She turned over twice and then Started! Hard to believe but that is exactly what happened!
'The Ice Princess' with hope on the Horizon after 12 years of Standing and not being started!

The following users liked this post:
Greg in France (04-13-2015)
#2
04-13-2015, 07:40 AM
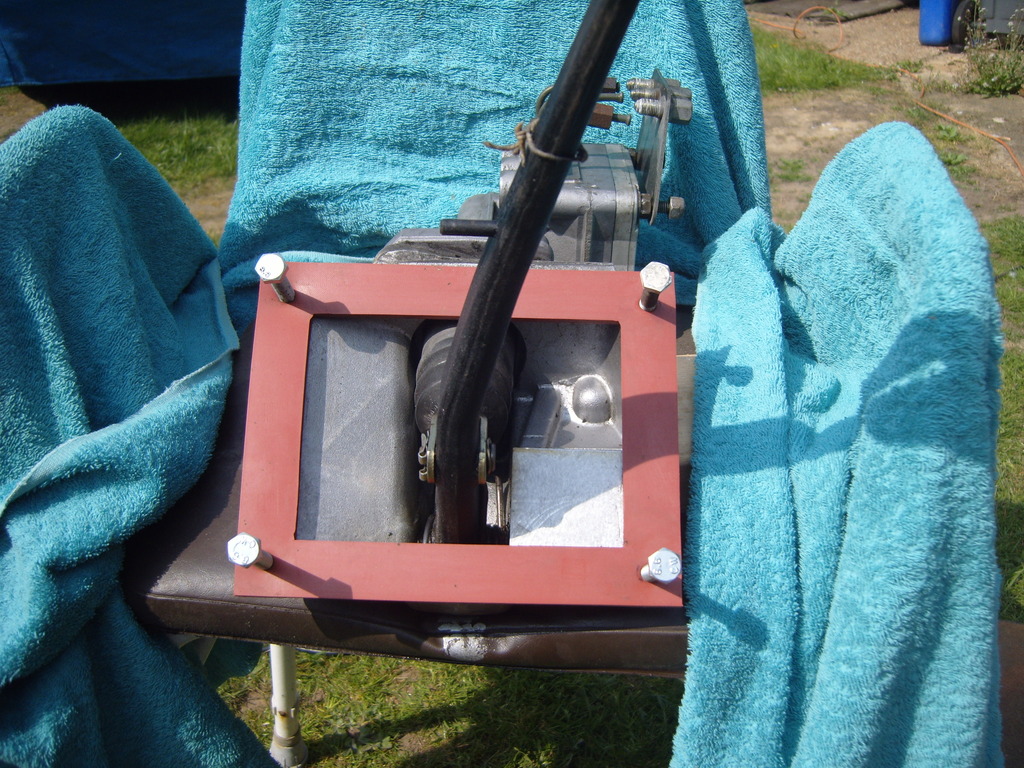
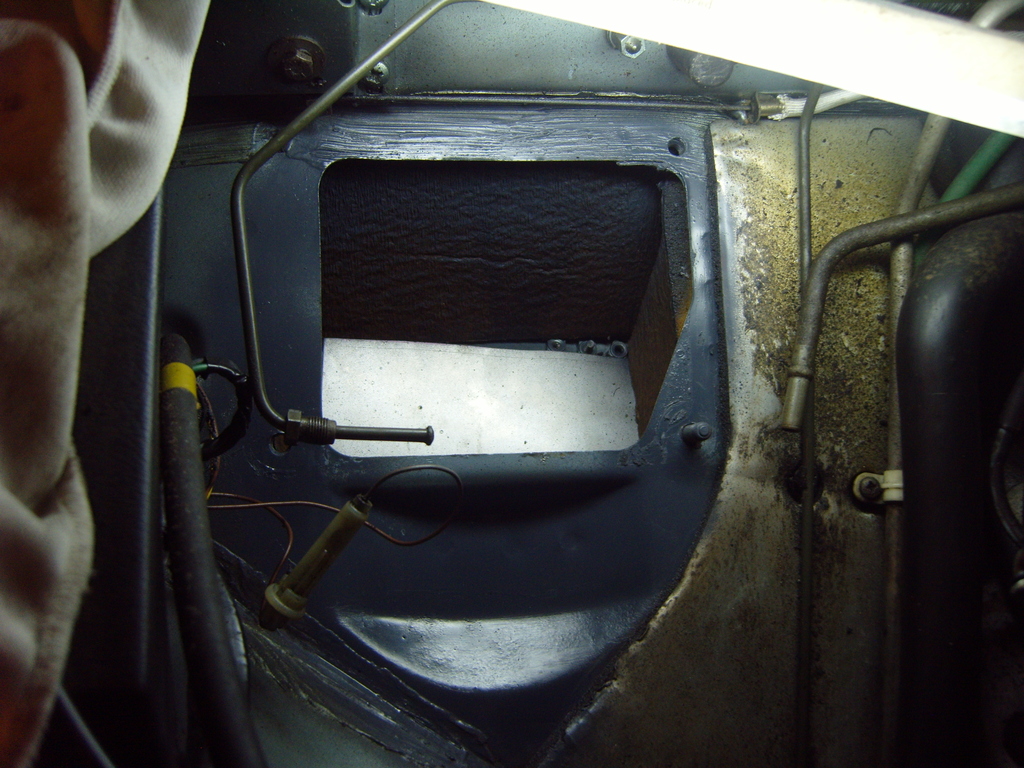
Although I thought that this would be a nightmare to get out, it turned out to be a bit of a 'Walk in the Park'
What made it even easier was that I went against conventional Wisdom and did not take the Polythene Reservoir off, which in point of fact I'd intended to do but the 'blinking thing' wouldn't let go of its rubber mountings.
So more by luck than judgement, I ended up leaving it on, which ended up making removing the ABS a Breeze as not only did you have something which you could hold on to, it also helped to minimize brake fluid spillage.
So first job is draining the old fluid out and while everyone one has their favorite way of doing something like that, I just opened a Caliper and let it run out into a container.
WARNING: Do not let any Brake fluid get anywhere near the paintwork as it will strip it right off!
WARNING 2: Even when you are thinking that the Reservoir is Empty its NOT EMPTY!
So spray around the inner wings, with clear Waxoyl, or WD40 or even just oil to minimize the risk of spoiling your paintwork.
And just stuff loads of Rag and or Bath Towels everywhere around the ABS because there will be a whole lot more Brakes Fluid to come out of it than you would think.
Also mask up the outer Wing, to prevent any damage to the paint, as you only need a drip the size of a raindrop to ruin your Car.
Before you start from what I've heard you are meant to de-pressurize the system.
I didn't know how to do that though I'm sure someone else will chip in and show you how but as for me I didn't bother, I just went for it but don't copy me do it right.
Draining out the Brake Fluid
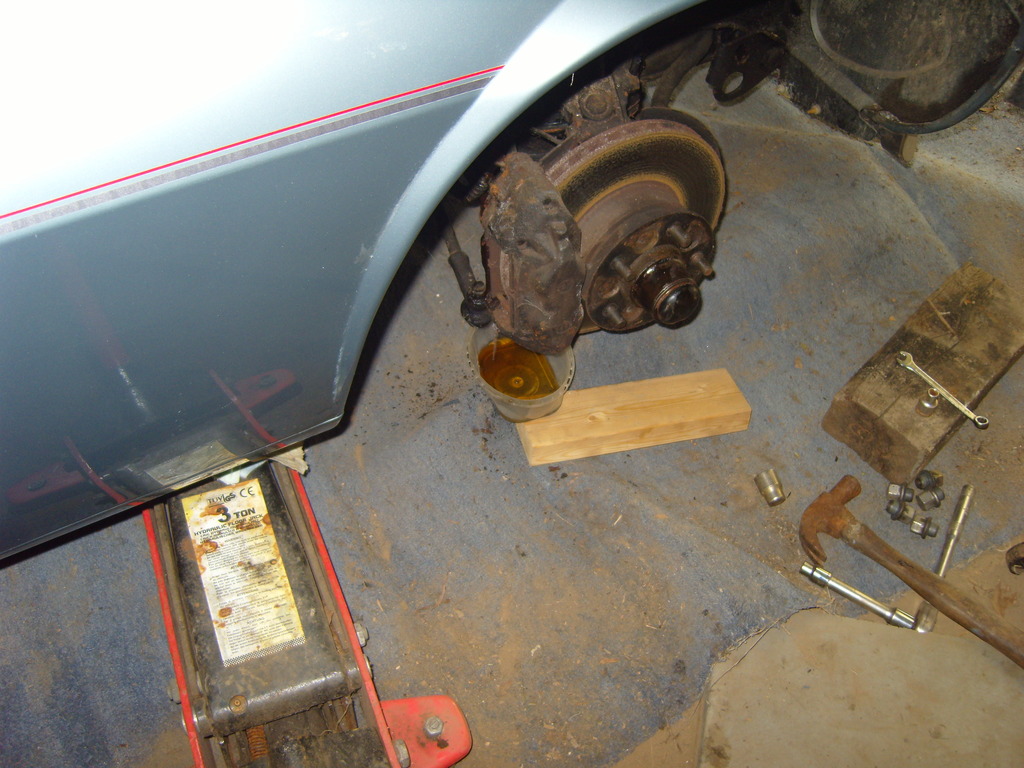
Unbolting The Actuator is easier than it looks, though for the bottom bolt next to the inner front wing, you will need a wobbly socket.
Though before you get to do any of that after depressurizing the System, you need to disconnect the Braided Brake line that goes into the bottom of the Reservoir from the metal pipe, which will have a hose clip on.
WARNING 3 BE REALLY REALLY CAREFUL!
Because once you separate those pipes, Brake Fluid will come pouring out of there, so put your finger over the end and trickle it into a container although as I didn't have one handy, I trickled it on to a Bath towel.
Then when the cascade of fluid had stopped, I pulled the Towel out from underneath the Car, to keep it well away from any Paintwork.
How you do it is up to you but Brake Fluid and Paintwork do NOT mix.
So Be Very Careful!
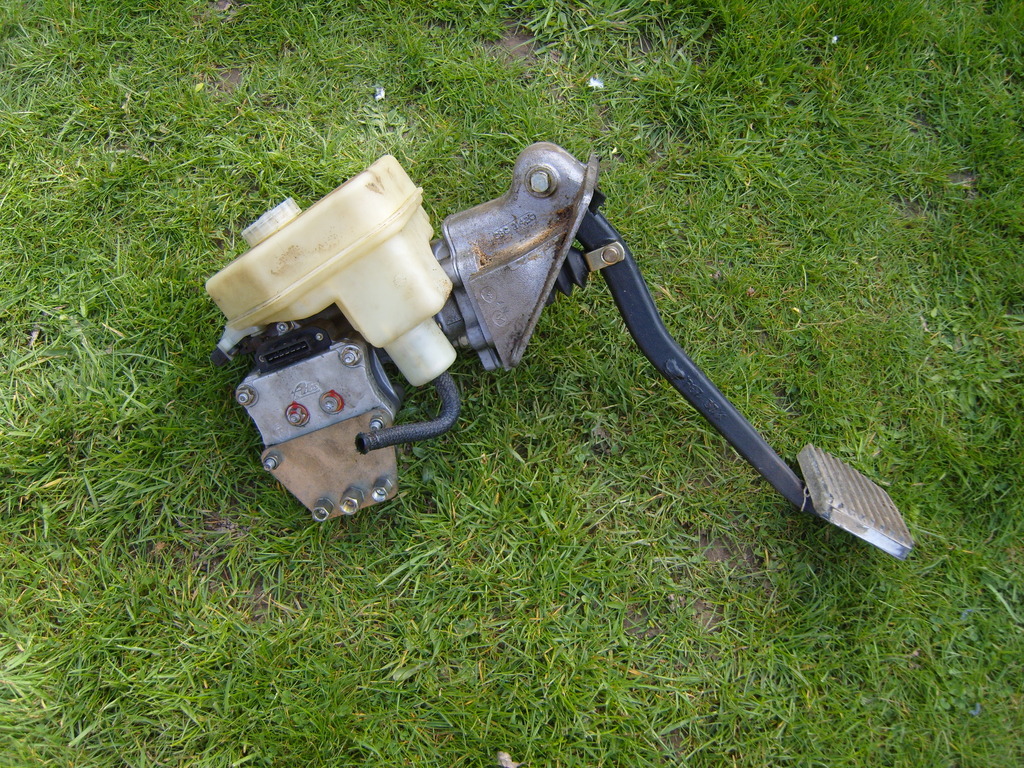
Unbolting the ABS Actuator (Easier than it looks!)
And there is was gone! Just be Careful that you don't break the brake switch.
All this was done from under the Bonnet/Hood
No need to get under the Dashboard.

Finally out of the Car! BE WARNED When you separate that braided pipe from the metal pipe BRAKE FLUID WILL COME POURING OUT OF THERE!
What made it even easier was that I went against conventional Wisdom and did not take the Polythene Reservoir off, which in point of fact I'd intended to do but the 'blinking thing' wouldn't let go of its rubber mountings.
So more by luck than judgement, I ended up leaving it on, which ended up making removing the ABS a Breeze as not only did you have something which you could hold on to, it also helped to minimize brake fluid spillage.
So first job is draining the old fluid out and while everyone one has their favorite way of doing something like that, I just opened a Caliper and let it run out into a container.
WARNING: Do not let any Brake fluid get anywhere near the paintwork as it will strip it right off!
WARNING 2: Even when you are thinking that the Reservoir is Empty its NOT EMPTY!
So spray around the inner wings, with clear Waxoyl, or WD40 or even just oil to minimize the risk of spoiling your paintwork.
And just stuff loads of Rag and or Bath Towels everywhere around the ABS because there will be a whole lot more Brakes Fluid to come out of it than you would think.
Also mask up the outer Wing, to prevent any damage to the paint, as you only need a drip the size of a raindrop to ruin your Car.
Before you start from what I've heard you are meant to de-pressurize the system.
I didn't know how to do that though I'm sure someone else will chip in and show you how but as for me I didn't bother, I just went for it but don't copy me do it right.
Draining out the Brake Fluid

Unbolting The Actuator is easier than it looks, though for the bottom bolt next to the inner front wing, you will need a wobbly socket.
Though before you get to do any of that after depressurizing the System, you need to disconnect the Braided Brake line that goes into the bottom of the Reservoir from the metal pipe, which will have a hose clip on.
WARNING 3 BE REALLY REALLY CAREFUL!
Because once you separate those pipes, Brake Fluid will come pouring out of there, so put your finger over the end and trickle it into a container although as I didn't have one handy, I trickled it on to a Bath towel.
Then when the cascade of fluid had stopped, I pulled the Towel out from underneath the Car, to keep it well away from any Paintwork.
How you do it is up to you but Brake Fluid and Paintwork do NOT mix.
So Be Very Careful!
Unbolting the ABS Actuator (Easier than it looks!)


And there is was gone! Just be Careful that you don't break the brake switch.
All this was done from under the Bonnet/Hood
No need to get under the Dashboard.

Finally out of the Car! BE WARNED When you separate that braided pipe from the metal pipe BRAKE FLUID WILL COME POURING OUT OF THERE!

The following 2 users liked this post by orangeblossom:
Greg in France (04-13-2015),
ptjs1 (04-23-2015)
#3
04-13-2015, 08:01 AM
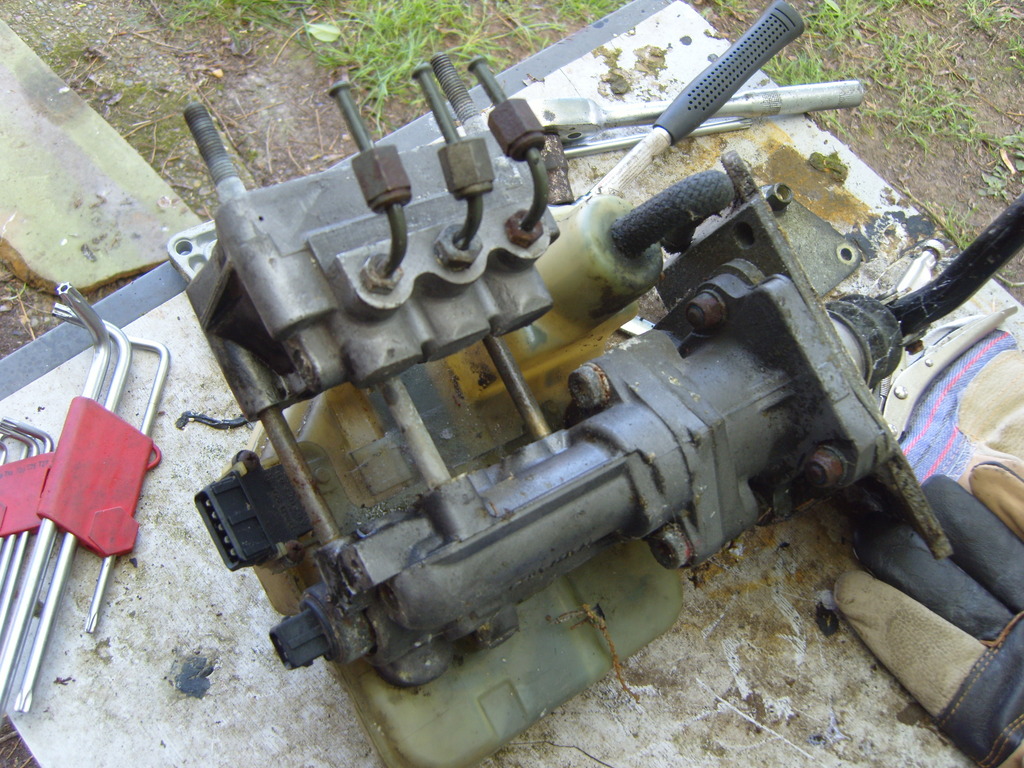
Again a dead easy job but you will need a Star Key to undo the middle bolt and I also used some new metal brake pipes, that didn't turn out quite right to keep the dirt out.
Star Key on this one.
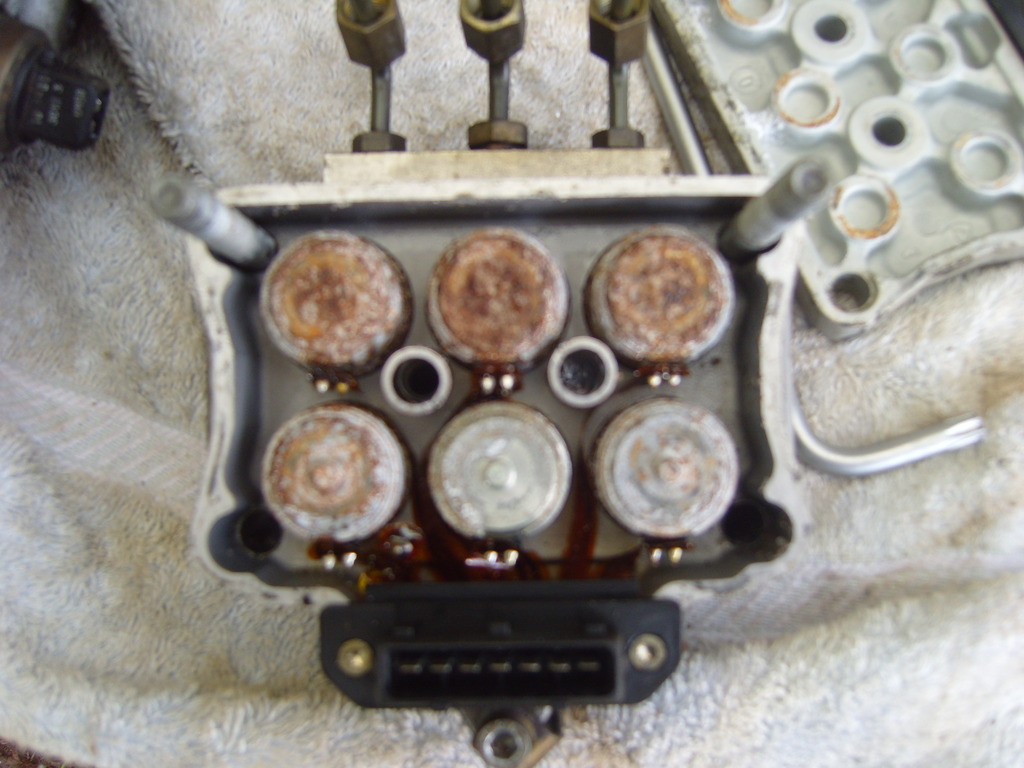
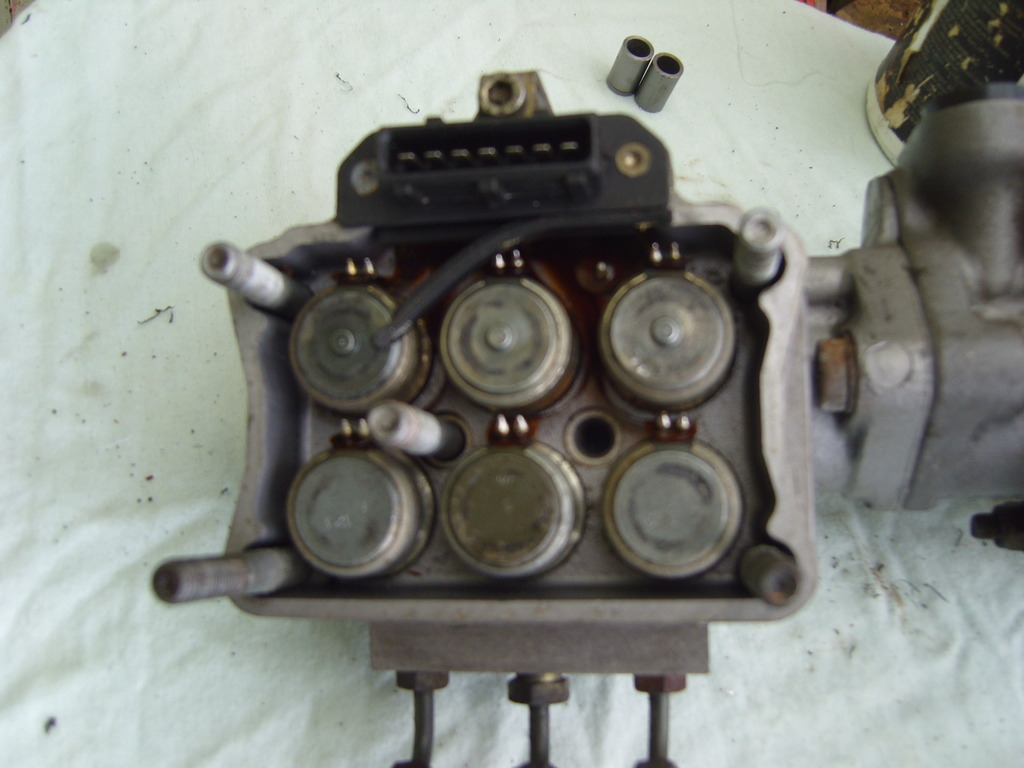
Now for the real Horror Story Check This Out!
Maybe not so surprising, that the Brakes don't work!
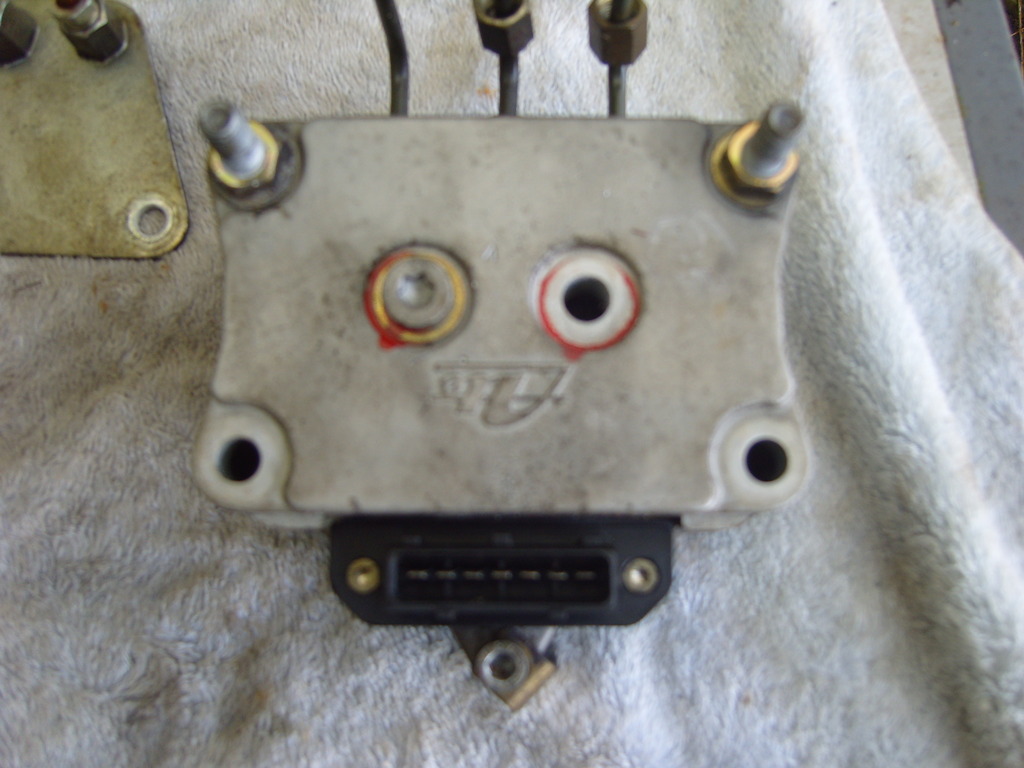
These are the Electric Solenoid Valves with the Ribbon Connectors, that some Forum Members have re-wired with hard wire.
Cables at the Ready for Testing the Solenoid Valves.

This is as far as I have got, at the time of Posting but I am intending to put a 12V Battery on one end, with the negative wire on the common pin of that 7 pin plug and then dab the Positive wire on the other 6 pins.
In order to see if the Valves are working or sticking.
At least I think that this is what you are supposed to do, so if Davedental is reading this, please jump in and let me know if I am doing this right?
And also how you get a faulty valve out, as I've sort of hit the buffers at this point.


Star Key on this one.

Now for the real Horror Story Check This Out!
Maybe not so surprising, that the Brakes don't work!
These are the Electric Solenoid Valves with the Ribbon Connectors, that some Forum Members have re-wired with hard wire.
Cables at the Ready for Testing the Solenoid Valves.

This is as far as I have got, at the time of Posting but I am intending to put a 12V Battery on one end, with the negative wire on the common pin of that 7 pin plug and then dab the Positive wire on the other 6 pins.
In order to see if the Valves are working or sticking.
At least I think that this is what you are supposed to do, so if Davedental is reading this, please jump in and let me know if I am doing this right?
And also how you get a faulty valve out, as I've sort of hit the buffers at this point.

The following 7 users liked this post by orangeblossom:
Greg in France (04-13-2015),
Gunner01 (04-13-2015),
Norri (04-13-2015),
OldCoastie (01-09-2021),
Paul_59 (10-04-2016),
and 2 others liked this post.
#4
04-13-2015, 10:37 AM
Senior Member
The following 2 users liked this post by Gunner01:
billythequid (10-03-2023),
orangeblossom (04-13-2015)
#5
04-13-2015, 06:29 PM
Apart from trying to help other Forum Members, who sooner or later may encounter this debilitating problem, that can depress the hell out of you, actually putting it into words is helpful to myself.
It not only helps to remind me of how far I've got and what I've done but also gives those who know better than me, the chance to jump in with suggestions of anything that I may not have thought of.
Those Valves look pretty rusty and corroded but the business end, is where they go into the block, so after I have tested them to see if they work or not, I've got to try and find a way of getting them out of that block.
I am also going to try and retain the original ribbon connectors as they really look ok to me, in an if it 'ain't broke don't fix it' sort of way.
You may also be wondering how long it took a non mechanic like me to get to this stage, as when I first looked at the 'Actuator' I was very tempted to close the Bonnet/Hood and walk away.
Draining the Fluid: I just opened a Caliper Bleed Screw and let the whole lot drain into a container, I also gave it a few pumps on the Pedal to help it along (but it takes as long as it takes)
Removing the ABS Brake Actuator, which at first glance looks an absolute 'pig' of a job, was dead easy!
At first I found myself wasting an hour, undoing the Cup Bolt that holds the Reservoir in place (No4 Allen Key required for this) and trying to pull it out of its rubber mountings.
It was such a PIA to even try and pull it out, that I was really scared of damaging something and thought it might be held in place by other screws I didn't know about.
So I replaced the Cup Bolt and left the Reservoir on.
I would strongly advise you, to do exactly the same, its at least 200% easier to remove the 'Actuator' with the Reservoir still bolted on the top, although I must admit it didn't look it.
Top Bolt under the Bonnet/Hood Catch a Socket with an Extension but close the Bonnet/Hood Catch (with the Bonnet/Hood up) to give you more room, a really great tip from 'Greg in France'
Top Bolt to the right of this (UK Car) Straight Socket with an Extension.
Bottom Bolt on the Left between the Reservoir and the Inner Wing
Extension with a 'Wobbly' just before the Socket but slide it underneath the Brake Pipe.
Bottom Bolt to the right of this (you can't get a socket on it) So its just a bit of a fiddle with an open ended Spanner.
Brake Pipes, dead easy to get to with the Reservoir still in place.
The Braided hose from the Bottom of the Reservoir, which joins onto the Metal pipe with a hose clip.
Undo the Clip and gently rock the Braided Hose with a pair of pliers with a piece of rag in between the Jaws, so you don't damage the Braided Pipe, as you loosen it off.
As I may have said before, what looks like an Empty Reservoir, is as far away from being empty as it gets, as there's still a Ton of Fluid still in there and when you get to separate the Braided Hose from the Metal Pipe.
It will come pouring out of there like a Garden Hose!
Enough to Soak a Bath Towel all the way through!
So put your finger over the end to try and control the flow as if you are not ready for this it will take you by surprise.
So have lots of soapy water ready to wash down any spills in the Engine Compartment and although it doesn't need saying, remove any Bath Towels that get soaked in Brake Fluid from underneath the Car.
One drip of Brake Fluid on the Paint and it will be 'Game Over!'
While I know you know what you're doing, I feel the need to mention this for the sake of anyone else, who may not be so familiar with what its all about.
Unbolting the ABS 'Actuator' and all of the Brake Pipes, can be done in only 20 Minutes! but after a 12 Year Lay up, I wasn't in a hurry and took my time.
Even so I did it in under One Hour!
Having the Polythene Reservoir Still attached to the Actuator, actually works in your favor as its gives you something to hold onto, as you 'Jiggle' the complete assembly including the Pedal out of the hole.
All done from under the Bonnet/Hood no need to get under the Dash, though handy if you have a 'Mate' who can help to guide it out, as you don't want to break the Brake Switch, which the Pedal leaver sits on.
What really surprised me was how small the Brake Pedal looks when its out of the Car, compared to how big it looks when you're in the Seat.
Removing the ABS 'Actuator' is very, very, easy, easier than falling off a greasy log!
What takes the time is being really careful, that you don't get any Brake Fluid on the Paintwork.
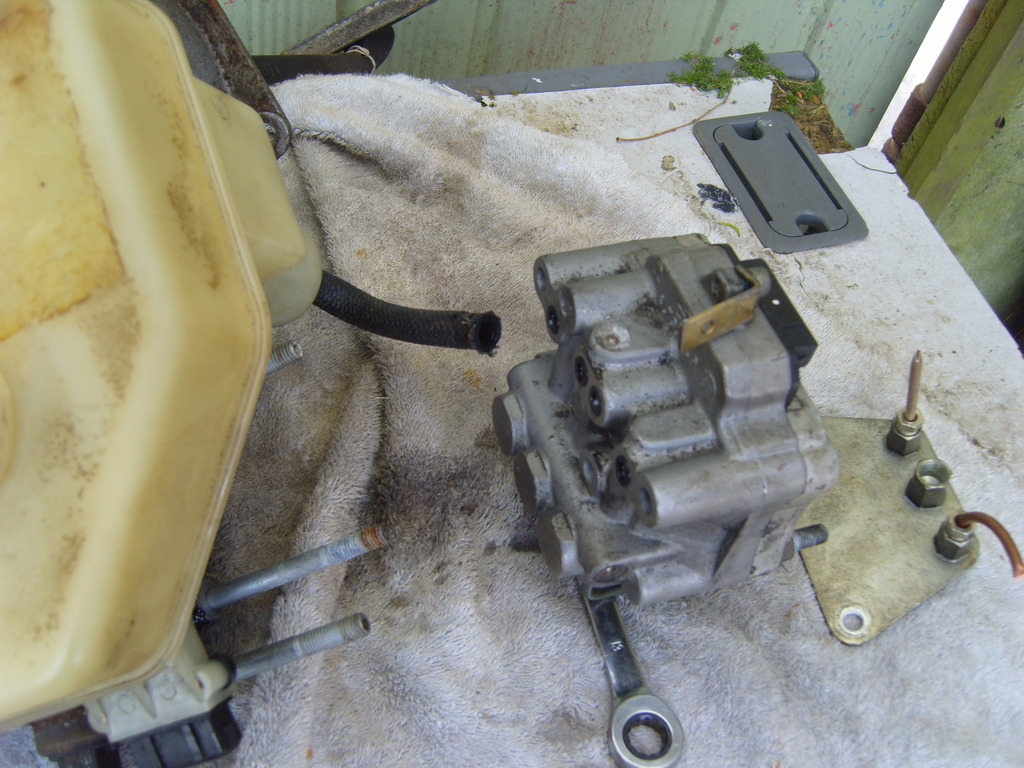
Dismantling the ABS Valve Block, to get to the Stage that you see in the Photos, is also a 'Breeze!' the whole thing virtually falls apart in your hands!
I very much doubt if the next part is going to be that easy, I will have to see, as I am sort of 'Winging it' at the moment.
My only regret is not having the '*****' to do this 12 years ago but having a Spare XJS tends to make you Lazy, in that respect.
The only Bonus being that this One Owner car has virtually done no mileage as since I bought her 12 years ago, I only did 1,000 Miles before the ABS started giving me problems.
So I've got an unmarked 'Minter' to look forward to driving, as soon as I get her fixed.
As an added bonus, before I laid her up, I sprayed all the Chromium with Clear WAXOYL so all of that is still in perfect condition.
If anyone has any ideas how to get those Valves out, please 'chip in'
After all we're all in this together!
Last edited by orangeblossom; 04-13-2015 at 06:39 PM.
#6
04-22-2015, 04:03 PM

Junior Member
Hi OB, is this now an old note? I have a feeling you may have already passed this stage. however if you haven't I have a couple of tips. Yes you are right about testing the solenoid coils. Pin 7 is common and pins 1-6 are connected 1 to each coil, so 12v across 7 and any other will test a coil. Listen for a snappy click, a duff one will become apparent when you hear the good ones, if that makes sense!
Removing the solenoid valves is a little awkward but I used 2 smallish screwdrivers,1 either side, and gently teased and prised up the valves. They are only held in place by the friction of an 'O' ring. You may want rethink using the ribbon connector as cracks can occur in old plastic ribbon cables like this because they become very brittle. Personally i think rewiring is much safer. However, I am aware that not everybody is as comfortable with soldering as I am and as long as everything is tested again before refitting to the car hopefully all will be OK. I removed all the valves completely to flush them and place them in an Ultra Sonic cleaner for 30mins (kept the fluid level just below the coils)This involved de-soldering the valves which wasn't as easy as it should have been because the ribbon cable was quite a tight fit on the solenoid pins. For me resoldering new wires was much the best way. Of course, take photos and make a circuit diagram but it really is quite easy if a little fiddly. Let me know if I can help further.
All the best
Dave
The following users liked this post:
orangeblossom (04-22-2015)
#7
04-22-2015, 05:12 PM
Hi OB, is this now an old note? I have a feeling you may have already passed this stage. however if you haven't I have a couple of tips. Yes you are right about testing the solenoid coils. Pin 7 is common and pins 1-6 are connected 1 to each coil, so 12v across 7 and any other will test a coil. Listen for a snappy click, a duff one will become apparent when you hear the good ones, if that makes sense!
Removing the solenoid valves is a little awkward but I used 2 smallish screwdrivers,1 either side, and gently teased and prised up the valves. They are only held in place by the friction of an 'O' ring. You may want rethink using the ribbon connector as cracks can occur in old plastic ribbon cables like this because they become very brittle. Personally i think rewiring is much safer. However, I am aware that not everybody is as comfortable with soldering as I am and as long as everything is tested again before refitting to the car hopefully all will be OK. I removed all the valves completely to flush them and place them in an Ultra Sonic cleaner for 30mins (kept the fluid level just below the coils)This involved de-soldering the valves which wasn't as easy as it should have been because the ribbon cable was quite a tight fit on the solenoid pins. For me resoldering new wires was much the best way. Of course, take photos and make a circuit diagram but it really is quite easy if a little fiddly. Let me know if I can help further.
All the best
Dave
Removing the solenoid valves is a little awkward but I used 2 smallish screwdrivers,1 either side, and gently teased and prised up the valves. They are only held in place by the friction of an 'O' ring. You may want rethink using the ribbon connector as cracks can occur in old plastic ribbon cables like this because they become very brittle. Personally i think rewiring is much safer. However, I am aware that not everybody is as comfortable with soldering as I am and as long as everything is tested again before refitting to the car hopefully all will be OK. I removed all the valves completely to flush them and place them in an Ultra Sonic cleaner for 30mins (kept the fluid level just below the coils)This involved de-soldering the valves which wasn't as easy as it should have been because the ribbon cable was quite a tight fit on the solenoid pins. For me resoldering new wires was much the best way. Of course, take photos and make a circuit diagram but it really is quite easy if a little fiddly. Let me know if I can help further.
All the best
Dave
Cheers!
Yes you are right, this is an old note but instead of using Screwdrivers, I used a small pair of 'Mole Wrenches' (very carefully) with just a slight twisting action and a very careful piece of pulling.
We are talking microscopic movements but they all came out Ok and underneath these as you know, are tiny little round filters, that were full of white gunge, probably caused by water@Grant Francis.
Fortunately I have got some of those Watch Repair Screw Drivers and managed to tease them out, after which I cleaned them with a Toothbrush.
Everything's Clicking and Jumping, just the way it should and I could have it all back in the Car in under an Hour.
But because I'm properly Terrified! of screwing things up at this Stage, those 4 little Black rubber 'O' rings are what could make or Break it!
So it would be easier, to get it right first time rather than have to do it all over again.
While I'm Tempted to re-use them, there is a firm not far away, that have a machine that can bang out more than I will ever need.
The only hold up has been down to 'prepping' my Grey XJS for Her MOT.
Which I'm please to say She passed with flying Colors!
So after that bit of a hold up, I'm ready to Take off the Brakes! or should that be putting them on!
One of my Coupes, I don't use any more, is fitted with the old Brake Booster System.
Which compared to the ABS is Sickeningly Simple apart from a bit of re-plumbing, so Retro Fitting that will be 'Plan 'B'
If it wasn't for You and DJ 'The Ice Princess' would still be in the Garage and no further forward that She was 12 years ago but now at last there is hope on the Horizon.
So Confident am I of Fixing Her now, that when the Insurance for my Grey XJS is due at the end of this month, I am Insuring them both.
Trending Topics
#8
04-24-2015, 12:26 PM
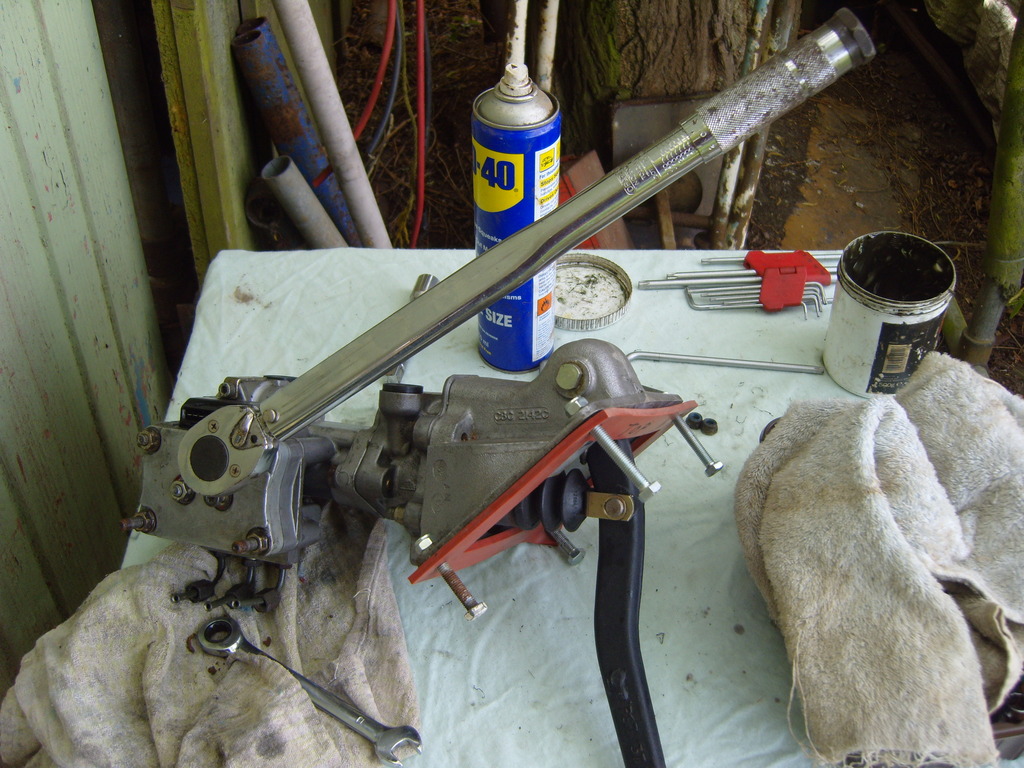
First a Custom made Gasket made out of Silicone Rubber, while I waited, which took about 5 Minutes.
Next I cleaned up the Facing plate of the ABS using my Mini Air Sander.
You've really got to get one of these �25 on ebay! which is ideal for preparation work and removing rust.
An absolutely Amazing piece of Kit! Rating 20/10! which uses 50mm (2inch) Velcro backed sanding discs and you can also buy a 3inch head to fit on it, though some of them come with both.
Before:
After:
Gasket Trial Fitted to the ABS Unit:

Next I cleaned up the Facing plate of the ABS using my Mini Air Sander.
You've really got to get one of these �25 on ebay! which is ideal for preparation work and removing rust.
An absolutely Amazing piece of Kit! Rating 20/10! which uses 50mm (2inch) Velcro backed sanding discs and you can also buy a 3inch head to fit on it, though some of them come with both.
Before:

After:

Gasket Trial Fitted to the ABS Unit:

The following users liked this post:
ptjs1 (04-25-2015)
#9
04-25-2015, 03:05 PM


Veteran Member
The following users liked this post:
orangeblossom (04-25-2015)
#10
04-25-2015, 06:14 PM
I could never 'get' 'Twin Peaks' anymore than I could 'get' 'Lost'
But I'll tell you what I have got, I have got the FLU! (Bummer!)
That's the only thing that's holding things up!
#11
05-01-2015, 03:46 PM
I'm over the FLU and 'Back in the Game!' so work on the ABS can now continue.
But first I'm going to back track a little with a few more photos and a bit more detailed explanation.
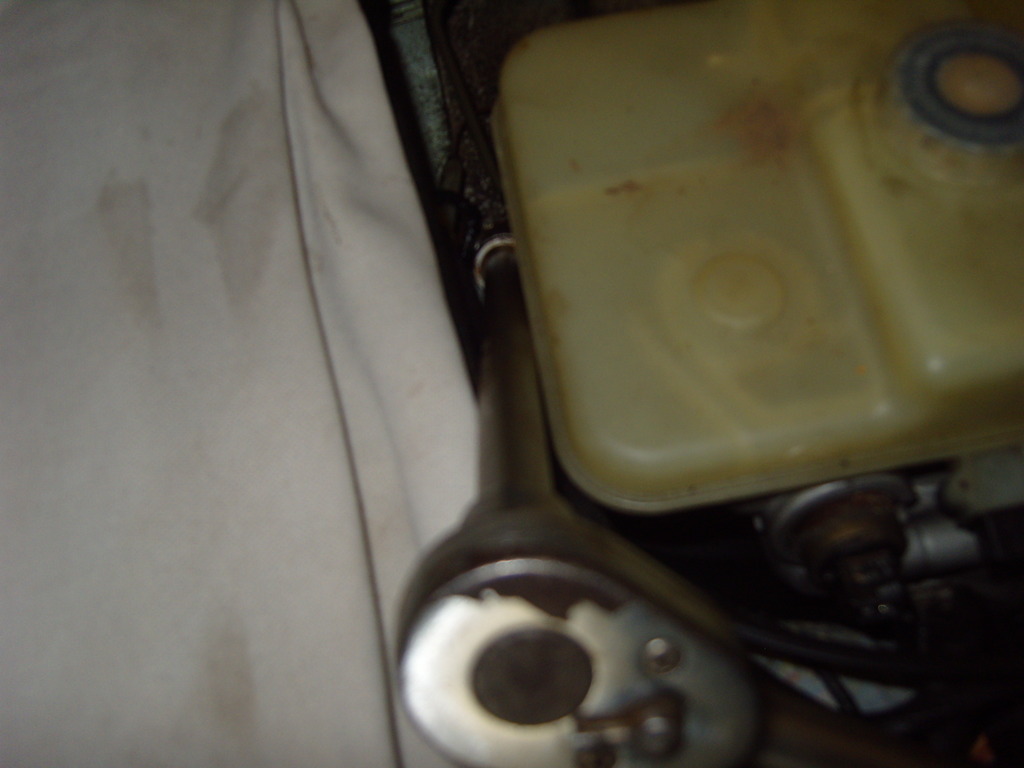
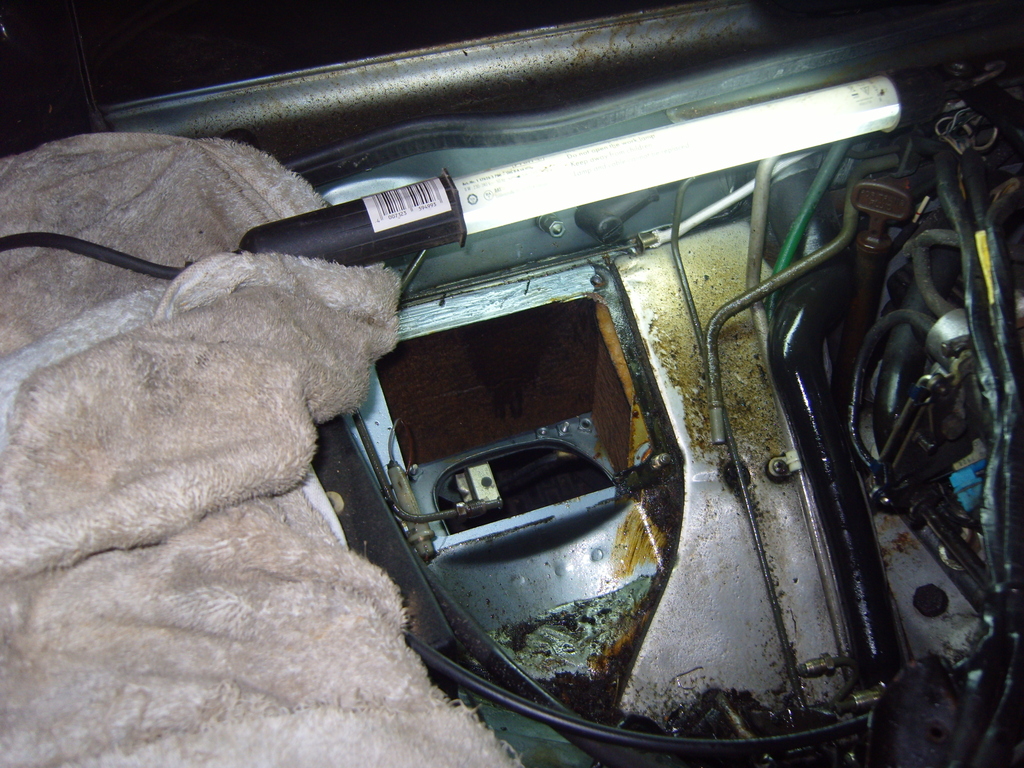
First: Removing the ABS unit, was much easier with the Reservoir left in place.
It certainly didn't get in the way of removing the 4 mounting bolts or even disconnecting the brake pipes.
But one of the main advantages, apart from having something to hold onto when you lift and jiggle it out of the Car, is that its very easy to completely overlook that the rubber mountings that it is bolted to.
Also have pipes from the Reservoir Carrying 'Brake Fluid' into the ABS, so even when you are convinced the Reservoir is 'Empty' 'IT'S NOT EMPTY!'
as there will be Residual Brake Fluid laying in the bottom of the Reservoir.
And once it is pulled from its mountings on top of the ABS Unit, that Brake Fluid will go everywhere! and if that Fluid goes on your paint, before you know what's happening it will strip it off!
Residual Brake Fluid Will Come Pouring Out Of These Tubes, if you take the Reservoir off the ABS Unit before you take the Unit out of the Car.
The ABS Reservoir Mountings Which Also have Brake Fluid passing through them! (Don't let any Brake Fluid get anywhere near your Paintwork)
But first I'm going to back track a little with a few more photos and a bit more detailed explanation.
First: Removing the ABS unit, was much easier with the Reservoir left in place.
It certainly didn't get in the way of removing the 4 mounting bolts or even disconnecting the brake pipes.
But one of the main advantages, apart from having something to hold onto when you lift and jiggle it out of the Car, is that its very easy to completely overlook that the rubber mountings that it is bolted to.
Also have pipes from the Reservoir Carrying 'Brake Fluid' into the ABS, so even when you are convinced the Reservoir is 'Empty' 'IT'S NOT EMPTY!'
as there will be Residual Brake Fluid laying in the bottom of the Reservoir.
And once it is pulled from its mountings on top of the ABS Unit, that Brake Fluid will go everywhere! and if that Fluid goes on your paint, before you know what's happening it will strip it off!
Residual Brake Fluid Will Come Pouring Out Of These Tubes, if you take the Reservoir off the ABS Unit before you take the Unit out of the Car.

The ABS Reservoir Mountings Which Also have Brake Fluid passing through them! (Don't let any Brake Fluid get anywhere near your Paintwork)

#12
05-01-2015, 05:43 PM
#13
05-02-2015, 04:50 PM
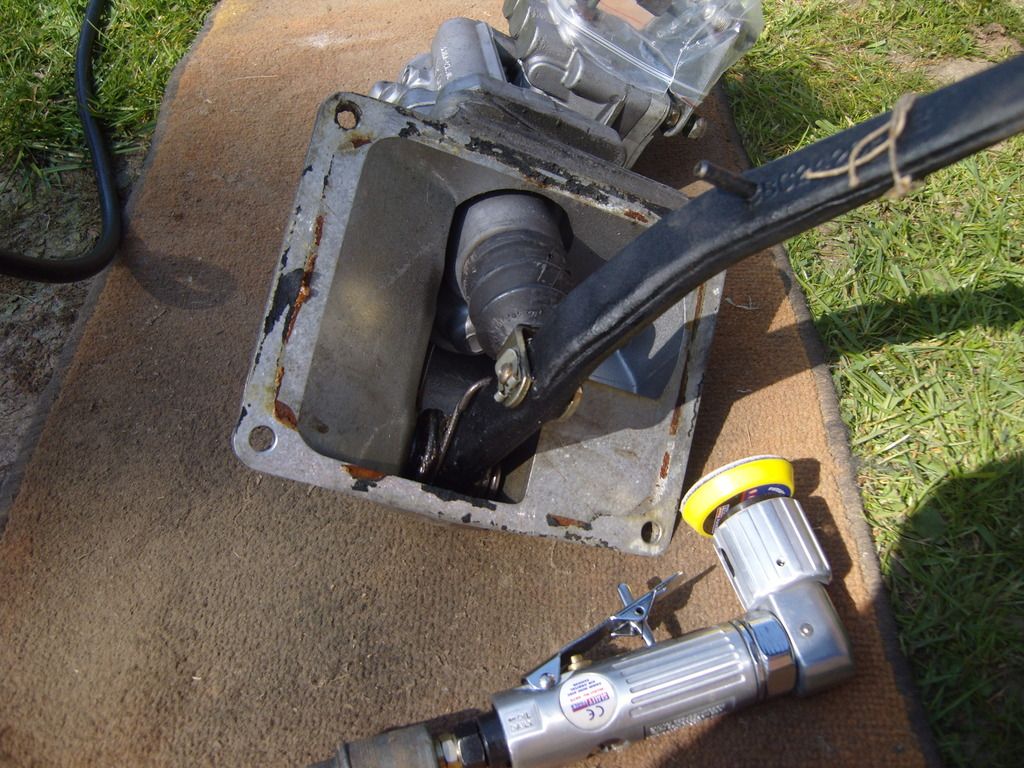
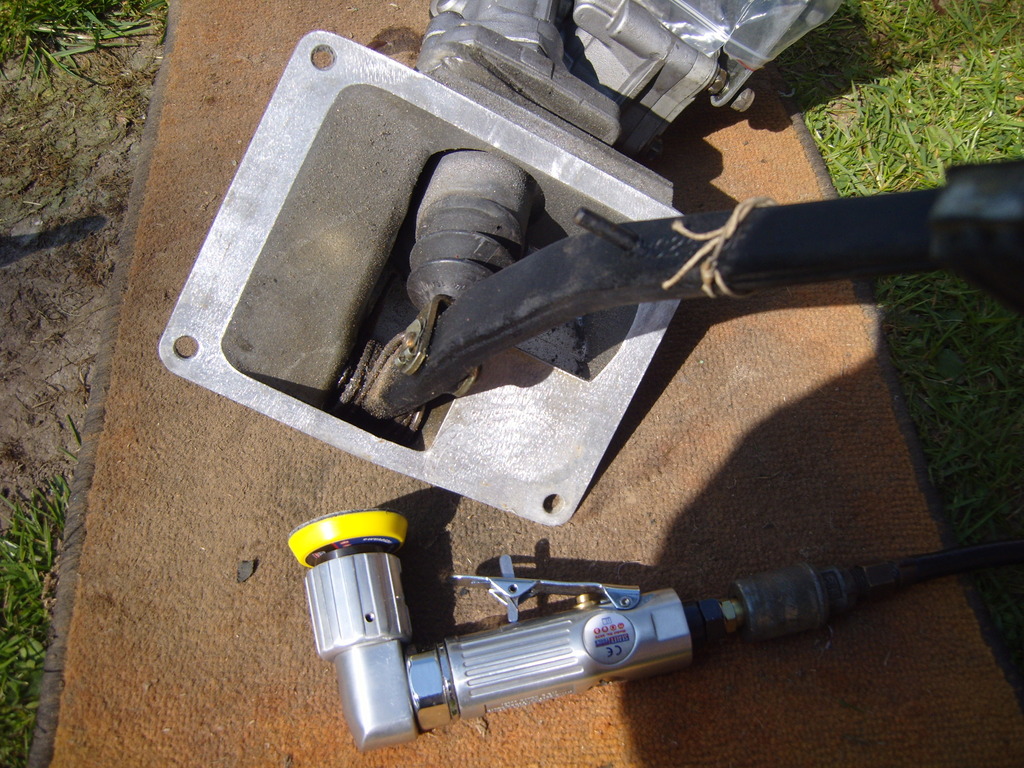
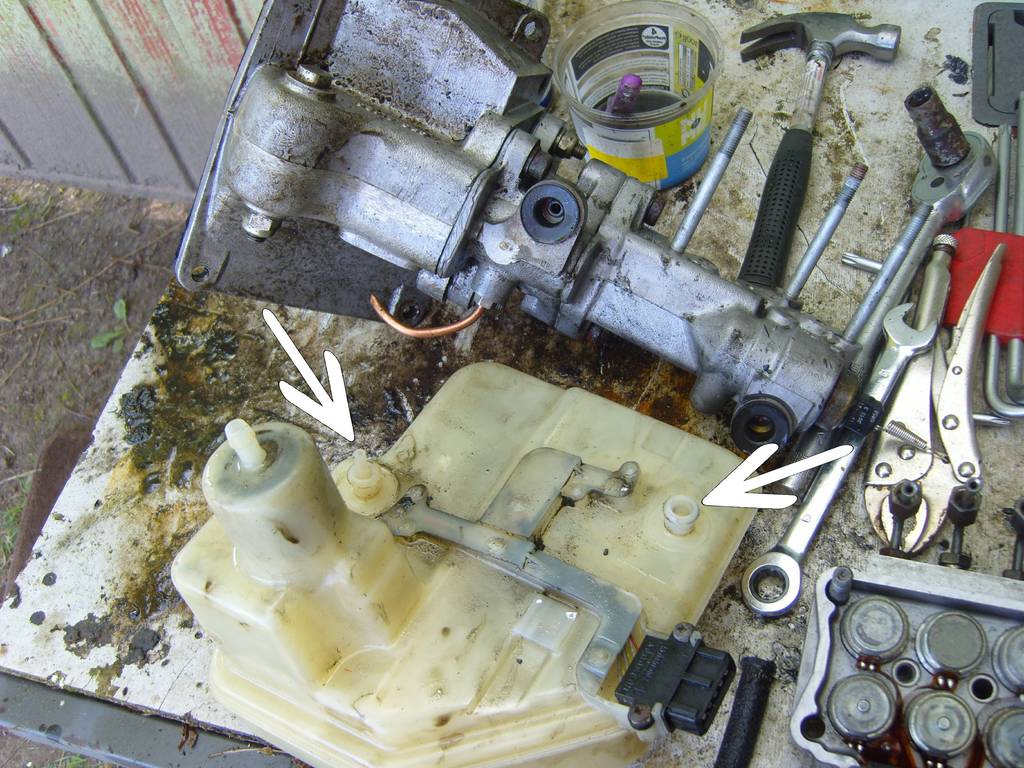
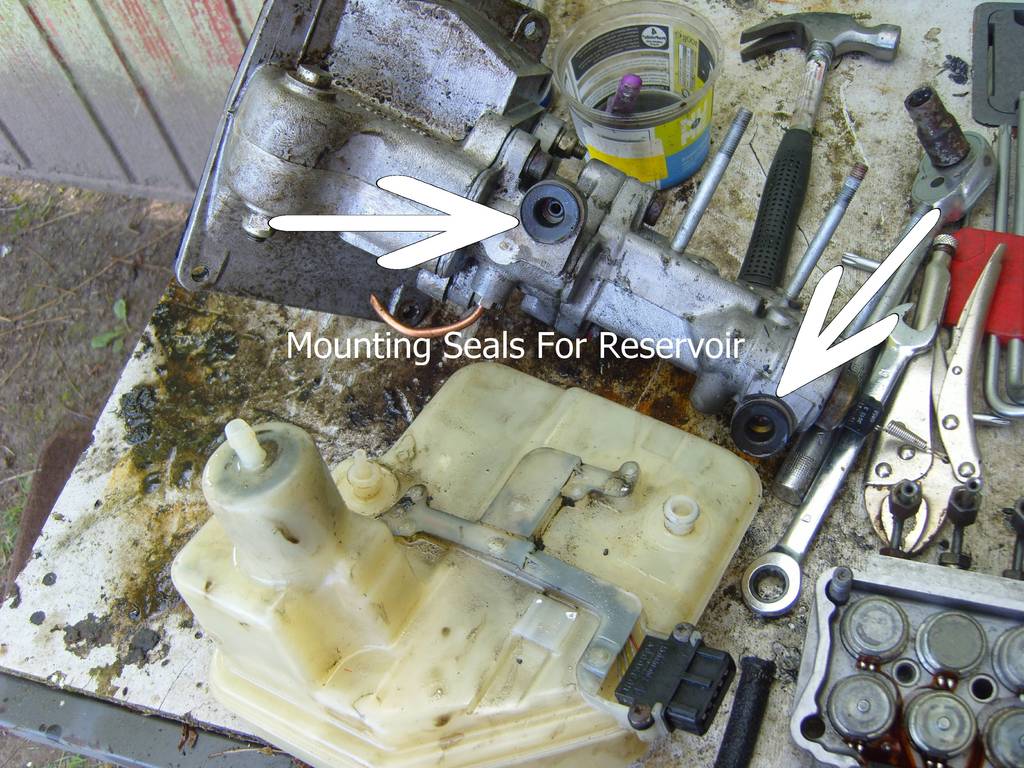
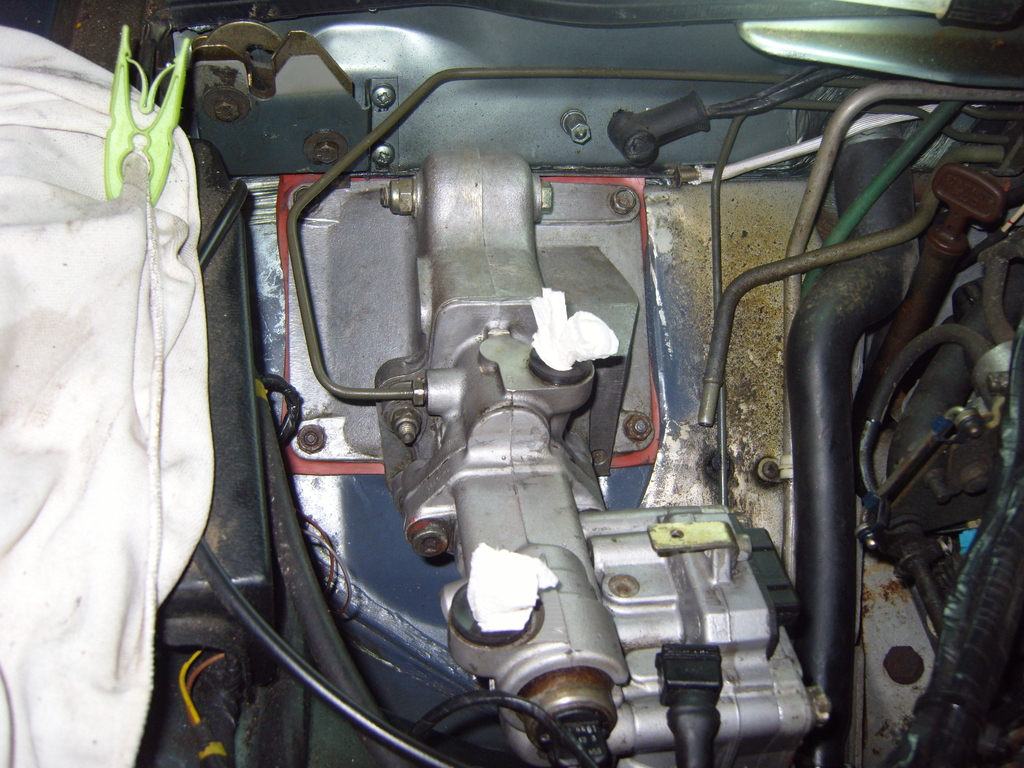
When removing the Valve block from the ABS, be extremely Careful not to lose the rubber gasket that seals the electric socket to the Valve Block as its so small that if it falls, you may not even realize its missing.
Another View of the Gasket Seal, pulled out of place so you can see where it goes.
How the Valve Block unbolts from the ABS Actuator
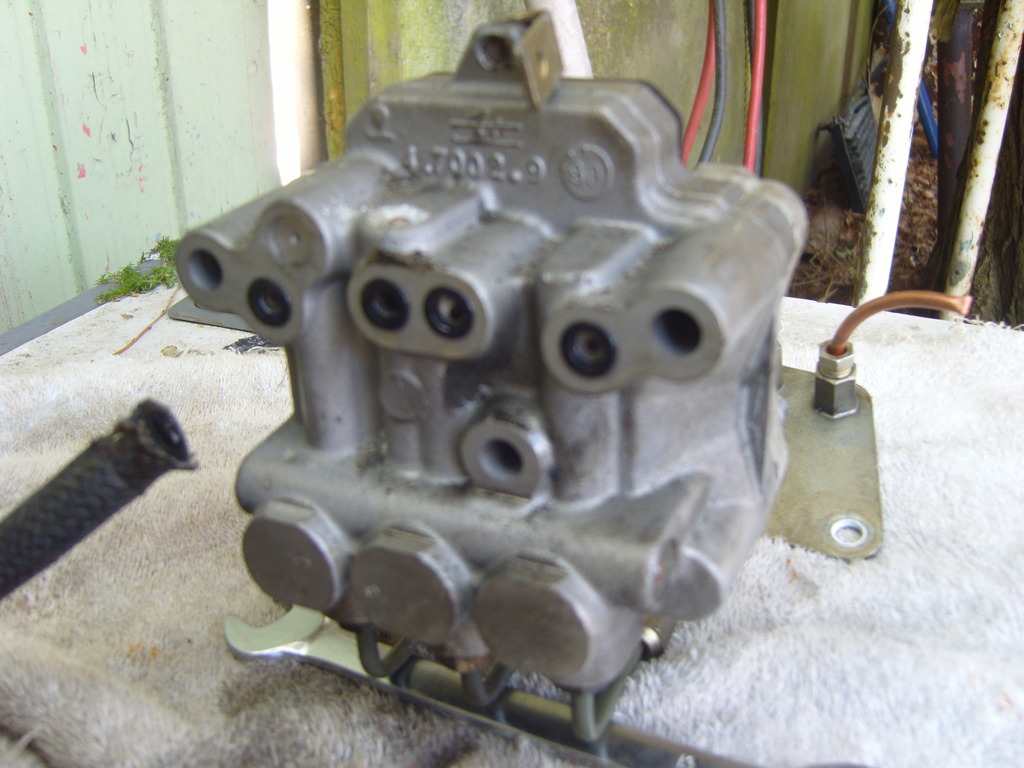
The Valves just pull out of the Valve Block and underneath each one of these, is a very fine mesh filter, that also has to come out to be cleaned.
But the electrical ribbon connectors are so fragile, that unless you really take your time, they are easily broken, in which case you may end up having to re-wire them.
It took me hours to clean them but as I had Flu, it was something to do and gave me the satisfaction of still being able to work on the Car.
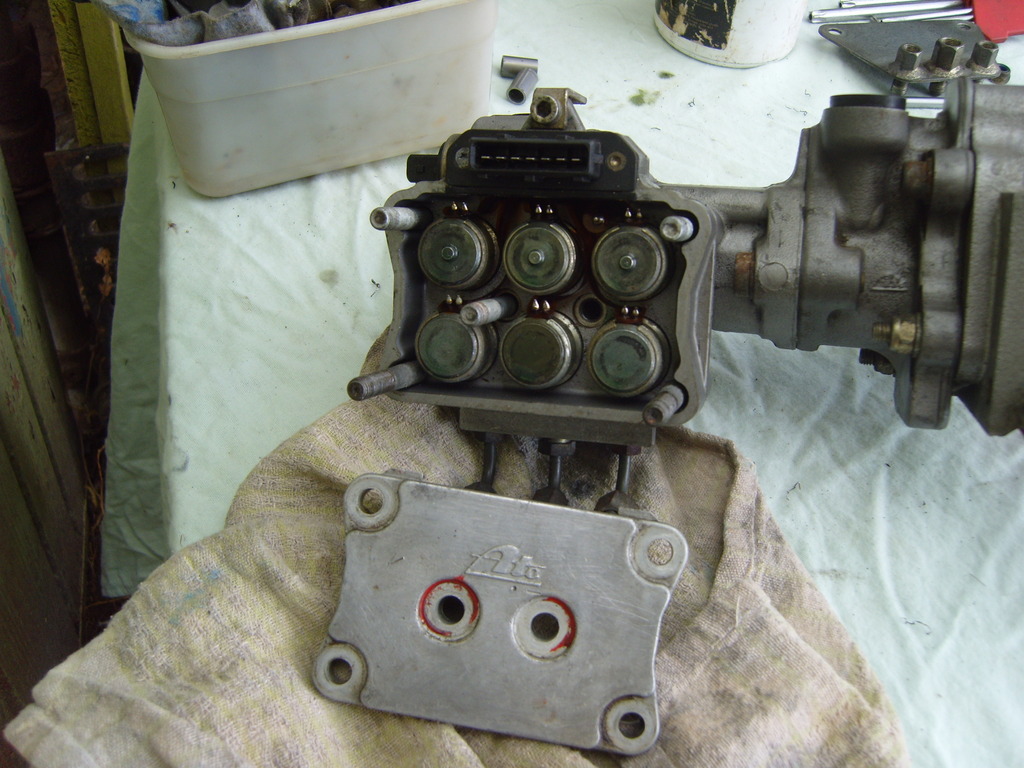
Having got that Job out of the way and already feeling much better, it was time to bolt the Valve Block back on the side of the ABS Actuator.
All Cleaned up and ready to go back in, with the Custom Made Gasket which I had laser cut by a firm not far away from me and made from Silicone Rubber to withstand the heat.
The Baffle Plate was looking a bit Grotty, so after sanding and priming, I repainted it.
The Photo only shows you, the first time I did this but as I wasn't satisfied with how it had turned out, I sanded it down and did it all over again.
Before Sanding and Painting the Baffle looks a bit Grotty.

After Sanding, Priming and Painting (But afterwards I did it all over again!)

Another View of the Gasket Seal, pulled out of place so you can see where it goes.

How the Valve Block unbolts from the ABS Actuator

The Valves just pull out of the Valve Block and underneath each one of these, is a very fine mesh filter, that also has to come out to be cleaned.
But the electrical ribbon connectors are so fragile, that unless you really take your time, they are easily broken, in which case you may end up having to re-wire them.
It took me hours to clean them but as I had Flu, it was something to do and gave me the satisfaction of still being able to work on the Car.

Having got that Job out of the way and already feeling much better, it was time to bolt the Valve Block back on the side of the ABS Actuator.

All Cleaned up and ready to go back in, with the Custom Made Gasket which I had laser cut by a firm not far away from me and made from Silicone Rubber to withstand the heat.
The Baffle Plate was looking a bit Grotty, so after sanding and priming, I repainted it.
The Photo only shows you, the first time I did this but as I wasn't satisfied with how it had turned out, I sanded it down and did it all over again.
Before Sanding and Painting the Baffle looks a bit Grotty.
After Sanding, Priming and Painting (But afterwards I did it all over again!)

#14
05-02-2015, 05:19 PM
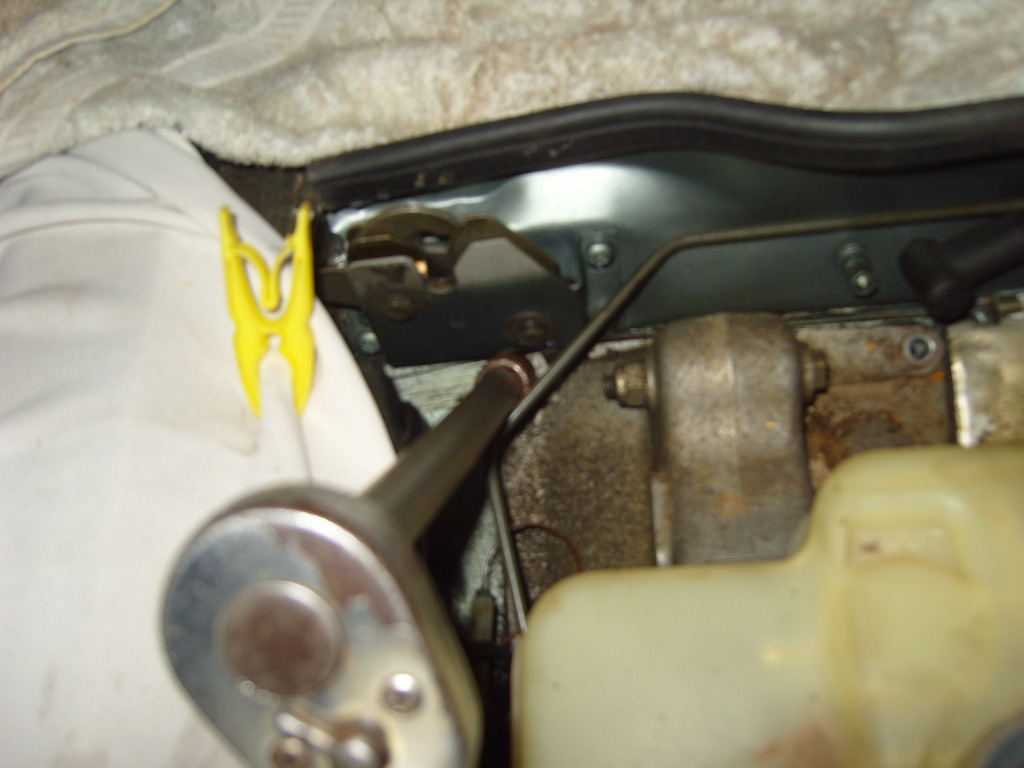
Time to put the ABS Actuator back into the Car, where this time its much easier, not to have the reservoir on while you do this.
Also make sure you Plug the holes in the ABS to keep any dust out, as that's the stuff that messed everything up in the first place.
When you look through the hole in the Baffle you can see the Brake Switch and the metal spigot, that's welded half way down on the Brake Pedal Lever, is there to trip that Switch.
Where once having done so, the Brake Lights 'Should' come on!
There are just a couple of very small bolts, holding that Switch in place, so you can unbolt that Brake Switch to make sure it doesn't get broken.
I didn't bother with this myself, I was just very careful putting the Unit back in place, so that is for you to decide.
That Silver 'Gizmo' in the hole is the Brake Switch.
Back in the Car, Bolted in Place with all the Brake Pipes Connected and the Gasket already seems to be working a treat.
I won't put the Reservoir on yet, as the next job will be to Jack up the Car and then take all the Wheels off, in order to prepare for Bleeding the Brakes.

Also make sure you Plug the holes in the ABS to keep any dust out, as that's the stuff that messed everything up in the first place.
When you look through the hole in the Baffle you can see the Brake Switch and the metal spigot, that's welded half way down on the Brake Pedal Lever, is there to trip that Switch.
Where once having done so, the Brake Lights 'Should' come on!
There are just a couple of very small bolts, holding that Switch in place, so you can unbolt that Brake Switch to make sure it doesn't get broken.
I didn't bother with this myself, I was just very careful putting the Unit back in place, so that is for you to decide.
That Silver 'Gizmo' in the hole is the Brake Switch.

Back in the Car, Bolted in Place with all the Brake Pipes Connected and the Gasket already seems to be working a treat.
I won't put the Reservoir on yet, as the next job will be to Jack up the Car and then take all the Wheels off, in order to prepare for Bleeding the Brakes.

Last edited by orangeblossom; 05-02-2015 at 05:21 PM.
The following 2 users liked this post by orangeblossom:
Greg in France (05-03-2015),
ptjs1 (05-06-2015)
#15
05-03-2015, 01:37 AM

Veteran Member
The following users liked this post:
orangeblossom (05-03-2015)
#16
05-03-2015, 02:17 AM
It really should be me who's Thanking you!
As without your help and encouragement, this is another wonderful car, that would have stayed in the Garage for ever and a day and doesn't compare with the kind of stuff that you get up to.
So Lets just hope it works!
Although I do have a Secret Obsession to Retro Fit the 'Fool Proof' Non ABS Brake Booster System from one of my other Cars.
The following 2 users liked this post by orangeblossom:
Dave1109971 (05-05-2015),
Gunner01 (05-03-2015)
#17
05-05-2015, 07:43 AM
Senior Member
The following users liked this post:
orangeblossom (05-05-2015)
#18
05-05-2015, 10:04 AM
Veteran Member
The following users liked this post:
orangeblossom (05-05-2015)
#19
05-05-2015, 04:21 PM
Thank You!
If it helps just one more person get their Car back on the road, then that's what's really makes it all worthwhile, as well as reminding myself what to do, in the event that I might have to do it again at some future time.
Last edited by orangeblossom; 05-05-2015 at 04:54 PM.
#20
05-05-2015, 04:53 PM
Hi Jonathan
Thank You!
I'm not a mechanic or even mechanically minded and I would rather be driving my Car than having to fix the ABS on my XJS.
The only problem being that most Garages/Shops, would never want to touch a job like this.
Spare parts seem non existent and I would have probably got a Bill for around �1,000! which really didn't leave me any choice but to jump in and have a go myself.
The reality was that this job is dead easy, although I'll admit it doesn't look it, from the moment you open the Bonnet/Hood and then just stand there Staring at the 'ABS Actuator' wondering where on earth you ought to start.
What takes the time is the attention to detail, first by being careful not to spill any Brake fluid anywhere on the Bodywork or in the Engine Bay.
Followed by cleaning the Valves inside the Valve Block, with the benefit of hindsight, it would have been much quicker to re-wire it but as I had plenty of time on my hands, having got the Flu.
It seems I may have ended up doing things the hard way!
The following 3 users liked this post by orangeblossom: