
Advice for Wind Screen Deflector for my 2006 XKR?
#41
 09-28-2012, 11:36 AM

Senior Member
Norri
I went to that post and signed up for photobucket. I down loaded the pictures to photobucket and got my url to access the photos. When I go to reply to a message and then try to insert images by putting my url address in I get a box with a red X. If I acess the url on my computer I get the pictures. I must be doing something wrong when I try to post them on the Jaguar Forum. Any suggestions from anybody? I tried to post them with this message and got the same thing. The url I am using is--s1354.photobucket.com/albums/q681/wcnesta/.
Bill N
03 XKR
I went to that post and signed up for photobucket. I down loaded the pictures to photobucket and got my url to access the photos. When I go to reply to a message and then try to insert images by putting my url address in
Bill N
03 XKR
Last edited by wcnesta; 09-28-2012 at 12:03 PM.
#42
09-28-2012, 12:42 PM


Join Date: Oct 2007
Location: PHX some of the time
Posts: 116,746
Received 6,253 Likes
on
5,453 Posts
This one?
Go to your Photobucket page and click on the picture you want, a little box will pop up, click on the direct image link and it will copy to your clipboard.
Come to the forum and click on the yellow box with mountains in the reply box and paste the link in the pop up box click OK and you're done.
Go to your Photobucket page and click on the picture you want, a little box will pop up, click on the direct image link and it will copy to your clipboard.
Come to the forum and click on the yellow box with mountains in the reply box and paste the link in the pop up box click OK and you're done.
The following users liked this post:
wcnesta (09-29-2012)
#43
09-29-2012, 10:47 AM
Senior Member
Hi Norri
I finally figured out what I was doing wrong. When I pasted the url in the box I did not delete the Http:/ that was already there so my url showed two Http's and that is why I kept getting the error. Thanks for your help. Now I can post pictures Yahoo.
Bill N
Last edited by wcnesta; 09-29-2012 at 11:21 AM. Reason: found the problem
#44
09-29-2012, 11:33 AM
Join Date: Oct 2007
Location: PHX some of the time
Posts: 116,746
Received 6,253 Likes
on
5,453 Posts
Well done, it's the little things that give the most pleasure!
When the pop up box appears that HTTP is highlighted and will disappear when you paste your link. If you click in the box before pasting the HTTP becomes solid and part of your link if you don't delete it.
Ask me how I know this.
When the pop up box appears that HTTP is highlighted and will disappear when you paste your link. If you click in the box before pasting the HTTP becomes solid and part of your link if you don't delete it.
Ask me how I know this.
The following users liked this post:
wcnesta (09-29-2012)
#45
09-29-2012, 05:04 PM
Senior Member
 Look I can even add smiles to my posts.
#46
09-29-2012, 07:11 PM
Veteran Member
So once again I am on one of those searches for a stupid part that SHOULD be easy to find but never is. I visited two auto parts stores and a boating supply store and a local plumbing supply store to find nylon washers. Good luck! The closest I came was at the plumbing supply store where the guy suggested I just slice some vinyl tubing and create a washer, which I might do.
Why do I always find myself on these searches for some simple part and it turns into a search for the Holy Grail
Doug
Why do I always find myself on these searches for some simple part and it turns into a search for the Holy Grail
Doug
#47
09-30-2012, 10:03 AM
Senior Member
Doug
I will look at one of the hardware stores in my area.This place has loads of stuff and I am sure they have those washers. It is one of those old New England hardware stores that has been in business for ever. I can do pictures now, thanks to Norri, so if you need some more let me know. I attached one that shows my wife and I with our 1st place award for best in class at the Lenox, MA British car show this summer.
Bill N
03 XKR
#48
09-30-2012, 11:48 AM
Veteran Member
Bill,
Nice picture--especially like the wheels
I would appreciate it if you happen to stumble on a few washers as long as you don't need to go out of your way. I haven't tried the big box hardware stores yet (Home Depot or Lowe's) but I have had dismal luck in the past looking for things like this at those types of stores. Ace would probably be a better chance but the one that used to be nearby closed up and I won't get t a chance to go to the next closest one for a while.
I swear someone could get rich opening up a store called "Those little parts that you can never easily find".
Doug
The following users liked this post:
wcnesta (09-30-2012)
#50
10-01-2012, 10:07 AM
Veteran Member
I will look in Home Depot and/or Lowe's next chance I get (likely next weekend). Just from experience though the best I have gotten when it comes to looking for oddball parts like this is maybe something that comes close, but we'll see.
I did contact Welsh a few times and they were singularly unhelpful. The guy I was dealing with there (Dave Boone) said that extra bits and pieces were not available and I offered to buy the hardware kit if they could get that but never heard back. His recommendation was to check out a local hardware store or a fastener supplier--thanks Boone!
Doug
#51
10-20-2012, 11:30 AM
Senior Member
Hi Doug
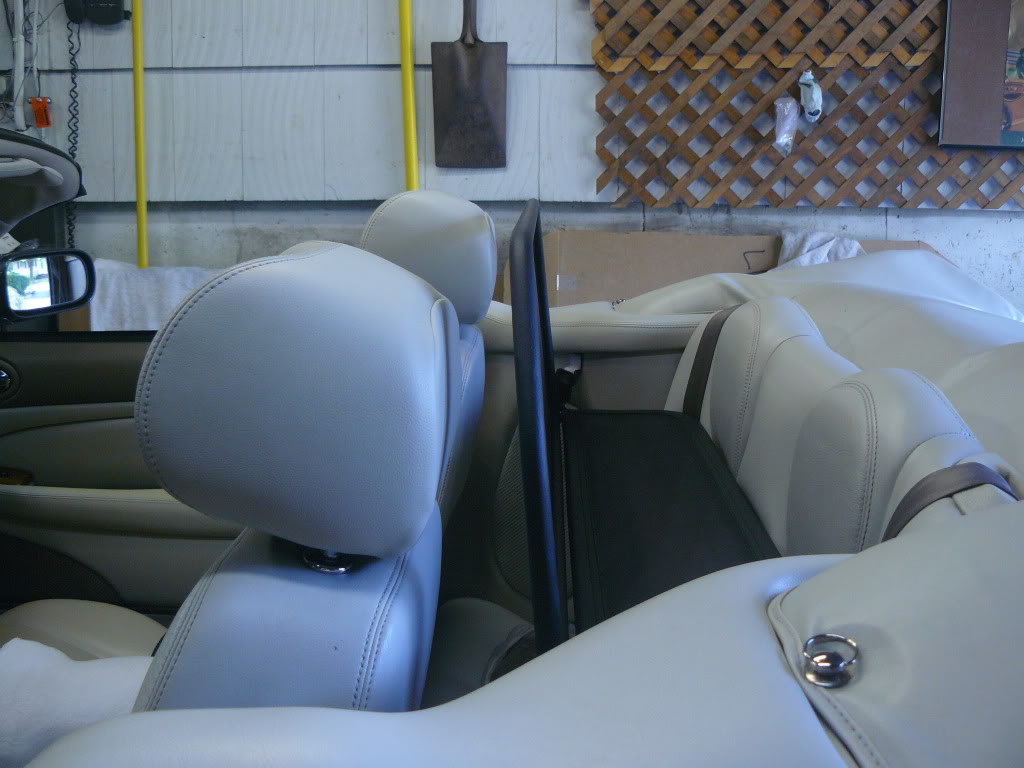
I checked out my local hardware store but no luck finding the nylon washer. They had some but they were to small. I found something that might work in their plumbing section. It was a cork/rubber washer. I think you should pressure Walsh Management on this issue, go right to the top and you will get results. My deflector has been working really nice and we are really satisfied with it. I added a Jaguar stick on leaper to it and I think it makes it look like Jaguar made it for the car. I lowered my deflector by reversing the brackets, as I think it looks better,but I am going to install it the right way and see if I get even less wind, if not I will lower it back. The only problem with it being lower, is you see the top of the deflector in you rear view mirror.
Bill N.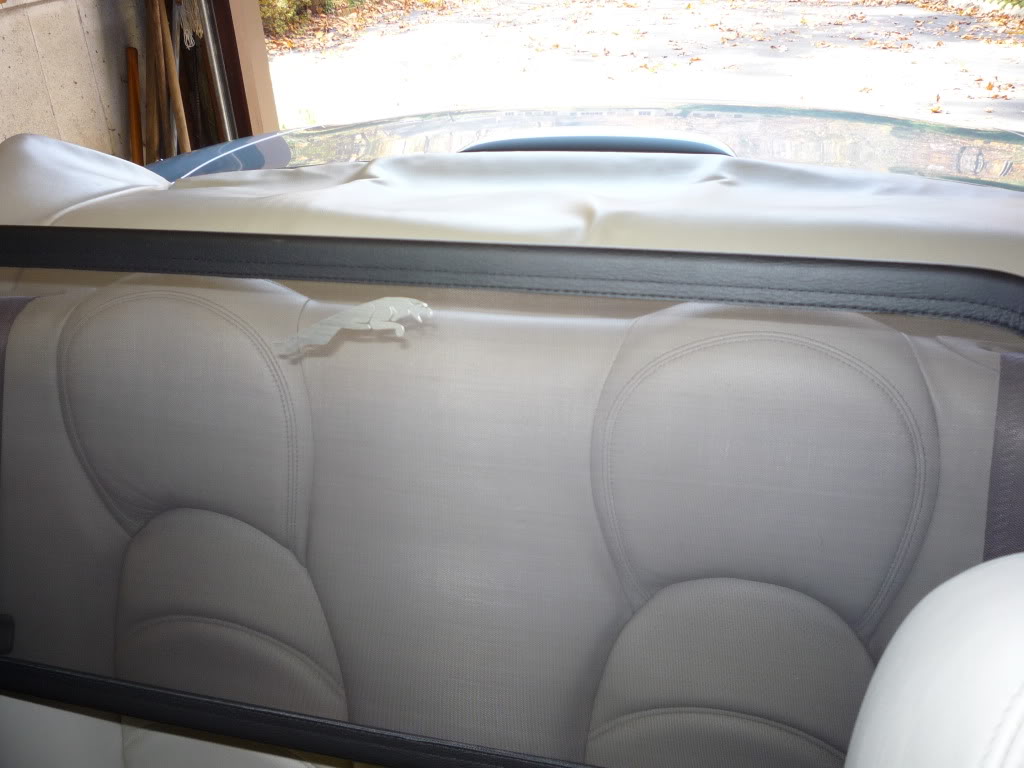
#52
10-20-2012, 11:53 AM
Veteran Member
Probably to get rid of me the guy at Welsh told me that they get the deflectors from Classic Additions in the UK and that I should contact them. I did so via their website and promptly got an email back from Adrian to let me know they were sending me some washers. That was several weeks ago and they confirmed that they had mailed them but they apparently got lost in the mail somewhere. So they are again mailing some washer and I hope to get these in the next few days.
As I said whenever I try to find these types of odd little parts it ends up being a search for the Grail!
Doug
As I said whenever I try to find these types of odd little parts it ends up being a search for the Grail!
Doug
#53
10-23-2012, 02:43 PM
Senior Member
#56
05-30-2013, 10:46 AM

Having researched Wind deflectors, my wife was not amused at the volume or wind compared to her Volvo C70, I decided on the Adamesh offering which I bought from Amazon
. I wondered if my experience in fitting this may be worth sharing for anyone else contemplating this.
FITTING AN ADAMESH WIND DEFLECTOR TO A SERIES I JAGUARXK8 CONVERTIBLE
FITTING AN ADAMESH WIND DEFLECTOR TO A SERIES I JAGUARXK8 CONVERTIBLE
I fitted this deflector, workingcarefully and slowly, in two hours. I also suffer from Multiple Sclerosis so Imove rather slowly, need to hang-on to the car and don�t have much strength. Myanalysis is, if I can manage in two hours, it should easily possible to fit itin one.
1. The kit.
This is comprehensive with the actualWind Deflector in two discrete pieces, the larger vertical mesh frame and the smallerhorizontal mesh frame. These are well made comprising a metal frame coveredwith mesh which is fitted around the outsides with a leather-look finish. This isOK, but not quite as well-finished as my Volvo Wind Deflector for our C70).Having said this, the Volvo Wind Deflector was something like �700 whilst theAdamesh was �182 so this is being a little picky! A smaller bag contains all thebrackets and fittings.
2. TheInstructions
The instructions were fine, but, inmy opinion it would have been helpful to have included a picture of each of thefittings along with a number or reference against this in order to make it easierto identify which bracket to use at which stage and which way up they should befitted. Having said that, once you start the actual fitting, it is fairlyobvious.
3. Fittingthe Deflector
Having lowered the roof, the first thingto do is to undo both �top� seatbelts bolts. These are in fact �Star� or Torx boltswhich means that you will need T-50 Torxspanner to undo them. These were quite stiff in their threads to undo but cameundone quite easily. Having removed these, I placed both Torx bolts in a jarwith some oil in to soak the threads.
Next you need to remove the leather coversso, having removed the seatbelts, all you need to do is to undo the cross pointscrew that faces the front of the car, the cross point screw that is situatedon the top of the leather cover and the one hood-fixing stud also on the topusing a small spanner. Once all of these are removed, the leather rear wing covercan be removed. Once you have done this, you will see the black metal plate whichthe Deflector brackets are bolted to. With the two leather covers off, I tookthe opportunity of carefully cleaning them.
At this point it was obvious that itwould be rather easy to drop bolts, nuts and fixings down inside the innards ofthe Jag � probably never to be seen again. I therefore used clingfilm tostretch over this cavity but well under where I needed to work, just in case Idid drop a vital part.
On the driver�s side, (assuming youhave a RH drive car) the bracket already has the two required holes in it butthere is a small plastic bracket that has to be removed. Despite looking likescrews, they are not and will not simply unscrew. I carefully slid a Stanleyknife under the heads to remove them and then removed the bracket. There was a furtherbolt in this bracket holding a clamp that I also removed leaving me a flat bracketwith no fittings. I then found a piece of cardboard and carefully folded itover the bracket. Next, I cut along these folds until I had a perfect patternof the bracket � a template. Holding this in place, I then pushed a pencilthrough the cardboard and through the two existing holes in the bracket below. Takingmy cardboard template, I then went to the passenger side, turned it over,aligned it and marked through the two holes in the cardboard giving me exactly theright place to drill and centre punched them. I then carefully drilled the twoholes needed on the passenger side using a 6mm drill bit. The swarf generatedduring the drilling was captured by the clingfilm as it fell.
Next it was a matter of fitting totwo larger brackets. On the passenger side the holes aligned perfectly, but Ifound it was a fiddle trying to get the nuts onto the bolts underneath the bracket.I found the following method worked well and prevented me from dropping thenuts. I took a 6mm ring spanner and then placed some Gaffer tape on the undersideI then dropped one 6mm nut into the ring which stuck to the tape underneath, andthen placed a second 6mm nut on top of this. This brought the second nut level withthe spanner. Now I could position the spanner with the nut under the bolt andsimple tighten it. I repeated this on the second bolt.
On the driver�s side I did the same,but located the original plastic bracket under the metal deflector bracketbefore tightening the nuts and bolts up using the same method with the ringspanner. I then removed the cling film and discarded it. Eco note: I�m sure onecould have kept this and used it in cooking or similar!
I then fitted the adapter thatpermitted the smaller section mesh frame attach to the larger section andfitted the remaining brackets to the ends of these. I next asked my wife to comeand help hold one end of the deflector whilst we offered each end up to the largerbrackets which were now fixed to the car. When we were happy with the finalposition, I fully tightened all the nuts and bolts.
All I had to do now was to refit thetwo leather wing covers, which surprisingly too longer than I had thought. Gettingthe nylon screw fixings in exactly the right position was a little fiddly, buthardly rocket science. Then I refitted the two seat belts and stood back toadmire the deflector.
Making the template based on the driver�sside bracket made ensuring the holes were correctly positioned on the passenger�sside was a very worthwhile exercise and although I didn�t drop any nuts orbolts, the clingfilm did collect all the swarf from drilling the holes andprevented this from perhaps fouling in the hood mechanism.
The tools I used were:
T-50 Torx spanner
6mm Drill
6mm Ring Spanner
6mm Socket
Cross Point Screwdriver
Stanley Knife
Cling Film
Strip of Gaffer Tape
Spare wife (or other obliging adult)for ten minutes. They could also help with fitting the deflector
#57
05-30-2013, 11:19 AM
Veteran Member
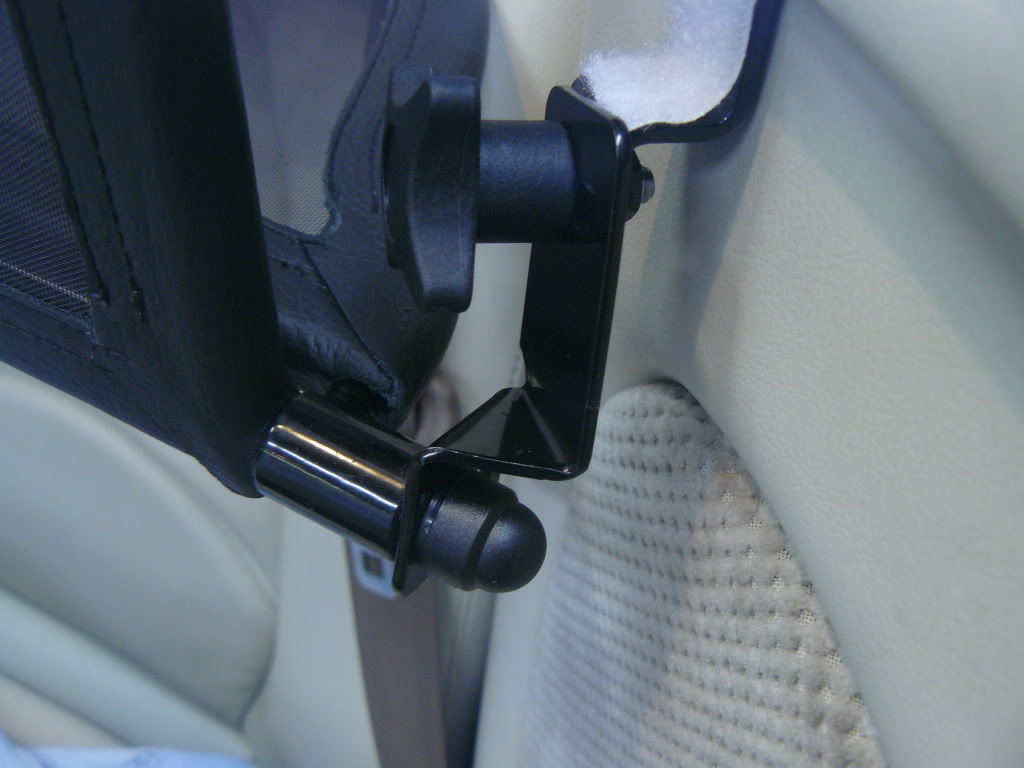
Hey Dee Tee--nice write-up. You should try and post close-ups of the actual attachments, both of the top piece to the bottom piece and then to the car.
From my experience the various aftermarket deflectors are essentially identical to each other with minor variations. I am only a couple of miles from Mina Gallery and showed him my deflector when I was still looking for the plastic washers. He said the one they supplied looked very similar to mine but the hardware was slightly different.
Once I got the extra washers from Classic Additions and tightened things up sufficiently, it was enough to keep the vertical piece vertical. Now all I need to do is get into the habit of actually dropping the top more.
Doug
#58
05-31-2013, 05:32 AM
Hi Doug,
Thanx for the comments - you're right it would have been good to submit some photographs, I did takes some, but was so involved, not enough. I'll see if I can submit what I do have shortly. I am about to take the car on a 2000 ish mile UK tour, so will update my impressions on how effect the deflector is. At the moment, the rear windows stay down with the hood down, but I now have all the parts to modify the XK8 so I can raise the rear windows with the hood down.
I must also take some photographs of the car whilst on tour and post some. It's 13 years old with 15,000 miles and has never been out in the rain..... Hoping that Scotland may stay dry in the next week or so!
Dee Tee
#59
05-31-2013, 06:12 AM
Join Date: Oct 2007
Location: PHX some of the time
Posts: 116,746
Received 6,253 Likes
on
5,453 Posts

#60
05-31-2013, 11:29 AM

Member
I too was interested in one and found that any you get requires drilling on the 2006 XKR. I rode in a 2004 with one instaledl and I didn't see that big of a difference to warrant the price. Mida sells a nice one that allows the top to be up when it is installed and removes easily. I believe you should find someone with one installed and ride in it before you make the investment.
Bob
Bob