
DIY Flip Key Conversion without Reprogramming - Guide with pictures
#1
 04-07-2013, 01:02 PM


Hi guys, thought I'd share my latest project with everyone.
It's been shared a few times on here that it would be nice to get the Jag flip style key fobs to work with the XK. Here's a short guide with pictures on how to convert a regular Jag key to a flip style key fob:
What you'll need:
1. One "donor" working (programmed and cut) key for your XK8/R.
Notes: You will salvage the blade and transponder from this key
2. One Jaguar flip key fob, commonly used on the S and X type
Notes: The blade that comes with this style fob will not work on the XK. Therefore, it's perfectly OK to pick up a used one off of ebay without a blade, or with the original blade that will be replaced.
3. Common hand tools including a screwdrivers, pliers, metal saw, glue gun, and a dremel.
WARNING: You are taking the chance to foil beyond repair your existing Jag key by doing this mod. If you take your time, work slow, and follow this guide you should be OK, however, it is strongly advised that you're prepared for a case of failure. Don't do this on your only key
Here we go:
1. If your existing FOB came with a blade, you need to punch out the pin holding the blade in place.

2. Pry the blade from your existing key

3. You now need to slighly cut down the base of the blade (opposite end of the cut section). Also, you need to use a saw to make a slight cut in the side that will serve to hold the blade in the FOB via a pin.

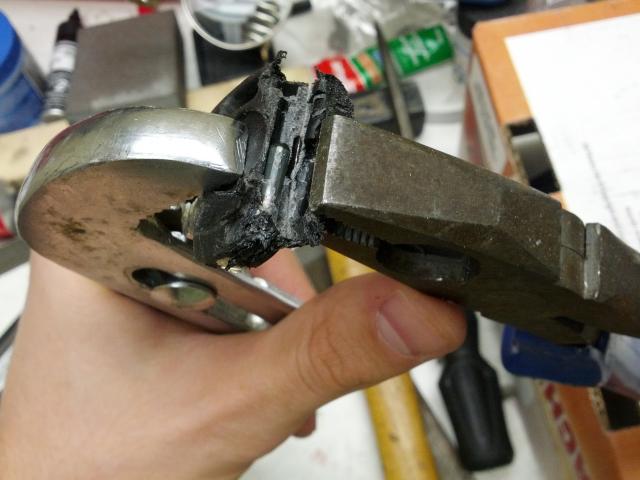
4. Here's the trickiest step: you need to salvage the programmed transponder chip from your existing Jag key. You cannot simply get the new key fob programmed, because the transponder unit is different - you need to use one from a regular XK style key. Some helpful hints:
- Notice where the transponder is in the picture below. There is also a "plug" in the key grip in the area where the transponder was originally inserted.
- Use a heat gun to heat the grip slightly - it is plastic.
- Use a soldering gun to cut the plastic just above where the transponder is
- Use two pliers to split in the part where the transponder is.
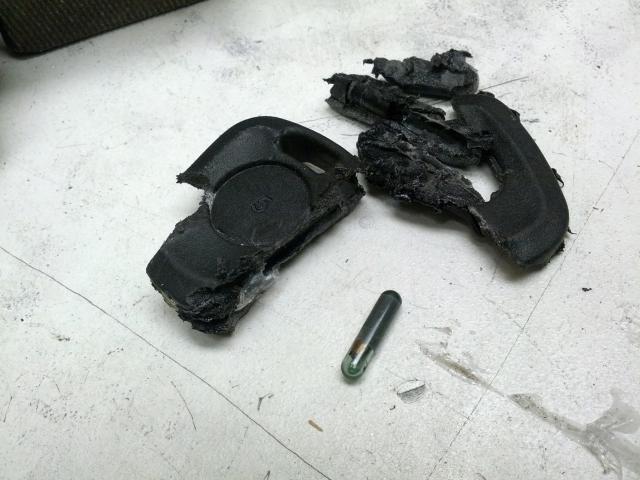
5. Here is where the old transponder is in your new Key fob. Remove it. Insert your programmed transponder from your existing key. You'll notice the XK transponder is slightly longer, but that's fine.

6. Use a glue gun to plug the other end, and hold secure the transponder in place.

7. Assemble your new fob back together, insert your cut blade, and insert the pin to hold the blade in place.

8. Done? Not quite, the XK blade is still slightly too long. You'll need to remove the plastic "ledge" running perpendicular to the body of the key fob, as seen below:

9. After a few seconds with the dremel:

10. You're done! Final product:


Don't forget to program your new key using the procedure in the FAQ!
I'd like to add I've been using this key for over 3 months without a single issue. It's great not to have to carry around the bulky key with remote anymore! If you have any questions feel free to PM me. Cheers!
It's been shared a few times on here that it would be nice to get the Jag flip style key fobs to work with the XK. Here's a short guide with pictures on how to convert a regular Jag key to a flip style key fob:
What you'll need:
1. One "donor" working (programmed and cut) key for your XK8/R.
Notes: You will salvage the blade and transponder from this key
2. One Jaguar flip key fob, commonly used on the S and X type
Notes: The blade that comes with this style fob will not work on the XK. Therefore, it's perfectly OK to pick up a used one off of ebay without a blade, or with the original blade that will be replaced.
3. Common hand tools including a screwdrivers, pliers, metal saw, glue gun, and a dremel.
WARNING: You are taking the chance to foil beyond repair your existing Jag key by doing this mod. If you take your time, work slow, and follow this guide you should be OK, however, it is strongly advised that you're prepared for a case of failure. Don't do this on your only key
Here we go:
1. If your existing FOB came with a blade, you need to punch out the pin holding the blade in place.
2. Pry the blade from your existing key
3. You now need to slighly cut down the base of the blade (opposite end of the cut section). Also, you need to use a saw to make a slight cut in the side that will serve to hold the blade in the FOB via a pin.
4. Here's the trickiest step: you need to salvage the programmed transponder chip from your existing Jag key. You cannot simply get the new key fob programmed, because the transponder unit is different - you need to use one from a regular XK style key. Some helpful hints:
- Notice where the transponder is in the picture below. There is also a "plug" in the key grip in the area where the transponder was originally inserted.
- Use a heat gun to heat the grip slightly - it is plastic.
- Use a soldering gun to cut the plastic just above where the transponder is
- Use two pliers to split in the part where the transponder is.
5. Here is where the old transponder is in your new Key fob. Remove it. Insert your programmed transponder from your existing key. You'll notice the XK transponder is slightly longer, but that's fine.
6. Use a glue gun to plug the other end, and hold secure the transponder in place.
7. Assemble your new fob back together, insert your cut blade, and insert the pin to hold the blade in place.
8. Done? Not quite, the XK blade is still slightly too long. You'll need to remove the plastic "ledge" running perpendicular to the body of the key fob, as seen below:
9. After a few seconds with the dremel:
10. You're done! Final product:
Don't forget to program your new key using the procedure in the FAQ!
I'd like to add I've been using this key for over 3 months without a single issue. It's great not to have to carry around the bulky key with remote anymore! If you have any questions feel free to PM me. Cheers!
Last edited by pomosv; 04-07-2013 at 05:08 PM.
The following 27 users liked this post by pomosv:
01Silverstone (03-01-2014),
Andy Cox (01-09-2014),
auburn2 (05-13-2014),
avos (04-07-2013),
blindside (08-12-2020),
and 22 others liked this post.

#3
04-07-2013, 03:58 PM


Join Date: Oct 2007
Location: PHX some of the time
Posts: 116,700
Received 6,243 Likes
on
5,444 Posts
#4
04-07-2013, 05:11 PM
I replaced all the images with a [IMG]+url code - can you guys see them now?
It's interesting, I used the "insert Image" function and url's of photos posted on photobucket (with permissions set to public). Same method as always. They show up fine on my end. Looks like maybe that's something the forum admins need to look into.
It's interesting, I used the "insert Image" function and url's of photos posted on photobucket (with permissions set to public). Same method as always. They show up fine on my end. Looks like maybe that's something the forum admins need to look into.
The following users liked this post:
Norri (04-07-2013)
#5
04-07-2013, 05:18 PM
Join Date: Oct 2007
Location: PHX some of the time
Posts: 116,700
Received 6,243 Likes
on
5,444 Posts
#6
04-07-2013, 05:41 PM

#7
04-07-2013, 08:26 PM
Senior Member
Trending Topics
#11
04-09-2013, 10:22 PM
#12
04-10-2013, 06:04 AM
Join Date: Oct 2007
Location: PHX some of the time
Posts: 116,700
Received 6,243 Likes
on
5,444 Posts
#15
04-13-2013, 01:31 AM
When I first saw this mod done on the XKEC forum some years ago I thought it was a good idea then completely forgot about.... Thanks for reminding me.....FYI For anyone buying a new flip out fob it is possible to have the transponder programmed to your car, you just can not have them re programmed it is a one time thing so you would have to go through he swap like pomosv has shown so well
#16
04-13-2013, 11:23 AM
Veteran member
My new flip key is done! Thanks again pomosv.
To add a couple tips to this DIY project,
(1) I recommend cutting the old key to fit the flip base as short as possible while still being able to put that notch into the key to hold it secure. My first attempt left the tip of the key rubbing the chrome edge at the end of the key channel. You'll notice that pomosv also removed his round key ring from the FOB because there is no way this old XK8 key will fit with it still attached. Since I carry a lo-jack transmitter also, I opted to use a 'string' type attachment I had lying in a drawer.
And (2), competent Dremel skills are an advantage for this project (which I do not excel), where neatness counts in cutting the black plastic of the fob itself.
#17
04-13-2013, 04:40 PM
Veteran Member
Have been following this thread with interest. Just to be clear either the X-type or S-type will work? Size-wise how does this compare closed with the old fob? I assume it is a larger body, but eliminates the "key" protrusion for a smaller footprint?
I see bottoms and tops on eBay, but didn't see a whole unit. I assume I can get the two pieces and put them together without any issues?
I see bottoms and tops on eBay, but didn't see a whole unit. I assume I can get the two pieces and put them together without any issues?
#18
04-13-2013, 04:46 PM
Join Date: Oct 2007
Location: PHX some of the time
Posts: 116,700
Received 6,243 Likes
on
5,444 Posts
The following users liked this post:
Jag#4 (04-13-2013)
#19
04-14-2013, 01:01 AM
Nicely done H2O!
Here is a link to the flip key I purchased:
Used Jaguar Flip Key Keyless Remote Fob CWTWB1U243 | eBay
It is listed as "FCC ID:CWTWB1U243". Other than that, I just see that they're listed as both x and s-type keys, but I'd go with one that has an actual picture matching the one we posted.
The flip key fob body is quite small; I'd say its slightly longer but also narrower than the original remote. It's an ease to carry around compared to the bulky key and remote combo.
Also as an added tip, a little bit of metal polish on the metal flip base, and a little bit (just a tiny drop) of tire dressing on a rag to clean the plastic really makes the fob feel like new!
Have been following this thread with interest. Just to be clear either the X-type or S-type will work? Size-wise how does this compare closed with the old fob? I assume it is a larger body, but eliminates the "key" protrusion for a smaller footprint?
I see bottoms and tops on eBay, but didn't see a whole unit. I assume I can get the two pieces and put them together without any issues?
I see bottoms and tops on eBay, but didn't see a whole unit. I assume I can get the two pieces and put them together without any issues?
Used Jaguar Flip Key Keyless Remote Fob CWTWB1U243 | eBay
It is listed as "FCC ID:CWTWB1U243". Other than that, I just see that they're listed as both x and s-type keys, but I'd go with one that has an actual picture matching the one we posted.
The flip key fob body is quite small; I'd say its slightly longer but also narrower than the original remote. It's an ease to carry around compared to the bulky key and remote combo.
Also as an added tip, a little bit of metal polish on the metal flip base, and a little bit (just a tiny drop) of tire dressing on a rag to clean the plastic really makes the fob feel like new!
Last edited by pomosv; 04-14-2013 at 01:04 AM.
The following users liked this post:
Jag#4 (04-20-2013)
#20
04-20-2013, 10:32 PM
I'm almost done with mine... I had trouble getting the old transponder out of the new FOB... getting out the old transponder was relatively easy but time consuming... I whittled the plastic down so that most of the excess key was gone. The heat gun is really the trick. I don't think I could have done it without it. I'm gonna seal the transponder in with black silicone instead of using a glue gun.
I test fit the key and kept grinding until just before the fob bottomed out while still letting the key turn in the ignition. It feels much more secure with the key in the ignition, but the key does wobble a bit. I have a bit of CA glue I'm gonna use to secure it before putting the pin back in, which apparently I do not need to ground a guide, not that I'd want that pin to actually secure it because of how much movement there is... I think I have the tang ground down to a little under 2.5mm. Doing this allows me to keep using the small keyring without binding or even touching it as I close it, without issue.
Anyway, thanks again for motivating me to do it!
Last edited by xenophobe; 04-20-2013 at 11:18 PM.