
front lower control arm bushings
#1
 08-02-2014, 02:54 PM


I'm purchasing front lower control arm bushings for my 98 XK8, and I have come across two part numbers:
MNE1360BB
MNE1360CA
However, anywhere I look just describes both as "front lower control arm bushing". Is one of these for the front and one for the back of the front lower control arm? Or are they interchangeable?
Thanks,
Marty
MNE1360BB
MNE1360CA
However, anywhere I look just describes both as "front lower control arm bushing". Is one of these for the front and one for the back of the front lower control arm? Or are they interchangeable?
Thanks,
Marty
#2
08-02-2014, 03:40 PM

Veteran Member
The following users liked this post:
metalmarty (08-02-2014)
#3
08-02-2014, 04:45 PM
Veteran Member
Join Date: Apr 2014
Location: Jersey, Channel Islands
Posts: 4,077
Received 2,291 Likes
on
1,503 Posts
Hi Marty,
AS Wayne implies, ...BB is the rear bush. There has been some change around part numbers here over time; I've attached a TSB showing this - it may be helpful as it shows how to R&R the original nylon-cased ones, although it gives yet another part number for the front bushing. Apparently Jaguar now fits the MN1360BB bush to both back and front (apparently it's firmer), although I can't find a TSB to that effect.
There's some banter on the subject here:
https://www.jaguarforums.com/forum/x...shings-101817/
Note plums' comments on page 2.
Did you finally get that ***** upper fulcrum bolt sorted?
HTH,
Mike
The following users liked this post:
metalmarty (08-02-2014)
#4
08-02-2014, 05:32 PM
Hi Marty,
AS Wayne implies, ...BB is the rear bush. There has been some change around part numbers here over time; I've attached a TSB showing this - it may be helpful as it shows how to R&R the original nylon-cased ones, although it gives yet another part number for the front bushing. Apparently Jaguar now fits the MN1360BB bush to both back and front (apparently it's firmer), although I can't find a TSB to that effect.
There's some banter on the subject here:
https://www.jaguarforums.com/forum/x...shings-101817/
Note plums' comments on page 2.
Did you finally get that ***** upper fulcrum bolt sorted?
HTH,
Mike
AS Wayne implies, ...BB is the rear bush. There has been some change around part numbers here over time; I've attached a TSB showing this - it may be helpful as it shows how to R&R the original nylon-cased ones, although it gives yet another part number for the front bushing. Apparently Jaguar now fits the MN1360BB bush to both back and front (apparently it's firmer), although I can't find a TSB to that effect.
There's some banter on the subject here:
https://www.jaguarforums.com/forum/x...shings-101817/
Note plums' comments on page 2.
Did you finally get that ***** upper fulcrum bolt sorted?
HTH,
Mike
Thanks man! So I'm going to use BB all around. Are the BB also for the rear control arms?
And no, I tackled the fulcrum bolt again this morning, this time with a torch and extra penetrating fluid, still to no avail. Looks like I'll be grinding that sucker out and buying a new control arm and bolt. I only hope that I can actually get the bolt out after I destroy it. Otherwise... new subframe? Ugh.
The passenger side went pretty smoothly, except for the ball joint which I basically ended grinding to pieces and pressing out with my 20 ton press.
#5
08-02-2014, 06:46 PM
Veteran Member
Marty, sorry for the short answer, but was on the way to pick up front wheel bearings for the F150 and dinner was close, you ever been late getting home for a dinner the wife had been working on all afternoon.
Anyway, do you think both sides of the upper control arm are stuck. I was going to suggest you use a cutoff wheel or dremel and cut it in half. If one side comes out, then the other side can go on your 20 ton press.
Good luck,
Wayne
Anyway, do you think both sides of the upper control arm are stuck. I was going to suggest you use a cutoff wheel or dremel and cut it in half. If one side comes out, then the other side can go on your 20 ton press.
Good luck,
Wayne
The following users liked this post:
metalmarty (08-06-2014)
#6
08-02-2014, 06:53 PM
Marty, sorry for the short answer, but was on the way to pick up front wheel bearings for the F150 and dinner was close, you ever been late getting home for a dinner the wife had been working on all afternoon.
Anyway, do you think both sides of the upper control arm are stuck. I was going to suggest you use a cutoff wheel or dremel and cut it in half. If one side comes out, then the other side can go on your 20 ton press.
Good luck,
Wayne
Anyway, do you think both sides of the upper control arm are stuck. I was going to suggest you use a cutoff wheel or dremel and cut it in half. If one side comes out, then the other side can go on your 20 ton press.
Good luck,
Wayne
#7
08-02-2014, 06:57 PM
Veteran Member
Thanks man! So I'm going to use BB all around. Are the BB also for the rear control arms?
And no, I tackled the fulcrum bolt again this morning, this time with a torch and extra penetrating fluid, still to no avail. Looks like I'll be grinding that sucker out and buying a new control arm and bolt. I only hope that I can actually get the bolt out after I destroy it. Otherwise... new subframe? Ugh.
The passenger side went pretty smoothly, except for the ball joint which I basically ended grinding to pieces and pressing out with my 20 ton press.
BB is the lower front rear and CA I'd the lower front front. If you look at them closely they are slightly different, on the end where the small round center is one of them is flush and the other protrudes slightly, this locates the control arm in the mount correctly. Also be careful replacing the rear one, it's a bitch. I took mine to a machine shop and they destroyed two tring to get them in.
The following 2 users liked this post by Jandreu:
metalmarty (08-06-2014),
michaelh (08-03-2014)
Trending Topics
#8
08-02-2014, 07:37 PM
Veteran Member
The following users liked this post:
metalmarty (08-06-2014)
#9
08-02-2014, 11:21 PM

The following 2 users liked this post by johns55:
metalmarty (08-06-2014),
michaelh (08-03-2014)
#10
08-03-2014, 05:33 AM
Veteran Member
Join Date: Apr 2014
Location: Jersey, Channel Islands
Posts: 4,077
Received 2,291 Likes
on
1,503 Posts
Thanks to all who stepped in to set the record straight; probably best to listen to those who've actually done the job...
Mike
The following users liked this post:
metalmarty (08-06-2014)
#11
09-15-2014, 05:40 PM

The following users liked this post:
metalmarty (09-16-2014)
#12
09-16-2014, 03:24 AM

Veteran Member
I used a standard angle grinder with a 1mm cutting disc, I needed to rotate the bolt a couple of time to cut all the way through. Don't worry about getting the bolt out, worry about how lose it is. You will probably damage the top hat washers so plan to get a few new ones in.
Last edited by RaceDiagnostics; 09-16-2014 at 03:26 AM.
The following users liked this post:
metalmarty (09-16-2014)
#13
09-16-2014, 07:54 AM
I actually finished this about a month ago; I should really update my posts more often. I really wish I had documented what I did as well... it was unconventional to say the least.
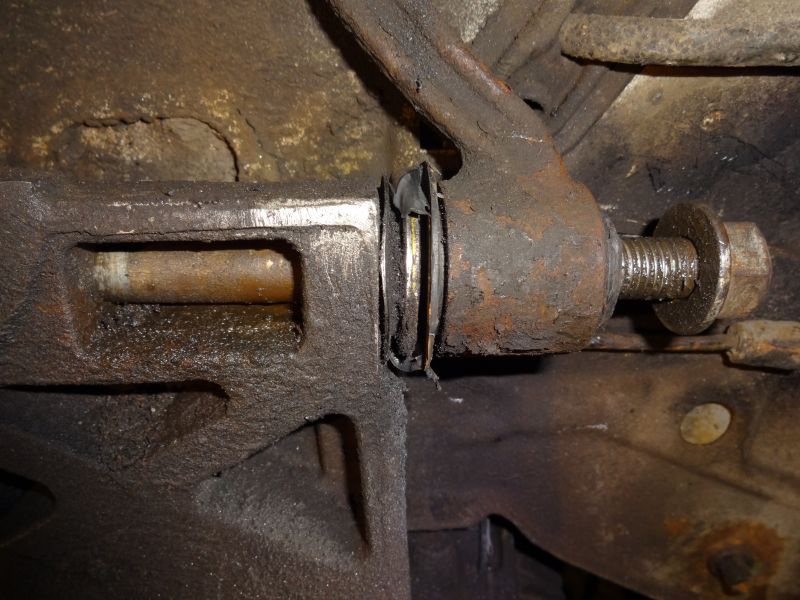
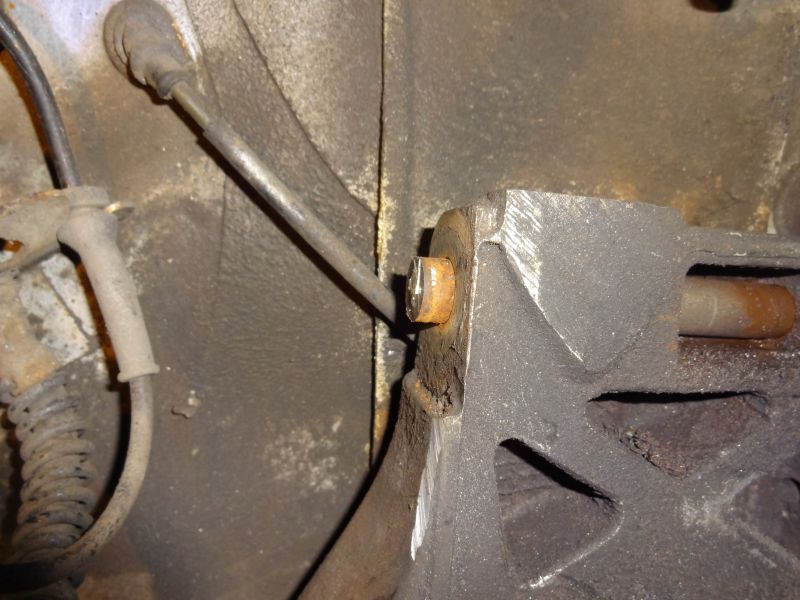
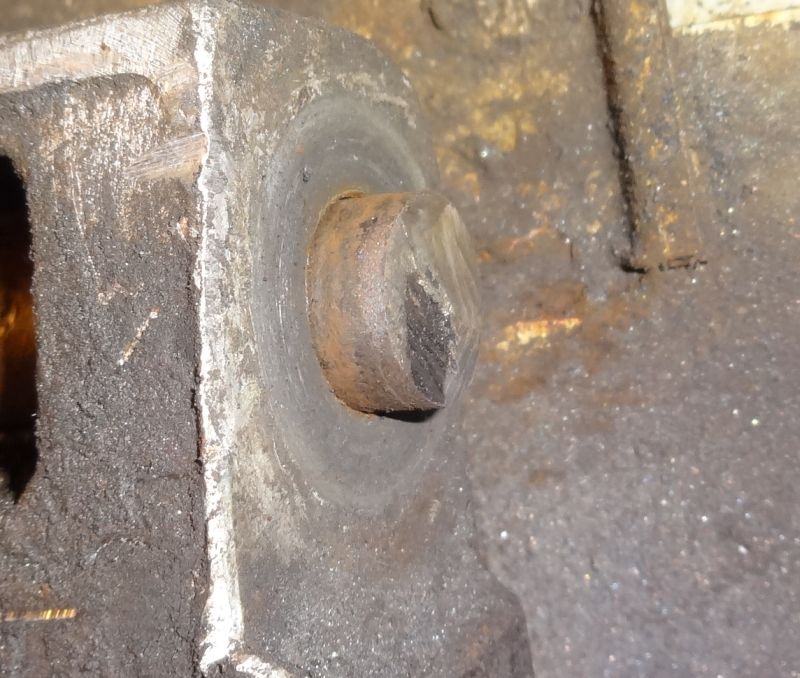
It turns out the fulcrum bolt was seized not only to the subframe, but to both bushing sleeves as well. Additionally, the subframe appears to have been cut at some point, and there was a large washer seized to that and the bolt. All of the cone washers and spacers were missing, and the fulcrum nut was cranked down to the point where the control arm warped inward and has restricted travel. Whoever did the work on this car before me was, well... let's not go there.
Anyway, I used a die grinder with a titanium carbide bit to grind out the center part of the bolt, at which point each side was only seized to two parts rather than a full four. With half the resistance now, I cranked the bolt side and nut side while heating with a MAPP torch until I got some sort of movement. Then I sawed off the ends of the bolt with a cutoff wheel while slowly rotating the bolt, which was basically all they could do at the time. I also used the cutoff wheel to remove the seized washer that was stuck where the subframe had been ground down.
Next, I sawed the control arm into three pieces with the cutoff wheel, burned out the bushings with the torch, and forced the pieces off the fulcrum with a mini-sledge. I used the sledge on the outsides of the bolts while heating with the MAPP torch to get some lateral movement, and as soon as they were as far in as I could get them I used a ball joint fulcrum-type tool on the inside (with the forks around the outside part of the bolt) and cranked it down under heat while tapping it with the sledge. When they eventually came out, we all know the shotgun-esque sound that accompanies metal being forced from metal, and the fragments of molten bolt shot out and bounced around the wheel well a few times.
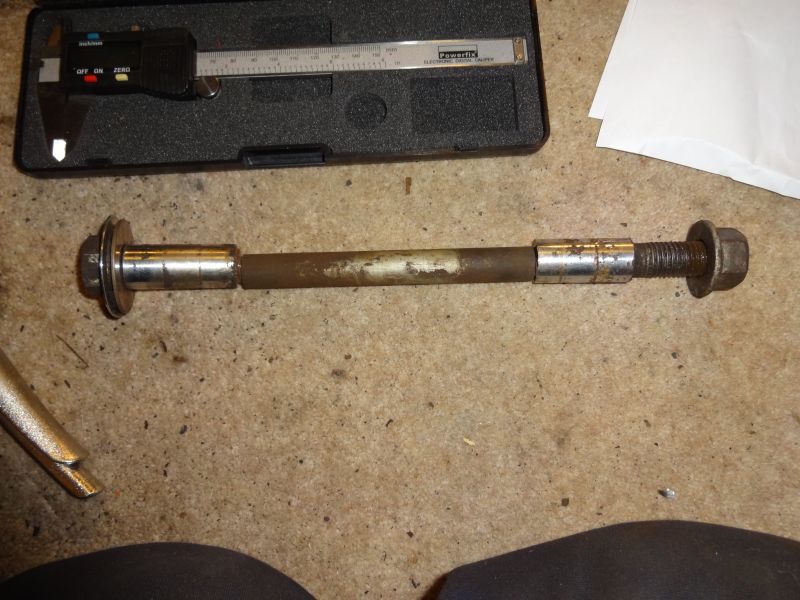
I got a used complete control arm (with fulcrum bolt, cone washers, shims, bushings, and ball joint) from ebay for around $50, I pressed out and in the new ball joint and bushings, greased everything and popped it in without a hitch. Since there were no shims on anything, I used the default positions, although I needed to add another few shims to accommodate for where the subframe had been ground down.
Car rides great now.
It turns out the fulcrum bolt was seized not only to the subframe, but to both bushing sleeves as well. Additionally, the subframe appears to have been cut at some point, and there was a large washer seized to that and the bolt. All of the cone washers and spacers were missing, and the fulcrum nut was cranked down to the point where the control arm warped inward and has restricted travel. Whoever did the work on this car before me was, well... let's not go there.
Anyway, I used a die grinder with a titanium carbide bit to grind out the center part of the bolt, at which point each side was only seized to two parts rather than a full four. With half the resistance now, I cranked the bolt side and nut side while heating with a MAPP torch until I got some sort of movement. Then I sawed off the ends of the bolt with a cutoff wheel while slowly rotating the bolt, which was basically all they could do at the time. I also used the cutoff wheel to remove the seized washer that was stuck where the subframe had been ground down.
Next, I sawed the control arm into three pieces with the cutoff wheel, burned out the bushings with the torch, and forced the pieces off the fulcrum with a mini-sledge. I used the sledge on the outsides of the bolts while heating with the MAPP torch to get some lateral movement, and as soon as they were as far in as I could get them I used a ball joint fulcrum-type tool on the inside (with the forks around the outside part of the bolt) and cranked it down under heat while tapping it with the sledge. When they eventually came out, we all know the shotgun-esque sound that accompanies metal being forced from metal, and the fragments of molten bolt shot out and bounced around the wheel well a few times.
I got a used complete control arm (with fulcrum bolt, cone washers, shims, bushings, and ball joint) from ebay for around $50, I pressed out and in the new ball joint and bushings, greased everything and popped it in without a hitch. Since there were no shims on anything, I used the default positions, although I needed to add another few shims to accommodate for where the subframe had been ground down.
Car rides great now.
#15
09-16-2014, 11:08 AM

Senior Member
Marty,
Your patience and determination is only bettered by "Superman".
I've followed your unbelievable repairs on your car since joining the forum and have just sat at times and stared straight ahead in disbelief. Not to belittle your car, but seeing the extent of the rush you have faced and in the pictures above, surely that car must have sat in salt water for a long time. With your patience however, the rust will soon be a memory----at least in the important area's.
Chuck
05/XK8 Conv.
#16
09-17-2014, 06:50 AM
I really wish I documented it. I had intended on doing so, but my patience only goes so far, and having my car flying on jack stands in front of my house for a week or so is just about the extent of it. lol. I'm sure we can all relate.
#17
09-17-2014, 09:37 AM
Marty,
Your patience and determination is only bettered by "Superman".
I've followed your unbelievable repairs on your car since joining the forum and have just sat at times and stared straight ahead in disbelief. Not to belittle your car, but seeing the extent of the rush you have faced and in the pictures above, surely that car must have sat in salt water for a long time. With your patience however, the rust will soon be a memory----at least in the important area's.
Chuck
05/XK8 Conv.
Your patience and determination is only bettered by "Superman".
I've followed your unbelievable repairs on your car since joining the forum and have just sat at times and stared straight ahead in disbelief. Not to belittle your car, but seeing the extent of the rush you have faced and in the pictures above, surely that car must have sat in salt water for a long time. With your patience however, the rust will soon be a memory----at least in the important area's.
Chuck
05/XK8 Conv.
As anyone within earshot will tell you as I violently damn my car to hell for the duration of the repair, patience and determination can be two very different things. Sometimes having only one of the two is enough. Luckily for me.

Thread
Thread Starter
Forum
Replies
Last Post
MC36
US Lower Atlantic
0
09-01-2015 07:34 PM
Currently Active Users Viewing This Thread: 1 (0 members and 1 guests)

