
Hoses ordered
#1
 09-25-2014, 02:37 PM

Well I have went ahead and ordered my octopus hose and the plastic connector that goes on it (one hose from it goes under intake to t-stat housing. It is leaking a little at the plastic connector and since the car has 95k on it I may as well replace the complete hose also. Looks like a knuckle buster of a job, I can hardly wait to do it. There is one odd connector on it, that goes to the plastic three way connector, how does that connector come apart?
I called two parts vendors here on the site for the parts, asked about the hose and one was totally confused and kept putting me on hold and could not confirm the hose worked on my car. I called the other place, he had the same hose, same part number and the seceded part # listed and he knew what he was doing, quick easy info given and off the phone in a few minutes.
I called two parts vendors here on the site for the parts, asked about the hose and one was totally confused and kept putting me on hold and could not confirm the hose worked on my car. I called the other place, he had the same hose, same part number and the seceded part # listed and he knew what he was doing, quick easy info given and off the phone in a few minutes.
#3
09-25-2014, 03:55 PM
#4
09-25-2014, 05:20 PM

I just replaced my octopus hose & did remove the throttle body. As you can see by the pic, you have a lot more room to both remove the hose and then wrangle the new octopus hose back in place behind everything else that is in the way. It definitely made the job much easier and I highly recommend it.
As for the 3 way connector, when I tried to get the hoses off, it actually started to crumble in my hands. As you can see from the pic, the connector on top broke completely off. Mine is a 97 and the plastics in these early cars are now very brittle just because of age let alone the heat they have been exposed to. I think you will end up having to replace the 3 way connector. The new one looks very nice when it is installed.
Best of luck to you on your project.
Last edited by bsprowls; 09-25-2014 at 05:39 PM.
#7
09-25-2014, 07:20 PM
Trending Topics
#8
09-27-2014, 08:26 PM
Well I am not ready to take off an intake. I looked at this heater hose setup. YES the TB has to come off. ha ha ha. Do I want to take this on, ha ha ha ha.
How do the little silver fasteners come off the hoses to the TB, I assume they are reusable if taken off correctly.
What is involved in pulling off the TB? Do I have to depressurize gas line or anything?
The way the hose is made, the way the appear to GLUE the hoses to the hoses, that crap holds up over time????
The hosing appears to go under wires and **** behind the TB, I guess I just need to take my time and make it a weekend project?
#9
09-27-2014, 08:32 PM
I just replaced my octopus hose & did remove the throttle body. As you can see by the pic, you have a lot more room to both remove the hose and then wrangle the new octopus hose back in place behind everything else that is in the way. It definitely made the job much easier and I highly recommend it.
As for the 3 way connector, when I tried to get the hoses off, it actually started to crumble in my hands. As you can see from the pic, the connector on top broke completely off. Mine is a 97 and the plastics in these early cars are now very brittle just because of age let alone the heat they have been exposed to. I think you will end up having to replace the 3 way connector. The new one looks very nice when it is installed.
Best of luck to you on your project.
As for the 3 way connector, when I tried to get the hoses off, it actually started to crumble in my hands. As you can see from the pic, the connector on top broke completely off. Mine is a 97 and the plastics in these early cars are now very brittle just because of age let alone the heat they have been exposed to. I think you will end up having to replace the 3 way connector. The new one looks very nice when it is installed.
Best of luck to you on your project.
On that back connector (not the facing to the front, not the one facing up, but the one facing to the back that the hose snaps into two prong like things), it is as simple as just snapping the new hose onto the connector? What is keeping the water pressure from just coming right out of it?
Then on the passenger since, that connector, my new hose, that end has a pitting with a green thing attached to it, does the green thing stay on, how does that fasten on???
#10
09-27-2014, 09:22 PM
Veteran Member
Join Date: Nov 2006
Location: Glasgow, Scotland UK
Posts: 47,303
Received 9,005 Likes
on
4,113 Posts
#11
09-27-2014, 09:42 PM
#12
09-28-2014, 09:09 AM
On that back connector (not the facing to the front, not the one facing up, but the one facing to the back that the hose snaps into two prong like things), it is as simple as just snapping the new hose onto the connector? What is keeping the water pressure from just coming right out of it?
Then on the passenger since, that connector, my new hose, that end has a pitting with a green thing attached to it, does the green thing stay on, how does that fasten on???
Then on the passenger since, that connector, my new hose, that end has a pitting with a green thing attached to it, does the green thing stay on, how does that fasten on???
As for the other side, the Norma push & seal type "R" connector with the green ring, take a look at this link:
https://www.jaguarforums.com/forum/x...nector-102883/
Hope this helps!
#13
09-28-2014, 09:21 AM
Are the silver fasteners on the TB cooling lines you are talking about like #2 in the attached pic? That is what mine were. These are spring bands and you can use pliers to squeeze together taking the tension off to release them. They make special pliers for this but I was able to use a small pair of RoboGrips.
#14
09-29-2014, 08:00 AM
#15
09-29-2014, 02:01 PM

While you are in there, take a close look at your injectors and fuel rails.
I had my octopus hose replaced because the engine was already that disassembled to replace cracked injectors and leaky fuel rails (no way to get them out without removing the supercharger).
When you're that deep in the engine, might as well take a close look at everything...
I had my octopus hose replaced because the engine was already that disassembled to replace cracked injectors and leaky fuel rails (no way to get them out without removing the supercharger).
When you're that deep in the engine, might as well take a close look at everything...
#17
10-03-2014, 08:47 AM
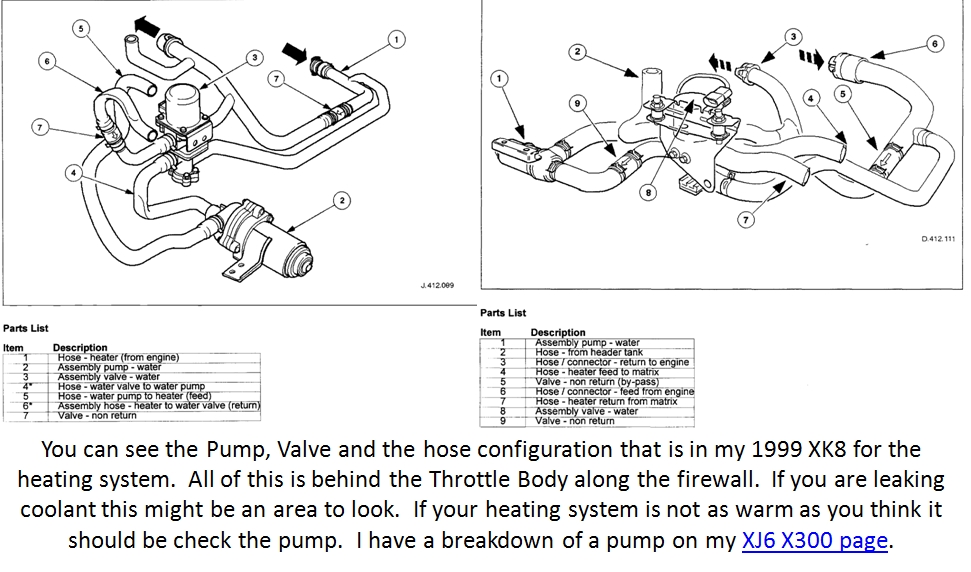
Yes it is just that simple. They just snap together. The attached pic shows the various connections.
As for the other side, the Norma push & seal type "R" connector with the green ring, take a look at this link:
https://www.jaguarforums.com/forum/x...nector-102883/
Hope this helps!
As for the other side, the Norma push & seal type "R" connector with the green ring, take a look at this link:
https://www.jaguarforums.com/forum/x...nector-102883/
Hope this helps!
#18
10-03-2014, 11:33 AM
