
How to change the steering rack video
#1
 05-05-2014, 04:56 PM


#2
05-05-2014, 06:03 PM


#3
05-05-2014, 11:50 PM

Senior Member
#4
02-16-2015, 10:31 AM


On the floor in 3 hours due to sticky tie rod ends and calipers. Obviously changed clothes :-)

Where the PS tubes with O rings pop in - nervous about reusing O rings but also nervous about replacing them...

Pinion spline bushing I cracked wedging off knuckle and broke trying to remove from pinion spline.
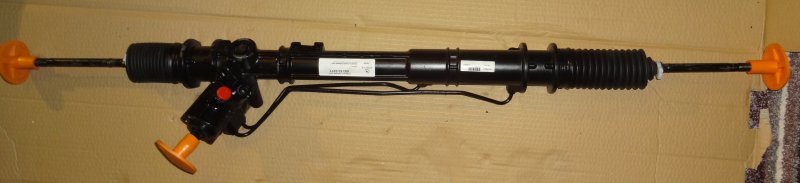
Wouldn't have tried it on my '99 without this video. No Air Deflector or cross beam support on my '99 Conv. Had to take off the calipers to use my HF tie rod tool. Needed to jack the front up fairly high - I used his method with jack stands on the sides (and a couple other jacks for good measure). Calipers and tie rod ends were sticky but manageable with air tools (or a good 3' steel pipe wrench extension) - if you are comfortable doing your own brakes you should be comfortable with this. I was worried about dropping it off the splined shaft but went reasonably well - I did damage the black plastic alignment bushing on top of the pinion as this is the surface available to wedge a big screwdriver between the coupling and rack to start freeing the spline. The screw driver loosened the rack spline out of the coupling over a quarter inch and then wiggling the rack a couple times it slid off the rest of the way. I left one right lower rack bolt on loose and had a jack stand to set the rack on when it came free. I then removed the last bolt while balancing the rack on the stand. It only weighs maybe fifty lbs. but is awkward in that environment. I am trying an inexpensive Ebay rebuilt from American Axle ($225 shipped). Had to switch over the transducer (2 star bolts and could be popped out). Had difficulty reinstalling the transducer - probably needed a new O ring - I am going to check on availability. I ran some fluid through the PS pump and lines by starting the car briefly twice with bucket underneath. I am heading to dealer tomorrow. I need the O rings for the PS tubes to / from the rack. Also need the O ring for the PS Rack transducer. Finally need a transducer retaining bolt that I cobbled, and the black plastic bushing between the spline and the rack (pictured). If anyone has any tips for uninstalling / installing or sourcing these I would appreciate it. The tube o rings are very small and look like they will require an eyeglass screwdriver to remove (hopefully without damaging the tubes). Did I mention it was freezing in Louisville :-) I hope I am not scaring anyone because I am not a heavy duty mechanic and am pleased with how this is going - will update.
#5
02-18-2015, 01:34 PM
Visited the dealer and they could only pull up the whole rack & pinion as a replacement part. Computer didn't recognize the numbers on the tube o- rings in the video (if you pause the video you can read them right off the Jaquar UK receipt...). They also couldn't break out the transducer (only electrical connection on the rack) or the black spline alignment /dust cap / bushing in my picture. SO... I will try to reassemble the tubes and transducer with the original O-rings and if they leak perceptibly I will try the 285 metric o rings for $10 at HF. I will also put the dust cap back on the pinion spline although it is broken and goop it up really good with silicone grease. As long as the steering wheel is centered and the Tie Rod ends are turned on the same number of rotations I should be fine to drive for an alignment. Going to be 10 below in Louisville for a couple days I will let you guys know...
#6
02-18-2015, 02:01 PM

Veteran Member
#7
02-18-2015, 03:03 PM
Well I actually have a small weep with the new o-rings so I wouldn't worry too much about using the old ones. Good luck with that.
I have now also got hold of a cheap reconditioned unit to put onto the car as the one from the salvage yard has too much free play for my liking and the adjuster is rounded off.
Not sure when I will get time to fit it.
I will need to take care when trying to swap over the pinion cap.
I have now also got hold of a cheap reconditioned unit to put onto the car as the one from the salvage yard has too much free play for my liking and the adjuster is rounded off.
Not sure when I will get time to fit it.
I will need to take care when trying to swap over the pinion cap.
The following users liked this post:
thenaz007 (02-19-2015)
Trending Topics
#8
02-19-2015, 07:50 AM
I almost reinstalled the rack without switching over the pressure transducer (my rebuilt rack didn't have one). It did not want to go into the rebuilt rack completely - either the o ring swelled or the new paint on the rebuilt rack ate up tolerance. I tried to tap it in and then stripped one of the star retaining bolts trying to force it in with the cheesy retaining bolt. Promptly bent the bolt when I continued to tap. The thing is 90% in and held securely by one retaining bolt I am going to give it a shot and see if it drips. Not much choice until I can locate parts. I guess I should easy out and replace the 2nd stripped retaining bolt while its on the bench rather than risk the redo.
#10
02-23-2015, 08:17 AM

We have met the enemy and he is us. The transducer wouldn't fit because there was still a transportation cap on the rebuilt rack. The transportation caps had been painted over with the rack, and appeared to be metal with a hole where there should be metal with a hole. In my previous post I shared a photo of the holes for the PS tubes - they still have the travel caps in them (painted over) as well...
SO... Getting the spline on the pinion back up into the collar on the knuckle IS a bitch. I again supported the rack on a jack and started the right lower rack bolt (lower bolts are slightly shorter than the upper bolts). I then started bench pressing the left end of the rack with one hand while trying to guide the collar onto the spline with the other. I left the jack in the middle so I could set it down occasionally to rest(!) The collar moves freely side to side and with some difficulty the knuckle will telescope in and out towards the steering wheel about an inch. You can get the collar lined up on the spline but it just doesn't want to go on. I finally decided Jaguar allowed the knuckle to telescope so you could attach the rack and then bring the collar down over the spline. I half attached the left lower rack attachment bolt but still couldn't bring the knuckle down over the collar by hand. You HAVE to have leverage. If you try to push the rack / spline up you will just cause the knuckle to telescope up. I eventually found some extra large locking needle nose pliers that allowed me to push a couple points on the collar toward a ledge on the pinion. This got me about halfway over the first of two sections of spline. Of course it didn't give me even downward pressure around the collar so I had to try to tap it level and then squeeze some more with the pliers. I was "pull" tapping down on the collar with a pair of extra long bent needle nose pliers and wasn't having much luck when I went to a full size crow bar with a curled end. Amazingly I had just enough clearance to tap down on one side of the collar with the inside of the curled end of the crowbar and then tap down the other side of the collar. These are very small taps because you don't have much room or much purchase, but alternating 20 taps a side I eventually got the collar down over the spline. I was also spraying rust remover every 20 minutes into the collar, which barely had a sheen of surface rust, and thinking about the video where he painfully took the whole knuckle off and cleaned off the spline so it would go on and off easily... Tired, cold and euphoric over my success I promptly tried to install my tierod ends upside down (finally
#11
02-23-2015, 08:31 AM
Veteran Member
#12
02-23-2015, 09:10 AM
The first time I had to put the steering rack back onto the car (this was a year before I made the video) I also had big problems with the spline and u joint, I couldn't get it past this point.

In the end I made an improvised slide hammer out of this to "pull" it on to the pinion.
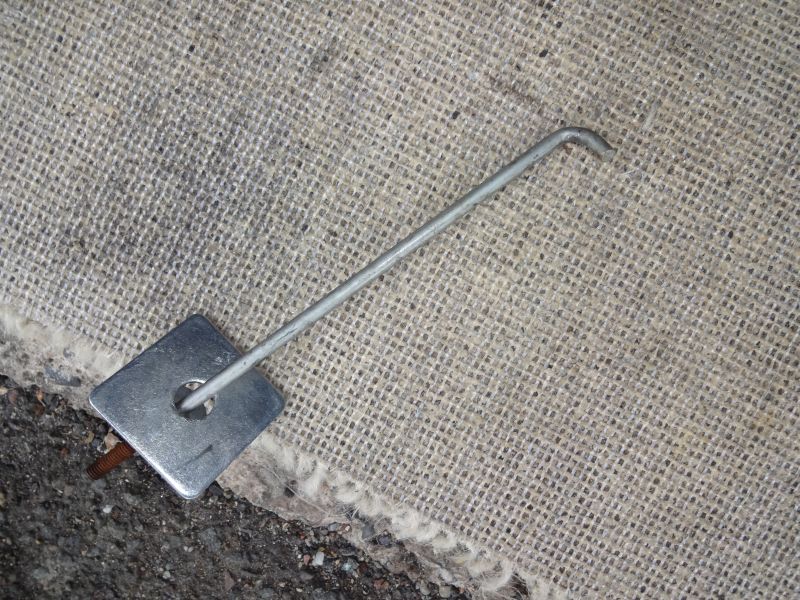
The second time round, totally removing the U joint and cleaning/de-rusting it made the job far easier, although there was nothing easy about it.
In the end I made an improvised slide hammer out of this to "pull" it on to the pinion.
The second time round, totally removing the U joint and cleaning/de-rusting it made the job far easier, although there was nothing easy about it.
#13
03-22-2016, 06:18 PM
Senior Member
#14
03-23-2016, 08:46 AM
I think the US version is slightly easier to fit is the pipework has easier access.
Loosening the U joint coupling at the top of the lower steering column will perhaps give a bit more travel at the bottom and help when trying to get the bottom refitted to the rack.
You can get access to the top of the lower steering rack by lying on your back with your head by the pedals.
You should also clean up the spline on the lower steering column before trying to refit the lower u joint, it needs to be able to slip on as far as possible.
The following users liked this post:
cyber3d (03-23-2016)

#16
08-18-2019, 04:26 AM
These are the o rings from jaguar, the price is ridiculous and they are a poor fit, I ended up with a slow leak of fluid immediately after fitting them. I finally got the leak resolved in March this year after buying 3 different O rings for each size with various cross sections, and fitted the ones that I could only just squeeze in, the drip has now gone.
The following users liked this post:
GGG (08-18-2019)
#17
08-19-2019, 11:49 PM
#18
08-20-2019, 06:57 AM
Hi, it was not possible to see which side was leaking but I would guess it was the high pressure side. I think Jag just picked the closest o rings they had on the shelf for the replacement parts rather than ones that were the correct size as part of a cost reduction drive without fully checking that they worked.
#19
08-20-2019, 09:13 AM
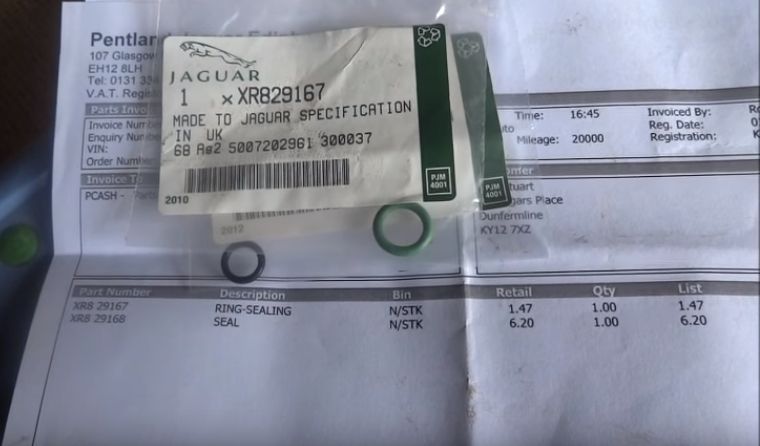
richardh@britishparts.co.uk says the JLM20672 is now XR829168
I suspect they should have given you XR829166 instead of the XR829167
I will try order them and see how they seal
I suspect they should have given you XR829166 instead of the XR829167
I will try order them and see how they seal
Last edited by stevepaa; 08-20-2019 at 09:47 AM.