
HOW TO: Cleaning the Wheel Speed Sensors FAQ
#1
 05-29-2010, 10:25 PM

I was getting the ABS warning light and DSC warning message intermittently. Also, sometimes when I would apply the brakes I could hear the ABS system clicking away even though I was nowhere near the limit of traction. Usually it happened when I was almost stopped and only going 5 to 10 miles per hour. Info from this forum told me that it was most likely either a dirty wheel speed sensor or a bad wheel speed sensor, so I decided to clean them all to see if that would fix the problem. Here is a tutorial with pictures in case anyone else wants to try this.
Tools needed:
* 5/16ths inch socket with a ratchet (a 5/16ths inch wrench will work, too)
* Toothbrush
* Dish soap.
Also, you need to take the wheels off. The tools for that are already in the trunk.
Time:
It took me about 90 minutes. If you have an impact wrench and a floor jack it will go faster, but I was just using the jack and lug wrench from the trunk.
Skill Level:
Your daughter could do it.
I did the front wheels first. Just jack up one wheel and take it off. I figured out after I had both front wheels finished that it would have been a little easier if I had turned the wheels in the direction of the wheel sensor I was trying to clean. In other words, when working on the left front wheel, turn the steering wheel to the left. When working on the right one turn the wheel to the right. Make sure you only turn the wheels when both front wheels are on the ground. You don't want the car falling off of the jack.
So here's the tutorial...
Removing and Replacing the Front Sensor
Here is a picture of the front right wheel well. The sensor is on the other side of the rotor and you can't see it in this picture (That's why I said to turn the wheel to the right. It would be easier to access the sensor with the wheel turned to the side.

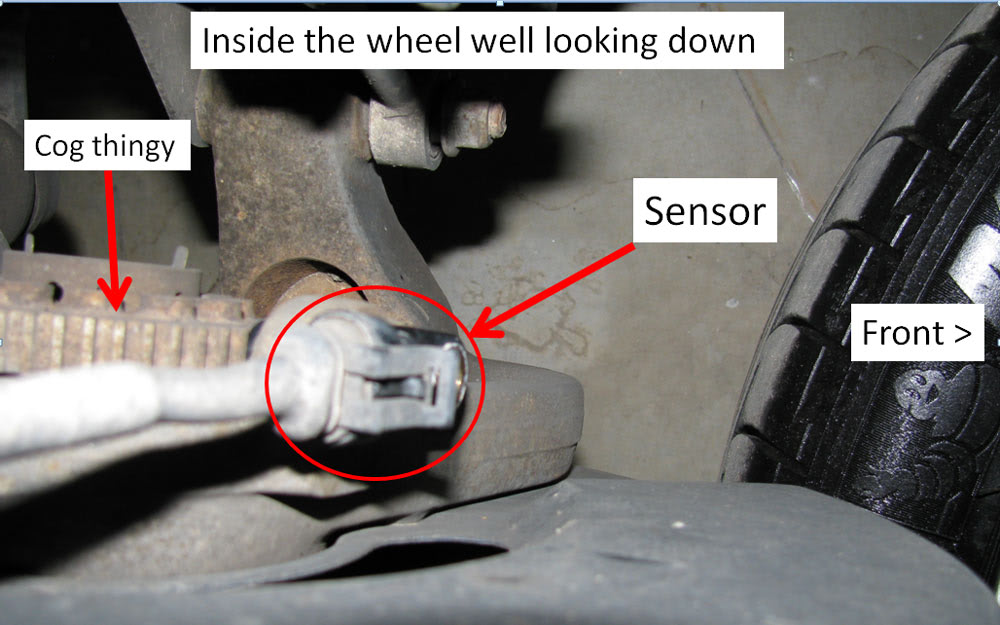
Here is a picture of the actual sensor. You can see the little cog thingy on the left side of the picture. The sensor bolts on right next to the cog thingy. As the little cogs move past the sensor the sensor detects them and sends a signal back to the ABS system so that it knows the speed of each wheel. In this picture I have already removed the one bolt that holds the sensor in place. It's a 5/16ths inch bolt and it is very easy to access and remove.
By the way... you can see the tire on the right side of the picture because when I was a kid my dad taught me to slide the wheel under the car so that if the car falls off the jack it will still be supported by the wheel. Jack stands will do the same thing. It's just a little safety measure.
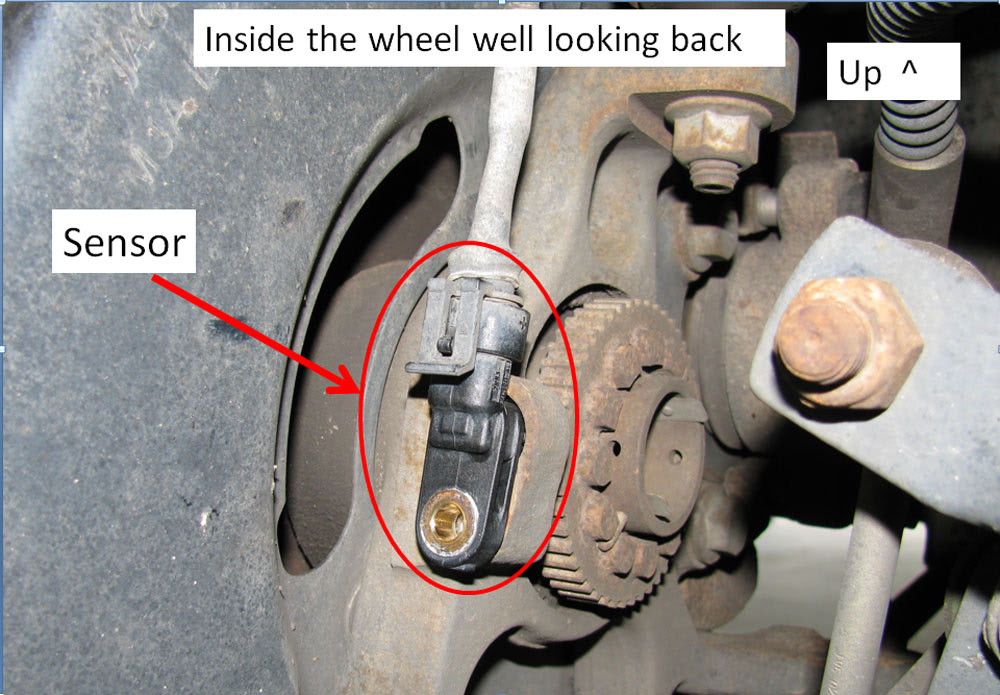
And this picture is from an angle you will never see unless you have the ability to remove your head. This is from within the wheel well looking back. The wheel speed sensor is nice and clean because I have already removed it and cleaned it. Once again, the bolt which holds it in place is not installed in this picture. You can see the bright, shiny brass where the bolt will be inserted. In this picture you can also see the wire harness which plugs into the sensor. Make sure you check the harness for damage.
Removing and Replacing the Rear Sensor
The rear sensor is even easier to get to than the front sensor. After removing the wheel you can easily see the sensor by sticking your head in the wheel well and looking down.
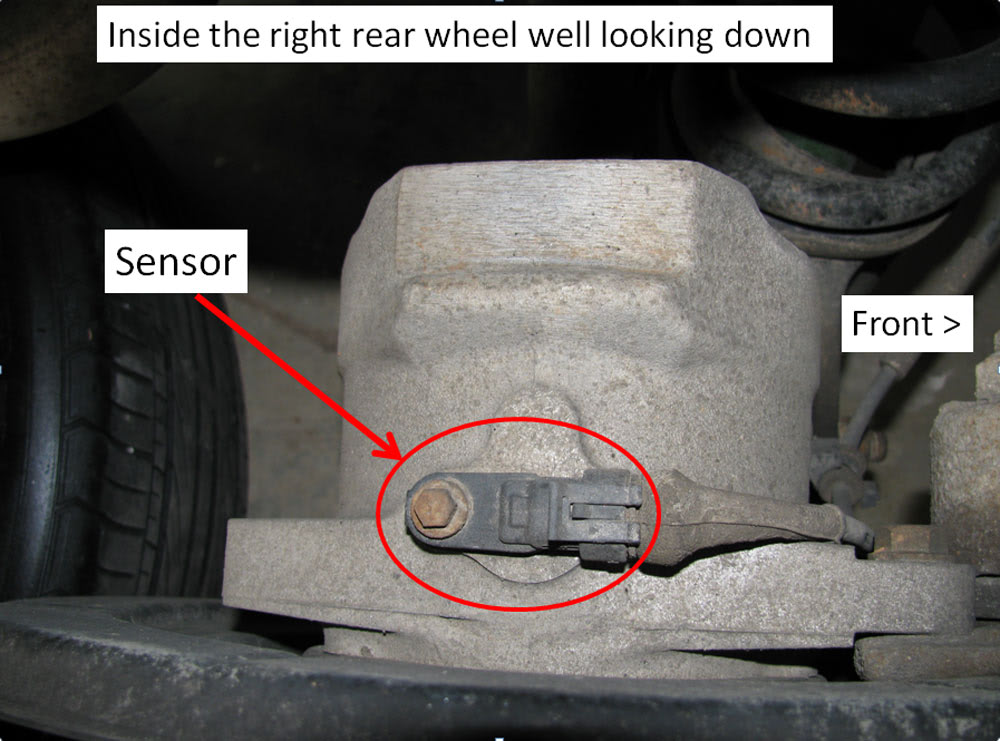
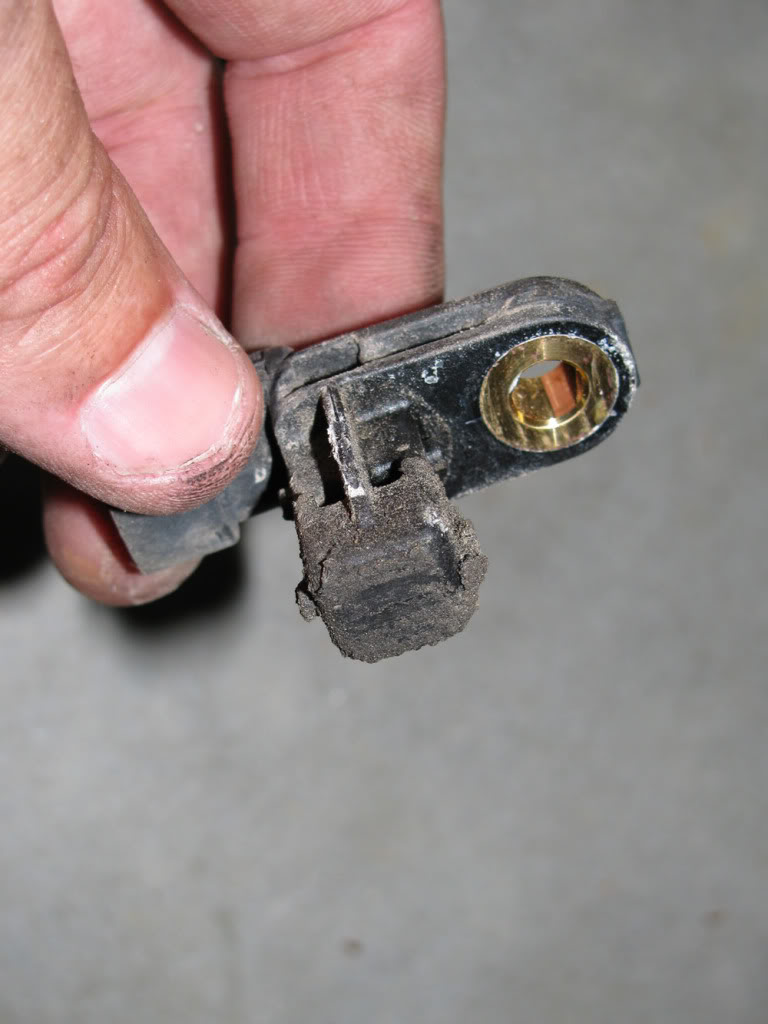
The rear sensor looks exactly the same as the front, except as I mentioned above, it mounts on a housing that hides the little cog thingy. I think that's why the rear sensors were dirtier than the front sensors. The front sensors get washed off any time the car goes through a puddle, but the rear sensors are protected from the elements. grease and other crud builds up on them and it doesn't get rinsed off. Here's a picture of the sensor after it has been removed. You can see the cog thingy through the little hole.
Cleaning the sensor
Here's one of the dirty sensors I removed. This one was the dirtiest, but both of the rear sensors were much dirtier than the front sensors. I think that's because the front sensors are exposed, and the rear sensors are buried in some kind of housing which surrounds the rear axles.
To clean the sensor, simply take it to the kitchen sink and scrub it with a toothbrush and some dish soap. Try not to get any water into the electrical connector end of it. If you do get water in there, it's not the end of the world. Just tap the water out and then wait for it to dry before you reinstall it. You don't want to reinstall it wet because you might end up with some corrosion in the connector.
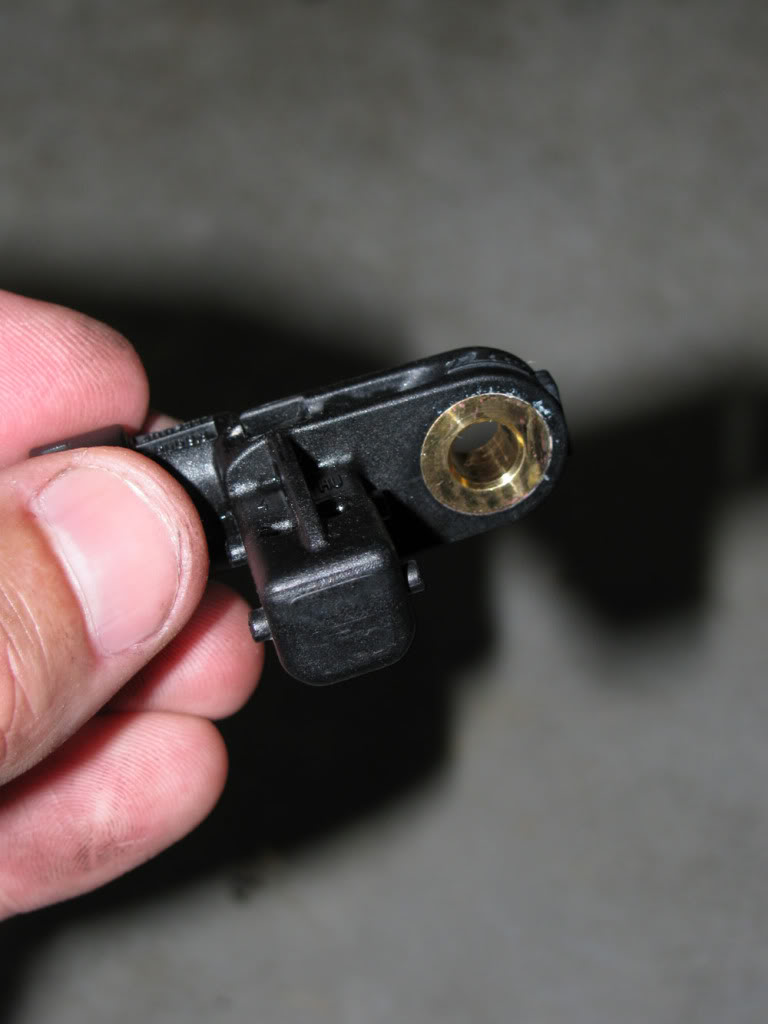
After about 45 seconds with the toothbrush your sensor will end up looking like this:
And that's it! It's really a simple "repair". I've driven my XK8 about 50 miles in city traffic since I cleaned them and the ABS/DSC warnings haven't activated, and I haven't had the faulty clicking from the ABS system. Prior to cleaning the sensors I would have expected it to happen at least 3 or 4 times. Only time will tell if this actually fixed it, but judging by the amount of gunk on the rear sensors, I think dirty sensors were the culprit.
UPDATE!!! I just made a video on how to do this. You don't even need to remove your front wheels! The pictures above are still helpful because they will help you locate the front wheel speed sensors with your hands. You can't really see them because they are hidden by the tire and the front fender. The rear sensor are easy to see once you get the wheels off.
Here is the video:
Jaguar XK8 Wheel Speed Sensors - YouTube
Tools needed:
* 5/16ths inch socket with a ratchet (a 5/16ths inch wrench will work, too)
* Toothbrush
* Dish soap.
Also, you need to take the wheels off. The tools for that are already in the trunk.
Time:
It took me about 90 minutes. If you have an impact wrench and a floor jack it will go faster, but I was just using the jack and lug wrench from the trunk.
Skill Level:
Your daughter could do it.
I did the front wheels first. Just jack up one wheel and take it off. I figured out after I had both front wheels finished that it would have been a little easier if I had turned the wheels in the direction of the wheel sensor I was trying to clean. In other words, when working on the left front wheel, turn the steering wheel to the left. When working on the right one turn the wheel to the right. Make sure you only turn the wheels when both front wheels are on the ground. You don't want the car falling off of the jack.
So here's the tutorial...
Removing and Replacing the Front Sensor
Here is a picture of the front right wheel well. The sensor is on the other side of the rotor and you can't see it in this picture (That's why I said to turn the wheel to the right. It would be easier to access the sensor with the wheel turned to the side.
Here is a picture of the actual sensor. You can see the little cog thingy on the left side of the picture. The sensor bolts on right next to the cog thingy. As the little cogs move past the sensor the sensor detects them and sends a signal back to the ABS system so that it knows the speed of each wheel. In this picture I have already removed the one bolt that holds the sensor in place. It's a 5/16ths inch bolt and it is very easy to access and remove.
By the way... you can see the tire on the right side of the picture because when I was a kid my dad taught me to slide the wheel under the car so that if the car falls off the jack it will still be supported by the wheel. Jack stands will do the same thing. It's just a little safety measure.
And this picture is from an angle you will never see unless you have the ability to remove your head. This is from within the wheel well looking back. The wheel speed sensor is nice and clean because I have already removed it and cleaned it. Once again, the bolt which holds it in place is not installed in this picture. You can see the bright, shiny brass where the bolt will be inserted. In this picture you can also see the wire harness which plugs into the sensor. Make sure you check the harness for damage.
Removing and Replacing the Rear Sensor
The rear sensor is even easier to get to than the front sensor. After removing the wheel you can easily see the sensor by sticking your head in the wheel well and looking down.
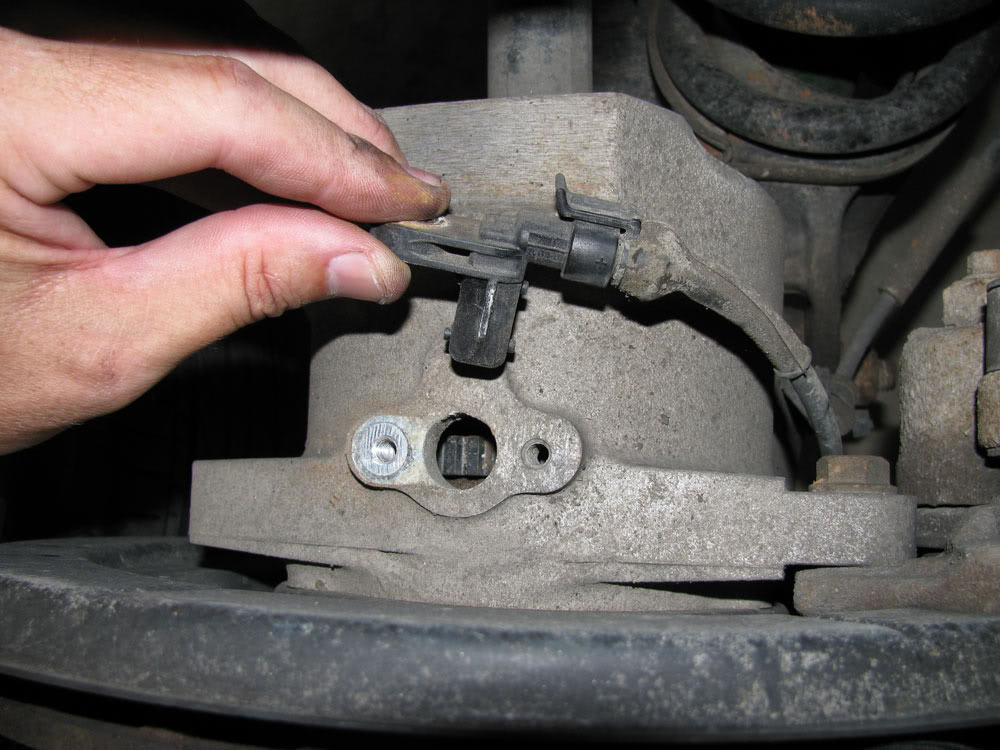
The rear sensor looks exactly the same as the front, except as I mentioned above, it mounts on a housing that hides the little cog thingy. I think that's why the rear sensors were dirtier than the front sensors. The front sensors get washed off any time the car goes through a puddle, but the rear sensors are protected from the elements. grease and other crud builds up on them and it doesn't get rinsed off. Here's a picture of the sensor after it has been removed. You can see the cog thingy through the little hole.
Cleaning the sensor
Here's one of the dirty sensors I removed. This one was the dirtiest, but both of the rear sensors were much dirtier than the front sensors. I think that's because the front sensors are exposed, and the rear sensors are buried in some kind of housing which surrounds the rear axles.
To clean the sensor, simply take it to the kitchen sink and scrub it with a toothbrush and some dish soap. Try not to get any water into the electrical connector end of it. If you do get water in there, it's not the end of the world. Just tap the water out and then wait for it to dry before you reinstall it. You don't want to reinstall it wet because you might end up with some corrosion in the connector.
After about 45 seconds with the toothbrush your sensor will end up looking like this:
And that's it! It's really a simple "repair". I've driven my XK8 about 50 miles in city traffic since I cleaned them and the ABS/DSC warnings haven't activated, and I haven't had the faulty clicking from the ABS system. Prior to cleaning the sensors I would have expected it to happen at least 3 or 4 times. Only time will tell if this actually fixed it, but judging by the amount of gunk on the rear sensors, I think dirty sensors were the culprit.
UPDATE!!! I just made a video on how to do this. You don't even need to remove your front wheels! The pictures above are still helpful because they will help you locate the front wheel speed sensors with your hands. You can't really see them because they are hidden by the tire and the front fender. The rear sensor are easy to see once you get the wheels off.
Here is the video:
Jaguar XK8 Wheel Speed Sensors - YouTube
Last edited by Reverend Sam; 09-02-2011 at 07:41 PM. Reason: Added video instructions.
The following 125 users liked this post by Reverend Sam:
01Silverstone (03-21-2014),
abonano (03-07-2014),
adriaxj8 (11-03-2013),
AlanG (08-19-2014),
Alvin Burns (03-21-2011),
and 120 others liked this post.
#2
05-29-2010, 11:05 PM

Veteran Member
#3
05-30-2010, 02:08 AM
Veteran member
The following users liked this post:
XK8 (04-11-2015)
#4
05-30-2010, 08:08 AM
Senior Member
#5
05-30-2010, 09:07 AM
The following users liked this post:
XK8 (04-11-2015)
#6
05-30-2010, 10:07 AM
The following users liked this post:
XK8 (04-11-2015)
#7
05-30-2010, 12:20 PM
Veteran member
Trending Topics
#8
05-30-2010, 08:26 PM
Day two with the clean sensors and I've had no problems whatsoever since they were cleaned. I now have no doubt that this fixed the issue. Prior to cleaning them I would have expected to the the error messages at least once or twice. This has got to be the easiest and cheapest repair EVER! I think I got a killer deal on this car because the previous owner was having problems. I fixed the problem for no cost whatsoever! It just took a couple of hours of my time (and some great advice from jaguarforums.com)!
The following 3 users liked this post by Reverend Sam:
#10
05-31-2010, 07:44 PM
Veteran Member
Join Date: Nov 2006
Location: Glasgow, Scotland UK
Posts: 47,303
Received 9,005 Likes
on
4,113 Posts

The following 4 users liked this post by JimC64:
#11
06-04-2010, 11:43 AM
#12
09-11-2010, 02:29 PM
#13
09-11-2010, 06:36 PM

The following users liked this post:
steve11550 (11-02-2011)
#14
10-09-2010, 12:08 PM

Thanks for this howto !
A quick note for the folks undertaking this, on my 1997 XK8 there was a ground wire connected underneath the screws on the front sensors. I also noted that the screws had blue loctite thread compound on them (so it may be a good idea to do the same after cleaning).
This can be done without jacking or removing wheels as long as you do turn the front wheels, and you have a short handled combo wrench or rachet. it can be done lying flat on your back at eah wheel. I would recommend using a work light whether or not you choose to remove the wheels. Leaving the wheels on the entire four wheel process can be done in about thirty minutes..
#16
10-10-2010, 07:13 PM

TIMING IS EVERYTHING - This morning, coffee in hand, Jaguar Forum on screen, I reviewed your sensor cleaning post. Later, driving out of driveway, ABS light comes on. Not a problem - went to work like a NASCAR pit crew member and 40 minutes later, out the driveway with no light. Thank you!!!!
#17
10-11-2010, 06:42 AM
TIMING IS EVERYTHING - This morning, coffee in hand, Jaguar Forum on screen, I reviewed your sensor cleaning post. Later, driving out of driveway, ABS light comes on. Not a problem - went to work like a NASCAR pit crew member and 40 minutes later, out the driveway with no light. Thank you!!!!
#19
10-12-2010, 06:22 PM
Veteran Member
My ASC light and TRAC CONT warning have been intermittently coming on the past few weeks as soon as I leave the driveway. I've been pulling over immediatly and shutting off the car, restarting, and the light/warning has gone out every time.
Does this sound like dirty sensors or something else?
Does this sound like dirty sensors or something else?
#20
10-13-2010, 07:07 AM
My ASC light and TRAC CONT warning have been intermittently coming on the past few weeks as soon as I leave the driveway. I've been pulling over immediatly and shutting off the car, restarting, and the light/warning has gone out every time.
Does this sound like dirty sensors or something else?
Does this sound like dirty sensors or something else?
