
Supercharger removal
#1
 07-09-2012, 11:35 PM


Steveinfrance says
The original post by maxwdg
https://www.jaguarforums.com/forum/x...omg-noo-76526/
contains a wealth of detail on the s/c.
Please post to that if you have any comments, this thread is closed to keep it reasonably tidy.
I have tried to condense it down to the nitty gritty.
The original thread still exists.
Please don't be upset if one of your posts has gone - an awful lot of mine have!
This thread is in the XK8 XKR How To sticky under Supercharger removal
Steve
Car: 2003 XKR supercharged 4.2L, 80,000 miles
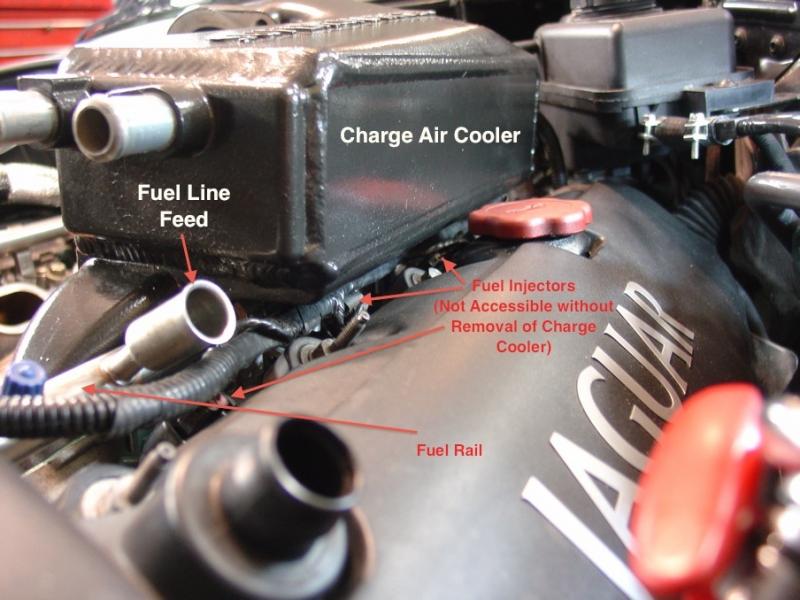
Symptom: Gradual increase of raw fuel smell particularly when cold. Over a couple of weeks this just went from - Huuuh, I think I smell fuel to: Sh*t! Look at that leak!! I can barely see the dripping by looking under the charge air cooler, between the cooler and the top of the valve cover with a flashlight. At a cold start the left side fuel rail's pulsation dampener is dripping fuel on the head so bad its practically a stream!!!! - then within about 30 sec (when the engine idles down) it slows to a drip, drip, drip about once every 10sec.
Solution (possibility): I have seen by a couple of older posts that this is a problem that has cropped up on other's cars too. I did see a part number for the damper AJ84080 (about $40 but I don't know if that was for a 2003 model engine) and heard that the damper, like the injectors, is sealed to the fuel rail by O-rings. Perhaps I can just replace the O ring or rings and not have to replace the entire fuel rail. Anybody??
Huge Scary Problem: It appears as though, I can not get to the fuel rail or the damper (or injectors) WITHOUT TAKING THE ENTIRE TOP OF THE ENGINE OFF!!!! Is this the case !!!!! AaaaaaahhhhhHHHH!!! Off comes the Supercharger, Charge Air Coolers, Ten coolant hoses, $180 worth of gaskets and two days of work to get to the fuel rail??? Please tell me this isn't true... There HAS to be an easier way to repair such a seemingly simple problem. I saw that member "Tomcaticus" had the same problem (in Dec 2011) and had it repaired professionally a cost of 4 hours of labor - but I have a sneekin' suspicion Tom's XJ was not supercharged.
This one's a big one for a DIY guy like me, aint it?
Any help, ideas and/or commiserating would be appreciated...
-Max
The original post by maxwdg
https://www.jaguarforums.com/forum/x...omg-noo-76526/
contains a wealth of detail on the s/c.
Please post to that if you have any comments, this thread is closed to keep it reasonably tidy.
I have tried to condense it down to the nitty gritty.
The original thread still exists.
Please don't be upset if one of your posts has gone - an awful lot of mine have!
This thread is in the XK8 XKR How To sticky under Supercharger removal
Steve
Car: 2003 XKR supercharged 4.2L, 80,000 miles
Symptom: Gradual increase of raw fuel smell particularly when cold. Over a couple of weeks this just went from - Huuuh, I think I smell fuel to: Sh*t! Look at that leak!! I can barely see the dripping by looking under the charge air cooler, between the cooler and the top of the valve cover with a flashlight. At a cold start the left side fuel rail's pulsation dampener is dripping fuel on the head so bad its practically a stream!!!! - then within about 30 sec (when the engine idles down) it slows to a drip, drip, drip about once every 10sec.
Solution (possibility): I have seen by a couple of older posts that this is a problem that has cropped up on other's cars too. I did see a part number for the damper AJ84080 (about $40 but I don't know if that was for a 2003 model engine) and heard that the damper, like the injectors, is sealed to the fuel rail by O-rings. Perhaps I can just replace the O ring or rings and not have to replace the entire fuel rail. Anybody??
Huge Scary Problem: It appears as though, I can not get to the fuel rail or the damper (or injectors) WITHOUT TAKING THE ENTIRE TOP OF THE ENGINE OFF!!!! Is this the case !!!!! AaaaaaahhhhhHHHH!!! Off comes the Supercharger, Charge Air Coolers, Ten coolant hoses, $180 worth of gaskets and two days of work to get to the fuel rail??? Please tell me this isn't true... There HAS to be an easier way to repair such a seemingly simple problem. I saw that member "Tomcaticus" had the same problem (in Dec 2011) and had it repaired professionally a cost of 4 hours of labor - but I have a sneekin' suspicion Tom's XJ was not supercharged.
This one's a big one for a DIY guy like me, aint it?
Any help, ideas and/or commiserating would be appreciated...
-Max
Last edited by steveinfrance; 11-09-2012 at 08:57 AM.
#2
07-10-2012, 02:25 AM
Veteran Member
JTIS, I fear, confirms your worst nightmare. Maybe someone has done this another way but it starts with
Remove Charge Air cooler,
and the first line of that section starts Remove supercharger.
Great engineering.
Without the supercharger it is an easy job.
Remove Charge Air cooler,
and the first line of that section starts Remove supercharger.
Great engineering.
Without the supercharger it is an easy job.
#3
07-10-2012, 04:29 AM
Veteran Member
What a great opportunity to swap to a TS ;-)
But seriously, it is a good opportunity to have the injectors professionally cleaned.
But seriously, it is a good opportunity to have the injectors professionally cleaned.
#4
07-10-2012, 11:34 AM
Yeah, Dreaming about what could be 500-600 HP after a new TS supercharger actually makes the inevitability of future hours bent over the fenders a bit more interesting and fun to think about - but, alas, in "todays economy" I pretty much know what's in store for me.... My best hope is that I fix the leak and get all the pieces put back together (with a bit of cleaning here and there) and my beauty runs well again.
I have the JTIS disk for my car - but it wont run AT ALL on any of the computers I have at hand - I work on MACs exclusively and we don't own a PC at home either.... Could one of you guys kindly transfer the sections for removal of the supercharger and charge air coolers to a .pdf for me. I can probably figure out how to do the job on my own, but the factory procedure is always helpful, right?
Avos, you have a good idea re: the injector cleaning - can you or anyone else point me toward a reputable, tried and true vendor in the states?
Does everyone recommend slotting that blasted bolt hole on the back of the SC to facilitate reassembly? Also, I presume replacing that nasty coolant hose under the supercharger would be advisable too, huh?
I'm getting into "my ZEN" by listening to soothing music and doing back exercises in preparation for this trial.
Thanks guys!
#5
07-11-2012, 10:55 AM


Graham,
Yes please OP will need the 18 50 15 section starting
Remove the throttle body.
Remove the exhaust manifold to exhaust gas recirculation (EGR) valve tube.
Remove the supercharger outlet pipe.
and going on for several days.....
En passant, as we might say, is it worth a JIC replacement of the knock sensor while he's got the chest cavity open?
Free Cloud Storage - MediaFire
That's certainly getting into the guts of the beast. Well worth a close inspection of the entrails otherwise hidden from view for any timely transplants.
Graham
#6
07-20-2012, 07:01 AM
Well, I have the top of the engine taken off! That was a bit of a time consuming ordeal - but I just had to dive in and get too it. (It took me about 6 hours.)
I was able to get the injectors and rail off and they have been sent for cleaning and inspection to "InjectorRX" in Houston,TX.
As my luck would have it, In an attemp to find the leak, I pulled the system off the engine as a whole (leaving the injectors in place,) plugged the fuel inlet, added fuel until I felt the rails were entirely full and using schrader valve pressurized valve to 45psi. I found no leaks whatsoever!!!! What appeared to be a bad leak at one of the pressure dampers could NOT be found! I was pretty disillusioned... I hope InjectorRX finds the leak.
Anyway, while I have the "chest cavity" of my engine open - I thought it best to replace the inaccessible things that are libel to go kaput in the future - Like the knock sensors and the evil rubber hoses. But....
I can't find part numbers I am confident are accurate for the hoses (please see attachment) anywhere I have looked. If one of you guys knows for certain what the P/N for the hoses I have marked in the pic as "A" and "B" please let me know.
Thanks again guys - A full write up of this ugly job is in the future...
#7
07-20-2012, 07:31 AM
Veteran Member
Iirc the normal operating pressure is 65 psi or so fo rthe 4.2 engines. En once you floor it, you need to add the 11 psi boost as well, so in total you can get 76 psi.
Trending Topics
#8
07-22-2012, 05:47 PM
Max,
Hoses
2003 Jaguar XK8 & XKR - Heater Pipes.pdf
It's under 'Heating' and not 'Engine Cooling' in the Parts Manual.
Graham
Hoses
2003 Jaguar XK8 & XKR - Heater Pipes.pdf
It's under 'Heating' and not 'Engine Cooling' in the Parts Manual.
Graham
Last edited by steveinfrance; 08-10-2012 at 09:33 AM.
#9
07-22-2012, 10:16 PM
While I'm waiting for the injectors, rails and gaskets to arrive in the post, I have time to do a bit of detailing.
I decided that the top of my engine could look a whole lot better with a major cleaning and a change of finish. I cant take credit for the idea - I saw a similar color detail in a pic here on this forum several years ago. I remembered that as I worked what you see in the attachments. It's not powder-coat, Its "500 degree high temp enamel" color coat with a high-temp clear over the top.
I realize, with paint, have to be very careful not to scratch things up when I re-assemble the pieces!
My wife didn't get mad and was actually impressed with how the setup looked when she came home from shopping and found this setup on the kitchen counter!
Admission: It probably helped my case that, yesterday, I painted lady bug designs on her fingernails, huh? Hey! You got to give a little to take a little right ???
First pic is the before, the others I shot tonight.
The following users liked this post:
TrevLevin04XKR (10-31-2017)
#10
07-23-2012, 12:36 PM
Thanks for the nice comments guys!
I know I can make things look nice. But now the bigger challenge, get it all back together with no leaks and have it run right... The FIRST time.
BY THE WAY... Jaguar dealer Parts man in Atlanta has a different P/N for the Heater Feed Hose than was showing on the .pdf that Graham found for me. He said that "R" cars have a different hose than the XK8s. He also said that a "3 way connector toward the back of the engine on the Left side almost always brakes so order that part along with the hoses when you are doing this job.
Heater Feed Hose PN: AJ87634
Heater Return Hose PN: NNE3946CA
3 way Connector PN: NNE3944BA
With shipping the order was just over 36 dollars
Last edited by steveinfrance; 08-10-2012 at 09:33 AM.
#11
07-24-2012, 11:53 AM

Join Date: Sep 2008
Location: Damon /Houston, Texas
Posts: 7,254
Received 2,183 Likes
on
1,355 Posts
When you go to reinstall. The bolt on the back that mounts the sc to the engine needs to be installed first, and slot the sc mount. Then slide the sc down under the bolt and tighten youll spend wayyyyy too much time other wise trying to start the bolt and tighten it with limited access.
Last edited by steveinfrance; 08-10-2012 at 09:34 AM.
The following users liked this post:
benfbrown (02-11-2020)
#12
08-01-2012, 03:33 PM
I got the injectors and fuel rail back from "InjectorRX" last Saturday.
To Recap: I found fuel leaking from appeared to be the pulsation damper on the left fuel rail. After the rails were removed from the engine, I could not reproduce the leak in my him shop....So I needed my rails pressure checked to ID the leak and fix the problem. I also chose this opportunity to have the injectors cleaned and verified as well. Additionally, I wanted to replace the rubber heater hoses and knock sensors that are located under the supercharger - they are all subjected to very high temperatures and prone to leak/malfunction.
Chris from Injector RX was very willing and interested to develop a way of pressure testing the rails. He had not been asked to do this before, but welcomed the challenge. I received a call about 4 days after I had sent my rails and injectors to his shop. He duplicated the leak - It WAS the pulsation damper. Chris found that the O-rings that seal the damper to the rail had deteriorated to the point that they would not hold a seal at the fuel system operating pressure. He said that the o-ring's poor condition were consistent with alcohol damage he had seen in other applications (marine systems are his specialty) in recent times. Straight high-test unleaded gasoline is a very rare find in and around the Kansas City area - so his assessment didn't surprise me.
Chris replaced the o-rings on each rail's pulse dampers and pressure tested the system under-water for two days. He pronounced them good-to-go and after cleaning the injectors sent them back to me. My cost for his work was approx. $210.00.
You can see the injector report attached as a file below.
I have been too busy with life to devote as much time as I'd like to finishing this project.... But, I AM making progress. The following pics show whats up in the "chest cavity" of my little green beast.
You will see that in an attempt to shield the new heater hoses from the exorbitant heat they must endure under the supercharger, I have "aluminized" them with HVAC aluminum tape before putting them in place. I may have wasted my time with this little "shade-tree mechanic" trick - but I figured it couldn't hurt and it just may reflect a bit of the heat away from the rubber hoses... I really don't want to take this thing apart again for a coolant leak caused by a confound hose! You can also see the new knock sensors - also replaced as a preventative measure.
More Later.
#13
08-04-2012, 11:05 AM
There was a big push last night - to get "Sir Hiss" put back together...
Six hours after the start of the reassembly - It starts! It Runs!!!
Real rough for about the first 10-15 seconds - then it smoothed out and purred, just as normal... All good so far, right?
Let it come up to operation temperature, checking for fuel and coolant leaks: We found none.
Turned engine off and topped off coolant.
Started it up and took it for first shake-down run.
First mile was all good... Then... bump, bump, two hesitations at about 3/4 throttle acceleration. Slowed down and attempted second fast acceleration and BAM! The RUDE "restricted performance" hit and all fun was gone.
OBDII reader sez: P0300, P0304, P0306, P1314 & P1000 Also, the "D" on the shifter is flashing red and it will not go into "sport mode" to allow manual shifting.
I cleared the codes, but after codes were reset, car was definitely still missing, and the transmission would not go back into the sport mode. But no code were thrown right away. I drove slowly back to my shop and it threw the same codes within in a minute of driving. The trans was still doing it's automatic "we know better than you" up-shifting into 6th gear by 30 mph sh*t. - I HATE THIS TRANSMISSION, by the way.
Wow! What a let-down..... With two very competent mechanics doing the re-assembly, everything went back together with ease. We both expected it to run perfect right out of the garage - because it was running perfect when I found the fuel leak that started this whole thing.
We know what the codes mean, and thought of many of the things that might cause those codes, but we're stumped at the moment.
We checked all the obvious things that we had worked on. Professionally cleaned fuel rails, and injectors - all installed correctly... Electrical hooked up correctly, no leaks (Fuel or Coolant.) Nothing has reared it's head. We started thinking - Plugs, wires, coil packs...... But WE DIDN'T TOUCH THAT STUFF - why would any of THAT suddenly take a dump??
As I type this on Sat Morning, I'm preparing to head downstairs to my man-cave of a shop to ponder over my sick buddy some more....
Any suggestions?
#14
08-05-2012, 11:16 AM
Thanks Steve and Enderle: I'm still open for suggestions...
With another four hours of experimentation and searching for the obvious yesterday (including running propane around all the vacuum hose connections) this is what I know.... It's beginning to appear that the miss-firing and "restricted performance" happens only when the car has been running for a while - basically when it's up to full operating temperature.
I made several test drives - each ending with the damn "restricted Performance" showing up. However......
Last night with the ambient temp outdoors being about 82f/28c degrees the car ran well for about 5 miles of moderate to hard driving, then, again, while waiting at a stop sign to turn right, she started to miss-fire at idle again. I pulled out onto a four-lane and booted her pretty good and she accelerated fine... I didn't expect that. I was only about a mile from home, so I headed back. She ran perfectly the rest of the way. WTF??? I checked the codes and got nothing. Hmmm? So I put her to bed and went on with my evening.
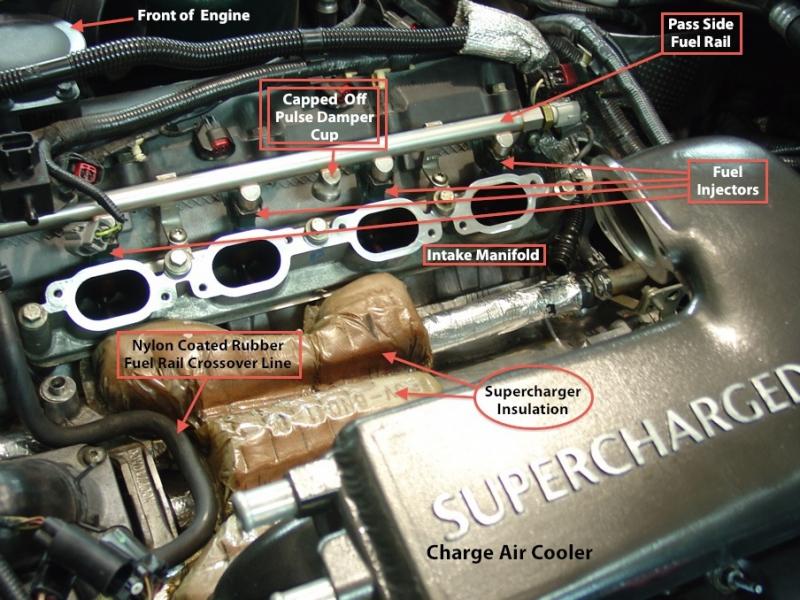
Anyhow, as promised, here are more detailed pictures of the reassembly process done Friday night. Taken when I was still in a good mood and anticipating a late night ride in a perfectly running Jag. Should have known better....
By the way, Brutal, as you can see from one of the pics, I slotted the back supercharger bolt - something that you and several others on the forum have suggested. But I must say, that I'm still confused about why I needed to do that? The bolt was completely accessible for tightening with a standard 3/8 drive ratchet with a extension and a 10mm socket.
Perhaps the ease of access to that bolt in my situation was because I had taken the throttle body and manifold off of the supercharger in situ or before I removed the supercharger. Conversely, when I installed the S/C - BEFORE I attached the T/B manifold to the S/C the rear bolt was easy to get to.
Understandably, we each approach a problem our own creative ways and I, for one do certainly appreciate ANY and ALL suggestions, so, indeed, Thank You! And Hey! At least I didn't have to do ANY alining of THAT particular bolt - Mr Supercharger slipped right in there !
Here's some pics... I hope that somebody gets some better understanding out of being able to see just what is under that mess on top of our "R" models.
With another four hours of experimentation and searching for the obvious yesterday (including running propane around all the vacuum hose connections) this is what I know.... It's beginning to appear that the miss-firing and "restricted performance" happens only when the car has been running for a while - basically when it's up to full operating temperature.
I made several test drives - each ending with the damn "restricted Performance" showing up. However......
Last night with the ambient temp outdoors being about 82f/28c degrees the car ran well for about 5 miles of moderate to hard driving, then, again, while waiting at a stop sign to turn right, she started to miss-fire at idle again. I pulled out onto a four-lane and booted her pretty good and she accelerated fine... I didn't expect that. I was only about a mile from home, so I headed back. She ran perfectly the rest of the way. WTF??? I checked the codes and got nothing. Hmmm? So I put her to bed and went on with my evening.
Anyhow, as promised, here are more detailed pictures of the reassembly process done Friday night. Taken when I was still in a good mood and anticipating a late night ride in a perfectly running Jag. Should have known better....
By the way, Brutal, as you can see from one of the pics, I slotted the back supercharger bolt - something that you and several others on the forum have suggested. But I must say, that I'm still confused about why I needed to do that? The bolt was completely accessible for tightening with a standard 3/8 drive ratchet with a extension and a 10mm socket.
Perhaps the ease of access to that bolt in my situation was because I had taken the throttle body and manifold off of the supercharger in situ or before I removed the supercharger. Conversely, when I installed the S/C - BEFORE I attached the T/B manifold to the S/C the rear bolt was easy to get to.
Understandably, we each approach a problem our own creative ways and I, for one do certainly appreciate ANY and ALL suggestions, so, indeed, Thank You! And Hey! At least I didn't have to do ANY alining of THAT particular bolt - Mr Supercharger slipped right in there !
Here's some pics... I hope that somebody gets some better understanding out of being able to see just what is under that mess on top of our "R" models.
The following users liked this post:
mkrion (03-16-2017)
#15
08-06-2012, 01:29 AM
Veteran Member
Since we're on a straw grasping mission here and the problem is heat related - did you bleed the supercharger properly?
Install the expansion tank pressure cap.
Remove the supercharger coolant fill plug.
Remove and discard the sealing washer.
Place a suitable cloth around supercharger fill port.Jaguar recommends filling the cooling system with softened water
Top up the coolant through the supercharger fill port.
Coolant may spill from supercharger fill port when ignition switched on.
Switch ignition on.
not allow the supercharger water pump to run dry for more than one minute.
Failure to follow this instruction may result in damage to the vehicle.
Allow the supercharger water pump to run and top up the coolant through supercharger fill port.
Switch the ignition off.
Install the supercharger coolant fill plug
#16
08-06-2012, 03:08 AM
Thanks again Steve for the detailed instructions on bleeding the charge-air cooling system. I think you are on to something. I was suspecting as much yesterday. I thought I had bled the system correctly when we took her out for the first test runs - but I certainly didn't do all that your instructions specified. Today, I was able to add quite a bit of coolant to the charge-air and the main cooling system(about 500 to 700 ml total) A bubble perhaps? That doesn't seem like much, but it may have been enough. I was able to drive the car, spiritedly, for about 20 minutes today without a single misfire or "restricted performance" event. Yeah! I will use use your instructions to attempt to add even more coolant tomorrow morning. I hope it really is that simple of solution! And I hope I had not damaged anything by getting it too hot - my test drives were quite short, so I trust I'm in luck there..... Crossed fingers
In the meantime, I took the time to add a few more pics to this thread - with written details within the pic. I really hope to help folks see what is involved in with this repair - mostly, so that they will not feel so intimidated that they will not attempt a repair themselves.
It really has not been super difficult - just time consuming. And the good news is that I have less than $400.00 invested in what others have said was well over a $2500 repair! My hometown dealer quoted me $3100.00 for handling the repair for me. Hack! Choke! Cough! I thank the Lord that I was granted the stubborness and courage to take things like this on myself. Also, I DO NOT ever forget the supreme helpfulness of a like-minded group hanging out here! Thanks again guys.
Here's more pictures.
Last edited by steveinfrance; 01-07-2013 at 05:31 AM.
The following 3 users liked this post by maxwdg:
#17
08-06-2012, 11:40 AM

Just for giggles---make sure the I/C aux. pump is running. I'm with Steve's suggestion that it sounds like there wasn't enough coolant in the I/C cooling circuit. I would also check the I/C aux. pump fuse just to eliminate that possibility as well. Good Luck. This is like reading a murder mystery.
I would add to that, had a similar issue and it turned out to be the pump, they tend to fail. A new Jaguar pump is about $400, you can get a peformance ford intercooler pump (and wire it in) for about $90 and it is a far better pump.
#18
08-07-2012, 10:22 AM
I'm going to very tentatively pronounce this project a success...
I say this with trepidation because - well.... I own a Jag, and the spirits of Coventry, I think, have never been happy with us "yankees" even owning one of the "Wooorld's finest Motah-caaahhs."
I topped the I/C coolant system off yesterday morning before heading off to work. I used the procedure that Steve's post outlined. When I opened the supercharger coolant fill plug the coolant was at or near the top (with the ignition off) when I turned the ignition on a could hear the pump running and the level did drop a little bit. I was able to add no more than a couple of shot glasses worth of coolant to the system. So it looks like I had the system fairly full before. I then checked the expansion tank and found it full also.
The car ran well on the trip to and from work - and the trip home the ambient temp outside was 100f/38c degrees. So I think I may be "good to go!"
I must have had a "bubble" in the I/C-supercharger cooling circuit during the first few test drives. Thanks for all your suggestions guys!
Wow, that air coming out of the S/C must be incredibly HOT!!! I'm amazed that all those big V8s with the blower sticking out of their hoods with the straight shot from the blower output directly into the cylinder heads and no inter-coolers actually function without major problems. This realization really makes me think that a methanol injection system or a "Killer Chiller" may be a really decent investment for our XKRs - particularly for cars, like mine, that have the smaller S/C pulley modification.
At this point, all seems back to normal, and no fuel or coolant leaks. Add to that, the added visual impact of a nice new clean look under the hood and the satisfaction of performing this minor-turned-major repair done for approximately one TENTH of what a dealer would charge makes this a wonderful thing!
Thank you all for being at my side in a virtual way through-out my work.
I trust my pics and write-ups can be helpful to others in the future.
"Sir-Hiss" lives to wow the peeps of Mid America AGAIN !!!
Cheers!
The following 7 users liked this post by maxwdg:
CaleyThistle (01-15-2015),
CharlzO (05-10-2018),
jimejag (11-14-2021),
khlee (01-14-2021),
mkrion (05-08-2017),
and 2 others liked this post.

Thread
Thread Starter
Forum
Replies
Last Post
aholbro1
XJ XJ6 / XJR6 ( X300 )
17
08-05-2021 05:02 AM
Currently Active Users Viewing This Thread: 1 (0 members and 1 guests)

