
xk8 center dashboard light replacement
#1
 04-30-2013, 04:33 PM


i had the lights repalced last year in the main/driver cluster by the dealer($150+ ugh) - and I understand from on-line videos why and how time consuming it is. I had all lights replaced while they had the whole dash pulled apart!
Now, one light is out in the center dash (behind the fuel guage) and am wondering if its easier for me to do it DIY??
Any tutorials or info on how to do this??
Thanks
Now, one light is out in the center dash (behind the fuel guage) and am wondering if its easier for me to do it DIY??
Any tutorials or info on how to do this??
Thanks
#2
04-30-2013, 05:29 PM

Welcome to the forum chalmin,
If the dealer replaced all eight bulbs in the Instrument Pack last year, it's unusual to have one blow so fast. This could be a broken track on the circuit board. Removing the Instrument Pack and changing bulbs is straightforward. Opening it up to examine and repair the board is more complicated but still a DIY fix. Are you OK with a set of written instructions and diagrams?
When you get a minute, please follow this link New Member Area - Intro a MUST - Jaguar Forums - Jaguar Enthusiasts Forum to the New Member Area - Intro a MUST section and post some info about yourself and your vehicle for all members to see. In return you'll get a proper welcome and some useful advice on posting to the forum.
Graham
The following users liked this post:
Don B (12-10-2018)
#3
05-01-2013, 04:10 PM
Hi Graham,
Thanks for the response. I will certainly register in the Forum following this exchange. I looked at the suggested requirements and they seem fair and logical.
As for the lights, the dealer replaced all (3??) in the main, or left cluster that illumiate the speedometer and tach (only). Now one of the lights in the center dash (behind the fuel guage) is out. I would certainly try to replace all bulbs that are in the cluster if I try to access.
I would appreciate instructions on how to proceed.
Thnaks again,
J.P.
2005 XK8
67,000 miles
4.2L engine
#4
05-03-2013, 03:52 AM
There's 8 bulbs in the Instrument Pack - 2 different sizes. Is this the area (arrowed in red) on yours that's out?
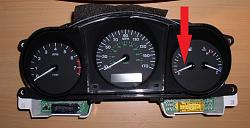
If so, it will be the small size bulb arrowed in blue that needs to be replaced:
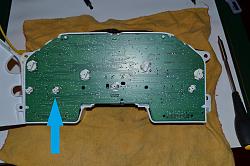
You do NOT need to open the Instrument Pack to replace bulbs - just remove the unit from the vehicle. I had an issue on the board that needed fixing when this pic was taken.
When one bulb has gone, I'd replace the set when the Instrument Pack is out. Two ways to approach this. Either from the Jaguar Dealer who will supply bulbs complete with holders or source aftermarket bulbs only.
If I've identified the correct bulb and you want to do this yourself, post back here and I'll post instructions for removing and replacing the Instrument Pack.
Graham
The following 4 users liked this post by GGG:
#5
05-06-2013, 08:17 AM
Hello Graham,
Thnaks for the response and detailed inforamation. I made a mistake in describing which of the dash lights is out - it's actually the one behind the oil pressure gauge (in the center dash section).
All of the bulbs in the primary, driver's cluster were replaced last year by the dealer. From your information and on-line instructional video, that seems like a long and delicate task. I hope that the center cluster is easier to access?
Thanks,
J.P.
#6
05-06-2013, 08:27 AM
Senior Member
Easy one. Pull the wood Trim off carefully. There are 4 screws holding the instuement cluster. Remove them and you can pull out the cluster to access the bulbs without disconnecting the harness. There are 2 bulbs that twist in. They are standard bulbs. Take them to your auto supply store and replace both. Reverso the proceedure to complete.
The following 2 users liked this post by DaveC:
Orthodixie (02-21-2018),
stetson1 (11-27-2014)
#7
05-06-2013, 08:38 AM

Veteran Member
There's 8 bulbs in the Instrument Pack - 2 different sizes. Is this the area (arrowed in red) on yours that's out?
Attachment 41574
If so, it will be the small size bulb arrowed in blue that needs to be replaced:
Attachment 41575
You do NOT need to open the Instrument Pack to replace bulbs - just remove the unit from the vehicle. I had an issue on the board that needed fixing when this pic was taken.
When one bulb has gone, I'd replace the set when the Instrument Pack is out. Two ways to approach this. Either from the Jaguar Dealer who will supply bulbs complete with holders or source aftermarket bulbs only.
If I've identified the correct bulb and you want to do this yourself, post back here and I'll post instructions for removing and replacing the Instrument Pack.
Graham
Do you know where i can buy a complete WHITE LED lamps kit for my XKR 2005 dashboard? ( without navy ).
The following users liked this post:
Orthodixie (02-21-2018)
Trending Topics
#8
05-06-2013, 08:50 AM
That is the Instrument Cluster and it's easier to do.
1. disconnect the battery ground cable (not essential but safer when working on the electrics.
2. remove the Centre Veneer Panel:
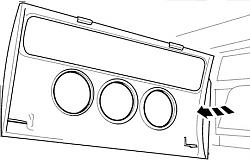
This is secured with four spring clips. To release it, gently prise the bottom out with a thin plastic or wooden spatula and then pull to release from the top two clips. Watch the clips - they have teeth like a rabid dog!
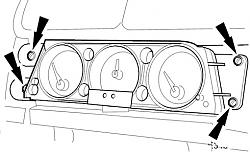
3. remove the four gauge module screws:
4. disconnect the harness connector
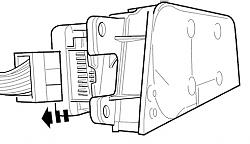
The bulb holders rotate to release.
Graham
1. disconnect the battery ground cable (not essential but safer when working on the electrics.
2. remove the Centre Veneer Panel:
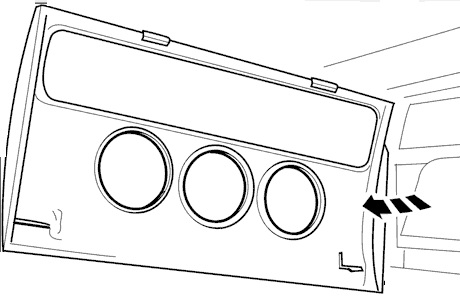
This is secured with four spring clips. To release it, gently prise the bottom out with a thin plastic or wooden spatula and then pull to release from the top two clips. Watch the clips - they have teeth like a rabid dog!
3. remove the four gauge module screws:

4. disconnect the harness connector

The bulb holders rotate to release.
Graham
The following 6 users liked this post by GGG:
Orthodixie (02-21-2018),
piper 888 (11-09-2021),
stetson1 (11-27-2014),
toaster (03-31-2018),
wcben (11-29-2014),
and 1 others liked this post.
#9
05-06-2013, 08:54 AM
I always stick with the standard Jaguar bulbs in the Instrument Pack and Instrument Cluster.
Have a vague recollection of a post mentioning issues with LEDS and the member went back to standard bulbs but I can't find the post.
Graham
The following users liked this post:
User 070620 (05-07-2013)
#10
05-06-2013, 09:26 AM
Veteran Member
The best domestic site for me has been LED Lights, Bulbs & Accessories - SUPER BRIGHT LEDS
They are easy to communicate with, and have everything you could ever need in the way of LED. There is also an interchange source list on their site.
The following users liked this post:
User 070620 (05-07-2013)
#11
05-06-2013, 12:24 PM
Veteran Member
https://www.jaguarforums.com/forum/x...s-video-40235/
The following 2 users liked this post by Jag#4:
GGG (05-06-2013),
Orthodixie (02-21-2018)
#12
05-07-2013, 04:30 AM
Veteran Member
https://www.jaguarforums.com/forum/x...dimming-38712/
now, if you know, tell me what type of dashboard lamp i must order and the number ( 3 instruments type without navy )
I think that XKR/8 need more T4 bulbs and more similar T3 bulbs but i'm not shure.
The following users liked this post:
Orthodixie (02-21-2018)
#13
05-07-2013, 06:44 AM
#14
07-12-2014, 09:15 PM
Junior Member
Changing the dashboard lamps is one of those unfortunate necessities of car ownership.
There is a nice YouTube video on this subject, but for those of you wonderful XK8 owners who like a procedure (as I do)... here you go:
Replacing Jaguar XK8 Dashboard Lamp Bulbs
There is a nice YouTube video on this subject, but for those of you wonderful XK8 owners who like a procedure (as I do)... here you go:
Replacing Jaguar XK8 Dashboard Lamp Bulbs
Michael Herman
October 20 2012, redone July 11, 2014
October 20 2012, redone July 11, 2014
Buy bulbs in advance of this procedure. You will need
4 Large bulbs: Sylvania 2821 LL or Philips 194,
4 Small bulbs: Sylvania 2723 LL or Sylvania 37LL or Philips 37.
I found the Sylvania 37LL lasted about 4 years. I therefore replaced the Sylvania 37LL and 2821LL with Philips 37 (=37LL) and 194 (=2821LL) on July 11, 2014. Cost is $5 for 2 bulbs, at Pep Boys, a nationwide US chain.
Tools: 7mm and 8 mm sockets (shallow sockets are fine) and a socket wrench to drive them. You need a 10mm wrench to disconnect the Battery ground terminal. You also need a long magnet (such as a magnetic screw retriever tool common in auto repair work) to prevent screws from dropping. Philips #2 screwdriver. The entire procedure will takes about an hour the first time, or could be done in about 35 minutes with practice.
Video
Step
Activity
Accumulated Time
Use the button on the left of the steering column to move the steering wheel UP and out.
0 min (start)
2.
1 min
3.
5 min
4.
7 min
5.
6.
7.
Then turn the steering wheel knob control to OFF so it does not park back in when you open the door.
8 min
8.
9 min
9.
KEEP THE DRIVER DOOR OPEN or retract its glass down so the doors will open and close without power.
10 min
10.
12 min
11.
12.
14 min
13.
16 min
14.
19 min
15.
16.
22 min
17.
24 min
18.
30 min
19.
20.
21.
40 min
22.
You rotate the display dashboard panel (which has the light bulbs) facing downward, above the steering wheel, so it can be pushed into the cavity. Push it back in and rotate it to face forward, reversing the way you removed it.
Before you secure its 4 copper colored bolts (with 7mm heads), be sure that you pull the wiring for the black connector above the electronics panel, so it can be reconnected to the front woodgrained panel.
After you put the 4 bolts (7mm heads) in, re-install the triangular vent cover to the left.
Then install the electrical connector for the trip on the top right of the woodgrained dashboard cover, and slip the two large top tabs under the top of the dashboard. Then screw down the 2 philips head screws.
Then slip the top of the knee "bolster" into its top groove, and re-attach the valet switch on its left. Then install the 2 copper colored bolts (8mm heads).
Finally, reattach the battery terminal, and put its battery panel back on top.
All done...
About 60 min
The following 9 users liked this post by mherman346:
Jag#4 (07-13-2014),
Jon89 (02-21-2018),
Kimbene (05-17-2015),
Orthodixie (07-11-2017),
piper 888 (11-09-2021),
and 4 others liked this post.
#15
07-24-2014, 04:38 PM
I just replaced the bulbs in the instrument cluster, HVAC panel and center consul switch panel. The most challenging part is finding all of the correct bulbs without tearing it all apart first. For others who may wish to do the same, the following is a list of the bulbs required by panel:
Instrument panel: 4ea 194 long life bulbs (Clear lens) & 4ea 37 or 24 long life (Clear lens) bulbs.
HVAC panel: 7ea T3 neo wedge (Blue lens), 1ea T3 neo wedge (green lens) & 2ea T4 neo wedge (Blue lens).
Center consul switch cluster panel: 5ea T4 neo wedge (blue lens) & 1ea T4 neo wedge (White lens).
I ordered the bulbs from Automotive Household Truck Trailer RV Lighting Led Light Bulbs and received them in three days. I previously tried LED's but they failed quickly and were too bright. I would recommend sticking with the incandescent bulbs.
The following 3 users liked this post by CapnPete:
#16
11-22-2014, 02:08 PM
Veteran Member
Well I just went through this today and have a couple of lessons I learned. One of the bulbs is burned out (the one that illuminates the left side of the tach). First lesson is to not pay attention to the Jaguar parts numbers. I went and ordered 4 bulbs/holders that were indicated to be "illumination" bulbs. The part number indicated for these is XR83865. The first mistake I made was I should have looked at the bulbs before tacking the project. I went through Sam's video and Mike's excellent write-up and took my time and had everything out in about 45 minutes (I was going painstakingly slow).
Then when I took the old bulb/holder out I could see it was burned out but the bulb is LARGER than the ones I ordered. Turns out that the Jaguar EPC has the bulbs identified backwards. The larger bulb is clearly for illumination and the CORRECT part number is LJA4390BA (the parts catalog erroneously had this number for the WARNING lights. To be clear the illuminating bulbs are big and the warning light bulbs are small.
So I had to put the panel together again and run over to the local Jag dealer and buy the LJA bulbs--only about $6.00 each.
Also know that it takes much longer to get all of the pieces out versus putting them back in. As with most parts in our cars the important fastening bits and pieces are plastic and easily breakable. So there is NO need to overtighten anything when replacing.
Finally I did not bother unhooking the battery and there was NO harm in this. For one thing leaving the battery hooked up allows you to move the steering wheel in positions that are convenient for removing the screws and parts. There was NO sparking when I removed the electrical connectors (don't know if it matters but I did the yellow on on the left first). The only thing that happens is that the panel will briefly come to life but that is is.
Now that I have the right bulbs I need to start again but this time should take no more than about 20-30 minutes tops.
Doug
The following 2 users liked this post by SeismicGuy:
Don B (11-27-2018),
Orthodixie (02-21-2018)
#17
02-21-2018, 11:35 AM

Veteran Member
Great information contained in this thread, particularly post #14. I noticed yesterday that the bulb illuminating the coolant temperature gauge in my wife's 2006 XK8 is out. When I decide to tackle that bulb replacement job, post #14 along with Reverend Sam's how-to video will serve as my guide....
Are there similar instructions on how to replace the bulbs in the climate control temperature setting display? The right-side bulb in my wife's XK8's display has been out for awhile now....
Are there similar instructions on how to replace the bulbs in the climate control temperature setting display? The right-side bulb in my wife's XK8's display has been out for awhile now....
#18
02-22-2018, 09:11 AM
Veteran Member
#19
03-31-2018, 01:54 PM
Veteran Member
I finally got around to doing the coolant temperature gauge bulb replacement job today. As it turned out, I needed one of the new larger bulbs, not one of the new smaller bulbs. A quick trip to my local NAPA store to pick up a new Wagner 194 wedge-base clear bulb (47 cents) and I was able to complete the job after taking everything apart. My monster-sized hands did not help me, though. Small hands will definitely have the advantage here....
Thanks as always to Reverend Sam for the how-to video, and to mherman346 for the detailed written tutorial. If more dashboard replacement bulbs are in my future with this car, I will once again refer to this thread to refresh my memory....
Thanks as always to Reverend Sam for the how-to video, and to mherman346 for the detailed written tutorial. If more dashboard replacement bulbs are in my future with this car, I will once again refer to this thread to refresh my memory....
The following users liked this post:
toaster (03-31-2018)
#20
04-09-2018, 05:29 AM


I was in the U.S. Navy for eight years during the Vietnam War. My job was to maintain and repair shipboard and shore based electronic equipment. Obviously, reliability and longevity of our equipment was a concern, including the incandescent lamps that illuminated the various lights, dials and gauges (this was before the age of LEDs). If a bulb failed during a firefight, or at night in a storm at sea, it could be disastrous.
And so, the Navy didn�t use brand-new bulbs to replace burnt-out ones. They used pre-aged bulbs.
Mortality curves used by actuaries and statisticians can also apply in predicting the life cycle of most mechanical and electronic devices, including light bulbs. There�s a high failure rate during the initial use of a device and also at the end of its life, but the failure rate is low between those two points. We used to say that if a transistor survived the first seven hours of operation, it would last seven years. Light bulbs fall in a similar category. If they survive the initial period of operation then they will last a long time. But they will, nevertheless, eventually fail.
Pre-aged bulbs are actually used bulbs. The manufacturer operates them at the rated voltage for a certain time and then culls out those that have failed. The remaining bulbs are considered reliable since they have survived the period of infant mortality.
What are sold today as long-life bulbs are different from pre-aged bulbs. Long-life bulbs still suffer the effects of infant mortality, but since they are designed to operate at a higher voltage than what would normally be applied, they simply last longer. For example, long-life household bulbs in the U.S. are designed to operate at 130 volts despite the fact that they are actually operated at 120 volts. The lower the applied voltage, the longer a bulb will last. However, as the voltage is lowered, the light becomes dimmer.
What I�m saying here is that you shouldn�t be too surprised if a brand-new bulb that you just put into your instrument cluster fails. It happens rarely, but it does happen. If and when a bulb fails in the instrument panel of my XKR, I�d be tempted to pre-age the new bulbs before I install them. Sound crazy? Not half as crazy as having to pull the dash apart one more time to replace a bulb I just installed.
Vince