When you click on links to various merchants on this site and make a purchase, this can result in this site earning a commission. Affiliate programs and affiliations include, but are not limited to, the eBay Partner Network.
Those of us who have the original factory fitted navigation unit know how useless it is. It doesn't support post code searches and as the last map update DVD was made in 1993, it's database is hopelessly out of date.
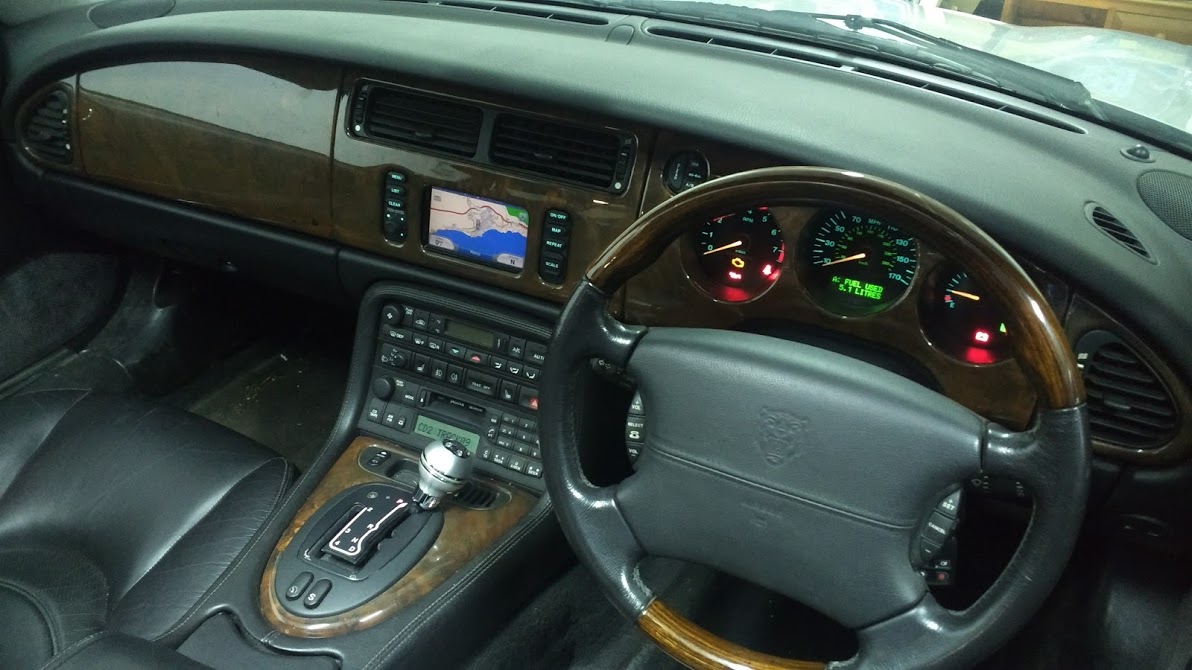
I mainly use my car for day trips out and like to visit places I haven't been to before. For this reason a decent navigation system is important to me, especially so as the wife is useless at reading maps and World War 3 often breaks out when we get lost. I decided after being inspired from various posts on several forums, to replace the original unit with a modern touch screen unit.
You need a 5" screen size to fit the existing hole in the wooden trim and as most units have the on/off switch on the back or side (inaccessible once fitted), a method of turning themselves on and off via the ignition. The Garmin Nuvi range (5" screens) fit the bill perfectly.
I bought the Garmin Nuvi 3598 LMT-D that comes with touchscreen, lifetime map updates, lifetime digital traffic info, Bluetooth and voice commands.
I began by removing the centre wooden trim and the original display screen. I took the wooden trim indoors and mounted the sat nav unit over the hole using 3M double sided industrial tape (very strong)! The unit is slightly bigger than the hole so is easy to mount. The dimensions also mean you can still see the whole screen but you have to mount it slightly offset so that the internal microphone is not covered up. I used a sheet of fine stainless steel mesh sprayed satin black to cover the two holes where the original buttons came through, again using the 3M tape. This allows the sound from the Garmin unit to come out, it looks just like speaker mesh.
As my car has a heated windscreen, I was worried that there might be a problem picking up the satellites or traffic data so I took the trim with the sat nav attached back to the car and tested it in position. It picked up the satellites in about 30 seconds and the traffic data signal strength showed approx. 75%.
Next job was to hard wire the unit. I had bought a cigarette light adapter that is needed to plug into the Garmin power lead and I had read that there is a 12 volt aux take off above the glove box. However this was permanently live (despite fitting an addition relay into the boot fuse tray) and after googling found someone else had just tapped into the original display screens multi plug to get a switched live and earth.
After pushing most of the excess power cable and traffic data antenna/wire through a hole in the left-hand side of the dash, I refitted the wooden trim and it just fits back into position. I now have a modern navigation unit that looks factory fitted. The only down side is that to update the maps or firmware, you have to remove the wooden trim again to get to the usb port on the back of the unit. As this does not have to be done on a regular basis, it's not too much of a problem.
The Garmin unit was �244 after searching around for the best price and the other bits came from eBay for about �25. It was not that hard to do and if you need sat nav, I would highly recommend this mod.
I will post some pictures tomorrow of the finished article, let me know what you think!
P.S. I also bought a Garmin mechanic with eco route. This is a Bluetooth dongle that plugs into the cars obd2 port and sends live data to the Garmin unit which shows up on the screen in gauge format. You can display various dials including MPH, revs, voltage, fuel pressure and most importantly,coolant temperature !
I'm doing something similar with mine, but I decided to keep the original switches (by dismantling the OEM satnav). I prefer the factory look, even if the switches do nothing, apart from the on/off switch which I have wired to power the Garmin on and off.
I also added a leaper logo to the Garmin on startup.
Mine also has a backup camera input, so I will finally get that functionality on the car nearly 15 years after it left the factory.
The Garmin Mechanic stuff looks great and I for one will be really interested to see that in action when you have it all working.
Would it be difficult to make a new database for this? They bought the maps from some one and it is just data. Surely it would be a little challenge but creating a database converter from some current database to the format used by the jag would not be impossible.
Any one, preferably in Europe, willing to donate a complete working nav system I will gladly give it a go when I finished my current center console project.
If I succeed, of course the knowledge and data will be free for all of you.
I thought about fitting the original buttons but was worried they would block the sound from the Garmin's speaker. With the mesh, the sound output is loud enough even at motorway speeds with the radio on.
Please let us know how your volume levels are once you have finished the installation.
I thought about fitting the original buttons but was worried they would block the sound from the Garmin's speaker. With the mesh, the sound output is loud enough even at motorway speeds with the radio on.
Please let us know how your volume levels are once you have finished the installation.
I'll let you know. I am also thinking about wiring the audio output of the sat nav into the stereo - I already have a Motorola bluetooth module fitted that gives me bluetooth music from the phone, and my idea is to connect the audio out from the Garmin directly back in to the amp, mixed with the CD/bluetooth audio. I don't use the radio, so this wouldn't be an issue for me that it would only work with CD/Bluetooth audio. The Garmin also has an audio player, so that would be an additional music source.
That looks great - shame my Garmin doesn't support it. I might well start looking on ebay for another unit that does.
Would it be difficult to make a new database for this? They bought the maps from some one and it is just data. Surely it would be a little challenge but creating a database converter from some current database to the format used by the jag would not be impossible.
Any one, preferably in Europe, willing to donate a complete working nav system I will gladly give it a go when I finished my current center console project.
If I succeed, of course the knowledge and data will be free for all of you.
A good place to start would be to look at the map disc - there used to be a link on the forum to download the iso:-
I would imagine the data is encrypted somehow, but if you could figure it out I'm sure a lot of people would like to know how to update it. Until then putting a 5" Garmin in the hole is the easiest (and cheapest) solution. I paid �15 for mine on ebay.
Now that the GVN is discontinued another option would be to connect an Android box to the existing screen and rig up the sat nav buttons to control it. I don't know if you can get an Android box that has a compatible video out or if you would need a converter like the VCI-X, but that makes it an expensive project again and it still wouldn't be touch screen. It would be nice though to have an Android powered screen there instead of the useless sat nav.
I finally got around to replacing the useless Sat Nav system in the XKR with a Garmin Nuvi 3597 I bought on line last year. I chose this system because it offers voice command programming for the navigation, lifetime traffic reporting, lifetime map updates (you have to take the unit out of the car) to update), weather reporting and Bluetooth hands free phone calling.
I basically followed the posts of the fellow who installed a similar unit in a right hand drive XKR coupe. All the postings I saw the installers routed a wire to a switched accessory port or a cigar lighter receptacle. The biggest difference in my installation is that I used the switched power already routed to the existing Sat Nav.
When you take out the sat nav you have two multi pin plugs to the left of the unit opening. I tied a ohm meter to ground a probed the pins to find the ground wire. Then I turned on the ignition and probed the pins to find 12V pos. It was on two pins, after turning the ignition back off 12V remained on one pin. The other pin was the switched.
The smaller plug large white wire is the ground or negative, the small white wire with a green stripe is the switched 12V positive. I used Scotchlock connectors to join these wires to a accessory socket lead. This allowed me to use the plug in Garmin power supply unmodified. I added a piece of foam rubber over the wires to protect the wires, separate the traffic receiver form the back of the Garmin and to keep a slight pressure against eh back of the Garmin to help secure it.
I bundled the wire with zip ties and secured to the zip ties that were in the sat nav recess. I placed the box on the wire which is the traffic receiver at the top of the wire bundle facing up to try to give it the best reception. I did not put an aluminum or sheet metal backing covering the opening as some other installers did as I did not want to interfere with the Satellite and traffic radio reception of the unit. The dash is mostly plastic and transparent to radio
waves, sheet metal is not.
The Garmin is mounted to the dash face with two sided tape above and below the opening. I cleaned the back of the dash with brake clean to assure good adhesion. Black Gaffers tape was used to close any openings and finish the install. The two original switch opening was finished with pieces of a metal speaker grille I purchased on e-bay. They were cut to give about 1/4 overlap and hot glued in place as the last part of the install.
Also not that when you replace the dash panel you need to pull the spring clips from the tabs on the panel and push them back into the slots in the dash before attempting to put the panel back in place. I spread the side tabs on the clop to give them a better grip in the dash.
The system works great! It comes on with the ignition and turns off 15 seconds after the ignition is switched off. The voce command works decently. The traffic receiver and weather work great. I am very pleased with it. The phone Bluetooth is not as cool as the original one in the car but I can keep the Garmin phone working.
I tried to stay as "OEM" as possible i.e. changing the SatNav system with minimal aesthetic mods so keeping buttons.
You just have to get the OEM screen out and fitting you new GPS system. No issue with the sound.
I may have one or two pics ASAP.
I tried to stay as "OEM" as possible i.e. changing the SatNav system with minimal aesthetic mods so keeping buttons.
You just have to get the OEM screen out and fitting you new GPS system. No issue with the sound.
I may have one or two pics ASAP.
That's what I did on mine, kept the buttons and just replaced the screen. If you look closely you can see that the new screen isn't an exact match size wise for the opening, but otherwise it looks original, which I prefer.
I also went down this road.
I installed a power socket in the glove box using the OEM wiring (not forgetting the relay in the boot fuse box) from which I power the aftermarket satnav, dash cam and iPhone.
I am using a Garmin 2569 LMT-D which links very nicely to my iPhone.
Initially, like others here I installed it behind the centre veneer panel to give an OEM look but I ended up buying a little kit off a firm who sell on eBay UK which allows me to fit & remove the unit as and when without having to take out the dash panel. I also get to keep all the original buttons which illuminate as normal.
Admittedly, the unit is a centimetre proud of the dash so not strictly OEM looking but I can live with that for the added convenience of easy removal.
Steve
I install the Garmin system and hard wired it into the old nav system power and ground, I don't remember the power color off hand but it was the only one that went on and off with the ignition. After I notice my radio making a winning noise with engine RPM's that I don't remember before. Is the a shield ground I missing it the nav wiring system I should be grounding? I could just hook all the grounds in the two plugs together to make sure. Anyone else have this problem?
I bought a Xgody sat nav from Ebay. At 50 quid i wasn't expecting a lot. I was surprised how much quality it has. It is mainly a tablet with sat nav, ebook reader, games, FM transmitter, Bluetooth, reverseing camera screen, and so on. Before i used a Mio sat nav and a Tom Tom. The responce of the Xgody is far better and more aqurate. Also it switches on and off with the touch screen. For that amount of money it is a real good bargain. They have a 5 inch and a 7 inch. I made a bracket infront of the old XK sat nav to put the Xody infront of the original, because i don't want to change the original. When you choose the 5 inch, it can be used to replace the original. And it is far less expensive than a Garmin.

 04-30-2015, 07:54 PM