When you click on links to various merchants on this site and make a purchase, this can result in this site earning a commission. Affiliate programs and affiliations include, but are not limited to, the eBay Partner Network.
Split boot Lower Front Ball Joint - failure timeline?
Hi Guys,
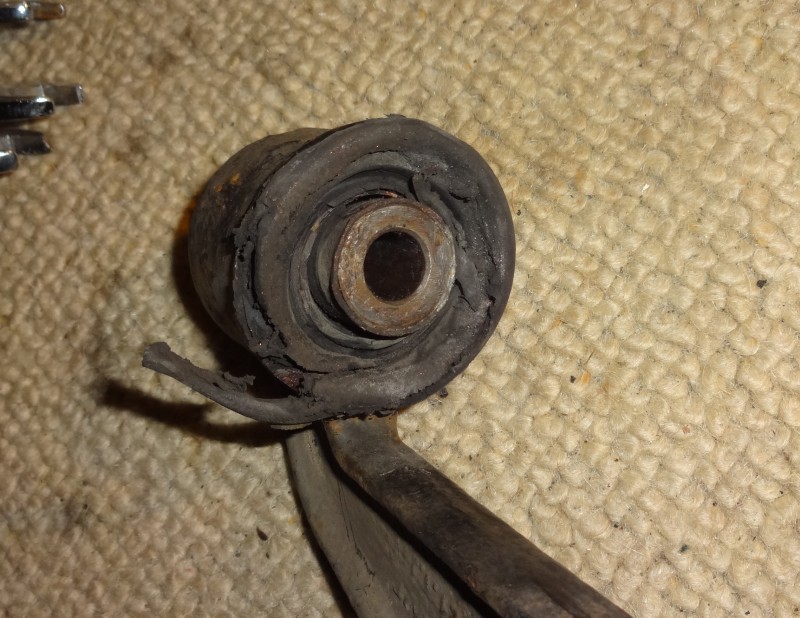
Just saw that the lower ball joint on the passenger side has a split boot. It must have happened recently, no play, no debris inside. Just plenty of grease.
I realize that I will have to replace this eventually, just a bad time to come up with the $$$ that the folks around here will charge. I read all the strings and it looks like sometimes folks get real lucky and can replace it themselves without removing the whole control arm, most times that is not true though.
From what I've read, ride quality will suffer far before safety becomes an issue. I don't know what to expect so let me ask: Do you think I can get away with a few thousand more miles like this?
If I'm missing something just let me know. Thanks for looking and I do appreciate your opinion.
If you're sure it happened recently, you may have some time before it becomes a problem. It would have to get pretty dry with a lot of dirt in the ball joint before it would have symptoms.
That being said, I would fix it. Depending on your mechanical skills, you could remove the control arm and bring it to a shop to have the ball joint pressed in. That would save some money. It's a slight pain in the rear job but very doable. You would have to loosen the steering rack to make room to remove the Control arm bolt.
I have previously "repaired" CV joint boots using RTV, the fixes have always lasted a few years (or until I sold the car).
You'll need to thoroughly degrease the surrounding area & let it dry off completely before smearing it with a good coating & letting it dry overnight.
If it's a big split give it a second coat to build it up & strengthen it over the split. You may even be able to stick a patch on it using something like a piece of inner tube.
If it doesn't work you've only lost the price of a tube of RTV, if it does it's bought you time.
Best to use black to make it less obvious to inspectors.
Should be OK for a few miles before there's any big problem. It's not particularly difficult to remove the rear control arm - it's not necessary to loosen the steering rack. It IS necessary to undo the inner (bigger) gaiter clip, and pull back the gaiter. With the steering on full lock, there's enough room to extract the bolt past the rack. Obviously, you will need a new clip when you put the gaiter back.
Shouldn't be too expensive to get a new ball joint pressed in - as you may have gathered from reading other posts / threads - some people have managed to do this fairly easily, but others have struggled due to the shape of the control arm.
You will need male Torx tools to separate the two halves of the control arm.
Thanks guys, I do appreciated it. Looks like I'm in on this one - I'll purchase the ball joint and take the arm to the local Auto zone. Spoke to them this morning and they do have a press.
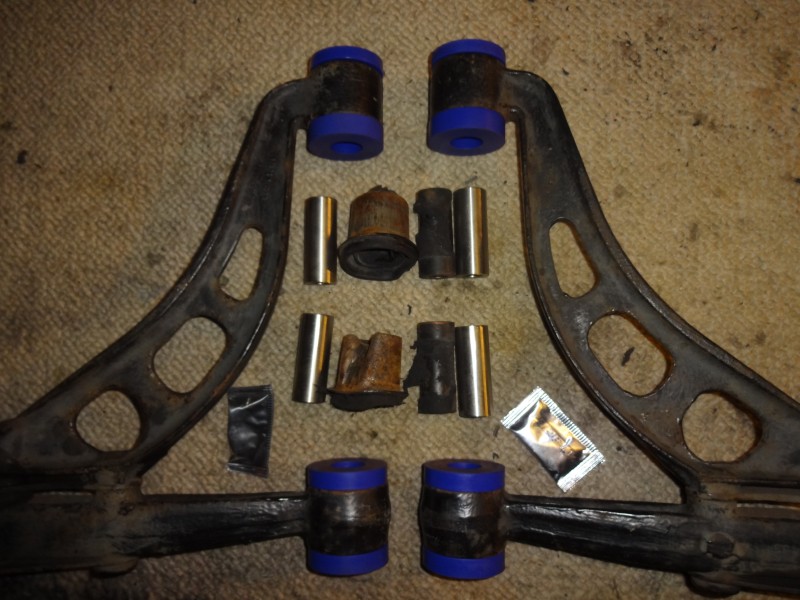
Guess I'll just have to purchase the bushing too, might as well replace that while the arm is out. Come to think of it there was a very detailed article in Jaguar Monthly (gosh I can't remember the magazine's exact name but I do have a copy on the shelf) with step by step instructions to remove this arm, it was targeted at bushing failures but I believe it is the same control arm. That article combined with your and everyone elses help at this site will make it doable. Once again, thanks a million. Gosh around here (central New Jersey USA) it would probably cost me $400 in labor for this ball joint alone.
You may be in for a surprise when you take it in to be pressed out and a new one pressed in. Jaguar does not sell the lower ball joint and arm separately however you can buy just the lower ball joint separately from many vendors. A special jig is needed to press it in due to the shape of the lower ball joint arm. It can be done, just a PIA. you will need a machine shop to do it. Local shop charged me $40 a side to remove and press in.
If the bushing is OK don't fool with it. It's even more of a PIA than the ball joint!
Pushing the old one out needs a lot of force but is straight forwards, mine took about 12 to 15 tonnes of pressure and sounded like a bomb going off when it budged.
As Jandreu suggested, a tool makes pushing in much easier, but perhaps an ingenious shop will work out how to do it without the tool.
This is what I made up, I have used it three times now.
Getting the bush out involves the following.
To get the bushes out I pushed out the inner part with my C clamp then hammered in a chisel between the bush and the arm till it fell out.
I did not bother separating the two arms, there did not seem any need to do this.
Pushing on the oem bushes is very tricky without damaging them, the much easier and better solution is to fit poly which takes about 1 minute and can be done by hand.
Had this happen to me long ago, I spoke to the mechanic at the jaguar independent shop in my area and he told me not to worry about it, that most the cars that come in have torn boots including his own car and he said to just keep an eye on it and keep it greased and that they rarely fail and when they do its due to being dry. I already have the ball joint to replace it but I have seen no play or problems with it, I just add some grease with a needle attachment on my grease gun every oil change. The new grease goes in and pushes a bit of the old grease out which seems to keep it clean. As long as the tear is not too big i bet you are fine. Also, right after you install it always grease the new ball joint you get if you get the one with a zerk fitting because they can come with very little grease.
You know, the ball joint is the WORST part of the control arm assembly to remove and press in new ones. But, if the ball joint is still good, you can just replace the boot. I actually did this on mine when I was putting in a vertical link on my 05 XJ that I used to own. It was suprisingly simple, and I thought I had seen 'boot repair kits' from a UK parts supplier (can't find it now), or you could scavenge the boot and clips from a new ball joint Jaguar XJ8 XK8 Lower Ball Joint MNC 1350 AA | eBay .
All you need to do is remove your control arm, and carefully get the clips off and on again...perhaps even adding a little grease on the reassembly.
Jandreau - Thanks for the heads up. It always gets complicated with these cars doesn't it.
On the other hand I was worried that I had to get this job done ASAP - no where near true.
RaceDiagnostics - Great Photos thanks. I love the point that the poly's are so easy to install. I've always wondered if this bushing (not this type of bushing) made the the biggest improvement when changed - can you please share how she felt after you replaced yours? Looks like the old ones were pretty beat up so this is a good case study. So far the only change I've seen is my upper front shock mounts - huge smile on my face after that one. My handling is not as tight as I remember it 2 years & 40,000 miles ago. So I'm prioritizing and planning which rubber bushings to replace next.
WaterLoo - My mechanic once told me there are no grease fittings on these cars. 2 months ago the forum enlightened me (he was wrong) - there are 4 fittings 2 on either side of the drive shaft in the rear. Were you saying there are zerk fittings on these ball joints? If not I assume one would cram the grease in right? Just want to be sure I understand.
H2OBoy - Matt this is very interesting. I never would have thought of replacing the boot alone!
Now I have to decide which path to take Thanks again guys.
The new ball joint you get may have a zerk fitting depending on which one you buy but the existing stock one does not. Since there are no zerk fittings on the existing ball joint, in order to add grease I use something like this
Which I insert into the existing tear to add a bit of grease, just insert it in like an inch and the new grease will push out the old, you then just wipe off any of the old grease. I have been doing this with each oil change for almost three years now with no problem. I had already bought a cheap used arm and had the new bushings and ball joint put into at a machine shop so I would have no down time but I have yet to install it because the current ball joint shows no wear and the mechanic I spoke to said there was no rush yet. A machine shop should have no problem installing the new ball joint but they will need to mar the arm in order to get it in as you can see in the photo the damage to the arm is minimal. I am waiting for when I actually need to change some other stuff before installing the arm and doing an alignment. You can change just the boot as was suggested you just need to be super careful not to puncture the new boot when getting the retaining clips back on .

 08-24-2015, 03:46 PM