Hot to change out the rubber seals on your brake caliper pistons and more...
#1
 02-21-2018, 06:32 PM


G'day guys!
First of all my apologies...I haven't been on the forum in ages. Between moving house, working offshore and life in general I haven't been doing much to my car other than driving it....putting off maintenance as much as practical just due to being so busy...
Anyway I finally scheduled in some alone time with the ole goose because I am due to bleed the brakes. I also want to try and figure out why the ole girl seems to pull to one side when braking. Additionally I was braking in the wet a few months ago (not too hard) and she started to slide her rear end out (like a fish tail). Time for investigation....
Bleeding the brakes: So I started bleeding the Rear's first but noticed while wifey was pressing down as hard as she could on the brake pedal (note: the Good book wedged underneath so the pedal wouldn't go all the way to the floor) and I opened up the nozzle with my 11mm spanner, it would only spit out about 5-10cm stream down my tube when she reached the bottom. This was a time consuming bleed to say the least but what I noticed is those rear brake pads hardly move when she applies the brake...mmmmm....
Ok so I finished bleeding the rears and wanted to take out those brake pads for an inspection. The first thing I noticed before I even began was on my RH (drivers side in Oz) rear Caliper, one of the discs is worn more than its matching pair. Took a snap shot too of the general condition before I started:
RH rear caliper assembly:

Alot of dirt and crud doesn't look great but I am guessing this is normal ??
Ok so first problem...trying to take out those brake pads. Man o Man what a task. You guys on the forum taught me they should come out using your fingers. Man it took me about 1 hr to get both out using gentle levering, back n forth, tapping it, spraying brake clean....you name it but it was an epic task and I didn't think they were actually going to come. But finally I got it.
Here is the mismatch in those two brake pads. The picture doesn't really do it justice but more obvious up close. Cause for concern?

Ok so to cut a long story short, went over to the other caliper and much the same difficulty pulling out those pads. Literally about 1 hrs work. If they were stuck in that hard does that mean those brake pads were barely moving when pressure was applied? As a side note my rear brake pads had some sort of goo stuck on them (similar to my fronts when I did them last year). I believe this is some sort of grease snake oil stuff one of the previous owners used (Stefan perhaps WoOz?)
Anyway. Pads looked ok but the worst thing I noticed is all my rubber seals look like poo. Mostly cracked and what not as you can see from the pictures:
RH Rear Caliper Rubber Seals with Pads removed:

LH Rear Caliper (note: moisture you see is just Brake Cleaner spray)

Ok so that is where I am to right now. A few questions I have though:
Whilst they are out I am just going to bite the bullet and install new brake pads. Waste of money or are they fine?
Those rubber seals look ordinary. Is it time to swap them out?
How do I test my brake calipers aren't sticking without the pads installed? Whats normal movement for those...a few mm with pressure applied to the pedal?I don't want to drop the pistons out.
How do I clean out the area inside the caliper where the brake pads were? Looks real dirty though probably not helping those pads coming out easy.
Ok guys thanks very much in advance. I haven't started on the front brakes yet because I still have her jacked up at the rear and besides I filed down my front pads last year as they were hard to get out back then.
First of all my apologies...I haven't been on the forum in ages. Between moving house, working offshore and life in general I haven't been doing much to my car other than driving it....putting off maintenance as much as practical just due to being so busy...
Anyway I finally scheduled in some alone time with the ole goose because I am due to bleed the brakes. I also want to try and figure out why the ole girl seems to pull to one side when braking. Additionally I was braking in the wet a few months ago (not too hard) and she started to slide her rear end out (like a fish tail). Time for investigation....
Bleeding the brakes: So I started bleeding the Rear's first but noticed while wifey was pressing down as hard as she could on the brake pedal (note: the Good book wedged underneath so the pedal wouldn't go all the way to the floor) and I opened up the nozzle with my 11mm spanner, it would only spit out about 5-10cm stream down my tube when she reached the bottom. This was a time consuming bleed to say the least but what I noticed is those rear brake pads hardly move when she applies the brake...mmmmm....
Ok so I finished bleeding the rears and wanted to take out those brake pads for an inspection. The first thing I noticed before I even began was on my RH (drivers side in Oz) rear Caliper, one of the discs is worn more than its matching pair. Took a snap shot too of the general condition before I started:
RH rear caliper assembly:
Alot of dirt and crud doesn't look great but I am guessing this is normal ??
Ok so first problem...trying to take out those brake pads. Man o Man what a task. You guys on the forum taught me they should come out using your fingers. Man it took me about 1 hr to get both out using gentle levering, back n forth, tapping it, spraying brake clean....you name it but it was an epic task and I didn't think they were actually going to come. But finally I got it.
Here is the mismatch in those two brake pads. The picture doesn't really do it justice but more obvious up close. Cause for concern?
Ok so to cut a long story short, went over to the other caliper and much the same difficulty pulling out those pads. Literally about 1 hrs work. If they were stuck in that hard does that mean those brake pads were barely moving when pressure was applied? As a side note my rear brake pads had some sort of goo stuck on them (similar to my fronts when I did them last year). I believe this is some sort of grease snake oil stuff one of the previous owners used (Stefan perhaps WoOz?)
Anyway. Pads looked ok but the worst thing I noticed is all my rubber seals look like poo. Mostly cracked and what not as you can see from the pictures:
RH Rear Caliper Rubber Seals with Pads removed:
LH Rear Caliper (note: moisture you see is just Brake Cleaner spray)
Ok so that is where I am to right now. A few questions I have though:
Whilst they are out I am just going to bite the bullet and install new brake pads. Waste of money or are they fine?
Those rubber seals look ordinary. Is it time to swap them out?
How do I test my brake calipers aren't sticking without the pads installed? Whats normal movement for those...a few mm with pressure applied to the pedal?I don't want to drop the pistons out.
How do I clean out the area inside the caliper where the brake pads were? Looks real dirty though probably not helping those pads coming out easy.
Ok guys thanks very much in advance. I haven't started on the front brakes yet because I still have her jacked up at the rear and besides I filed down my front pads last year as they were hard to get out back then.
Last edited by paulyling; 02-21-2018 at 06:45 PM.
#2
02-21-2018, 07:54 PM

G'day guys!
First of all my apologies...I haven't been on the forum in ages. Between moving house, working offshore and life in general I haven't been doing much to my car other than driving it....putting off maintenance as much as practical just due to being so busy...
Anyway I finally scheduled in some alone time with the ole goose because I am due to bleed the brakes. I also want to try and figure out why the ole girl seems to pull to one side when braking. Additionally I was braking in the wet a few months ago (not too hard) and she started to slide her rear end out (like a fish tail). Time for investigation....
Bleeding the brakes: So I started bleeding the Rear's first but noticed while wifey was pressing down as hard as she could on the brake pedal (note: the Good book wedged underneath so the pedal wouldn't go all the way to the floor) and I opened up the nozzle with my 11mm spanner, it would only spit out about 5-10cm stream down my tube when she reached the bottom. This was a time consuming bleed to say the least but what I noticed is those rear brake pads hardly move when she applies the brake...mmmmm....
Ok so I finished bleeding the rears and wanted to take out those brake pads for an inspection. The first thing I noticed before I even began was on my RH (drivers side in Oz) rear Caliper, one of the discs is worn more than its matching pair. Took a snap shot too of the general condition before I started:
RH rear caliper assembly:
Alot of dirt and crud doesn't look great but I am guessing this is normal ??
Ok so first problem...trying to take out those brake pads. Man o Man what a task. You guys on the forum taught me they should come out using your fingers. Man it took me about 1 hr to get both out using gentle levering, back n forth, tapping it, spraying brake clean....you name it but it was an epic task and I didn't think they were actually going to come. But finally I got it.
Here is the mismatch in those two brake pads. The picture doesn't really do it justice but more obvious up close. Cause for concern?
Ok so to cut a long story short, went over to the other caliper and much the same difficulty pulling out those pads. Literally about 1 hrs work. If they were stuck in that hard does that mean those brake pads were barely moving when pressure was applied? As a side note my rear brake pads had some sort of goo stuck on them (similar to my fronts when I did them last year). I believe this is some sort of grease snake oil stuff one of the previous owners used (Stefan perhaps WoOz?)
Anyway. Pads looked ok but the worst thing I noticed is all my rubber seals look like poo. Mostly cracked and what not as you can see from the pictures:
RH Rear Caliper Rubber Seals with Pads removed:
LH Rear Caliper (note: moisture you see is just Brake Cleaner spray)
Ok so that is where I am to right now. A few questions I have though:
Whilst they are out I am just going to bite the bullet and install new brake pads. Waste of money or are they fine?
Those rubber seals look ordinary. Is it time to swap them out?
How do I test my brake calipers aren't sticking without the pads installed? Whats normal movement for those...a few mm with pressure applied to the pedal?I don't want to drop the pistons out.
How do I clean out the area inside the caliper where the brake pads were? Looks real dirty though probably not helping those pads coming out easy.
Ok guys thanks very much in advance. I haven't started on the front brakes yet because I still have her jacked up at the rear and besides I filed down my front pads last year as they were hard to get out back then.
It does appear that one side of the pair is not doing the same work as the other pad. Bite the bullet pull the whole lot out and do a total rebuild including handbrake.
If you can handle the expense l strongly recommend the vented disc conversion.
The following users liked this post:
paulyling (02-21-2018)
#3
02-22-2018, 02:53 AM


Veteran Member
Great to hear from you Paul. Here's the hard word:
remove the axle cage from the care; remove the calipers and rebuild them/buy rebuilts, replace the discs, check the handbrake is OK. Now all those minor distractions like work etc etc are tamed, all good to start. Uneven pad wear is pretty common, by the way, all that crud etc etc has probably jammed a pad a bit.
Cheers
Greg
The following users liked this post:
paulyling (02-22-2018)
#4
02-22-2018, 04:53 AM
Paul,
Stefan for sure, as he had some work done on the rears before I knew him and the car, and that looks like a real shonky job was done.
Greg is 100%, time for cradle out, and sort the calipers, and source some solid rotors, as the "sandwich style" there are the originals.
Clarke is the cradle man nearest you.
The following 3 users liked this post by Grant Francis:
#5
02-22-2018, 05:44 AM
Veteran Member
The following users liked this post:
paulyling (02-22-2018)
#6
02-22-2018, 06:08 AM
Gday Greg! Good to chat again mate.
Crikey! You mean detach the IRS cage and being it out? Mmm....I was fearing that. My only concern I guess is doing this in my garage on my own? Is it doeable at home or do I need special equipment?
I know Clarke pulled out his IRS at home when Fireball had a fire. I seem to recall he let it down and removed it with a trolley jack. I am assuming quite a job as you would have to disconnect it from the driveshaft and all right?
Mmmm....sounds like my biggest adventure yet.
Cheers for the words of wisdom guys. I guess my next question.....where do I even start if I am to remove the IRS? What do you do to plug up those brake lines when you disconnect? So in a nutshell....to remove the whole cage take off the wheels, remove it from the drive shaft, unbolt it all and plug up the brake lines?
#7
02-22-2018, 06:12 AM
The following 2 users liked this post by paulyling:
Grant Francis (02-22-2018),
o1xjr (02-22-2018)
Trending Topics
#8
02-22-2018, 06:14 AM
Join Date: Jan 2014
Location: Delaneys Creek,Qld. Australia
Posts: 28,379
Received 6,317 Likes
on
4,367 Posts
The following 2 users liked this post by o1xjr:
Grant Francis (02-22-2018),
paulyling (02-22-2018)
#9
02-22-2018, 06:25 AM
Join Date: Jan 2014
Location: Delaneys Creek,Qld. Australia
Posts: 28,379
Received 6,317 Likes
on
4,367 Posts
I know Clarke pulled out his IRS at home when Fireball had a fire. I seem to recall he let it down and removed it with a trolley jack. I am assuming quite a job as you would have to disconnect it from the driveshaft and all right?
Mmmm....sounds like my biggest adventure yet.
Mmmm....sounds like my biggest adventure yet.
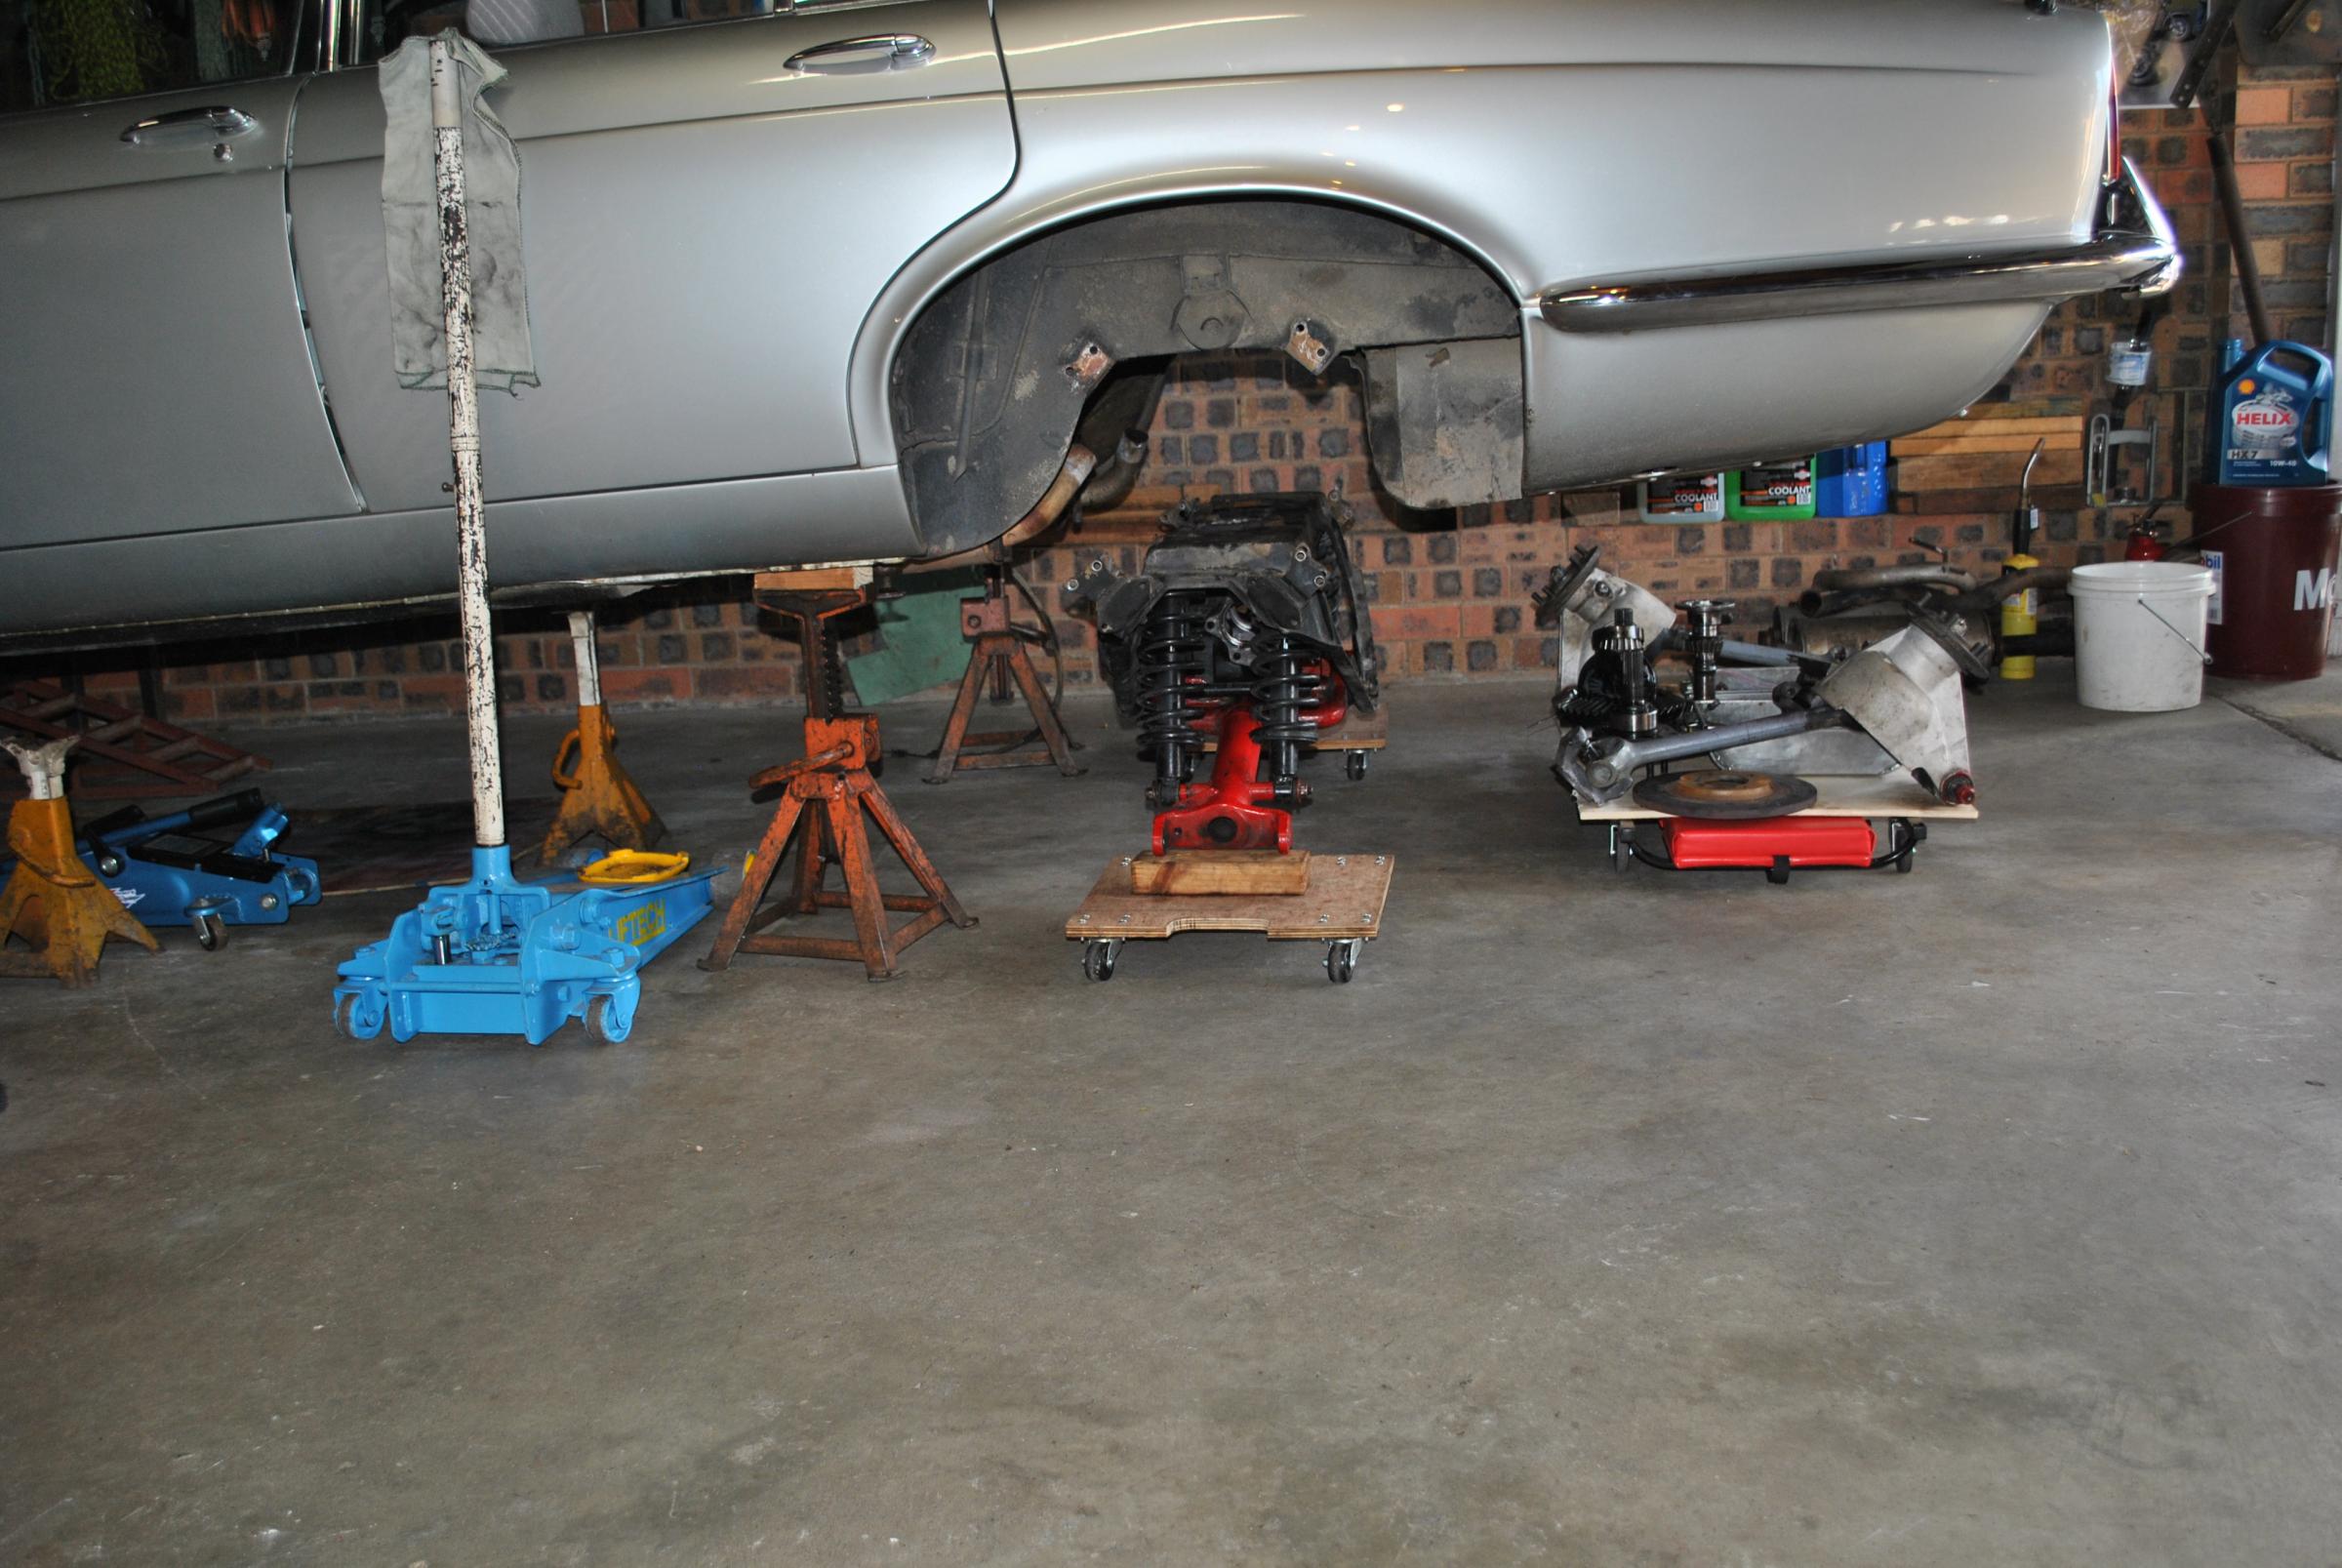
Not an easy job Paul, but doable on your own for a novice as I was 3 years ago when I went in head first and tackled it. But every step of the way I was on here finding out how to deal with it. Have a flick through my old thread, plenty of pics in there.
https://www.jaguarforums.com/forum/x...m-fire-115245/
Last edited by o1xjr; 02-22-2018 at 06:37 AM.
The following 3 users liked this post by o1xjr:
#10
02-22-2018, 06:26 AM
AND, I have a gut feeling the Goose is a Dana diff, NO drain plug, and different rotors.
BUT,
I seem to remember RDA have a multi fit rotor for these with the extra holes for the Dana caliper bolts, which of course are just holes on a Salisbury diff.
I will try????? and remember to ask them tomorrow.
PAUL,
Cradle is easier than a water pump, FACT.
I reckon if you search around Clarke did a pretty good step by step, back in the day, of removing and refitting that cradle?????
Best part on an XJS, the exhaust can come out WITH the cradle, as the tailpipes DO NOT go thru holes in the Beaver panel. BONUS.
The following 2 users liked this post by Grant Francis:
Greg in France (02-22-2018),
paulyling (02-22-2018)
#11
02-22-2018, 06:32 AM
Join Date: Jan 2014
Location: Delaneys Creek,Qld. Australia
Posts: 28,379
Received 6,317 Likes
on
4,367 Posts
Hardest part of the job was heating and hammering the pipes until I got them apart.
Grant, I recon Paul is off reading that thread right now.
Last edited by o1xjr; 02-22-2018 at 06:35 AM.
The following users liked this post:
Grant Francis (02-23-2018)
#12
02-22-2018, 06:34 AM
The following users liked this post:
Grant Francis (02-23-2018)
#13
02-22-2018, 06:43 AM
Join Date: Jan 2014
Location: Delaneys Creek,Qld. Australia
Posts: 28,379
Received 6,317 Likes
on
4,367 Posts
Welsh plugs and sump gasket on my old Jeep was a harder job(complete steering & suspension out). Cradle out is pretty straight forward and not too physical if you have the car high enough to roll the cage out the side.
Heads up, it wants to fall forward as you drop it down. A second set of hands would be handy at that point.

Last edited by o1xjr; 02-22-2018 at 07:13 AM.
The following 2 users liked this post by o1xjr:
Grant Francis (02-23-2018),
paulyling (02-22-2018)
#14
02-22-2018, 07:28 AM
Veteran Member
Paul
With no lift it is still doable on your own. I did mine that way 18 years ago for the first time. Basically this is the procedure I followed:
Greg
With no lift it is still doable on your own. I did mine that way 18 years ago for the first time. Basically this is the procedure I followed:
- Loosen but do not remove the rear wheelnuts
- Jack up car under the diff using a wooden spreader on the jack plate, as high as you reasonably can. Chock front both wheels both sides of each wheel.
- Put jackstands under the rear jacking points, stand them on thick wooden plates if not high enough. Be sure they do NOT foul the radius arm/body mount. Leave the jack under the diff for now.
- Tie some wire round the exhaust pipe forward of the under car silencers and anchor it to the gearbox mount plate, so when you undo the exhaust the pipes are supported; you do not want to break a manifold!. Undo the triangular collar exhaust joint between the cage and the silencer under the car, Keep the bits safe.
- Undo the tunnel silencer clamp joint where it joins the axle cage silencer pipes, separate the bits and remove the tunnel silencers.
- Wriggle the axle exhaust pipes out rearwards, having first pulled them forwards a bit to unhook the pin from the cage top fixing
- Undo the flexible brake pipe to under car pipe join, this is up on the inside of the RHS chassis rail. 13mm and 15mm open ender required, from memory. You will be changing the fluid so no worries about it draining out
- Pull the handbrake levers on the top middle of the cage together so you can release the end of the cable from the LHS lever. Unhook the cable from any lips holding it to the cage
- Undo the propshaft to diff bolts (4) and put a bit of wire/cable tie to identify one pair of the holes, so the prop goes back in the same place.
- Undo the LARGE (body) end of the radius arm bolt, having cut the lockwire and pulled it out. Loosen the other end of the safety strap and swing the strap out of the way.
- Clout the join between the radius arm cup and the body male-shaped bit it fits to with a cold chisel and a BIG hammer. It will pop off after a whack or two.
- Remove the rear wheels
- Undo the two long bolts that fix each of the four cage mounts to the chassis rail. Carefully tap through ONE of the two bolts on each mounting. If they will not come out easily, jack the centre of the diff a bit to take the weight off them.
- Next remove the remaining bolt from TWO of the mounts, one each side. Right now the cage is held in by two bolts, one each side on one mount each side.
- Get a mate or two round for safety, one each side of the axle. Knock out the last two cage mount bolts, having taken the weight on the jack. Your mates' job is to balance the axle side to side on the jack.
- SLOWLY lower the jack and pop the wheels back on held by a nut or two will do.
- Place a skid or a smaller trolley jack under the diff nose and lower the big jack completely so the axle is on its wheels with the nose supported somehow.
- Wheel the axle out rearwards and start work!
Greg
The following 4 users liked this post by Greg in France:
#15
02-22-2018, 07:49 AM
Join Date: Jan 2014
Location: Delaneys Creek,Qld. Australia
Posts: 28,379
Received 6,317 Likes
on
4,367 Posts
Pretty much how I did it Greg, except I put the front wheels on ramps and jack stands under the jacking points. Removed rear wheels, radius arms,hubs & half shafts then dropped the cradle onto a couple of dolly's I made.
I could not get enough height to go out the rear, but plenty of room to go out the side.
It might not be the best method but after sitting with a beer looking at it jacked up as high as I could get it and contemplating for a while it seemed the easiest solution for my situation.
I could not get enough height to go out the rear, but plenty of room to go out the side.
It might not be the best method but after sitting with a beer looking at it jacked up as high as I could get it and contemplating for a while it seemed the easiest solution for my situation.
The following 3 users liked this post by o1xjr:
#16
02-22-2018, 07:58 AM
The following users liked this post:
Greg in France (02-22-2018)
#17
02-22-2018, 09:13 AM

Senior Member
Thanks Greg, these instructions will come in very handy, I have this planned too although for the summer. My only worry is, I have to get the whole thing out(car is sitting outside) and somehow move it 20 meters away. I suspect this might be tricky part due to weight. The 20 meters pathway is fairly soft too. Any ideas on moving the whole thing around?
The following 2 users liked this post by katar83:
Greg in France (02-22-2018),
paulyling (02-22-2018)
#18
02-22-2018, 10:09 AM
Veteran Member
Moving the axle once out is easier if the wheels are on, then the problem you have is that the diff nose is very heavy and the axle wants to tip diff-nose downwards. I would make a little wheeled sled (dolly) for it; then you can pull the whole contraption.
#20
02-22-2018, 04:56 PM
Greg, one of the first things I am pondering....and perhaps a minor detail but the brake lines:
When you disconnect the brake lines, do you let the fluid drip out, catch it with a container or do you try and plug up the lines?
I know when bleeding the brakes letting the fluid go below the reservoir was bad news but that was just because it sucks in air correct?
Just doing a bit of pre-planning. As it stands, the Goose it is in the middle of a 2 car garage. I need to put the old pads back in first. Reverse the old girl back and go back in to one side where she will have an extended layover.....that will keep Wifey happy so she can put her car in too.

