When you click on links to various merchants on this site and make a purchase, this can result in this site earning a commission. Affiliate programs and affiliations include, but are not limited to, the eBay Partner Network.
Eliminate Voice and Phone module with a fiber optic coupler or loops?
I have the "no sound" problem. No audio from radio, dash-CD, trunk CD or Nav. CD is "playing" and turning the volume knob shows the volume going up and down - but silence.
it is a 2004 XJR with the Amp/Nav/CDC/Phone/Voice modules in the trunk (4 boxes in the stack, amp on sidewall.)
I eliminated the amplifier as a possibility - I took a spare amp that I know was working in the car that I took it out of myself - but swapping the amp had no effect.
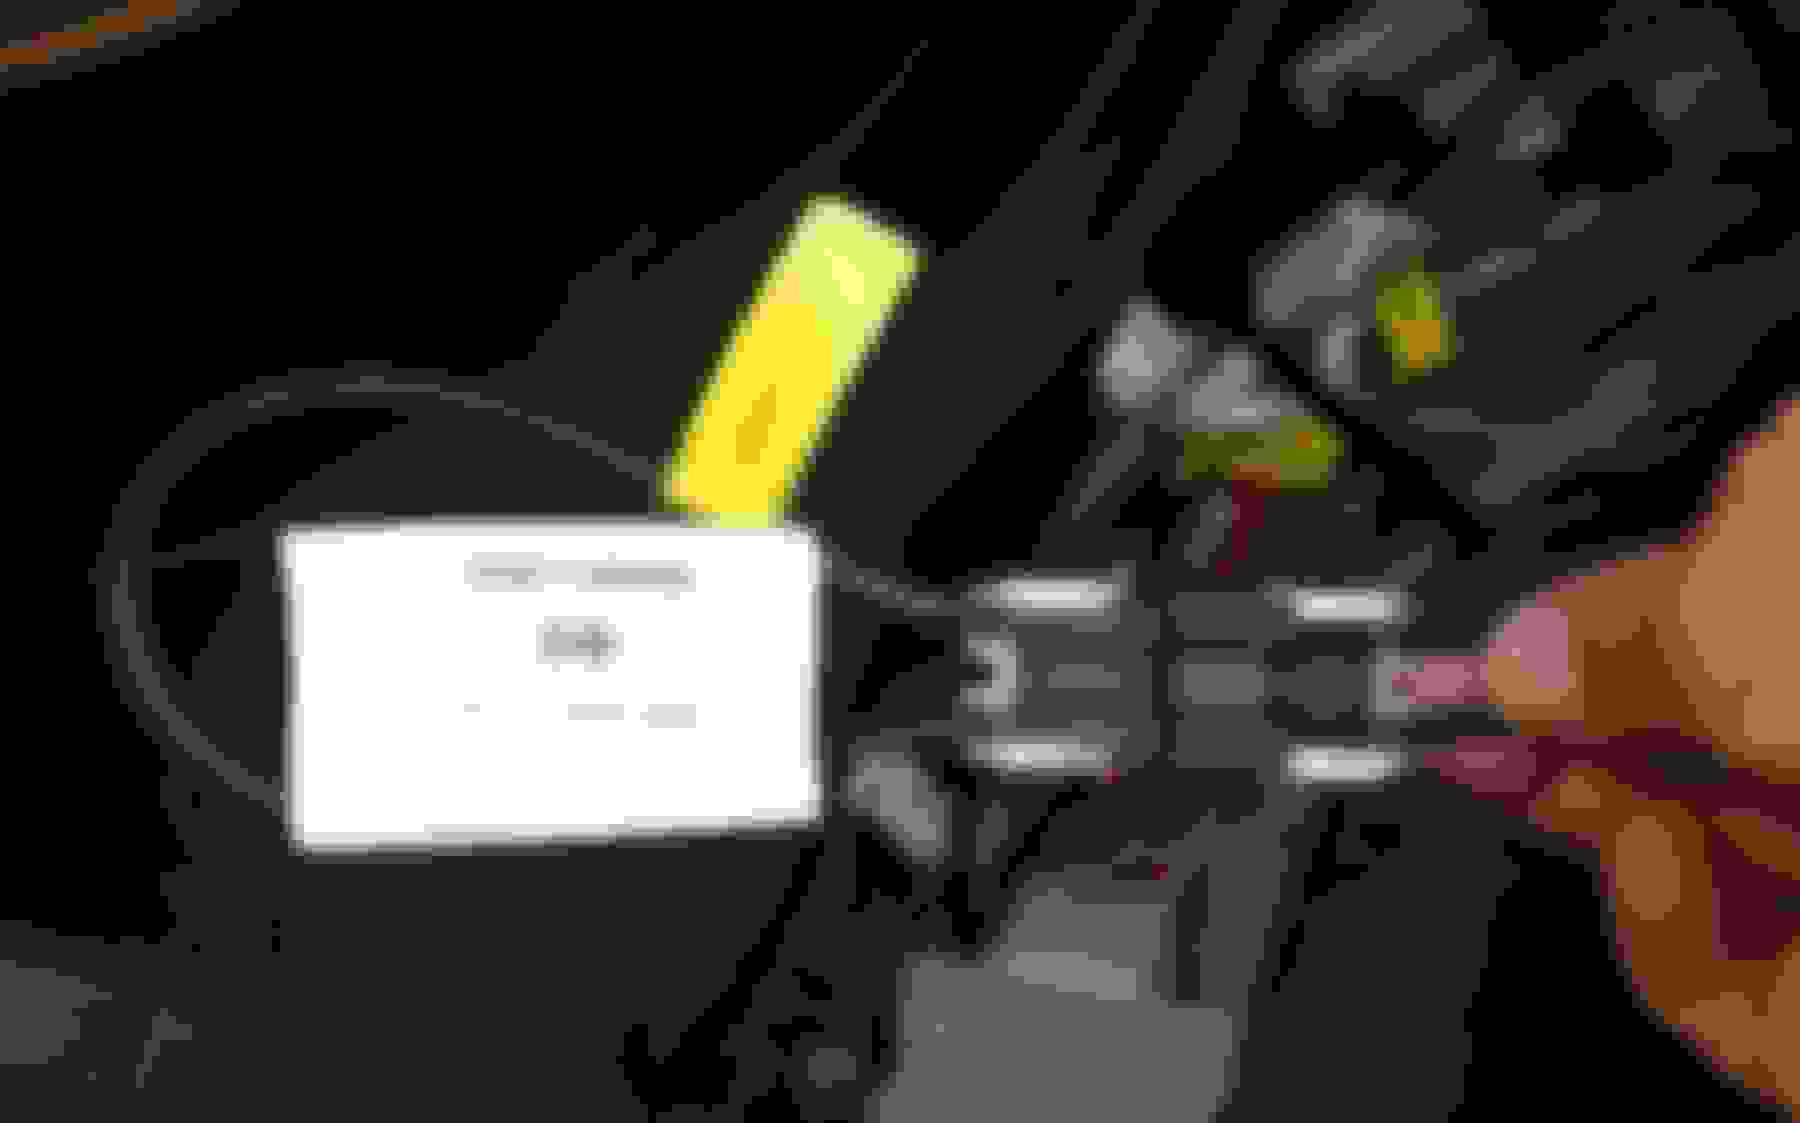
I believe the issue is somewhere in the fiber optic loop - or in one of the four boxes in the trunk stack. I unbolted the stack today and flipped it on its face to look at all the connectors in the back - jiggle them, make sure they're seated tightly, etcetera. The "Phone" box on the bottom of the stack had a fiber connector that seemed very loose and came out too easily - with no "click" on re-insertion. I loosened the white cover around the connector thinking I might re-configure the fiber wiring to eliminate the phone module (I never used it and never will) - but I didn't really want to go through with all that on my own. With the white "cover" backed off the connector it does seem to "click" into the socket properly. I tested everything again, but still no sound.
So here's my question. Can I get a connector-to-connector "coupler" so that i can just bridge together the existing connectors for the Phone and Voice-Activation modules? The Phone Module fiber connector is a male, and so is the Voice module connector, so the coupler would need to be female on both ends.
Alternatively, I should just be able to stick a "loop" onto the male phone connector - and another onto the male Voice Module connector - and leave the harness as-is, right?
Either of those approaches would eliminate those two devices - without having to take apart all the connectors and reconfigure the fiber wiring harness. I also don't care if I lose the CD-changer in the trunk. I just want to methodically isolate the bad wire or bad device so that I can get some audio going again.
I found one used loop online - but he's across the pond - and only has one.
I can't locate the "Loop" in any of the usual parts places (SNG Barratt, Ebay, Amazon, etc.) searching for what i believe is the part number - as shown in the photo - 2R8T-14B548.
Can somebody point me to where I can buy a new one online?
Thanks Cambo - XR837746 does appear to be the correct part number.
But what about the strategy here - is it "sound"? If I stick a loop on the Phone module connector, or the voice module connector, I'm bypassing that device, and it should help me identify which one is bad, right?
I bought a loop and today I tried eliminating each module (NAV, CDC, Voice, Phone) one at a time - with the Radio turned on - and none of them made a difference. Still no sound at all.
I also have a known-to-be-working spare AMP that came out of my X-type when I replaced the factory radio with a Sony unit. This is the same AMP that is in the XJR.
Swapping that made no difference either - still no sound.
I also noticed that i cannot "select" the CDC from the dash. pressing the CDC button does nothing. The unit does have power (I can eject and load the cartridge, and there are CDs in it.)
But putting the loop onto the CDC fiber connection doesn't eliminate the problem.
PINPOINT TEST G239843p6 : CHECK THE SUPPLIES AND GROUNDS TO THE CD CHANGER
G239843t49 : CHECK THE PERMANENT SUPPLY TO THE CD CHANGER
1. Disconnect the CD changer electrical connector, TL05. 2. Measure the voltage between TL05, pin 02 (NW) and GROUND.
• Is the voltage less than 10 volts?
-> Yes
REPAIR the circuit between the CD changer and battery. This circuit includes the rear power distribution box (fuse 27). For additional information, refer to the wiring diagrams. TEST the system for normal operation.
-> No
GO to Pinpoint Test G239843t50.
G239843t50 : CHECK THE GROUND TO THE CD CHANGER
1. Measure the resistance between TL05, pin 01 (BK) and GROUND.
• Is the resistance greater than 5 ohms?
-> Yes
REPAIR the high resistance circuit. For additional information, refer to the wiring diagrams. TEST the system for normal operation.
-> No
CHECK for DTCs indicating a wake-up circuit or optical ring fault. REFER to the DTC index.
Thanks Sean. Unfortunately I'm not electrically competent - and I don't have a tool to test voltage.
However, I don't care about the CDC enough to troubleshoot it or replace it. The CDC and the Nav unit both do have power (I can eject and load the cartridge and the Nav-DVD.)
I checked the fuse for the Amplifier, and it's OK. (I believe it is the 25a Fuse #9 in the trunk fuse box - which I read somewhere - but I could not find a chart to verify - despite looking through the whole "X350 - Workshop manual US005 - 4. Electrical" and a couple other manuals that I have.)
As mentioned earlier, I cannot "select" the CDC from the dash. pressing the CDC button does nothing.
If the CDC was the problem, then putting the the fiber blanking loop onto the DB2 connector for the CDC should have "closed" the fiber loop and allowed the radio and Dash CD to get working again.
I was sure that would work - but unfortunately it did not.
At this point I think I have read every "no audio" thread on this forum - and a bunch of other sources too.
I read in CambridgeV8's post that if the radio is on, you should be able to see the light in the fiber cable. But I don't see any light in any of the cables.
I also completely disconnected the battery and then reconnected it hoping that might re-set something. No difference.
There are four devices in the trunk stack: NAV/CDC/VOICE(?)/Motorala-Phone.
The only one I'd actually like to be able to keep is the (antiquated) NAV unit - I'd be OK deleting the other three entirely.
The Motorola phone module has a loose connector on the box itself. Putting the blanking loop on that one made no difference either.
I read in one thread that the devices have to be in a specific sequence in the loop -
"You need to have the fiber optic cable in this way - cabin -> CDC -> phone -> voice -> navigation -> amplifier -> cabin"
I think mine may not be in that sequence - but all the cables do have factory tags on them and appear to be in the right units - at least.
The way the fiber is routed from unit to unit is very confusing. Only one connector - the one connected to the "voice" module - has no yellow label on it.
But then there's a "REAR ICE / DB05" label on the connector that was already connected to the fiber blanking loop.
Having already bought a second Blanking Loop to try to isolate the bum unit, I don't really want to buy two more at $100 each to eliminate the three boxes I don't care about - and leave a tangled mess of fiber with 3 more connections that are all potential points of failure.
At this point I'm thinking I should just open the white clips holding the fiber pairs together and re-pair the cables to eliminate three of the connections entirely.
That would leave the fiber being routed: Cabin -> NAV -> Amp -> Cabin, depending on how you look at it.
Anyone know how those white clips open? I tried opening one before I spent money on a second blanking loop, but I couldn't see how it opened and I didn't want to break it, so I just bought the loop.
See photo below.
A little history:
I had this "no sound" problem about 3 years ago. First time it quit for a day, and came back the next day. Then it quit for a couple days and came back again, and about 2 years ago it quit - and never came back.
I took it to the dealer, and left it there for six weeks - but they were unable to figure out what was wrong. (My first bad experience at the local dealer - After the first week they were saying things like "it will cost more to fix than the car is worth" type stuff - and I couldn't tell how much they really tried to fix it - or if they just left it sitting there waiting for me to get fed up and take it away.)
The fact that it went away and then came back twice before makes me think its a loose connection somewhere.
I have a similar problem, my car had no nav, no voice, no cd changer. The car did have the premium alpine audio with the amp in the trunk. I have added the voice and CD changer making my own fiber line got the extra parts from a pick a part junk yard. Using a pick CAREFULLY pry the sides of the white connector for the fiber optic line and gently push up then down and the line will separate. The no audio part happens every so often and I have noticed that the voice doesn't work when this happens I turn the car off then on again and it comes back. Have noticed that quickly turning my ignition switch on seems to aggrevate this problem, when I slowly turn the ignition switch wait until 1 bell goes off then start. I have been unable to check if the amp has power or if the radio is sending a audio signal to the amp. Another thread mentions temporary grounging the neg(-) wire of one of the line level inputs from the radio to the amp and listen for any sound to verify the amp. As happens when I don't have the time to check
Seems likely that the D2B cable is unplugged from the back of the radio head unit, or broken somewhere else between the front and rear of the car.
In the X-Type there was a connector in the D2B fibre cable near the fuse panel under the dash, I don't recall if there's one there in the XJ as well but the wiring diagram says there is definitely a connector/joint somewhere between the head unit and the connector in the boot where the harness for the media stack plugs in.
This may or may not be of use in checking the D2B ring
Put ignition in 1st position to get head unit lit.
Press AM/FM + eject.
When the screen changes to the set up screen press
eject + Mix to cycle thru the SW versions.
You should see MAIN, CDC, PHON, VOIC - if have voice rec
NAVI.
If it does not cycle thru these then it shows the DB2 ring is broken.
Thanks Jackra - I went through those steps, and the only two items showing up are
1. "Main 0.9970"
2. "DTS 0.9920"
I assume "Main" is the main unit in the dash - not sure what DTS is though.
So it looks like it is not seeing any of the units in the trunk stack, which indicates a break somewhere in the DB2 fiber ring.
(Even though the NAV doesn't show up in the cycle, the maps still show on the main display, and seem to work. I think I read somewhere that only the audio for the Nav uses the DB2 fiber, and the NAV is also using the CAN or one of the other communication networks in the car.)
Can anyone confirm whether or not you should be able to see "light" in the fiber cable if the main unit radio is on and playing while you're looking into the cable in the trunk?
That would help localize the fault.
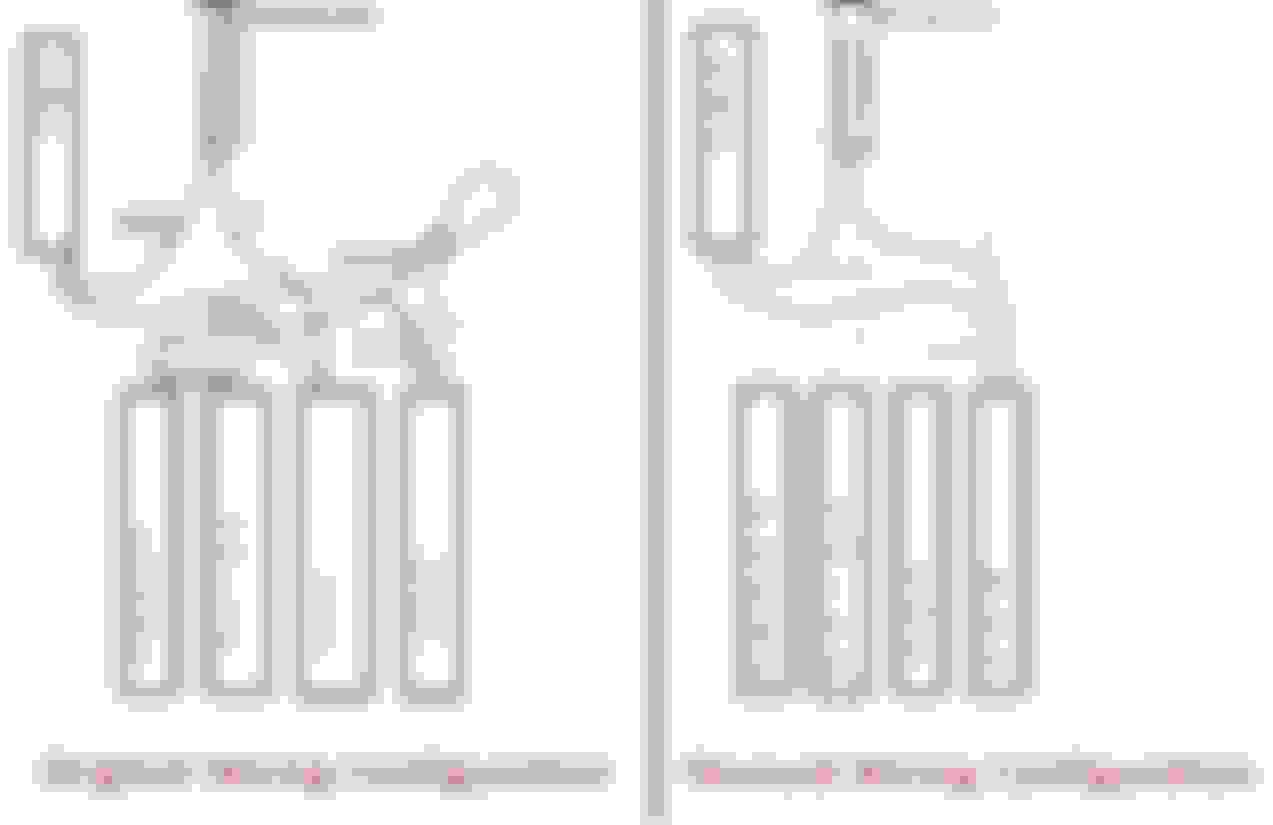
I think today I'll have a crack at re-pinning the cables to simplify the setup so that only the AMP and DVD are on the loop (2 units instead of the current 5).
Simplifying the configuration worked!!
I have Radio and Dash-CD making sound again.
Once I made a diagram and thought it through, I realized I would only have to swap/re-pin two of the individual fiber cables to get to the Cabin->Amp->Nav->Cabin setup that would cut the other three out.
By swapping the blue wire labelled "1" (originally to the CDC) for the wire labelled "2" (into the NAV unit) - it cut the other three devices out of the loop entirely.
Here's the before and after diagram:
It was quicker and easier than I expected - about 30 minutes total - I wish I had done it a long time ago.
Separating the individual fibers out of their paired connectors wasn't too hard. See photos below.
There's a small tab in the black plastic part that holds the white sleeve on.
Pry the white sleeve up to get it over the tab on both sides and the sleeve should slide off the black connector and farther down the fiber cable.
The corner of the white sleeve where you're prying is very thin, and unless you have 3 hands its tricky to get both sides up over their tabs at the same time in order to slide it off.
The black plastic connector has a thin black tab that holds the fiber cable and it's connector in place,
I used a thin flat-head screwdriver to lift that tab just enough to slide the fiber cable out of the connector.
Notice that the connector is also numbered and has directional arrows...
"1" (inbound to the device) and "2" (outbound from the device - to the next one in the chain)
The .pdf doc is somewhere in this cavernous forum and it is what I used when I added components.
I have no idea what DTS stands for despite searching for it.
Would this same process work to eliminate the cdchanger? Mine went to crap in the 2005 jag, and being D2B ignorant I ripped out the CD changer not realizing it would cripple the entire system.
Would this same process work to eliminate the cdchanger? Mine went to crap in the 2005 jag, and being D2B ignorant I ripped out the CD changer not realizing it would cripple the entire system.
If you complete the D2B connections where the CD changer used to be you should be fine.
If you complete the D2B connections where the CD changer used to be you should be fine.
Jackra_1
If I replace the D2B connector at my Amp with a loop, would this cut out everything after the AMP (NAV, CDC etc) but restore my audio (lost through a dead CDC), please?
My primary concern is that I now have no response at my rear entertainment module, (which is what I was using successfully as a blutoothed Aux input for my 'phone) and no audio for my radio etc?
Yours cluelessly,
Ray
An afterthought...What if I disconnect the D2B coming from the AMP at the NAV/CDC end and then connect that back round to the loom?
If this is feasible, there appears to be two components to the loom; presumably one coming from the head unit and the other returning to it? How do I tell which is which, please?
 06-16-2018, 04:28 PM