Playing with SDD and Air suspension
#21
 06-14-2014, 05:44 PM


Join Date: Feb 2014
Location: Crossroads of America
Posts: 19,391
Received 12,736 Likes
on
6,379 Posts
Hi Guus,
I have SDD v131.3 and a Mongoose cable, so with your excellent instructions I should be able to get the datalogger going. I'll let you know how it goes!
Cheers (and sweet dreams),
Don
The following users liked this post:
AD2014 (09-08-2020)
#22
06-15-2014, 05:15 AM

#23
06-22-2014, 02:39 AM
Last week the pressure gauge came in and yesterday I did some pressure testing on the front suspension. I’ve made my setup a bit different then the one 34by151 described and used Festo push on fitting and flexible air lines.
Photo 1 shows the air line as it’s normally connected.

I disconnected it, took off the olive and pushed the compression fitting higher to get enough free air line to fit it in a Festo push on fitting. I wanted to use the cars own air system to fill the bags. This way you get the actual situation (height) as it is on the car.
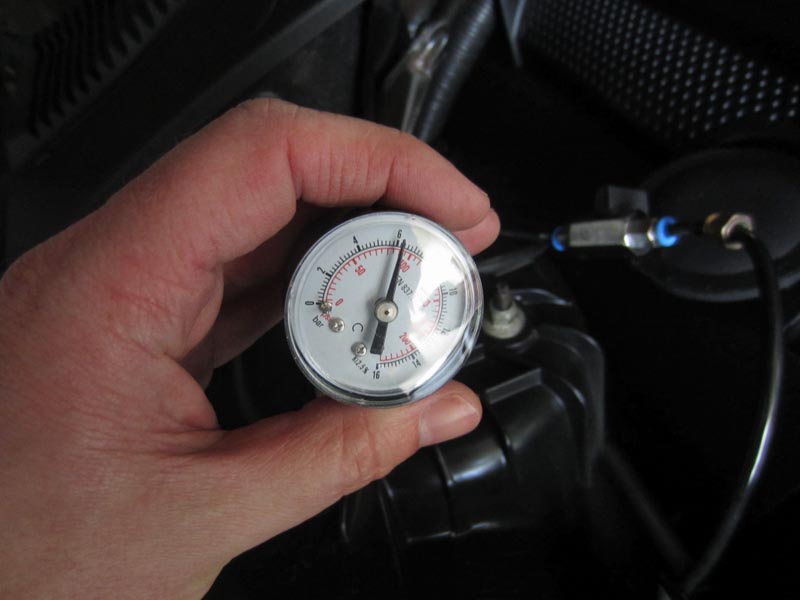
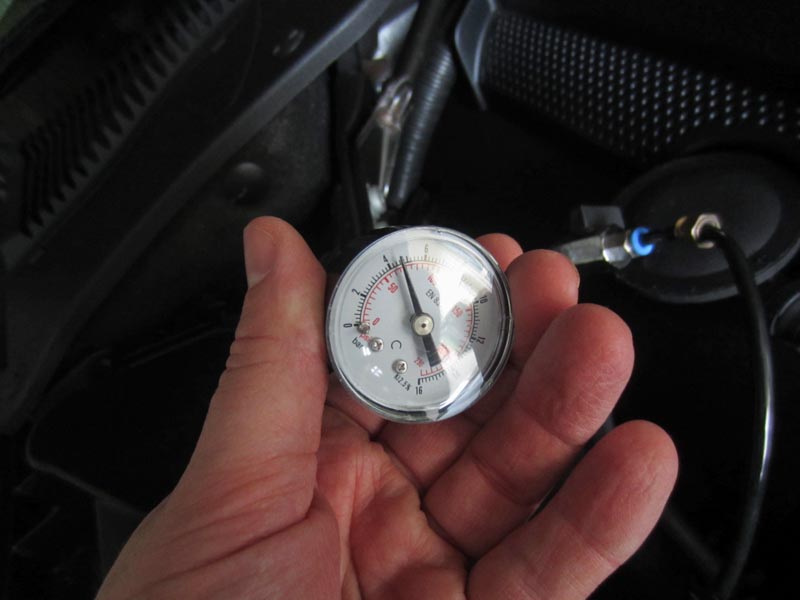
It’s pretty simple. The air goes from the line through a little valve with push on fittings on both sides. From there it goes to a T-connector. From there it goes goes in the push on fitting I fitted in the airbag. This is all done with normal 1/8” fittings. On the other side of the T-connector I’ve fitted my 0-16 bar pressure gauge. See photo’s 2 and 3. The valve allowed me to close of this section so I only would test the air bag.


The right side air bag sags the most so I fitted the setup there first. Started the car and let it fill the suspension. The first time the compressor stopped at approximately 4 bar and I shut of the car and closed the valve.


Within 30 minutes the pressure had dropped to 2,8 bar and after an hour less then 2 bar remained. Also checked my setup with soapy water but didn’t have any leaks so it seems this air bag is leaking.
Did the test again and this time I noticed the car came up quite a bit higher. The reason could be that the first time the whole suspension was pretty empty after standing for a week. This time the pressure also ran up to 7,8 bar.

After 15 minutes the pressure was already down to 6,2 bar and after 30 minutes to 4,8 bar.
Disconnected the setup and refitted the air line back to the right side. Then disconnected the left air line and fitted the setup to the left side. Started the car again and let it run till the compressor cut out and the car was back on the correct height.
Pressure this time was 7,6 bar.

After 30 minutes the pressure had risen to approximately 8 bar.

At first this seems a bit strange but what I think happens is that with the leaking right air bag more weight is pushing on the left one and this makes for the increase in pressure. You also see the left side has lowered a bit, I guess it can’t keep the car hight all by it’s own.
Now the good news. This morning (14 hours later) I checked the pressure on the left again and it’s still at 8 bar so this air bag seems to be good.
Guus
Photo 1 shows the air line as it’s normally connected.
I disconnected it, took off the olive and pushed the compression fitting higher to get enough free air line to fit it in a Festo push on fitting. I wanted to use the cars own air system to fill the bags. This way you get the actual situation (height) as it is on the car.
It’s pretty simple. The air goes from the line through a little valve with push on fittings on both sides. From there it goes to a T-connector. From there it goes goes in the push on fitting I fitted in the airbag. This is all done with normal 1/8” fittings. On the other side of the T-connector I’ve fitted my 0-16 bar pressure gauge. See photo’s 2 and 3. The valve allowed me to close of this section so I only would test the air bag.
The right side air bag sags the most so I fitted the setup there first. Started the car and let it fill the suspension. The first time the compressor stopped at approximately 4 bar and I shut of the car and closed the valve.
Within 30 minutes the pressure had dropped to 2,8 bar and after an hour less then 2 bar remained. Also checked my setup with soapy water but didn’t have any leaks so it seems this air bag is leaking.
Did the test again and this time I noticed the car came up quite a bit higher. The reason could be that the first time the whole suspension was pretty empty after standing for a week. This time the pressure also ran up to 7,8 bar.
After 15 minutes the pressure was already down to 6,2 bar and after 30 minutes to 4,8 bar.
Disconnected the setup and refitted the air line back to the right side. Then disconnected the left air line and fitted the setup to the left side. Started the car again and let it run till the compressor cut out and the car was back on the correct height.
Pressure this time was 7,6 bar.
After 30 minutes the pressure had risen to approximately 8 bar.
At first this seems a bit strange but what I think happens is that with the leaking right air bag more weight is pushing on the left one and this makes for the increase in pressure. You also see the left side has lowered a bit, I guess it can’t keep the car hight all by it’s own.
Now the good news. This morning (14 hours later) I checked the pressure on the left again and it’s still at 8 bar so this air bag seems to be good.
Guus
Last edited by Xag; 06-22-2014 at 02:42 AM.
#24
06-22-2014, 03:07 AM

A change in height on one or more corner will show a change in the other corners
It can play with your head working it all out but there is an easy way. Google corner weighting. You will find quite a few online calcs and spreadsheets. Playing with corner weighting is something quite common for race and trackday cars so its well documented on the net
If you want to test without this becoming a factor just put the car up on stands but not enough for the wheels to be off the ground. Just relieve the weight from the springs. It will still vary a bit but not by much as it wont have much weight transfer
Another important thing if you have a fair temp change is the pressure will vary with the temp but you should be seeing similar results from all the pressures. The pressure will drop as the temp lowers
Cheers
34by151
#25
06-22-2014, 04:45 AM
#26
06-22-2014, 10:28 PM
Senior Member
#28
06-25-2014, 01:46 PM
I've used the standard Festo QS-B push-in fittings.
Fittings | Festo United States
Straight one: 1/8" R (with PTFE) Male to 6 mm
Straight one: 1/8" R (with PTFE) Female to 6mm
T-connector: All 6 mm
These connectors are pretty cheap so don't pay over the top on Ebay. You local plumber may have them too!
The valve is a Norgren 601112118 Minivalve 1/8" G
The pressure gauge is a ICH 306.40.16 Range 0-16 bar 1/8"G
Air line is 6 mm
Don't know the rear size connectors yet.
Guus
#29
02-09-2019, 08:36 AM

Found a cheap valve block so I decided to exchange mine just to see what would happen. I wasn�t expecting it to fix the problem but was interested if there was some kind of internal valve leak as well. Replacing the valve block is easy, remove the electric connectors, unscrew the air lines and undo the two bolts of the valve block to the frame. I let all the air escape from both suspension and reservoir so I had to fill/pressurize the complete system again.
That gave me some interesting insights. Because I wanted to flush out any debris/water in the valve block I decided to refit the air lines back to the block one by one (or two). First I ran the compressor to vent the line to the block, then fitted the line. Then I expected the valve to the reservoir would open but it didn�t. First the two valve going to the rear suspension open en the car is lifted from the rear. When the car is raised enough these valves close and both the front ones open to lift the car at the front. The way of filling is also described in the workshop manual.
After (unexpectedly) leveling the car first before filling the reservoir I then expected the filling of the reservoir would then be the final step but the reservoir valve didn�t open at all!
At this point I connected the SDD and did some testing just to check if the valve was good and if it switch alright. An interesting observation I made when measuring the pressure with the SDD is that you see the pressure going up (apron 12-13 bar) when the compressor is running and going down again to a remaining pressure of approximately 1,6 bar. All this time the reservoir wasn�t connected at all. So the pressure you measure through the SDD is the pressure in the valve block and not necessary the pressure that is in the reservoir.
The car was at riding height so I decided to connect the reservoir line and go for a drive. I had a gut feeling the the different modes of the suspension (Sleep Mode, Preliminary Mode, Post Mode, Stance Mode, Drive Mode) might have something to do with the reservoir not filling. Decided to connect the SDD and log the data during a 10 minute interval from the start.
The chart below shows the values I logged with the SDD, pressure, compressor on/off, reservoir solenoid open/closed, exhaust solenoid open/closed and the 4 solenoids of the front and rear airbags. I omitted the rear ones from the Excel graphic because they didn�t switch at all during my testing. I�ve done similar tests before an until now only saw the front ones switch occasionally and the rear never. Maybe on full acceleration they do.
So the starting pressure of 1,6 is what is measured in the valve block. The pressure in the airbags will probably be higher at this point (but I don�t know how high) and the pressure in the reservoir is still zero.
The first 140 seconds nothing happens and then the compressor kicks in. Pressure builds up to 3,8 bar and then drops off sharp as the valve of the reservoir opens and the reservoir starts to fill. Then slowly the compressor raises the pressure up to 3 bar at which point the reservoir valve closes again and you see the pressure spiking to 4,4 bar because now it�s just compressor pressure again. But not for long because at this point the compressor stops and at the same time the exhaust valve opens to �vent� the system. This is supposed to be done to remove moisture from the system. The pressure drops again to 3 bar and almost immediately the compressor kicks in again. Normally the compressor has a cooling down time but my theory is that if the total pressure in the system drops below 3 bar the compressor kicks in no matter what to keep the car at height. In this case it has to because there is almost no pressure in the reservoir, normally that pressure could be used to allow for cooling time.
At that point I must have either braked or more likely drove over a speed bump. You see the front airbag valve open and the pressure shoots up to almost 7,5 bar. The opening of the airbag valves is probably triggered by the hight sensors. Then a few things happen, the compressor stops and the exhaust valve opens probably to get rit of the high pressure. Again almost immediately the compressor kicks back in and the reservoir valve opens again and after the compressor stops again the exhaust valve opens again. This happens another time probably to even out the pressure fluctuations. At 181 seconds the normal cycle resumes, compressor starts, reservoir valve opens and now steadily the pressure runs up to 11,3 bar. What is very noticeable is that the measured pressure drops really quick once the compressor is off and the exhaust valve opens. But since this pressure is measured in the valve block it doesn�t tell anything about the pressure in the airbags or reservoir at that moment.
At the end you see the same pressure peak as before, probably another speed bump again.
Well the valve block didn�t fix the problem but I believe the car stays upright longer. Got some fittings today and some 6mm air line, still need to buy the pressure gauges before I can pressure test the air bags themselves. That's for next time.
Guus
PS A bit of Dutch translation ;-)
Schakelgedrag luchtvering = switch behavior air suspension
Druk = Pressure
Compressor = Yep
Reservoirsolenoid = Reservoir solenoid/valve
Uitlaatsolenoid = Exhaust solenoid/valve
Vering voor = Front airbag solenoids
The following users liked this post:
slmskrs (01-24-2021)
#31
01-16-2020, 06:09 AM

Hey Xag, congratulations mate. Out of the whole internet, you are the only one that I've found to use the good stuff!
Basically, out of most industrial air pressure fittings providers, Festo is one of the best.
Working with several machine tools that had air driven spindles, I knew a little bit about air stuff before I got the Jag.
I was a little surprised about the system, as it's a very simple system, and it's a shame it doesn't have a more advanced way of keeping it under control (like pressure sensors on each corner, etc). I guess cost driven development nowadays is more important.
Anyway, if you don't mind, I will continue your thread with my own experiments.
I was having a leak on one of the bags, as I always found the car ******** overnight. I would suspect the rear right bag, but not sure. The previous owner changed the valve body and claimed it corrected the problem for a little bit, as now is dropping pressure over night, and not over an hour. He claimed he checked all the bags on the car and they were fine. So that's when I started to suspect that maybe a leak is happening on one of the air lines.
Took everything apart and checked what I need. From the local Festo dealer I've got basics of what I need.
- some 6mm pipe leftovers (front bags and tank is 6 mm)
- some 4mm pipe leftovers (rear bags and compressor is 4 mm)
- 1/8 BSP threaded quick-fit for 6 mm pipe
- 1/8 BSP threaded quick-fit for 4 mm pipe
- 6 mm T-connector (this is the smallest one available)
- 2x 6mm-to-4mm reductions
- 6 mm nipple
- 10bar pressure gauge with 6 mm quick-fit
- 2x shut-off valve
Made a setup to test the pipes similar to yours, but at the valve body side. Took apart the first right rear pipe and observed I'm in no luck, as the 4mm pipe is NOT a 1/8 BSP fitting!!! Trap for young players.
Same thing on the strut side, is not a 1/8BSP.
After long search, I've found the thread. The thread for the 4mm pipes is a UNF 5/16" 24TPI.
It's a very weird size, and no one manufactures quick-fits in this size.
So the search for UNF 5/16" to 1/8" BSP began. After 2 weeks I've found some adapters on ebay in UK, and I've ordered 6 of them, came in post several days ago.
Anyway, getting back to my setup, I've used in the meantime the original nut with the olive and some leftover pipe to test all the pipes and the pressure drop on each over night.
After 3 days/nights of moving things around and checking different sides, I've had a complete picture of the system:
- the right rear bag was obviously ********, dropping from 6 to 2 bar over night; it was not the pipe, it was the bag, as I've put the test setup directly on the top of the strut;
- there seemed to be a small leak to front right, but not really quantifiable;
- the valve body leaks somewhere. I've caught it by mistake, while I was moving the pipes around it was very quiet (11PM in the night), and I could hear this faint hissing on the compressor side (so the manifold entry). Surprisingly, when I've test the compressor line, it hold steady at 6bar over night.
I've been again to Festo, spent another $100, and got my self another set for T-connectors, a 16bar gauge this time, shut-off valves, etc (made a mistake to buy a 3/2 way the first time, and it was a pain in the *** to get that one to the point of closing but no venting ).
).
Tested multiple times, and got to the same conclusion.
Now, after waiting for a new bag (I've pulled the trigger and bought of ebay a Bilstein rear strut, after reading various reviews on how and why to use different options on suspension, but this is not the place to discuss these options), and playing around with it, I'm at the point where everytime I stop the car I go in the trunk and stop the valve, so the system doesn't lose the pressure on that bag (you know, the wake-up call every 30 minutes by the system to balance the whole car thing...yeah, pain the ***).
But the right front started to lose a lot of pressure now (about 2-3bar in 30 minutes). And is not the bag, because if I isolate it, it holds steady for more than 1 day.
And are not my fittings either. I believe the valve body is completely shot now, and that valve never actually closes. But my question now is why does it loses all that pressure? And where, if all the other valves are closed? Because the only place where it could vent is the compressor, and in general that valve is closed when the car is "sleeping". Or is it not?
And you were right Xag, the tank is not filling up immediately, it took mine 3 drives of 30 minutes to get to 4bar. Didn't had time to wait for it to build pressure, but I assume is holding it, as it had 4 bar overnight also; I've had to move the setup to other test side
P.S.: Ever tried to replace this shitty valve body design with a more up-to-date industrial one? Like a Festo terminal valve with some sort of controller? I know I'm very tempted.
P.P.S: I've got a bunch of parts from Festo again (another $130, I hope wifey doesn't check expenses often ) after the adapters from UNF 5/16" to 1/8 BSP arrived, to change all the fittings on the valve body with quick-fits. I've got the miniature 90 degrees bend ones in 4 and 6mm (1/8BSP thread, obviously), as the adapters would have pushed the fittings pretty high.
This weekend I'll mount the rear strut and change all the fittings...not sure if I should put back in the old "claimed to be damaged" valve body...I don't have any way to test it yet.
And I have no idea why people still struggle with nuts and breakable olives, when quick-fits are so reliable and easy to fit...maybe because of pressure rating that the classic nuts and olives have, but to be fair, the 10 bar rating of the quick-fits is within specs, they worked perfectly fine on my car for the past 3 months, and I prefer to have a $5 quick-fit burst in case of "emergency", than a bag, pipe (especially under the car), or the valve-body.
There are also high pressure 16bar quick-fits, which is what I've got for the compressor side.
Basically, out of most industrial air pressure fittings providers, Festo is one of the best.
Working with several machine tools that had air driven spindles, I knew a little bit about air stuff before I got the Jag.
I was a little surprised about the system, as it's a very simple system, and it's a shame it doesn't have a more advanced way of keeping it under control (like pressure sensors on each corner, etc). I guess cost driven development nowadays is more important.
Anyway, if you don't mind, I will continue your thread with my own experiments.
I was having a leak on one of the bags, as I always found the car ******** overnight. I would suspect the rear right bag, but not sure. The previous owner changed the valve body and claimed it corrected the problem for a little bit, as now is dropping pressure over night, and not over an hour. He claimed he checked all the bags on the car and they were fine. So that's when I started to suspect that maybe a leak is happening on one of the air lines.
Took everything apart and checked what I need. From the local Festo dealer I've got basics of what I need.
- some 6mm pipe leftovers (front bags and tank is 6 mm)
- some 4mm pipe leftovers (rear bags and compressor is 4 mm)
- 1/8 BSP threaded quick-fit for 6 mm pipe
- 1/8 BSP threaded quick-fit for 4 mm pipe
- 6 mm T-connector (this is the smallest one available)
- 2x 6mm-to-4mm reductions
- 6 mm nipple
- 10bar pressure gauge with 6 mm quick-fit
- 2x shut-off valve
Made a setup to test the pipes similar to yours, but at the valve body side. Took apart the first right rear pipe and observed I'm in no luck, as the 4mm pipe is NOT a 1/8 BSP fitting!!! Trap for young players.
Same thing on the strut side, is not a 1/8BSP.
After long search, I've found the thread. The thread for the 4mm pipes is a UNF 5/16" 24TPI.
It's a very weird size, and no one manufactures quick-fits in this size.
So the search for UNF 5/16" to 1/8" BSP began. After 2 weeks I've found some adapters on ebay in UK, and I've ordered 6 of them, came in post several days ago.
Anyway, getting back to my setup, I've used in the meantime the original nut with the olive and some leftover pipe to test all the pipes and the pressure drop on each over night.
After 3 days/nights of moving things around and checking different sides, I've had a complete picture of the system:
- the right rear bag was obviously ********, dropping from 6 to 2 bar over night; it was not the pipe, it was the bag, as I've put the test setup directly on the top of the strut;
- there seemed to be a small leak to front right, but not really quantifiable;
- the valve body leaks somewhere. I've caught it by mistake, while I was moving the pipes around it was very quiet (11PM in the night), and I could hear this faint hissing on the compressor side (so the manifold entry). Surprisingly, when I've test the compressor line, it hold steady at 6bar over night.
I've been again to Festo, spent another $100, and got my self another set for T-connectors, a 16bar gauge this time, shut-off valves, etc (made a mistake to buy a 3/2 way the first time, and it was a pain in the *** to get that one to the point of closing but no venting
).Tested multiple times, and got to the same conclusion.
Now, after waiting for a new bag (I've pulled the trigger and bought of ebay a Bilstein rear strut, after reading various reviews on how and why to use different options on suspension, but this is not the place to discuss these options), and playing around with it, I'm at the point where everytime I stop the car I go in the trunk and stop the valve, so the system doesn't lose the pressure on that bag (you know, the wake-up call every 30 minutes by the system to balance the whole car thing...yeah, pain the ***).
But the right front started to lose a lot of pressure now (about 2-3bar in 30 minutes). And is not the bag, because if I isolate it, it holds steady for more than 1 day.
And are not my fittings either. I believe the valve body is completely shot now, and that valve never actually closes. But my question now is why does it loses all that pressure? And where, if all the other valves are closed? Because the only place where it could vent is the compressor, and in general that valve is closed when the car is "sleeping". Or is it not?
And you were right Xag, the tank is not filling up immediately, it took mine 3 drives of 30 minutes to get to 4bar. Didn't had time to wait for it to build pressure, but I assume is holding it, as it had 4 bar overnight also; I've had to move the setup to other test side
P.S.: Ever tried to replace this shitty valve body design with a more up-to-date industrial one? Like a Festo terminal valve with some sort of controller? I know I'm very tempted.
P.P.S: I've got a bunch of parts from Festo again (another $130, I hope wifey doesn't check expenses often
This weekend I'll mount the rear strut and change all the fittings...not sure if I should put back in the old "claimed to be damaged" valve body...I don't have any way to test it yet.
And I have no idea why people still struggle with nuts and breakable olives, when quick-fits are so reliable and easy to fit...maybe because of pressure rating that the classic nuts and olives have, but to be fair, the 10 bar rating of the quick-fits is within specs, they worked perfectly fine on my car for the past 3 months, and I prefer to have a $5 quick-fit burst in case of "emergency", than a bag, pipe (especially under the car), or the valve-body.
There are also high pressure 16bar quick-fits, which is what I've got for the compressor side.
Last edited by LittleMan; 01-16-2020 at 06:29 AM.
#32
01-16-2020, 08:43 AM

#33
01-16-2020, 09:27 AM
Join Date: Feb 2014
Location: Crossroads of America
Posts: 19,391
Received 12,736 Likes
on
6,379 Posts
The following users liked this post:
AD2014 (09-08-2020)

#35
01-17-2020, 09:28 AM
Join Date: Feb 2014
Location: Crossroads of America
Posts: 19,391
Received 12,736 Likes
on
6,379 Posts
Just re-reading your post I was prompted to throw in a few ideas for consideration. First of all, the Wabco system has height sensors at three wheels (four wheels on the early cars), which would make pressure sensors somewhat redundant, and of course, all automakers are in a constant battle to minimize cost and complexity.
I don't know if you have checked out some of the documents linked in the thread below but if not you may find them helpful in diagnosing system behavior:
Air Suspension & ECATS System Summary: Components & Operation
Cheers,
Don
The following users liked this post:
AD2014 (09-08-2020)
#36
10-10-2020, 07:50 PM
Sorry for long time reply.
The compressor was rebuild by the previous owner.
Reporting back that the system works very well. Very easy to manage and evaluate. Bought 16+ bar pipes, fittings, quick fits and gauges; installed them permanently in the car; as soon as I have a question, I just look into the trunk and check the pressures. Placed gauges on all 6 pipes; I also have spare pipes, Ts, and valves, if I need to shut off a side on the go; takes 2 minutes to do it on the side of the road, if something is ever to fail.
Replaced valve body with a cheap aliexpress Merc S-class unit; connectors were all the same, the resistances of the solenoids were a bit different I think, but it just works. What it doesn't work are the fittings, which on the solenoid are all 5/16UNF thread, so I've used up all my adapters to 1/8BSP. But at ~$100 for the valve body unit, even if it fails every year I don't mind
If there's a big downfall or thing that I would develop in this whole upgrade system is this: find a way to have lots cheap 1/8 BSP Female to 5/16 UNF Male brass adapters.
Because as soon as you increase the thread to 1/8 BSP you find any style of quick fits, rated for 16 bar or over. I've used right angle style so made the pipes more easy to manage.
Anyway, problem now is the actual dampers. Even though I'm not losing air anywhere anymore, the ride is getting jerky day by day. 2 of the dampers are almost not doing anything anymore. And buying refurbished units I don't think gets us anywhere, as they are using old dampers. So I've pulled the trigger, and I already have 3 new units since I've bought the car (2 waiting to be installed), with the remaining good one still going to be kept unit it fails (it can be seen that I has been replaced at some point with a refurbish unit, so might still work for some time).
So all in all, if you consider a maximum of $1000/strut, and probably another $1000 to make the gauges+piping+valve body swap upgrade system I did, it should cost a maximum of $5000 to have the system upgraded to a fully functional system, easy to evaluate and maintain for the years to come.
Giving that you're basically having a mostly maintenance free air ride, that you can use daily for years and years, I would rekon that's not such a bad deal.
I've filmed the whole thing, but I've just didn't have time to go through it nicely and upload it.
The following users liked this post:
slmskrs (01-24-2021)

#38
12-07-2020, 11:43 AM

Three things I did not see in this so far:
1) Compressor nominal pressure should be capable of 15 bar (218 psi). Relief valve set at 17.5 bar (254 psi).
2) Pressure retaining valve in compressor should always maintain 3 bar (43.5 psi) to prevent air bag damage.
3) TSB XJ204.06 has a sequence of tests, using SDD, to do preliminary diagnosis of the Air Suspension System.
#39
12-07-2020, 01:12 PM
Join Date: Feb 2014
Location: Crossroads of America
Posts: 19,391
Received 12,736 Likes
on
6,379 Posts
Three things I did not see in this so far:
1) Compressor nominal pressure should be capable of 15 bar (218 psi). Relief valve set at 17.5 bar (254 psi).
2) Pressure retaining valve in compressor should always maintain 3 bar (43.5 psi) to prevent air bag damage.
3) TSB XJ204.06 has a sequence of tests, using SDD, to do preliminary diagnosis of the Air Suspension System.
1) Compressor nominal pressure should be capable of 15 bar (218 psi). Relief valve set at 17.5 bar (254 psi).
2) Pressure retaining valve in compressor should always maintain 3 bar (43.5 psi) to prevent air bag damage.
3) TSB XJ204.06 has a sequence of tests, using SDD, to do preliminary diagnosis of the Air Suspension System.
The info in your points 1 and 2 is contained in the link in post #35.
Cheers,
Don
#40
12-11-2020, 07:39 AM
I had a similar problem at one side of the front suspension.
A compressor replacement did not improve the situation.
A corrosion problem was suspected because the well protected back suspensions are almost never affected and the used "Ford" metal parts are quite cheap.
So a gum and plastic friendly corrosion spray was procured, in this case WD-40-3-in-1. Sonax 95 should work as well.
The two upper bolts on the left and right side were slowly loosened and the front of the car dropped.
3-in1- spray was applied to the bolts, washers and below the washers. (maybe some drops got inside !)
After the two bolts were fixed again I started the engine and waited in desperation.
This is too simple, it cannot work. But after some minutes the horizon started to drop.
A succesful test drive followed.
When I got home I needed a drink.