When you click on links to various merchants on this site and make a purchase, this can result in this site earning a commission. Affiliate programs and affiliations include, but are not limited to, the eBay Partner Network.
Anyone here replaced these and could roughly explain what's involved in changing these? I might need to do one at some point this year but unsure where to start and some instructions would definitely help
Yes have replaced these before. A little involved but not too bad of a job. If you're only doing the u joints on one axle, may as well do both u joints. Otherwise you'll have to take the axle back out.
I had replaced them with Spicer ones - which are quite good, and are a little more robust than genuine, and can still be lubed as well.
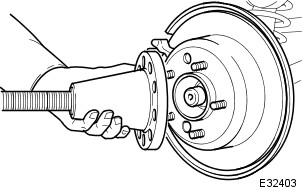
You'll need access to a bench vice, or something you can use that will press in evenly from both sides. Also, you'll need a hub puller - sometimes they will come off without force, but may be best have access to one in case.
If you have access to air tools, this would be good. If not, you'll have to improvise using hand tools, but can still be done.
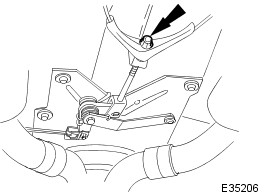
You'll want to start off by disconnecting park brake cable as seen in pictures below.
Fully slacken but do not remove parking brake cable adjuster nut.
Release appropriate side parking brake cable from connecting clip.
Release parking brake cable from suspension mounting bracket.
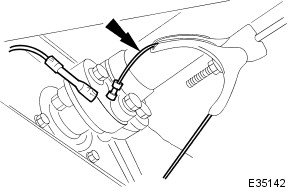
Disconnect the abs wheel speed sensor at this point
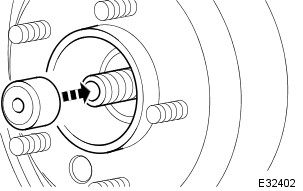
Then you'll need to remove axle nut, and push the axle out of the hub either by a puller, or you may need to improvise if you don't have one. Sometimes they come out with little effort.
Then...
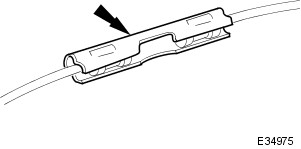
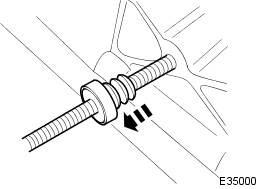
Protect the driveshaft thread with special tool JD 1D / 7.
CAUTION:
Do not use a hammer to detach the halfshaft from the hub assembly, failure to follow this instruction may result in damage to the halfshaft.
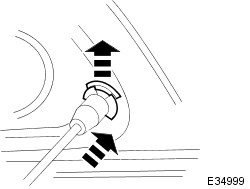
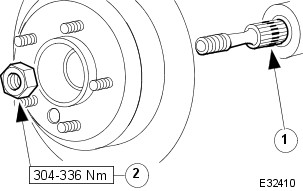
Withdraw the hub from the axle shaft
NOTE:
In the wheel-free condition, the axle is in tension and the flanges will separate as the nuts are withdrawn
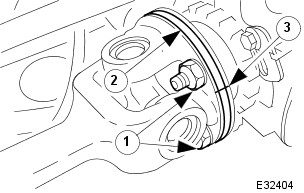
Release the axle shaft
Remove and discard the (4) nuts axle shaft to differential output shaft
Clear the axle shaft from the output flange studs
Remove and keep safe the camber shim
NOTE:
The axle shaft nuts may damage the studs upon removal; check the thread condition by engaging a new nut 2 or 3 threads by hand.
Inspect the output flange studs and renew if there is evidence of damage / distortion
Clean all traces of thread locking agent from the hub splines (and axle shaft if it is to be re-used)
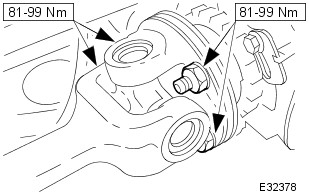
Installation
Installation is the reverse of the removal procedure, noting the following.
CAUTION:
Do not use air tools to install the nut. Failure to follow this instruction may result in damage to the component.
Secure the axle shaft.
Apply thread locking agent, to the SPLINE, as indicated.
Refer to the illustration - do NOT re-use the original nut.
Once the axle is out, give the end caps a tap with a hammer and socket, this will help loosen the snap rings. You'll need some needle nose pliers and snap ring pliers to remove. Once all the clips are removed, you should then be able to press out using a socket that's small enough to fit through the hole without getting stuck. I've always used a bench vice to do this.
I'm sure there are videos on you tube, and maybe even on here, but this should give you an idea of what you're getting involved in. I'm sure there are other brands to use as well, but Spicer was always the one I've used.
It is very important to not reuse the original axle nuts. They are designed with a helical insert that deforms when the nut is subjected to the final torque of more than 200 lb. ft. The helical insert cannot be relied upon to lock the nut on a second installation. At least two members of the Jag-Lovers forum who reused the axle nuts reported a nut coming off while they were driving their Jags (!), and a few others have reported discovering a nut had loosened (!).
The nuts are a bit pricey, but Jaguar specifies the same part for the XJ40, 6.0L XJS, X100, X300, and X308, so they're widely available.
I've heard reports of owners using high-strength threadlocker (e.g. Loctite red) on the old nuts, but since your life may depend on those nuts staying in place, this is one of the matters in which I highly recommend you trust the Jaguar engineers.
Also, when you replace the U-joints, consider also replacing the differential output shaft bearings and the hub bearings. The parts are not expensive and with the axle out you'll have easy access. I have lots of photos of these jobs in the albums at the link in my signature (sorry the large images are currently down, but you can see my thumbnails and descriptions).
Many thanks, will check the photos and part costs. I will have the car on ramps next weekend so hopefully can investigate what needs doing
Generally I have this issue where I can hit the gas pedal with my foot at lets say 55mph for a split second and it feels like there is a lot of play somewhere in the shafts and I think this is either jurid coupling or the u joints are knackered, especially since they were mentioned on its yearly test few years back, before I bought the car.
Generally I have this issue where I can hit the gas pedal with my foot at lets say 55mph for a split second and it feels like there is a lot of play somewhere in the shafts and I think this is either jurid coupling or the u joints are knackered, especially since they were mentioned on its yearly test few years back, before I bought the car.
Issues like this are often the result of multiple components no longer functioning within spec. Given your description, along with the U-joints and Jurid/flexible coupling, I would recommend inspecting the transmission mount, the driveshaft center bearing (the rubber mount in particular), and the rear subframe bushes. If a failing U-joint was the primary issue, I think you would probably have a noticeable vibration and/or noise under a wider variety of driving conditions.
Got to this eventually and found the main offender. It turned out to be the rear fulcrum bearings! I didn't noticed it earlier because rollers in the bearing were mashed against the hub and bolt and there wasn't much play at all when stationary. Only when driving this moved a lot!
The whole procedure in short is:
1. Remove the big nut and the bolt
2. Lift up the hub so it frees itself from the wishbone, its easy to move it around then and all this can be done in situ, no need to remove the hub entirely.
3. Remove old bearings leftover
4. Cut off the pin sleeve just behind the old bearing so everything can come out of the hub.
5. Bash an absolute hell to get the special spacers off the sleeve.
6. Then it was time to remove the old races and that turned out to be very difficult. I've basically built a weld all around the old races up to a 5-10mm, just so I could bash them out from the other side. This took quite a while and honestly no idea how this could be done without welding :O
7. Clean everything up and assemble with new parts. All came back ok
8. Everything took 3.5 hours.
Massive improvement now while driving, its not fully cured though so I will be replacing the other side too.
One last question, does a lifted wheel in parking should move? Mine can be rotated 10cm each side in the diff, not sure its suppose to be like this, any ideas?
Those are the worst fulcrum bearings I've ever seen!
Your solution for removing the races was ingenious. On the Series III there is a slight notch or two behind each race so they can be knocked out with a long punch, but I'm not sure that's true on the XJ40. A pilot bearing puller might work. Some owners have cut through the old races so they can be pulled/knocked out.
My drivetrain kept getting worse until the rear end started to make all sorts of clonking noises these past few days, also the gear changes were not right, shifting pretty hard. I could still not find anything loose in there so eventually, a bit desperate to find out the cause at this point, I decided to push the car a little until something gives up
Few sharp turns, few instant gear changes from R to D and back, with a hard push on the throttle and I finally spotted this:
Left side U-Joint finally gave up! Bits of cracked and mashed metal were falling out so today I got a new u-joint and rear hub nut and replaced both.
Apart from excellent instructions above I have few extra bits to add to it
I've used this to pull the hub:
It's a small puller, but worked great and I only needed couple of turns to get the hub off. No chance to do the job without one of these.
I didn't remove parking brake cable. Considering how much trouble it is to set it all up, I just wiggled the driveshaft to the side, there is enough space to do it without removing the cable.
It was an excellent idea to use a 22mm socket to hit the rings securing end caps. They were proper stuck in there but a few taps with a hammer and they were free again.
I've just replaced the outer u-joint, the inner one was still fine and I did it with the shaft still on the car. The old u-joint wouldn't come out without a fight so I've quickly decided to get the grinder out. Few minutes later I was left with this
and eventually with this:
The old needle bearings where completely shot on the hub side.
I didn't use a press but I can highly recommend it. I just added some silicone grease on the needles and hammered end caps onto the u-joint on all 4 sides.
I didn't have a torque wrench that could be used on the hub nut either so pretty much eyeballed it and did the nut very tight
All works very well now, gear changes back to normal, no clonking sounds at all, very happy with results, I think I finally sorted this!
What new parts did you use for the taper roller bearing replacement? Of course, you had to replace the bearing (CAC4610). Did you replace any other parts such as the pivot pin sleeve (CAC5846), adjustable spacer, washer, and locknut? I am preparing for the bearing replacement, and all information concerning the needed parts would be great. Thanks!
 01-25-2018, 04:15 PM