
Head removal tricks? Engine is out.


Thread Starter
|
Senior Member
Joined: Aug 2011
Posts: 158
Likes: 35
From: Boise, ID
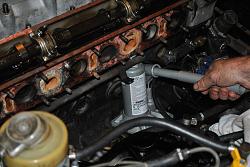
Does anyone have any tricks to get this thing off the block? I have had it hanging a couple inches off the ground (over some wood blocks in case she decides to let go) for the past two weeks, spraying it sometimes multiple times daily with PB Blaster and it wont budge. I see no other bolts holding the head on (all the little ones on the front are out) and the cams are out so the timing chain isn't holding it together. I am pretty confident it's stuck from corrosion but this thing is getting a little old. Engine is a S1 XJ6 engine that I'm trying to put a S3 head on and get my car put back together. I pulled the engine to clean up the bay a bit because it was caked in decades old dirt/oil and a brake reservoir leak left half the paint missing. Anyway, any tips would be great! I have tried lightly tapping the edges of the head with a mallet, but am too afraid to break that aluminum so I haven't been hitting hard. I have considered removing the studs but haven't tried it yet. I did think maybe turning each stud a few degrees (versus completely removing) might break everything free, but I have no idea if that will work or not. I have also thought about anchoring the block to the legs on my hoist, but that could get a little sketchy. Thanks in advance for any help!
Veteran Member


Joined: Nov 2013
Posts: 3,415
Likes: 1,647
From: Regional NSW, Australia
G'day mate! and greetings in Boisie from Inverell. First, you've done well . . . and almost there. Second, your experiences thus far (and frustration) are not unique . . . all these XKs go together tighter that witches' britches, so here goes.
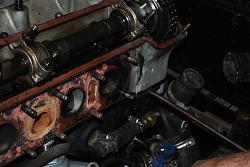
I can tell from your tone that you are aware of (and have double checked), but I emphasize for all others reading this, that all the smaller fixings around the front t/c cover have been removed and the t/c is free. The Al head is quite robust beyond this frontal thin wall area around the t/c cover. Carefully check all around block/head for any other snags . . . eg oil lube lines to the banjos at back of cams.
Removing the head studs via the short amount of thread available above the still-in-place head will be 1) very difficult; 2) achieve nothing, coz they are not a tight fit to locate the head - indeed, plenty of annular clearance to prevent binding.
However, at opposite ends of the block, and adjacent to cylinders #1 and #6, two of these head studs have small annular sleeves about 6mm long, which penetrate down into block and up into head equally. For the life of me, I cannot recall whether the front one (#1) is on left or right, but the back one (#6) is on diagonally opposite side . . . yeah, no help, right?
These 2 little locating spigots/dowels/whatever corrode into the nastiest little suckers imaginable . . . hence your experience is commonplace. Some, with engine still in car, s/plugs in and disconnected, have been known to back off head stud nuts and crank until the head "pops". In your case, I suggest your replace head stud nuts but leave about 3mm uniform "gap" then give the head a good sideways whallop with rubber or wooden mallet in the area of #1 and #6 cylinders. Neither gentle nor foolish be . . . aim your blow carefully; stay away from that thin frontal area and any protruding manifold studs; perhaps engage a friend to time simultaneous blows at each end on opposing sides . . . and it will let go.
Cheers and best wishes,

Ken
I can tell from your tone that you are aware of (and have double checked), but I emphasize for all others reading this, that all the smaller fixings around the front t/c cover have been removed and the t/c is free. The Al head is quite robust beyond this frontal thin wall area around the t/c cover. Carefully check all around block/head for any other snags . . . eg oil lube lines to the banjos at back of cams.
Removing the head studs via the short amount of thread available above the still-in-place head will be 1) very difficult; 2) achieve nothing, coz they are not a tight fit to locate the head - indeed, plenty of annular clearance to prevent binding.
However, at opposite ends of the block, and adjacent to cylinders #1 and #6, two of these head studs have small annular sleeves about 6mm long, which penetrate down into block and up into head equally. For the life of me, I cannot recall whether the front one (#1) is on left or right, but the back one (#6) is on diagonally opposite side . . . yeah, no help, right?
These 2 little locating spigots/dowels/whatever corrode into the nastiest little suckers imaginable . . . hence your experience is commonplace. Some, with engine still in car, s/plugs in and disconnected, have been known to back off head stud nuts and crank until the head "pops". In your case, I suggest your replace head stud nuts but leave about 3mm uniform "gap" then give the head a good sideways whallop with rubber or wooden mallet in the area of #1 and #6 cylinders. Neither gentle nor foolish be . . . aim your blow carefully; stay away from that thin frontal area and any protruding manifold studs; perhaps engage a friend to time simultaneous blows at each end on opposing sides . . . and it will let go.
Cheers and best wishes,
Ken

Joined: Jan 2014
Posts: 28,386
Likes: 6,340
From: Delaneys Creek,Qld. Australia
Turning the studs may result in snapping one off as they will be well and truly corroded in place, and this can turn out to be a very expensive exercise to repair.(don't ask how I know this). Breaking the stud turned the block into a very effective wine rack.
A simple head gasket replacement turned into a close to $7k engine rebuild.
https://www.jaguarforums.com/forum/x...gasket-157830/
We used bottle jacks to remove a stubborn head, plenty of force needed. Nothing broke. Good luck.


However, at opposite ends of the block, and adjacent to cylinders #1 and #6, two of these head studs have small annular sleeves about 6mm long, which penetrate down into block and up into head equally. For the life of me, I cannot recall whether the front one (#1) is on left or right, but the back one (#6) is on diagonally opposite side . . . yeah, no help, right?
Cheers and best wishes,
Ken
#6(front cylinder)is on the left, #1 (rear cylinder) is on the right
A simple head gasket replacement turned into a close to $7k engine rebuild.
https://www.jaguarforums.com/forum/x...gasket-157830/
We used bottle jacks to remove a stubborn head, plenty of force needed. Nothing broke. Good luck.


However, at opposite ends of the block, and adjacent to cylinders #1 and #6, two of these head studs have small annular sleeves about 6mm long, which penetrate down into block and up into head equally. For the life of me, I cannot recall whether the front one (#1) is on left or right, but the back one (#6) is on diagonally opposite side . . . yeah, no help, right?
Cheers and best wishes,
Ken

Last edited by o1xjr; Nov 14, 2016 at 05:25 PM.
Senior Member
Joined: Jan 2014
Posts: 577
Likes: 246
From: Seattle
I used 2 small bottle jacks inserted on the webbing at the bottom corners and pushed up under the head where it overhangs the block. A bit on each one... on each side ... evenly and it will eventually start moving keep the upward push even --- side to side thats how I did mine.. years ago
Thread Starter
|
Senior Member
Joined: Aug 2011
Posts: 158
Likes: 35
From: Boise, ID
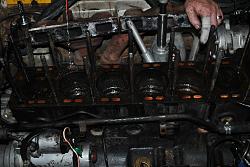
Thank you for the suggestions and cautions so far! I will try tonight armed with some new knowledge. I came across your pictures, Clarke, searching this forum for any quick pointers, and judging by you and alynmurray, it seems as if this is the way to go. When I originally pulled the S3 head, it was still in the car and I used one of those hoist things that straddle the engine via each fender, which in hindsight, seems like the best way to do it. I don't have access to that handy tool anymore and honestly never thought it would fight me like this. The bottle jack method seems perfect so I will let you know how it goes after work! Thanks again! Hopefully by spring she'll be purring again!
On a side note, I have been off this forum for a while and I have no idea why... Of all the forums I browse (ford trucks, r3vlimited, fullsize bronco, etc.) this has to be the most helpful and welcoming!
On a side note, I have been off this forum for a while and I have no idea why... Of all the forums I browse (ford trucks, r3vlimited, fullsize bronco, etc.) this has to be the most helpful and welcoming!
Senior Member
Joined: Jan 2014
Posts: 577
Likes: 246
From: Seattle
For what it is worth dept... If I still had the Jag 6 in my car (I don't) I would helicoil the top of the block and get away from those miserable long studs. My theory is they corrode at the bottoms and lose tensile strength -stretch.... then the torque value that was used gradually diminishes until the head gasket is not under the same "squeeze" as it was when initially torqued to spec. and fails ... crap !! Doesn't take much... if the stud stretches 1 thou or 2 how much is the torque on the stud nut diminished ? Does it go from 65 Lbs PSI to 35? if so that is where the problem lies. I know my head gasket failed,... after a long climb on a gradual slope under heavy load that was the test ... it failed.
Last edited by alynmurray; Nov 14, 2016 at 06:53 PM.

Veteran Member

Joined: Mar 2008
Posts: 25,536
Likes: 11,735
From: Pacific Northwest USA
Trending Topics

Veteran Member
Joined: Jul 2012
Posts: 6,796
Likes: 2,403
From: Walnut Creek, California
Or:
I was messing around in my garage/shop. I found a long unused
bottle jack. And lo and behold, an ancient screw jack. More than a bit grungy, but each in working order.
Carl
I was messing around in my garage/shop. I found a long unused
bottle jack. And lo and behold, an ancient screw jack. More than a bit grungy, but each in working order.
Carl
Thread Starter
|
Senior Member
Joined: Aug 2011
Posts: 158
Likes: 35
From: Boise, ID
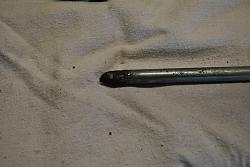
Success! Thank you all so much! I'll drink a beer in each one of your honor this weekend. Next question: I marred the threads on a couple studs, is it a good idea with these to swap out all head studs? Or would I just be able to get by with replacing the ones I screwed up? I know the BMW guys insist their engines have them replaced each time (80s 3 series motors at least), but wasn't sure if the same applies here. Again, thanks for your help! I'm excited to get moving on this project again!
Veteran Member
Joined: Jul 2012
Posts: 6,796
Likes: 2,403
From: Walnut Creek, California
Yahoo, if invited, I'll share Trader Joe's house brew.
Trader Joe, dark
As to the studs. If not badly corroded, and the threads
not too badly beat up, fix 'em and use them, Run a die
over them if seriously battered or a thread chaser.
I've used a DIY tool. Saw cut an "X" on the face of a proper
thread size nut. Run it on he suspect threads. The sharp edges
of the saw cut will clean light marring.
I suggest these over a swap for fresh metal, because of the
busting the stud risk. Not the end of the world, but messy...
Carl
Senior Member
Joined: Jan 2014
Posts: 577
Likes: 246
From: Seattle
If the engine is out of the car then replacing the studs (recommended) becomes more feasible (if the engine is still in the car I would go the "helicoil" route) .
When you pull the studs you will find there is a lot ( I mean a lot) of scale , crud , junk etc. laying down there in the bottom of the water jacket ready to fall in to the hole where the stud was screwed into.
That is why I asked if the block was out of the car,.. if it was, then you could effectively clean the interior of the block (flush it - hot tank it) before you re insert the new studs and trap a piece of debris in the hole - throwing off your torque specs when it comes time to torque down the head. = new head gasket again soon).
Look on the internet,... somewhere I saw an article about using helicoil inserts instead of these ridiculous studs. Never use the old ones because you can not know just how corroded they are deep down inside the block where they screw in. Pull all those pieces of junk ...they are worn out. You would never re use a head gasket would you? These studs are an important part of the head attachment /sealing system. If they stop applying proper amount of torque to the head to block joint ,..the head gasket will fail./ basic rule of internal combustion engines / mechanics
There are a lot of people posting here on this and other Jag bbs
who have never torn a Jag engine apart but yet they will offer you their opinion - = worthless in that case. I call it internet puke.
Last edited by alynmurray; Nov 18, 2016 at 08:27 AM.
Veteran Member
Joined: Mar 2008
Posts: 25,536
Likes: 11,735
From: Pacific Northwest USA
Or....
Pull out some of the freeze plugs and you'll be able to see the condition of the coolant passages and see some of the studs and be guided from there. If it look reasonably clean the studs should be OK.
The first time I did a head gasket job on one of these engines (my own) I pulled all the studs and found them to be in near perfect condition.....and then (Gah!) ran into the problem of he holes filling up with residual sand. In that case I ended up wishing I had left well enough alone.
The two other times I never touched the studs because the owners didn't want to open up any Pandora's boxes. Got lucky, no problems arose in those cases. But others haven't been so lucky.
Cheers
DD
Veteran Member
Joined: Mar 2008
Posts: 25,536
Likes: 11,735
From: Pacific Northwest USA
Pull all those pieces of junk ...they are worn out. You would never re use a head gasket would you?
Here's the difference: a head gasket can never be reused. It just won't work.
A stud CAN be reused, perfectly safely, if it is still in good condition.
There are a lot of people posting here on this and other Jag bbs
who have never torn a Jag engine apart but yet they will offer you their opinion - = worthless in that case. I call it internet puke.
who have never torn a Jag engine apart but yet they will offer you their opinion - = worthless in that case. I call it internet puke.
Sometimes there is more than one right answer. Opinions and experiences vary.
Cheers
DD
Thread Starter
|
Senior Member
Joined: Aug 2011
Posts: 158
Likes: 35
From: Boise, ID
I went back into my garage this morning before work and looked at them again. I may not have messed up the threads like I thought. There is just a bunch of oil and dirt pushed into the threads which made them look flattened in spots, but I don't think that's the case. I'll clean it well this weekend and really get a good idea. Thanks for the insight into these studs. I will try the freeze plug technique and gauge the coolant passages then. If I have to buy new studs, I'm ok with it, but would prefer not to if it isn't necessary. I was worried that since the engine was 43 years old that the cylinder walls would be beat up (I have never REALLY driven this car because of fuel issues in the past, so in 6 years, I've got only a few hundred miles on it), but there's not a blemish, visually or by feeling, on any of the walls, which makes me very happy. Any other suggestions while this is out? I'm going to clean it really well, repaint the engine bay, upgrade some things, and put it back together, but if there's anything else I should consider beforehand, I'd love to hear it. Thanks again! I'm glad to be able to move along with this project again! Maybe I'll be able to hit car week in Monterey with it next year like I keep telling my wife...
Veteran Member
Joined: Jul 2012
Posts: 6,796
Likes: 2,403
From: Walnut Creek, California
OK, things going well.
Get the threads real clean. Wire brush or even a chase. Needed to get good torque reads.
Feel the top edge of each bore. A finger nail works well. Any discernible ridge? If it is merely carbon, that is normal. but, if steel,
then the cylinder is tapered.
If your fuel issue was an over condition, washing the walls of lube
can wear them abnormaly.
Of course, the real test is a snap guage and a micrometer.
Don't let these comments overly alarm you. All is likely just fine.
Carl
Senior Member
Joined: Jan 2014
Posts: 577
Likes: 246
From: Seattle
Obviously you can pull them and have a look,.. but then you have a bunch of holes that can and will fill with water and crud. (GAH!!) More chance of a poor job.
That is why I said "you don't know their condition" (without pulling them) (if I pulled them,.. I would throw them away - sure you an use them again if you don't want to spend a couple hundred bucks.)
Personally I would step up for new ones (Peace of mind) if I was this far into it.
Different if you work for a repair shop and trying to keep the cost down for a customer and the customer is taking the risk of future related problems.
Pulling the freeze plugs and replacing them with engine in the car - no fun deal.
The other problem is..if the studs are stretched a bit and the Acorn top fasteners bottom out (especially with crud in the bottom holes) what is the effective true torque value? Would you be tempted to use 2 copper washers on the top of the head under the Acorn nut to gain clearance? No.. Buy new studs..
Its a sickening feeling when bringing the nuts/studs up to torque specs, and you find that the more torque that is applied ,..the easier it is to turn the torque wrench,...been there.. if you are lucky and understand what is about to happen you may be able to back off the nut and even luckier remove the whole stud.. then you get to thinking about the other studs that were installed at the same time, and have lived under the same conditions for 40+ years....
Clint Eastwood line comes to mind "are you feeling lucky?" with leaving the others in the block.
Veteran Member
Joined: Nov 2013
Posts: 3,415
Likes: 1,647
From: Regional NSW, Australia
Visual inspection of bores, over their full length, is critical . . . but compared to concerns about head studs that, unless obviously otherwise, are ordinarily still serviceable (see Doug's advice) . . . I would be far more concerned with the almost certain piston ring wear. Shiny bores are no guarantee that rings are not worn beyond specs . . . or even unbroken!
But then . . . I was never all that keen on partly re-building an XK engine, only to have to pull and strip it again for some related problem that would take but a few hours while engine was already out of vehicle.
Cheers
Ken
Veteran Member

Joined: Dec 2009
Posts: 9,555
Likes: 2,553
From: Crewe, England
OK, it's a Series 1 car, so the block should be a 7L. Is there any cracking between the bores ? You have to look very closely, and may have to use a bit of emery paper to clean the block face. If cracks are present, it is really an engine out job, find an uncracked block or fit lipped liners, then rebuild the engine. I suspect this cracking syndrome on these cars is the reason there are so many lumped XJs.