
Original Series 1 XJ6 Refurbishment and Questions

#22
 11-30-2017, 10:40 PM

We knew our power steering rack was bad from the start - as evidenced by the pan filled with PS fluid under the car in the garage in which it was stored. But it did work fine when filled with fluid, while leaving quite a puddle afterwards. We really wanted to save it... and failed.
But now it runs, steers, shifts and brakes (fluid flush still outstanding) - we should drive it!
- First, we pulled it apart, inspected it (actually looked pretty good we thought), and replaced the rack seals. A little "pop" and once again it poured its contents all over the garage.
- So, gluttons for punishment, we did it again, this time including the top/bottom pinion seals even though the pinion assembly did not appear to be the cause. Again, failure.
- Super mad now, we did it one more time out of desperation, this time dismantling the pinion and replacing the internal o-rings, too (though the replacements were not really correct). We cried a little when it still leaked.
But now it runs, steers, shifts and brakes (fluid flush still outstanding) - we should drive it!
The following 4 users liked this post by Pabarlow:
#23
12-02-2017, 11:43 AM

Veteran Member
Join Date: Mar 2014
Location: Tehama County, California, USA
Posts: 25,185
Received 8,950 Likes
on
5,295 Posts
#25
12-03-2017, 07:17 PM
I tend to reserve the word "restoration" for something approaching complete dismantle and rebuild, hence the rather awkward "refurbishment." Jamie penned "revival," which is admittedly sounds much better. Too late for the thread title!
We finally flushed the brake system, using a short section of brake pipe to replace the bleed nipples in the rear to ensure that we were completing removing any foreign material. Nice and clean throughout now, and the rear pads and calipers (and yes, emergency brake mechanism) all look good. Never fun working on Jag brakes, but it went pretty well.
That's it for fluids... but we do still have the AC to figure out. All controls seem to work and the compressor engages as it should, but we're not exactly making ice cubes with the air. So, a refill and/or conversion ahead.
(Gratuitous Mackie photo included because, honestly, he didn't help us with the brakes at all.)
#26
12-05-2017, 12:42 AM

#27
12-05-2017, 09:16 AM
#28
12-05-2017, 09:18 AM
Now that the XJ was up and running and nothing appeared to be falling off at this point in time, we were ready for the first drive!
Again, all good from our perspective; we're pretty happy so far!
Next up, we'll get into the exterior and interior work. Thanks for following!
Again, all good from our perspective; we're pretty happy so far!
Next up, we'll get into the exterior and interior work. Thanks for following!
Last edited by Pabarlow; 12-05-2017 at 10:28 PM.
The following 7 users liked this post by Pabarlow:
Demian (01-28-2018),
Doug (12-09-2017),
littlelic69 (09-25-2018),
LnrB (12-10-2017),
o1xjr (12-17-2017),
and 2 others liked this post.
#29
12-09-2017, 03:31 PM

Thought I would pipe in here - I'm the other half (Jamie) of this refurbishment adventure, though I have to admit that Peter is the skilled labor and I'm really just there to hand wrenches and deliver 6 packs of beer... but I'm definitely learning as we go along. My nephew was over the other night and we were going through some old photos and I came across this...
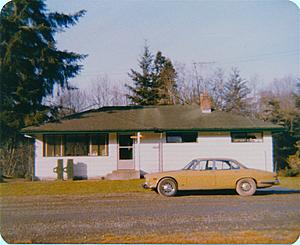
A pic of my Dad's 1973 greensand XJ12. He bought the car in 1979 and it made a big impression on me as a kid - it was a very out of character splurge for him (even as a used car), but boy did we have a couple of years of great fun and road trips before the financial reality of Jag ownership lead to my Dad passing it on to a new owner. Dad is long gone, but seeing a '73 greensand Jag visiting my driveway sure brings back a lot of memories and puts a smile on my face.
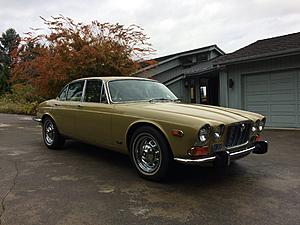

A pic of my Dad's 1973 greensand XJ12. He bought the car in 1979 and it made a big impression on me as a kid - it was a very out of character splurge for him (even as a used car), but boy did we have a couple of years of great fun and road trips before the financial reality of Jag ownership lead to my Dad passing it on to a new owner. Dad is long gone, but seeing a '73 greensand Jag visiting my driveway sure brings back a lot of memories and puts a smile on my face.

#30
12-10-2017, 09:38 PM
We're seeking confirmation of our antenna/aerial situation. As a reminder, this is a fairly late US-market Series 1 XJ6, and it has the antenna mounted in the left rear fender behind the fuel tank. We've got most of the antenna itself, and nothing else...
I've searched the forums and other sources and gather that if our car had an electric antenna, then the motor would be located in the trunk under the panel behind the spare wheel, right beside the fuel pumps, and would include wiring and a relay. Right? I've seen the page from a factory book with the drawing, but haven't found a photo graph that shows the motor in place. We appear to have nothing of the sort - no motor, obviously, but also no wiring in the trunk or in the fender.
What we're trying to figure out is if the pieces of antenna we have are from a power or manual antenna and, if the latter, then it is possible/likely that this US-market car was delivered without a power antenna?
Thanks for any input. The trunk photo gives a preview of how the paint cleanup has gone on the XJ - more to come!
#31
12-11-2017, 08:11 AM
Veteran Member
If you pull out the LH tail light assembly, you should be able to see the rest of the antenna underneath the fender. You do have the pretty S1 antenna bezel...
It could be a aftermarket power antenna or just a manual one (like mine).. it is hard to find ones that actually fit into the car.
I do have a Jaguar power antenna that works fine with some spare parts, but it does not fit in my '71 ... it mounts in the spare tire well and the cable runs into the LH fender.
I was able to fit the same antenna into my old '72 XJ easily.
#32
12-11-2017, 11:20 AM

Veteran Member
Join Date: Jul 2012
Location: Walnut Creek, California
Posts: 6,796
Received 2,399 Likes
on
1,880 Posts
Super !!!
The You Tube video was impressive. To include the obvious enjoyment of the back seat passenger.
What is the red light in the lower left of the fascia?
And, for an unknown reason, the thumb nails were not depicted here.
Limitations of my "equipment" ?
That is surely a great car.....
Carl
The You Tube video was impressive. To include the obvious enjoyment of the back seat passenger.
What is the red light in the lower left of the fascia?
And, for an unknown reason, the thumb nails were not depicted here.
Limitations of my "equipment" ?
That is surely a great car.....
Carl
#33
12-11-2017, 11:22 AM
Veteran Member
Join Date: Jul 2012
Location: Walnut Creek, California
Posts: 6,796
Received 2,399 Likes
on
1,880 Posts
#35
12-14-2017, 12:20 AM
OK, we know that this can be summarized as "simple exterior detailing", but as we have somewhere north of 30 hours in bringing the paint back as far as possible, we feel compelled to make a post of it!
Jamie and I went after all painted surfaces thoroughly and carefully. No power buffing machines (we do hate to see those rub-through marks on original-paint cars), just careful work by hand, using lightweight cleaner wax wherever we could, and stronger compounds only where necessary. We had the engine compartment carefully steam-cleaned first, which mostly just made the subsequent manual paintwork a little easier.
We're very happy with the result. The original paint is very nice to work with, lots of room for cleanup. And, the process of being forced to look very closely at every square inch of the car helped to confirm its condition - and it was very interesting to come across the various factory paint flaws! We do have paint chips here and there, and a few small dings, the worst of which is on the passenger door but might come out yet. Oh, and while we were at it, we carefully cleaned the wheelwells, suspension and wheels.
Next up, the interior including the dreaded headliner!
The following 3 users liked this post by Pabarlow:
#36
12-17-2017, 12:49 AM
We have a shiny and smooth-running car, but the interior has some significant flaws. The most obvious one is the typical failed headliner. While we want to keep the car as original as possible, we knew from the beginning that the headliner was being replaced.
Besides the headliner fabric no longer being bonded to the headliner board, we also had torn and soiled fabric around the rear window. We didn't know if the fibreglass headliner board itself was bad or not, though we figured that was likely to be the case. Nonetheless, this is where it was actually beneficial that the rear window gasket was bad - we needed to pull the window anyway, so we could therefore attempt to remove the headliner whole.
Since we know we are replacing the window gasket, we just cut the window out. Surprisingly, under all that RTV silicon, the window chrome strip was all there and undamaged. Nice! Under the window gasket and yet more silicon, however, were some paint chips from sealant application, which is too bad.
The metal cap panels (front top, rear top and bottom) were fine but for the fabric. The particle-board side rails weren't quite as good, with two ends suffering some damage upon removal and some of the clip holes tearing a little.
Worse, but not unexpected, the headboard itself fell apart wherever we touched it. We were going to have a big decision to make...
In the meantime, what lay under all the pieces was really very solid and apparently all original, if a little dirty. Knowing that the rear window gasket had failed and there had been some moisture getting in, we feel fortunate that the parcel shelf and rear seat bottom are so good.
So we started debating the options for the headliner, and quite a debate it was..
Besides the headliner fabric no longer being bonded to the headliner board, we also had torn and soiled fabric around the rear window. We didn't know if the fibreglass headliner board itself was bad or not, though we figured that was likely to be the case. Nonetheless, this is where it was actually beneficial that the rear window gasket was bad - we needed to pull the window anyway, so we could therefore attempt to remove the headliner whole.
Since we know we are replacing the window gasket, we just cut the window out. Surprisingly, under all that RTV silicon, the window chrome strip was all there and undamaged. Nice! Under the window gasket and yet more silicon, however, were some paint chips from sealant application, which is too bad.
The metal cap panels (front top, rear top and bottom) were fine but for the fabric. The particle-board side rails weren't quite as good, with two ends suffering some damage upon removal and some of the clip holes tearing a little.
Worse, but not unexpected, the headboard itself fell apart wherever we touched it.
We were going to have a big decision to make...In the meantime, what lay under all the pieces was really very solid and apparently all original, if a little dirty. Knowing that the rear window gasket had failed and there had been some moisture getting in, we feel fortunate that the parcel shelf and rear seat bottom are so good.
So we started debating the options for the headliner, and quite a debate it was..
Last edited by Pabarlow; 12-17-2017 at 12:57 AM. Reason: minor correction
#37
12-20-2017, 01:51 PM


Great project!
My name is Rob, and I just came across this great topic.
I am from the Netherlands Europe, and am currently in about the same phase (interior wise) on my 1971 XJ6 Series 1.
Well actually I have put the headliner surroundings back in already after re-upholsering it with new fabric.
The hardboard on mine above the doors was far from straight so I copied it onto a new piece of board.
It is an easy job and result should make up for the time invested there.
I realize you guys do probably not read Dutch easily, but pictures could show some result on the job on mine:-)
https://www.jaguarforum.nl/forum/top...ekocht/?page=3
Note: The Dutchies found my new headliner somewhat too pale compared to what was expected te be original, but looking at your cars old headliner fabric, it look similar in color (which makes me happy even more about result on mine)
Keep up the good work!
I will be reading the progress and learn more about the S1! (mine has failing oil pressure sender, and needs to be awoken during Christmas holidays here still, also...
Last edited by Ekskaar; 12-20-2017 at 02:02 PM.
#38
12-20-2017, 04:21 PM
Veteran Member
Join Date: Mar 2014
Location: Tehama County, California, USA
Posts: 25,185
Received 8,950 Likes
on
5,295 Posts
#39
12-20-2017, 10:43 PM
Robbert, welcome to the forum and this thread, we're happy to have you here! And, as Elinor has pointed out, Google Translate will hopefully allow our respective threads to learn from each other.
Jamie and I completely understand the challenges with the colour of the headliner and related fabric. Our forum posts are always a few weeks behind "real-time", so shortly you will hear what we went through to get what we believe is the correct colour for our car. Hint: it is not "oatmeal!"
Jamie and I completely understand the challenges with the colour of the headliner and related fabric. Our forum posts are always a few weeks behind "real-time", so shortly you will hear what we went through to get what we believe is the correct colour for our car. Hint: it is not "oatmeal!"
#40
12-21-2017, 10:50 AM
Robbert, welcome to the forum and this thread, we're happy to have you here! And, as Elinor has pointed out, Google Translate will hopefully allow our respective threads to learn from each other.
Jamie and I completely understand the challenges with the colour of the headliner and related fabric. Our forum posts are always a few weeks behind "real-time", so shortly you will hear what we went through to get what we believe is the correct colour for our car. Hint: it is not "oatmeal!"
Jamie and I completely understand the challenges with the colour of the headliner and related fabric. Our forum posts are always a few weeks behind "real-time", so shortly you will hear what we went through to get what we believe is the correct colour for our car. Hint: it is not "oatmeal!"
I did a much worse 1975 Series 2 some time ago (took me over a year)
Everything was broken on that car after sitting still for 18 years...
Only the headliner was intact there;-)
https://www.jaguarforum.nl/forum/top...ekken/?page=22
After I sold it, I started realizing that was a good decision (therefore now the S1)