2007 XK Cooling System Service
#1
 07-23-2017, 05:09 PM

My 2007 has logged 78K miles. I've noticed the occasional post having to do with a burst coolant hose, and decided I should replace the hoses, serpentine belt, tensioner and the coolant pump proactively. (I previously replaced the outlet tube and thermostat.) It is almost impossible to visually inspect some of those parts without removal of the engine intake air tube, etc.
Thanks to forum members tommytess and u102768 who provided part numbers. The US Jaguar parts catalog lists an incorrect part number for hose #9 (leading to the top of the overflow reservoir), while the manifold gaskets and EGR valve gasket are not easy to locate.
I've raised up the car, removed the two plastic panels below the engine, and drained the radiator. I needed to replace the neoprene rubber gasket on the radiator drain plug (bought from a local hardware store), as the original was falling apart.
A few questions/comments for those who have done this service:
1. It is necessary to remove the black plastic manifold riser for access to the hose that connects between the engine coolant pump bypass and the throttle body. Can this be done without disturbing the fuel rails and injectors?
2. Several hoses (like the PCV hoses for example) have plastic fittings at the ends. How do you remove those fittings without causing damage?
3. Some of the coolant hoses also have plastic fittings at the ends (blue plastic inserts in a black plastic body). How are those fittings gracefully removed?
4. Which hoses are the most likely to fail, based upon forum member experience?
5. The new hoses come with hose clamps, which I had not expected. I guess that helps to justify the prices...
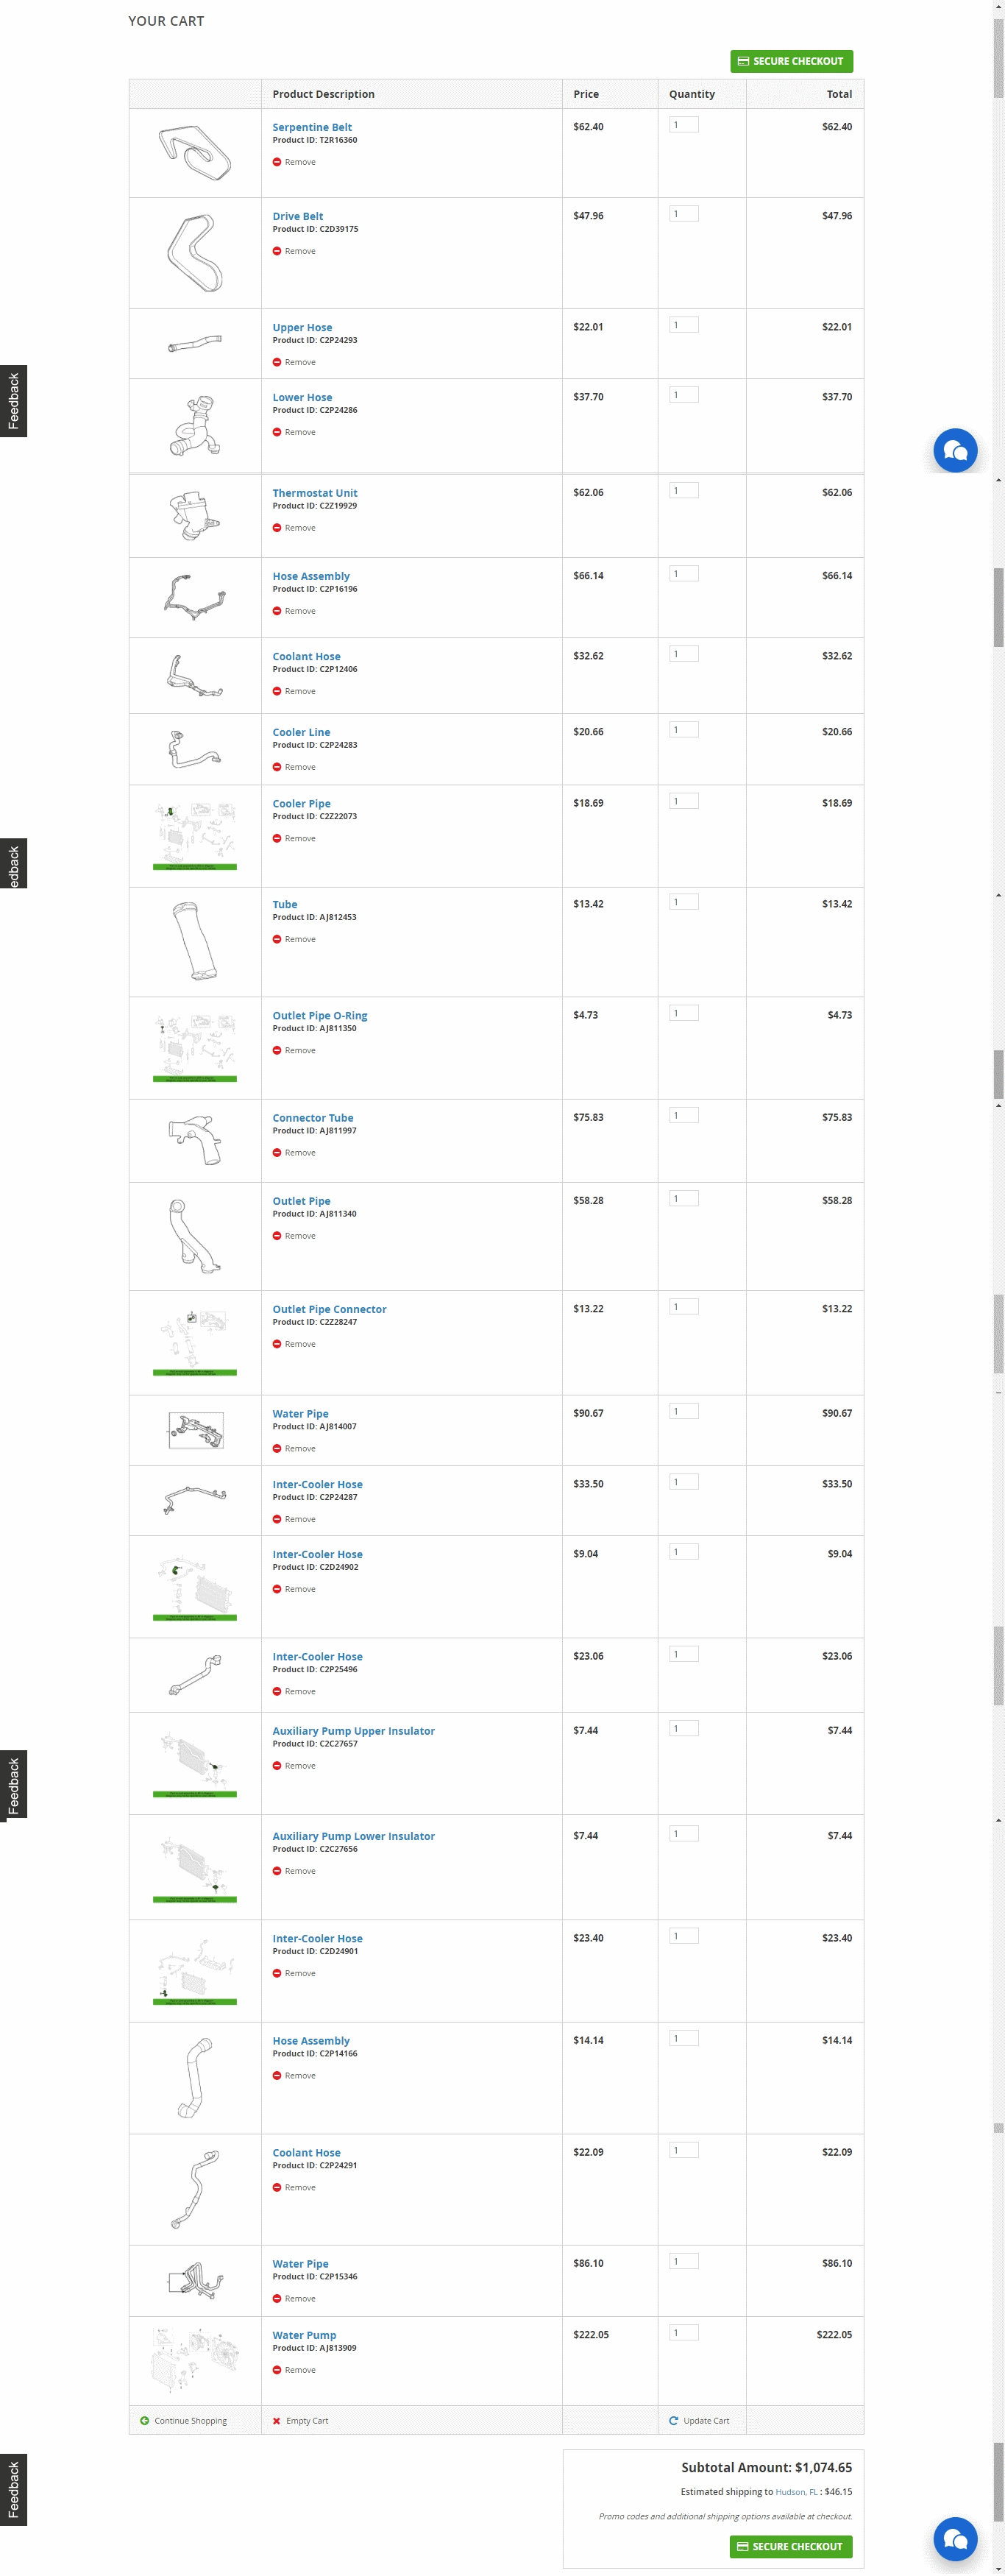
6. I attached the list of part numbers that I purchased. (The seat belt part number is for the driver's side, caramel color, I bought that because the original belt is starting to look a bit worn.) That list shows parts pricing via parts.com, prior to freight. The order was fulfilled by a Texas Jaguar dealer.
Thanks!
Thanks to forum members tommytess and u102768 who provided part numbers. The US Jaguar parts catalog lists an incorrect part number for hose #9 (leading to the top of the overflow reservoir), while the manifold gaskets and EGR valve gasket are not easy to locate.
I've raised up the car, removed the two plastic panels below the engine, and drained the radiator. I needed to replace the neoprene rubber gasket on the radiator drain plug (bought from a local hardware store), as the original was falling apart.
A few questions/comments for those who have done this service:
1. It is necessary to remove the black plastic manifold riser for access to the hose that connects between the engine coolant pump bypass and the throttle body. Can this be done without disturbing the fuel rails and injectors?
2. Several hoses (like the PCV hoses for example) have plastic fittings at the ends. How do you remove those fittings without causing damage?
3. Some of the coolant hoses also have plastic fittings at the ends (blue plastic inserts in a black plastic body). How are those fittings gracefully removed?
4. Which hoses are the most likely to fail, based upon forum member experience?
5. The new hoses come with hose clamps, which I had not expected. I guess that helps to justify the prices...
6. I attached the list of part numbers that I purchased. (The seat belt part number is for the driver's side, caramel color, I bought that because the original belt is starting to look a bit worn.) That list shows parts pricing via parts.com, prior to freight. The order was fulfilled by a Texas Jaguar dealer.
Thanks!
Last edited by Patrick Wong; 07-23-2017 at 05:14 PM.
The following 2 users liked this post by Patrick Wong:
GetITcoy60 (06-15-2021),
Mrbearman (08-13-2017)
#2
07-25-2017, 10:03 AM

Not so sure you need to replace every single rubber hose. Just replace those which are often noted on this forum.
Hoses/seals leak/fail under pressure. Many pre-war cars had cooling systems that operated with no pressure cap. Boiling point was 212F (sea level). Presurizing the system allows a higher boiling point, but also stresses all rubber hoses. Classic car collectors have often added pressure radiator caps; and found early hose failure.
Hoses today are much more robust.
Consider going to a system with zero pressure. Check out Evans Coolant. It has a much higher boil point than conventional coolants; and operates with no pressure. I have had it for years on my '07 XK with no troubles, leaks, etc.
The following 2 users liked this post by Rey:
Patrick Wong (07-26-2017),
ralphwg (07-25-2017)
#3
07-25-2017, 10:14 AM

Senior Member
Luckily I found mine before being stranded. Here is a link to my post with hose. Maybe it'll help.
https://www.jaguarforums.com/forum/x...-smell-183969/
https://www.jaguarforums.com/forum/x...-smell-183969/
The following users liked this post:
Patrick Wong (07-26-2017)
#4
07-26-2017, 12:20 AM
Although I bought all nine of the engine coolant hoses, I may end up not replacing some depending upon how difficult they are to access. However I am determined to get to the hose connected to the coolant pump bypass in the engine valley, which requires removal of the black plastic intake manifold riser, and will change all of the little hoses connecting to the throttle body, EGR valve, overflow reservoir etc.
Regarding Evans Coolant, I note that the manufacturer offers a 2 year warranty. Does that mean they expect you to replace the coolant at 2 year intervals?
#5
07-26-2017, 08:04 AM

Veteran Member
They're easy enough to check. Is they are swollen at the clamps (bulge out), replace them. If they are very easy to squeeze, vs. firm, replace them.
They get soft and swell when heated if they're warm. Not much to it really. Lastly, if you have to take several parts off to get you access to a hose and by doing so, you have gained access to another hose, save the labor time and change them both.
They get soft and swell when heated if they're warm. Not much to it really. Lastly, if you have to take several parts off to get you access to a hose and by doing so, you have gained access to another hose, save the labor time and change them both.
The following users liked this post:
Patrick Wong (07-26-2017)
#6
07-26-2017, 11:33 AM
Senior Member
I actually went back and read a couple years worth of this forum's posts in an effort to see which hoses seemed to fail most frequently. Unfortunately some posters did not see fit to identify which coolant hose failed or provide the odometer reading of their vehicle, both of those details are of great interest to me...
Although I bought all nine of the engine coolant hoses, I may end up not replacing some depending upon how difficult they are to access. However I am determined to get to the hose connected to the coolant pump bypass in the engine valley, which requires removal of the black plastic intake manifold riser, and will change all of the little hoses connecting to the throttle body, EGR valve, overflow reservoir etc.
Regarding Evans Coolant, I note that the manufacturer offers a 2 year warranty. Does that mean they expect you to replace the coolant at 2 year intervals?
As far as the Evans Coolant goes I would avoid it. The specific heat capacity is only 2/3 that of a 50/50 solution of water+glycol. (2633 vs 3620 J/Kg *C). This means that the Evans coolant will remove LESS heat per unit volume than the same amount water + glycol. The water pumps on our motors are designed to pump XX gallons/minute NOT 1 1/3 XX gallons per minute. If you are having problems with cooling Evans is not going to fix it.
The following users liked this post:
Patrick Wong (07-26-2017)
#7
07-26-2017, 03:50 PM

The following users liked this post:
Patrick Wong (07-26-2017)
Trending Topics
#8
07-26-2017, 06:00 PM
Tommy, do you recall whether it was necessary to remove the fuel rails and injectors when removing the black plastic intake manifold riser?
#9
07-26-2017, 06:07 PM
The following users liked this post:
Patrick Wong (07-26-2017)
#10
07-30-2017, 04:09 PM
An update. I've provided photos for those who have not yet needed to work on this part of their XK.
To relieve fuel line pressure, I started the engine, then pulled F33 in the relay/fuse box located at the rear seat back. The engine stalled after just a few seconds. That to me is a more elegant approach vs. venting fuel at the valve in the engine compartment.
I needed to purchase the special tool to disconnect the 0.5" fuel line spring coupling, and bought a set of nine multi-colored plastic tools (for various sized A/C and fuel lines) at a local discount auto parts store for $14 plus sales tax. The green 0.5" tool worked really well.
I found that the way to remove the plastic fittings on the PCV hoses was to squeeze at the ridged portions of the fittings. However there was one fitting that remained difficult, which was the fitting on the hose from the fuel tank vent purge valve to the throttle body elbow connected to the intake manifold. I gently squeezed it with pliers to get the fitting to release.
I removed the intake manifold and replaced the coolant hose which is hidden in the engine valley. The original hose was in OK condition. I installed the new hose and the portion of the thermostat housing that bolts to the engine block (in the photo of the hose, that part of the thermostat housing is mounted immediately to the left of the hose, you can see two of the four Torx screws holding that piece), cleaned up the manifold and the cylinder heads mating surfaces, replaced the manifold gaskets, and reinstalled the manifold. There are many connections and hoses to keep track of.
I removed the thermostat housing (aka coolant outlet tube) which provides access to the engine coolant pump and serpentine belt, and will work on that area next weekend. I provided two photos showing both sides of that part. You can see the engine coolant temperature sensor sticking out of the housing.
Last edited by Patrick Wong; 07-30-2017 at 04:25 PM.
#11
07-30-2017, 04:19 PM
The following users liked this post:
Patrick Wong (07-30-2017)
#12
08-05-2017, 01:31 PM
A final update. I replaced five of the coolant hoses (none of the replaced hoses were in terrible condition) and am going to call it good for now:
- hose from left side of radiator (LHD, driver's side) to thermostat housing. This hose also connects to the engine oil cooler.
- hose from engine block to throttle body (the one hidden by the intake manifold)
- hose from throttle body to EGR valve
- hose from EGR valve to thermostat housing
- hose from engine coolant reservoir to thermostat housing
Amazingly, the engine started on the first try, which is not to be taken for granted given all of the various electrical connections and hose connections which had to be removed and restored when the intake manifold was removed and reinstalled. No issues with radio station presets, electric seat positioning, power windows, etc. I had disconnected the 12V battery when I started this work, and fully-charged the battery while it was disconnected.
The four hose assemblies which remain have to do with the cabin heater connections, the hose from the thermostat housing to the radiator connection on the right side, and two hoses which are related to the auxiliary coolant pump mounted on the right side. Based upon visual inspection, all look OK to keep in service.
I stopped because it was too hard to access the right side radiator hose clamp. I have three hose clamp tools including one which is cable-operated, but could not figure out how to get that clamp off. There is a wiring harness adjacent which runs to an A/C pressure switch, and that harness was in the way.
I inspected the serpentine belt, tensioner, and engine coolant pump and all appear in good condition so I did not replace those.
A hint when mounting the thermostat housing to the front of the engine, secured with four machine screws. The center of the housing mates with the bypass mounted to the engine block. The housing can easily mate if you insert one screw and make it fairly tight. That will draw the bypass into the housing so that the other screw holes will line up. Be careful not to cross-thread the threaded holes when inserting the screws, it may be helpful to use a drop or two of machine oil when starting the screws into the holes.
Last edited by Patrick Wong; 08-05-2017 at 02:08 PM.
The following users liked this post:
Tervuren (08-06-2017)
#13
08-05-2017, 11:10 PM
Veteran Member
The following users liked this post:
Patrick Wong (08-06-2017)
#14
04-29-2018, 11:35 PM
...The four hose assemblies which remain have to do with the cabin heater connections, the hose from the thermostat housing to the radiator connection on the right side, and two hoses which are related to the auxiliary coolant pump mounted on the right side. Based upon visual inspection, all look OK to keep in service.
I stopped because it was too hard to access the right side radiator hose clamp. I have three hose clamp tools including one which is cable-operated, but could not figure out how to get that clamp off. There is a wiring harness adjacent which runs to an A/C pressure switch, and that harness was in the way.
I stopped because it was too hard to access the right side radiator hose clamp. I have three hose clamp tools including one which is cable-operated, but could not figure out how to get that clamp off. There is a wiring harness adjacent which runs to an A/C pressure switch, and that harness was in the way.
I did not replace the aluminum piping that leads to the cabin heater core because one of the bolts securing the piping to the body has insufficient clearance for me to reach it. I also did not replace the four black/blue plastic adapters which appeared to be in good condition.
I managed to get the right side radiator hose clamp off using the cable-operated hose clamp tool (the clamp located at the radiator). The hoses weren't in terrible condition. The original engine coolant reservoir did not have any apparent cracking or other distress in the plastic body. The occasional whiff of coolant smell seems to have gone away, not sure whether this is wishful thinking or not.
Some debris came out along with coolant, when I removed the small hoses associated with the auxiliary coolant pump. However the coolant drained from the radiator drain was in good condition so I put it back in (the coolant had been replaced last year, with only 4K miles logged since then.)
Last edited by Patrick Wong; 04-29-2018 at 11:47 PM.
The following users liked this post:
Sean W (04-30-2018)
#15
04-30-2018, 12:03 AM
Veteran Member
Join Date: Jan 2015
Location: Naperville, Illinois USA
Posts: 4,567
Received 1,887 Likes
on
1,281 Posts
The following users liked this post:
Patrick Wong (04-30-2018)

#17
05-01-2018, 10:33 PM
Most of the parts are definitely different. The general procedure will be similar. The coolant reservoir is the only cooling system part which is the same - although the correct reservoir cap differs by model due to varying pressure ratings - 120 kPa vs. 140 kPa vs. 200 kPa.
With the newer XK you probably would be more motivated to replace the engine coolant pump as a preventive measure given the higher failure rate of that pump.
With the newer XK you probably would be more motivated to replace the engine coolant pump as a preventive measure given the higher failure rate of that pump.
Last edited by Patrick Wong; 05-01-2018 at 10:36 PM.
#18
05-02-2018, 11:02 AM
This is what I have so far, am all ears if there are any I missed.
Hope that helps,
Dave
Last edited by 10XKR; 05-02-2018 at 11:13 AM.
The following users liked this post:
u102768 (05-02-2018)
#19
05-02-2018, 07:25 PM

Veteran Member
I don't see C2P13304 on there. That is the only hose I have had to change so far and it is the hose that connects the coolant bottle to a couple of places on the front of the engine.
One of the connectors on mine was brittle and I assume one of the locating legs got snapped off when I had the water pump changed because the connector popped off during rather spirited acceleration. It was $38 from EBAY.
One of the connectors on mine was brittle and I assume one of the locating legs got snapped off when I had the water pump changed because the connector popped off during rather spirited acceleration. It was $38 from EBAY.
#20
05-02-2018, 08:10 PM
I don't see C2P13304 on there. That is the only hose I have had to change so far and it is the hose that connects the coolant bottle to a couple of places on the front of the engine.
One of the connectors on mine was brittle and I assume one of the locating legs got snapped off when I had the water pump changed because the connector popped off during rather spirited acceleration. It was $38 from EBAY.
One of the connectors on mine was brittle and I assume one of the locating legs got snapped off when I had the water pump changed because the connector popped off during rather spirited acceleration. It was $38 from EBAY.
Cheers,
Dave