When you click on links to various merchants on this site and make a purchase, this can result in this site earning a commission. Affiliate programs and affiliations include, but are not limited to, the eBay Partner Network.
Maybe a dumb question, but is that the leaking side?
Yes it is. The other side is clean and dry. Yeah, if it was the other side, I wouldn't have to deal with the fuel line, and because of where the car is sitting in the garage, I wouldn't even have to move it from its current spot. But no, it had to be the 'tough' side to get to.
I'll probably move it to the other side of the garage next weekend, so I can clean up the floor and get to the lawn mower and patio chairs that it currently blocks. Then it will probably sit until the beginning of June, as the Mrs. would probably slice some things off, and nail 'em to the wall, if I spend time on this 'project' before an upcoming vacation trip.
When I'd put the car away in the late fall, it had not been leaking.
In Feb I had to start the car and back it out of the garage ...
The car never got up to operating temperature, just start up, back up and shut down. 15 minutes later, start up, drive forward, and shutdown. So oil would have been pumped up there, and then it leaked.
Well, it is your business if you decide to remove the valve cover, and that is probably a good learning activity to do just "for the hell of it". However I really doubt that a leaking valve cover gasket would allow quarts of oil to leak onto the floor, which is what would be required for you to notice oil on the garage floor while the car is sitting there. A few teaspoons of oil might come out because of a failed valve cover gasket, that is about it. And a minor leak would be caught by the plastic undercover, especially the large cover just behind the bumper which has square partitions molded in the top of the cover to catch fluids.
More likely there is a problem with a loose oil drain plug, a leaking oil pan gasket, or a failed oil pressure sensor, something like that down on the engine oil drain pan area, a place low enough to be in constant contact with the crankcase oil when the engine is off.
It's not impossible that your engine may have more than one leak, one up by the valve cover causing a stain, and a more serious leak lower in the engine. Good luck with your investigations.
Last edited by Patrick Wong; 04-24-2018 at 07:50 PM.
Well, it is your business if you decide to remove the valve cover, and that is probably a good learning activity to do just "for the hell of it". However I really doubt that a leaking valve cover gasket would allow quarts of oil to leak onto the floor, which is what would be required for you to notice oil on the garage floor while the car is sitting there. A few teaspoons of oil might come out because of a failed valve cover gasket, that is about it. And a minor leak would be caught by the plastic undercover, especially the large cover just behind the bumper which has square partitions molded in the top of the cover to catch fluids.
More likely there is a problem with a loose oil drain plug, a leaking oil pan gasket, or a failed oil pressure sensor, something like that down on the engine oil drain pan area, a place low enough to be in constant contact with the crankcase oil when the engine is off.
It's not impossible that your engine may have more than one leak, one up by the valve cover causing a stain, and a more serious leak lower in the engine. Good luck with your investigations.
Thanks Patrick, somehow I missed your post until today.
The oil filter, and that whole general area (sensors, and even the oil pan and drain plug) is clean and dry.
From what I see, the bottom edge of the left hand valve cover is moist, and the oil drained toward the rear of the cover, off the engine block and down the transmission bell housing, and was collecting toward the rear of the tranny cover and dripping off from there.
At first I was thinking that my car must be *** heavy, but then I remembered that there is a slight slope to the garage floor so any water (like snow melt) will tend to run out of the garage instead of farther into the garage.
There wasn't 'quarts of leakage' or there would be one hell of a mess. I'd say it was more like a 1/4 cup (but had spread before I got cardboard under there to absorb it), and when I did get the hood open and checked the oil level, it was sitting at the 'max' level (but this is a cold engine that hasn't been run in a couple months, so naturally it would be 'high' from everything draining back to the pan).
Hopefully tonight I'll have time to move it to the other side of the garage (putting down plastic and cardboard to catch inevitable additional leaks). Giving me space to get to the stuff currently blocked by the car, and exposing the 'problem' side of the car, so I can work on it in June.
'Nother dumb question, but can you just turn it around so the guilty cover will be on side you have access to?
Not a dumb question at all!
Had thought about that, but there is actually more stuff I need access to in the 'warm weather season' on that side of the garage, than on the side I'm going to move it to. This way the car can sit 'undisturbed', if necessary, for a month until I can get time to work on it.
Finally got around to ordering the parts, based on the service manual, to replace the leaking left hand valve cover gasket. I also ordered most of Patrick Wong's list of cooling system replacement parts (https://www.jaguarforums.com/forum/x...ervice-186165/), other than the water pump, serpentine belt, and tensioner, since I don't plan on attacking those for awhile.
Here's a screen shot of my shopping cart for just the oil leak parts:
Looking at it now, I see it doesn't include part numbers, I hope they get it right!
For reference, here are the part numbers, in order, matching the list above:
AJ812402 - LH Valve cover gasket
KSH108624 - Dipstick tube O-ring
C2C1641 - Dipstick tube nut (not necessary, but its the first nut to remove, and I'll probably lose it)
AJ86874 - Spark plug seal O-rings
AJ82856 - VCT control solenoid seal O-ring
AJ88581 - Oil filler pipe & cap (only need the O-ring for the pipe, but couldn't find a part number for it, and since I probably could use a new filler cap, why not just replace the whole thing?)
AJ810631 - Grommets sealing bolts in the center of the valve cover
AJ810629 - Stud retainer grommets (the parts catalog said 5 needed, but that seems 'odd', so added one more for good measure)
AJ810628 - Valve cover bolt grommets
A few of the part descriptions show a different model/year, but its the same part.
The service manual also said to replace the fuel line O-rings and garter spring, but couldn't find them in the parts catalog, so if they look like they need replacing, I should be able to get them at a local auto parts dealer.
I did not replace the fuel line O-rings when I removed the intake manifold last year. As you said, your local auto parts store should be able to help if you decide that is needed.
I am going to offer one other suggestion when you do the preventive coolant hose replacement project: you might consider replacing the plastic coolant reservoir at that time. I had noticed a tiny whiff of coolant from time to time, and that seems to have gone away now.
I can't be sure what caused the coolant smell with my car since the replaced hoses were not in terrible shape, but I did notice that the small hose which connects the reservoir to the aluminum piping leading to the cabin heater core had a tiny amount of dried coolant coming out of the end of the hose. This was not a leak between the hose and the aluminum pipe - it was more like the leak was coming out of the wall of the hose. Maybe that was the source of the smell.
The reason I suggest replacing the reservoir is because a few posts have mentioned its failure and the old reservoir was definitely discolored a dark amber color compared to the new white reservoir. There were no obvious cracks or other distress apparent in the plastic of the reservoir, so I would not say its replacement was mandatory. The price isn't bad, <$110 as I recall.
Yes, I did order the expansion tank too, $102.54. Thanks.
Dont do a thing.
Your first and huge clue is that this happened when put away for winter.
Old seals and gaskets shrink when not used because they are being denied lubrication.
Run some Amsoil oil.
Dont do a thing.
Your first and huge clue is that this happened when put away for winter.
Old seals and gaskets shrink when not used because they are being denied lubrication.
Run some Amsoil oil.
Well, that�s a thought, thanks, but doesn�t sound like a long term solution. I�d also like some �piece of mind�, knowing that I won�t be leaving oil stains on other people�s driveway. Especially since this drip is in the same area as the A/C condensation from my former duckbill, I don�t want to always have to check if it is water or oil.
I should have said, dont do a thing till you rejuvenate the seals and gaskets by running good oil through it for a couple of months. And clean every last drop of oil from the engine bay. Otherwise you will still have the leaks or worse chase the wrong leak.
Car that sits for extended periods of time will start dry rotting the seals. Also the leak could be so minor that it only drops after oil has had a chance to travel for a month. In which case cardboard is your friend.
I should have said, dont do a thing till you rejuvenate the seals and gaskets by running good oil through it for a couple of months. And clean every last drop of oil from the engine bay. Otherwise you will still have the leaks or worse chase the wrong leak..........
I can't remember....... way back on all the Oil threads, was it you who condemned the use of Every Oil but OEM Recommended, or was that someone else? My old brain fails me on that point.
I had similar symptoms. My '07 sat on the drive through the Michigan winter and I went to move her and there's a large diameter "wet" spot in the concrete - no color though.
Took it to my dealer and they pronounce that it's the plastic transmission oil pan and gasket which need replacing. All good now!
I can't remember....... way back on all the Oil threads, was it you who condemned the use of Every Oil but OEM Recommended, or was that someone else? My old brain fails me on that point.
I would never make the statement that OEM wisdom cannot be trumped. I did say on the cutting edge 5.0, the OEM has infinite advantage over us muppets picking an oil from the supermarket shelf.
I should have said, dont do a thing till you rejuvenate the seals and gaskets by running good oil through it for a couple of months. And clean every last drop of oil from the engine bay. Otherwise you will still have the leaks or worse chase the wrong leak.
Car that sits for extended periods of time will start dry rotting the seals. Also the leak could be so minor that it only drops after oil has had a chance to travel for a month. In which case cardboard is your friend.
That's a reasonable plan, but I've already set aside the time at the end of the month to do the work (with no time to drive the car before then), and have the parts on order, so I think I'll proceed with replacing the gasket.
I didn't have any issue the previous two winters, so I do suspect its just aging of the gasket, like all the other rubber and plastic parts that break down over time.
Ok, so after coming back from vacation, I used the time I had set aside to replace the LH valve cover gasket (and other seals in the valve cover) and did the deed. I have some tips below for anyone that needs to remove the LH valve cover, to make your life a bit easier.
Long story short... The gasket was indeed leaking, but not due to failure of the gasket itself, but instead due to human error on the part of whoever removed and replaced this cover previously. As I was doing the disassembly, and was down to the final two bolts to remove, I found that the lower bolt, closest to the firewall, wasn't tight, at all! And would have surely fallen out if it wasn't held in place by the rubber grommet.
I suspect that this has been slowly leaking for quite awhile, and not puddling as the oil burned up on hitting hot surfaces. However, this past winter, when I started the car to back it out of the garage, and then shut it down, and a short while later started it again to pull back into the garage, and shut it down, the engine never got warm enough to cause the block, cover, and gasket to expand to fill the gap, yet oil had been pumped up there, and then proceeded to leak out onto my garage floor.
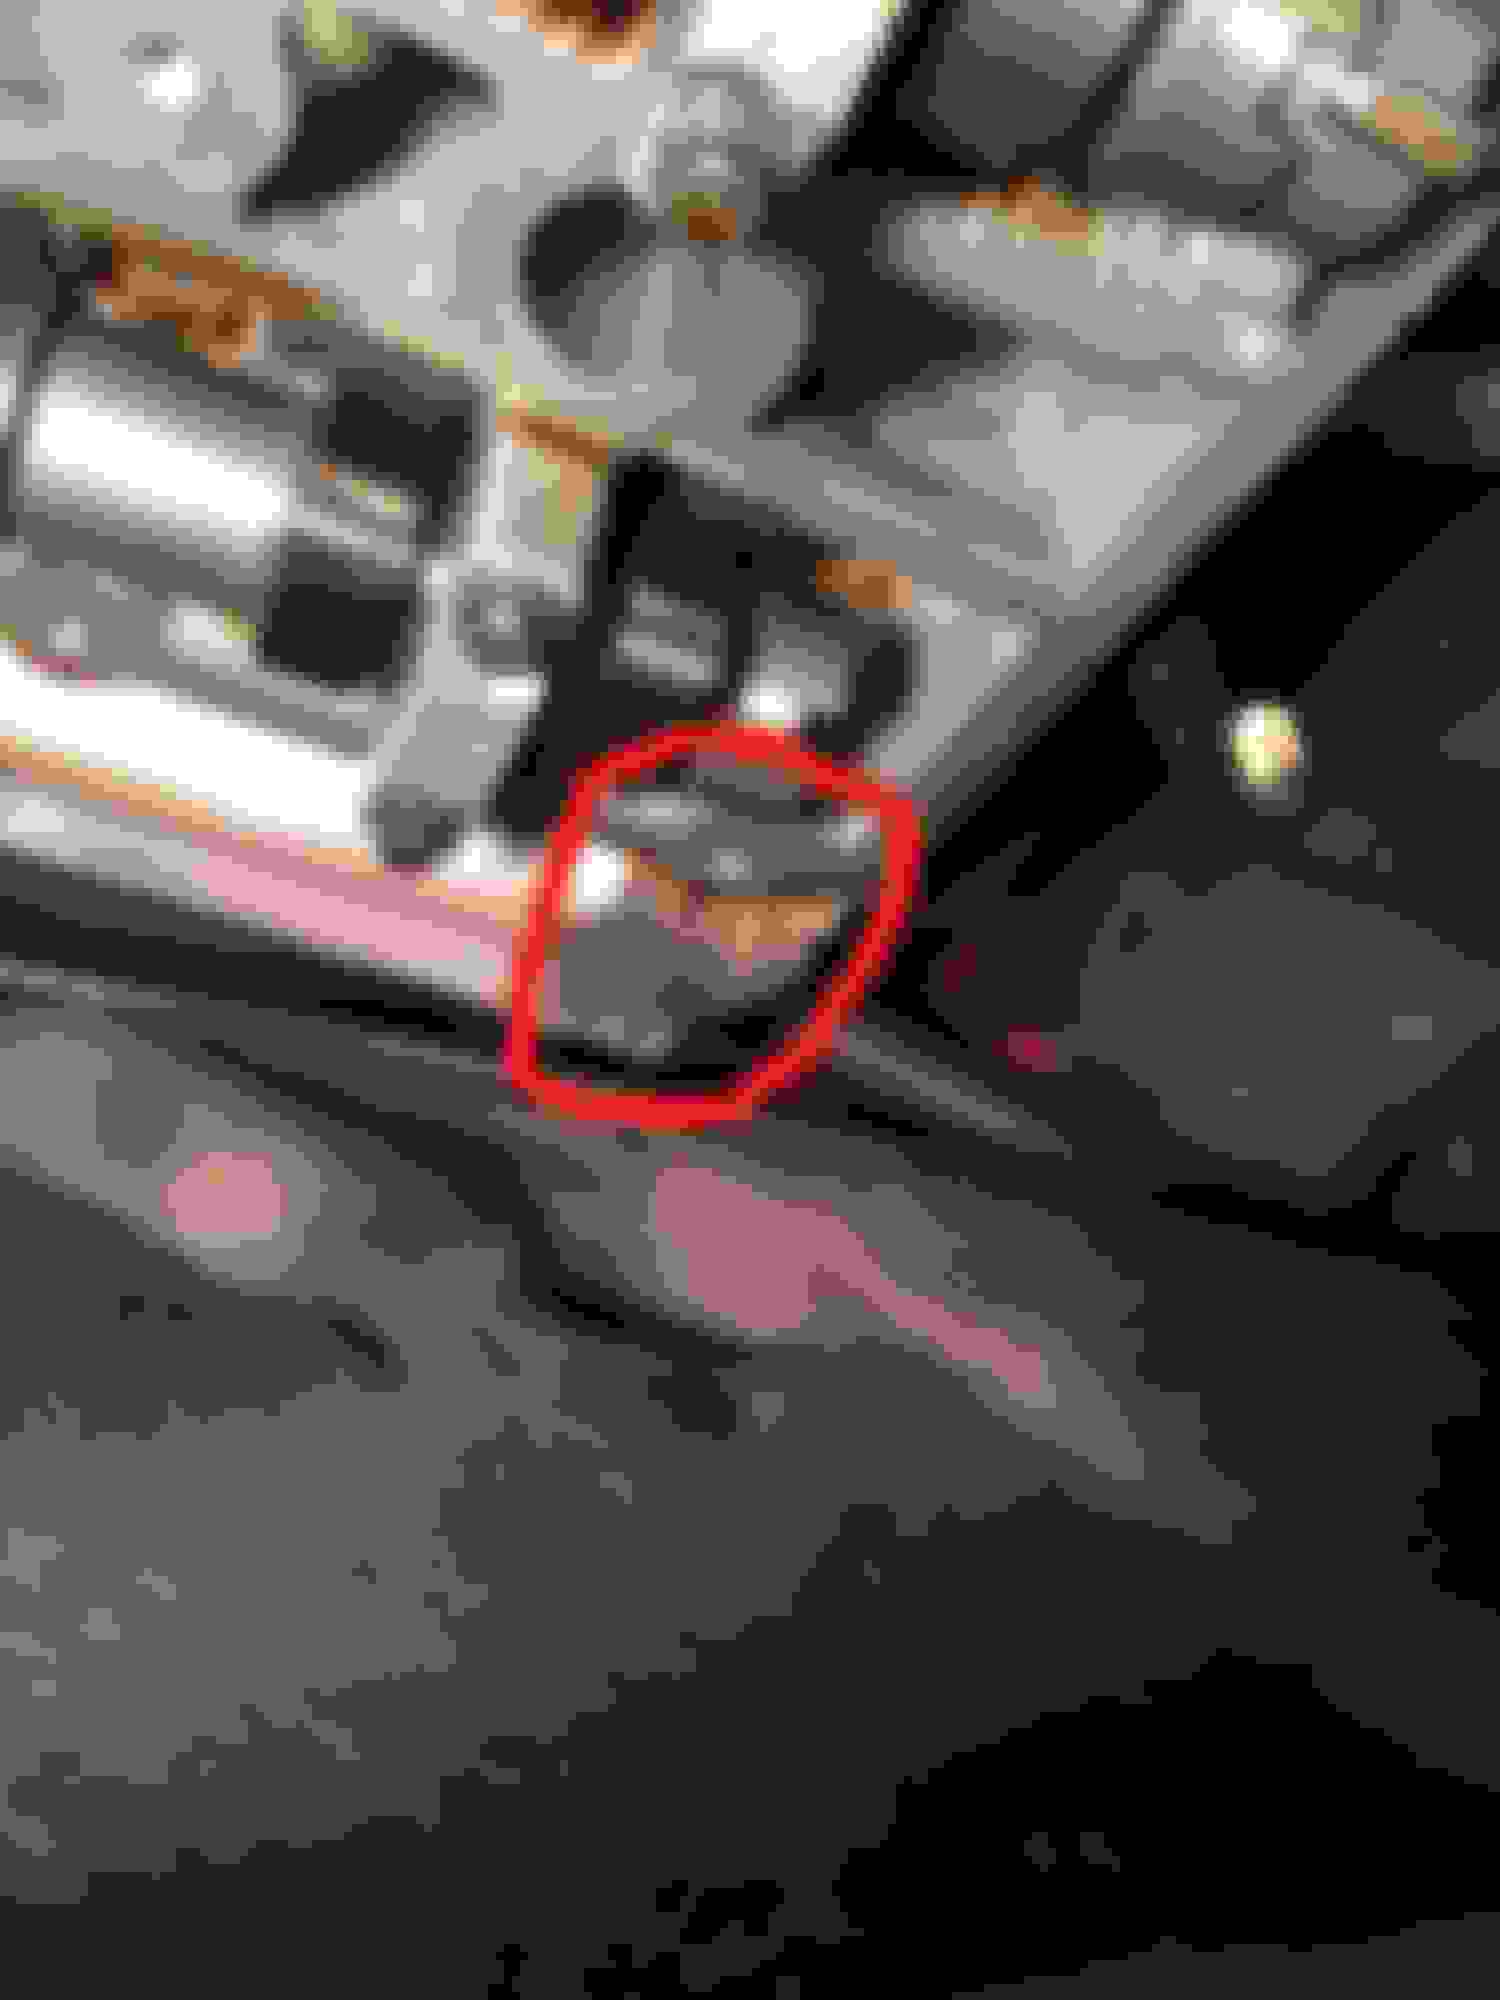
Since I was down to just one more bolt to remove, I decided that since I was that far into it, I may as well remove the cover and replace the gasket and seals. When I got the cover off, I could clearly see evidence of prior leakage due to the loose cover bolt, as seen in this photo. Notice the brown spot on the aluminum shield below that lower corner bolt hole.
Ok, some tips if you're going to remove the LH valve cover. The steps in the service manual are pretty clear, but there a couple of things I'd do differently:
1. Step #2 of the instructions is to remove the 'ignition coil-coil-on-plugs', and the procedure for that is to first remove the 'ignition coil cover'. Well, good luck with that, it ain't coming off with all the other stuff in the way, so 'step #5' of the valve cover instructions (disconnect the purge inlet line), should have come before attempting to remove the ignition coil cover.
2. Step #4 is to remove the 'oil level indicator and tube' (dipstick and tube). Unless you really want to replace the o-ring on the dipstick tube, I'd advise against it, as the tube has roughly an S-shape and is about 18" long and plugs into a hole that is not visible, so getting it back in is a real PITA. I googled suggestions for how to handle it (when I was trying to reinstall it), and I think the best solution, since the dipstick is 5 inches longer than the tube, is to leave the dipstick in the tube, and pull the tube up just enough so the mounting tab can be removed from the valve cover bolt it is attached to. Even if you pull the tube all the way out of its hole (the tube extends about 2 inches into the block), you'll still have 3 inches of the dipstick in the hole, to allow guiding the tube back into position.
I got mine back in by finding the hole with a bore scope. I tried guiding the tube down a wire that I managed to get into the hole, but was not successful at it, so I finally just snaked the tube, by itself, down until I was able to see it and the hole with the scope, and finally tweak it into place.
3. For step #10 (disconnect the fuel line with the special tool), I had followed Patrick Wong's advice in his coolant hose replacement thread, and before starting the service manual steps, had started the car, and while running, pulled fuse #33 in the panel between the rear seats, which shut off the fuel pump and allowed the car to die, removing the pressure in the fuel line.
4. Step #15 says to remove the oil filler pipe, easier said than done. Since I had bought a new one, I used a hack-saw to cut the little metal tongue that locks the filler pipe to the valve cover. Not sure how you'd get it off otherwise.
5. For step #16 (remove the bolts, remove and discard the seals), all I can say is that if you have bear paws for hands, heaven help you. I've got small hands, and it was ridiculous trying to get some of those bolts out (maybe if I had long skinny fingers, it would have been easier).
I had wondered why the 'grommets' I had ordered had cost so much for simple rubber donuts. Well, it turns out that the the grommets also come with the bolts and bushings attached (except for AJ810631, which is just a grommet and bushing, you re-use the existing bolt):
Old parts, laying on the bags from the new parts.
An update on the number of parts needed: The parts catalog had been correct, you only needed 5 of the AJ810629, and 1 of the AJ810631. And the AJ810631 is not used in the center of the valve cover, but rather is for the upper left-most bolt (when facing the valve cover).
So the job was tedious, due to the tight spacing to get to some of the bolts, and the inability to see directly where the dipstick tube goes, but got it done, so I can now start enjoying the car for the summer!
Wow, the valve train looks like new. Did you take any other photos of the exposed camshafts and valve train?
Yes, here are a couple more shots. I too, was surprised at how clean it looked under there. The photos were taken just after removing the cover, before I cleaned up the mating surfaces and old gasket sealant.
Originally Posted by Patrick Wong
Pls remind us how many miles are on the odometer? At what intervals do you change the engine oil?
The car now has 48,479 miles on the clock, and I change the oil once per year (although I normally do it in the fall, I decided to change to spring time this year, which was delayed by this repair, so hopefully I'll get it changed next weekend).
Originally Posted by Patrick Wong
Are you aware of any specific reason why the valve cover would have previously been removed?
Unfortunately, no. I have no record of service to that area, but then I've only had the car for the last 3.5 years of its life.
 04-24-2018, 12:02 PM

 Yeah, if it was the other side, I wouldn't have to deal with the fuel line, and because of where the car is sitting in the garage, I wouldn't even have to move it from its current spot. But no, it had to be the 'tough' side to get to.