
Drivers side floor rot, what the @#$%^&*
#1
 04-30-2012, 11:21 AM

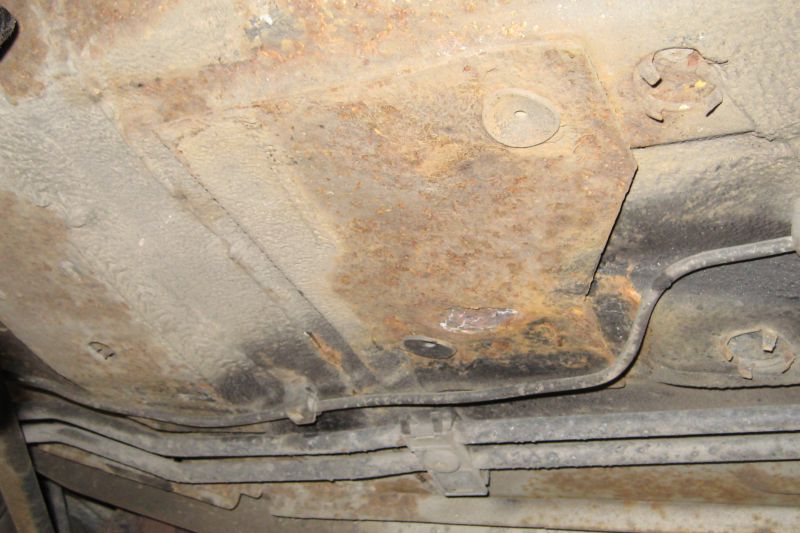
Among other items I have found while having the car in the air for a month is driverside floor rot, 1999 xk 8 coupe. Well I started picking and by the time i was thru I have a 4" x 6" hole in the floor board right now. No picture yet, tonight. It looks like it began under the mickey mouse factory steel plate that covers the manufacturing attachment points. This is just behind the seam where the fire wall attaches to the floor pan on the driver side. follow the brake line and where it makes the two 90 degree bends to go to the rear. Look closely and you will see two plugs opposite each other. Well its hollow underneath this patch. That is where it began . The plan is to get all the loose stuff out. grind to new metal. treat with rust primer, coat with rustoleum, fibreglass over the hole on both sides, add a new aluminum plate where the metal was and use PL adhesive caulk as the sealant bed and anchor thru manufacturing mount points, then a liberal coating with truck bed liner. Was not looking for this at all. If you have not looked to see if your car has this rot you may not want to. It is a pain in the rear without tearing the whole driver side apart so you can work in there.
Not a happy weekend. Something else to do.
Not a happy weekend. Something else to do.
#2
04-30-2012, 12:25 PM
Veteran Member
Daddy-o;
Sorry to hear it. I've been watching the plate areas on my coupe since I purchased the car last summer...I think my driver's side is OK, but the passenger side is going to need some work.
How much of the interior did you remove to get a look from above? And is the offending steel plate under the driver's SEAT, FOOTWELL or what?
Please do photograph your adventures...many of us will be needing this fix in the next few years, I'm sure. Hearing it more and more.
#3
04-30-2012, 01:38 PM

I would think that the best thing to do and save a few bucks is complete all of the prep work yourself and then bite the bullet and have a pro weld in a steel patch for you rather than fiberglass. Fiberglass will heat and cool differently (change shape) than the steel floor pan and flex differently than the steel and will come loose and cause more problems in the long run
#5
04-30-2012, 03:27 PM

Veteran Member
#6
04-30-2012, 05:13 PM
This was not in the budget but once i get it on the road again it wont hurt to get quotes. Mom always said "If you don't leave those scabs alone of they will never heal". To bad rust is not the same! I'll post some pics in about an hour.
As far as removing the interior bits I just pulled the kick panel off. I'll take a pic of that so you can see where the attachments are.
Remove the foot rest, there are to tabs on the top and bottom that you just pry over the locking stops then there two 8mm bolts that hold the pad down. Above the brake there is a small round plug on a threaded stud unscrew that. Then under the gas pedal there is a stop just pull that off.
I was then able to peel the carpet back enough to see what I was dealing with. But to repair properly the seat will have to go and the threshold. Then the carpet can be rolled back and hopefully protected with a weld cloth.
I have not figured out how to get the threshold out yet. It won't pry up. I'm going to try to tap it forward or back to see if it is a key lock vs button lock.
I'm not Rev Sam savvy so my words and pictures will have to do.
#7
04-30-2012, 05:33 PM

Senior Member
To remove the plate , carefully heat up the stainless insert with a hot air gun to soften the adhesive and gently lift them up while hot with a thin wide bladed scraper or similar , once removed you will see that the "threshold" is secured to the sill with torx screws ,
Hope this helps ,
Nik
The following users liked this post:
daddyo007 (04-30-2012)
Trending Topics
#8
04-30-2012, 06:18 PM

I've had great luck using epoxy resins for many repairs. I from Salt Ridden Western NY and nursed a number of old trucks and cars along for many extra years. Polyester resin is brittle and has no strength of its own. If you don't get it right with the glass and prep, its short lived. For a little more $$$ you will find epoxy resin to be like flexible steel. You can color it, Add cabosil as a thickener/filler and it's really strong. You can coat rusty metal and of course use fiberglass cloth. There is no parafin like poly so a quick roughen up and you can bondo, prime,etc. In trying to speed things up in cold weather, I learned gently running a heat gun over the applied area would relax the epoxy, let it sink into the cloth better and assume a glass like finish. I started using the "west system" which is probably the best and offers lower temperature hardners. Since then I have used lower cost products with great results. I also like the 50 / 50 mix ratio. I purchased many gallons from Clark Craft in Buffalo, NY, with great results. They are online and do ship. The only draw back is you will find so many uses for it. You must not leave cured epoxy uncovered. It looks great, but degrades quickly in the sun. After 24 hours, you will need a grinder to sand it down. Tough Stuff. Well worth a few xtra bucks.
#9
04-30-2012, 08:11 PM
Well my hour is up and here is what I have ahead of me.
The first photo is my new project.
The second is the back view of the driver kick panel. you pull it straight towards you to release off the clip.
The third photo is of the clips that are hidden under the black trim weather strip along the sill and up the jamb. to remove just roll the weather strip up and look under to see the clips. just work with it and you can figure it out. Next thing to clear it the hood/bonnet release. I did not remove this but held it open until the kick panel cleared it.
The fourth is the clips on the foot rest that will release the foot pad off the mounting bracket. the same clip is on the top and bottom. Just use a wide blade and pry open. Once open pull it towards you. this will expose two 8mm bolts that hold the bracket to the floor.
The more I look at this mess of a factory cover plate they would have been better off with just the plastic plugs and some goo on them and not this metal plated mess.
The fifth us the bracket un-assembled.
Thank you for the epoxy comment. I like it better not because its easier, really it is but I do not want to deal with moving that brake line and all that intails to be able to weld a plate under there. Its going to be hard enough getting the goo to go around all the seams. I cant see them welding it from the interior
and ending up with a whole lot of pin holes every where from weld splatter. But I wont hurt to ask about the welding. I knew I should have learned that trade when I had the chance.
Last edited by daddyo007; 04-30-2012 at 08:31 PM.
#11
05-01-2012, 12:24 PM
That little repair would be a no brainer using epoxy. I use a small grinder to create an outer ring of clean metal. I also use a cup brush on the same grinder. Dont worry about loose or rusty parts inside the repair. You can use it to hold things into place. I have sucessfully used cardboard As long as the outer edges are rough ground, you will get good strength and a good bond. Get a coat od resin and one piece of glass in place and let harden. Once your passed the droopy part it's easier to make nice with subsequent coats, instead of doing it all in one shot. Something to bridge the hole is essential, but it is not necessary for strength, only to create a mold, or hold the material in place.
You can also use The wire wheel cup to clean up the bottom of the car, which did not look too good. The epoxy will seal and strenghten that area too. Don't worry if it's not prepared that well. the worst that will happen, is it will fall off, but it will seal and prolong. At the least, bottom coat with undercoating to seal and slow down the rust. You can always do a better job or replace with metal later. I use the epoxy as a sealer and primer when I do replace metal on rusty areas and then prepare conventionally. It's pretty neat to see a flimsy rust piece become super strong. Again as long as you have an "outer ring" of good metal for support. the rest becomes a mold and gets encapsulated. don't worry about fiberglass cloth not being perfect or chards sticking out. After the patch hardens, (overnight), you can sand/grind it down and put on a glass like finish coat. No worry about parafin lile polyester resin, you can just add another coat anytime.
Do protect your nuts & threads -- wrap in wax paper or fill with silicone or RTV.
If you mess up, heat it so your bolts will work.
For a really quick fix glue down a piece of sheet metal with polyurethane construction adhesive from home depot or the like. Comes in a cartridge tube. Its pretty amazing stuff. It's one of the few things that will bond to and strengthen plastic bumper frames. It will glue down and water seal it for now. flexible & strong
#12
05-01-2012, 02:00 PM
I follow this really well. but one additional question will it bond / etch to the paint that is left after I wire wheel it? When spreading this stuff on upside down would I just mix it in small batches and spread when it begins to stiffen?
Would you use mesh on both sides?
I could see making an aluminum foil mold for the bottom and filling the top first then come back to slick up the bottom.
Any additional thoughts?
Would you use mesh on both sides?
I could see making an aluminum foil mold for the bottom and filling the top first then come back to slick up the bottom.
Any additional thoughts?
#13
05-01-2012, 03:16 PM
Yeah, in the unlikely but possible scenario of an accident, especially running off-road, does the absence of properly attached metal possibly allowing personal injury concern you? Even in a reasonably repaired vehicle crush zones and metal that was intended to deflect powertrain, exhaust, road debris, etc. can be compromised. Not trying to be Captain Buzzkill but trying to bring to light distinct, unconsidered possibilites. In some countries (Germany comes to mind) panel patching is verboten. Any deformities/perforations require OE design replacement panels.
#14
05-01-2012, 06:34 PM
This stuff requires patience and does not set up fast. If you have warm temps, let the epoxy sit in the container for 3 - 5 minutes you may get lucky and have a short window to manipulate it. But in a mixing cup if you wait too long it will get burning hot and set VERY quickly. Where ever gravity can work with you is the best case. You can paint a vertical panel or upside down, but you need some "mindless" support over/under holes or gaps till the resin hardens on fiberglass over larger holes. Often I will just paint the surfaces first to insure good coverage on the metal. Then I use cloth and what ever to help hold it into place after the base sets up. You can effectively seal rust spots with the resin only. Resin & cloth is best though! I have made molds out of wax paper, to work upside down. In the case of the hole in the floor that I saw, anything like paper and a piece of cardboard on the most basic level to hold the first layer of glass relatively flat till it hardens. Mesh or screen would be fine. After that you can fill with more resin & Glass, or fill a void with bondo but add a top coat of glass and resin. If you do some work with gravity working with you, like the floor hole, you will get a better understanding and experience so you can paint on upside down and vertical patches. After you see how strong this is, you won't be too concerned on what you used to hold/form it in place. Even if you weld a piece in I like this for the initial primer. I'm from the rust belt and have found nothing better to combat rust.
If your in a hurry with a small job the quick set epoxy cartridges will work, but per OZ its very expensive and the rule of thumb is the quicker the harden, the lower the strength.
Hope this helps
The guys at clark craft in Buffalo, NY were very helpful and ship anything you need, virtually anywhere.
Most marine shops have the more expensive west system, Bu you should not need much for that little hole. The underside is a different story. Most like myself, started with the west system. I like the 50 /50 mix beter than wests 20 ish / 80 ish. Easier to eyeball up and not need dispensers for small amounts.
Kinda why I'm happy as a clam in rust free florida where you can easily unbolt a 10 year old exhaust.
Good luck
#15
05-01-2012, 08:19 PM
Upside down work. Do the topside fist, get some practice.
Upside down:
Start by cleaning an area well and just painting some on. Start on a small easy area, in case this is not for you. You will probalbly get some drips if you put it on too thick. Again I chase it with a heat gun and it levels out nicely, even upside down. Let that harden over night and see how it looks to you.
then wet/ [aint an area, paint in some cloth using a wet brush to wet and push it to the underside and see how that goes. smaller pieces are much easier to work with and fall off less easily. practice with a 4 x4 or 6x6 area.
How do you get to Carngie Hall? Practice baby practice.
wax paper and gloves are real helpfull. This will harden like "flexible" Steel to most anything

#18
05-05-2012, 01:41 PM
Veteran Member
Here's the thread about repairing these plates.
https://www.jaguarforums.com/forum/x...p-there-54553/
https://www.jaguarforums.com/forum/x...p-there-54553/
The following users liked this post:
daddyo007 (05-06-2012)
#19
05-05-2012, 03:53 PM
Thank you RCSign.
I haven't looked under mine yet to see what condition they're in, however it sounds as though it might be a good idea to remove them and apply some rustproofing to that area as preventative maintenance. I'm not real thrilled with the prospect of removing them using air chisel though.
I haven't looked under mine yet to see what condition they're in, however it sounds as though it might be a good idea to remove them and apply some rustproofing to that area as preventative maintenance. I'm not real thrilled with the prospect of removing them using air chisel though.
#20
05-06-2012, 10:55 AM
I hope that his fit is still holding. I think I'll get the whole thing welded now. I think I got the hook up on a welding deal. But the plan is to have the whole perimeter welded not just tacked. Then on the upper side is to fill with self leveling caulk. This stuff is nasty runny but if there is a pin hole it will find it and fill it. Long cure time to. So the car will be out of service for a few days. Then on the under side painting on some truck bed liner to finish it off.
I never thought of an air chisel. Would work better than a grinder, and dremel around the brake lines and fuel lines.
Might have to go to Harbor Freight to check prices.
I never thought of an air chisel. Would work better than a grinder, and dremel around the brake lines and fuel lines.
Might have to go to Harbor Freight to check prices.
Last edited by daddyo007; 05-06-2012 at 10:58 AM. Reason: grammer again