XK8 / XKR ( X100 ) 1996 - 2006
Sponsored by:
Sponsored by:

Apollo Wheel Refurbishing - A Rags to Riches Story - RESOLVED

Thread Tools
 
Search this Thread
 
  #21  
Old 03-02-2019, 04:55 AM
Jandreu's Avatar
Veteran Member
Join Date: Mar 2014
Location: Goldsboro, NC
Posts: 2,173
Received 600 Likes on 446 Posts
Default

Yes mask off the inside of the bore. The rims are hub centric and must fit correctly.
 
  #22  
Old 03-03-2019, 06:32 AM
cjd777's Avatar
Veteran Member
Join Date: Dec 2011
Location: Spencer, NC
Posts: 2,728
Received 1,323 Likes on 735 Posts
Default

Rothwell, That is imperative. I've worked on and had to take the wheels off a few XK's and they required a great deal of effort to get them off. The shelf they sit on always requires anti seize. So, yes, there and the lug holes. I had to grind off the powder coat on my bolt on wires on the Triumph. Did not like that at all, but they would not go on the hubs.
 
  #23  
Old 04-12-2019, 03:45 PM
rothwell's Avatar
Veteran Member
Thread Starter
Join Date: Jan 2009
Location: Hudson, Florida
Posts: 2,066
Received 1,252 Likes on 687 Posts
Default

I am making progress on the wheels. Got the first coat of silver powder on them.

The hub bores were masked off but the lug holes were not. I checked and the lugs still fit easily.

They look good (already way better than the set I have on the car now) but not great - yet.

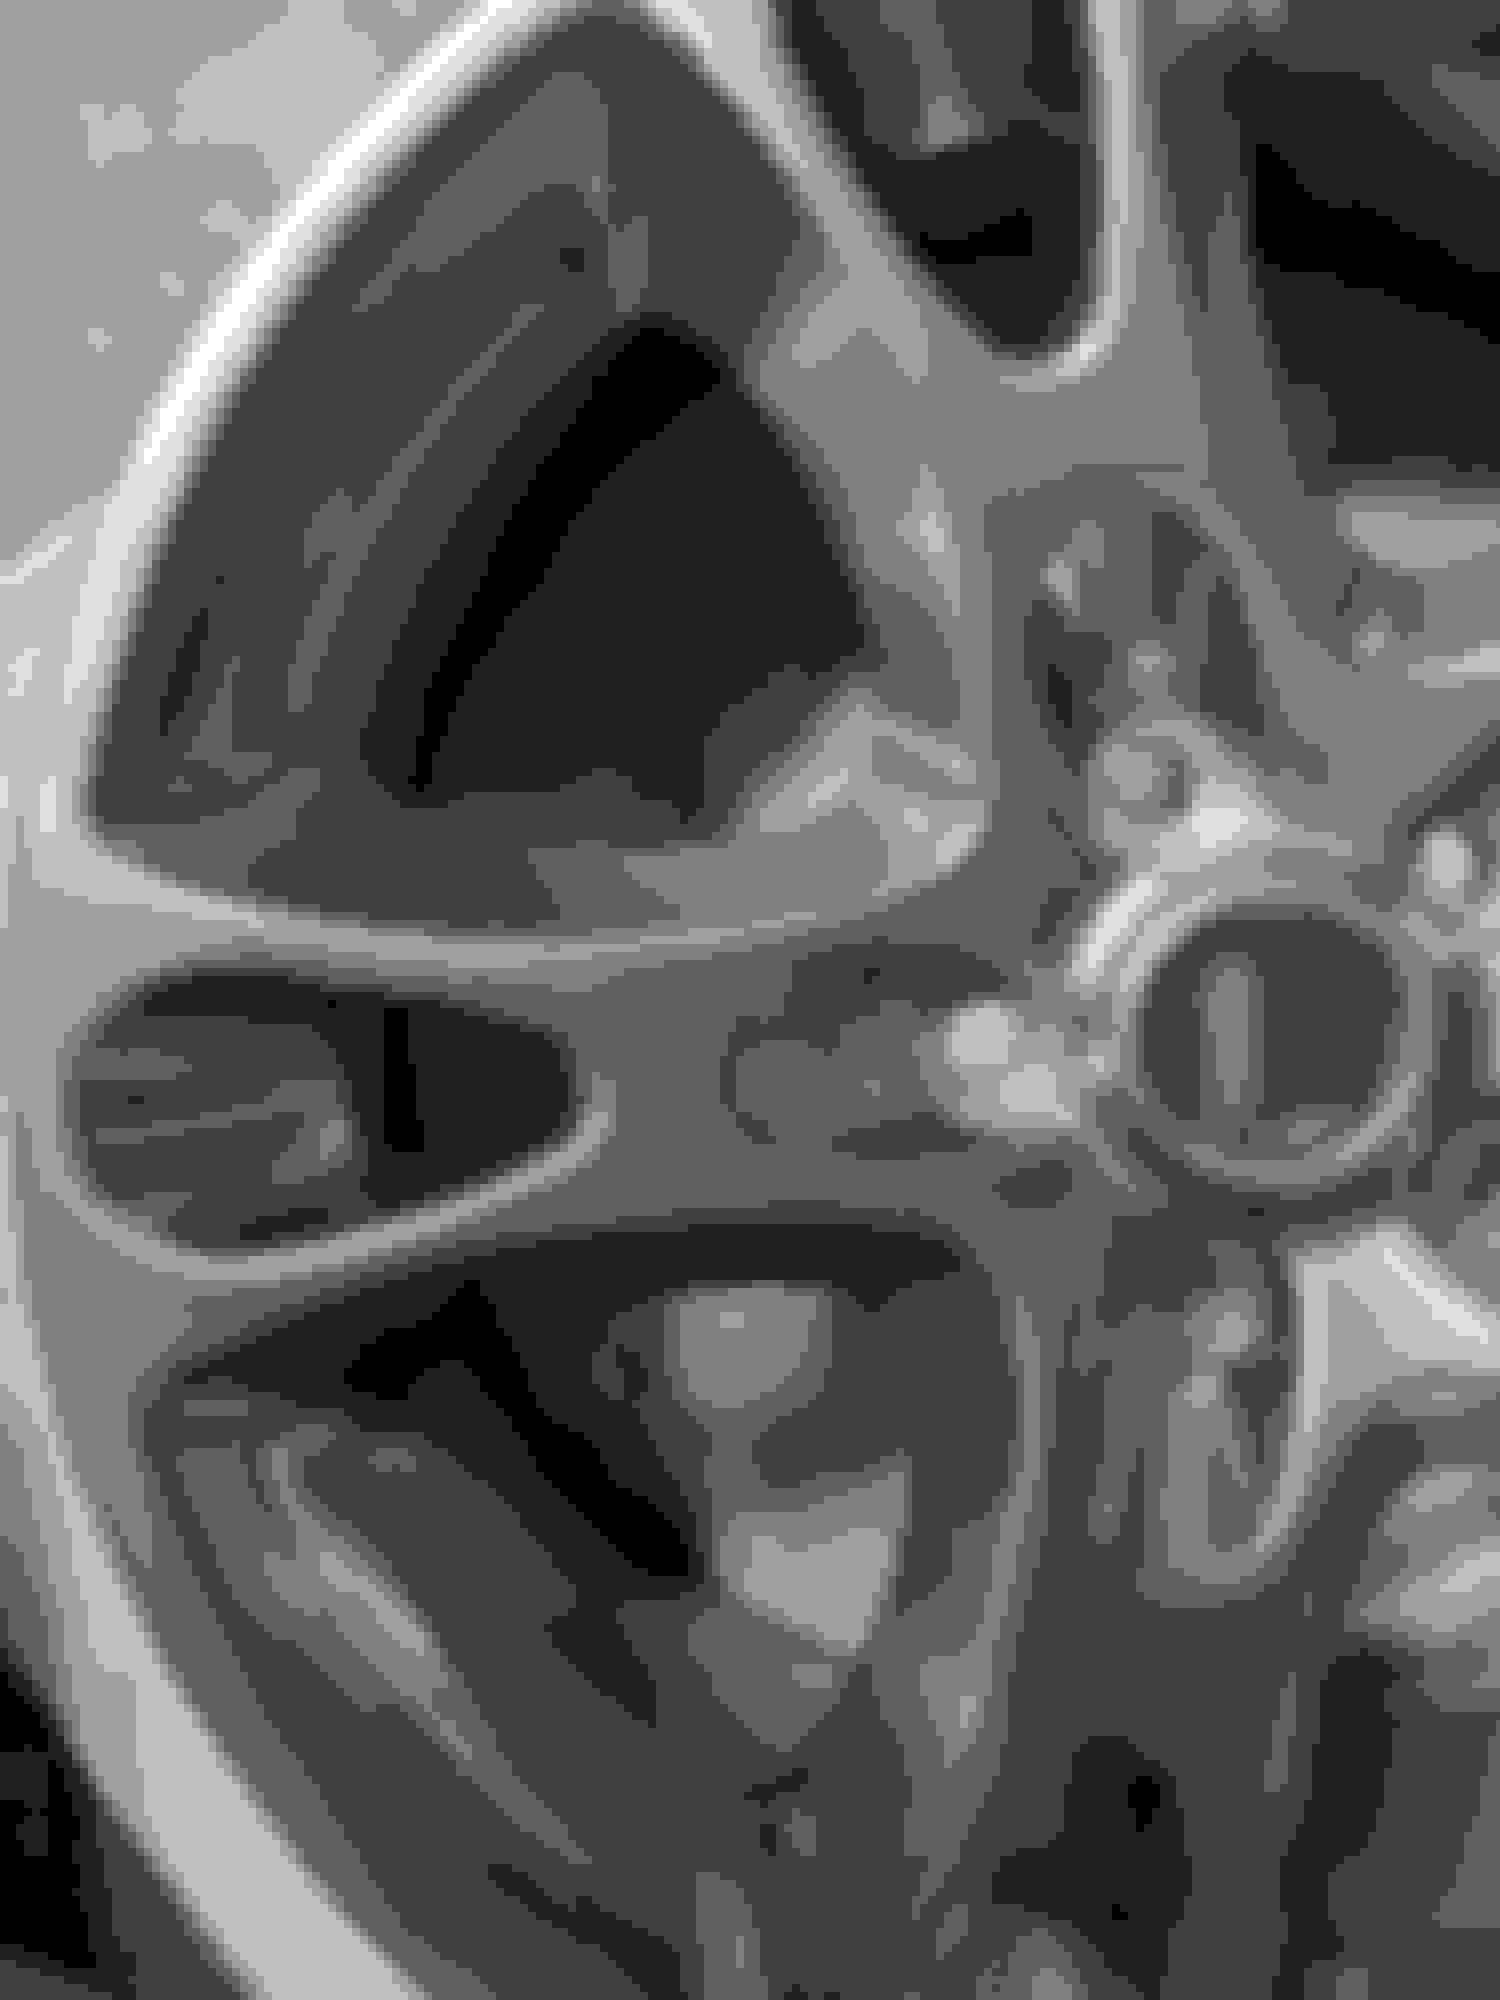
Some of the worst pitting can still be seen when up close so I will be sanding the front face and bead edge (using 120, then 220) to smooth out for a second coat of silver powder before the final clear powder coat is applied. Fortunately the powder material is the type that will bond to itself and allow multiple coats.

They should be good to go back to powder coating after about an hour of hand sanding on each wheel. I'll post more progress pics as I get along.


  #24  
Old 04-12-2019, 04:42 PM
cjd777's Avatar
Veteran Member
Join Date: Dec 2011
Location: Spencer, NC
Posts: 2,728
Received 1,323 Likes on 735 Posts
Default

Thanks for the update and they are looking good.
Might want to go with the 320 after cutting the ruff areas down. That grit gives primer a great hold. Like the idea you can melt the next coat on, didn't know you could do that.
Love the color.
 
  #25  
Old 04-13-2019, 01:03 AM
DavidYau's Avatar
Veteran Member
Join Date: Jan 2019
Location: Bahrain
Posts: 1,906
Received 1,417 Likes on 755 Posts
Default Looking good there

Great to see us forum members sticking to repair and recycling original materials.

Looking forward to seeing a pic pic of the wheels on the car
 
  #26  
Old 04-13-2019, 03:13 AM
ericjansen's Avatar
Veteran Member
Join Date: Dec 2013
Location: Taiwan, R.O.C.
Posts: 3,248
Received 1,351 Likes on 926 Posts
Default

Already looking wayyy better than the ones I have on mine .... Very nice.
 
  #27  
Old 04-13-2019, 08:40 AM
srpope80's Avatar
Senior Member
Join Date: Jan 2011
Location: Lutz, FL
Posts: 234
Received 115 Likes on 58 Posts
Default

Awesome thread @rothwell ! Definitely cool to see those wheels get a new shiny life!
 
  #28  
Old 04-13-2019, 09:46 AM
Join Date: Apr 2012
Location: Summerville, South Carolina
Posts: 24,358
Received 4,180 Likes on 3,643 Posts
Default

coming along nicely!!! look forward to seeing the finished product!!
 
  #29  
Old 04-13-2019, 12:37 PM
Muncie6spd's Avatar
Member
Join Date: Oct 2018
Location: Citrus County, FL
Posts: 49
Received 6 Likes on 5 Posts
Default

They look great, is this the final color? It looks something like pewter and I love it! Great job David.
 
  #30  
Old 04-13-2019, 03:54 PM
rothwell's Avatar
Veteran Member
Thread Starter
Join Date: Jan 2009
Location: Hudson, Florida
Posts: 2,066
Received 1,252 Likes on 687 Posts
Default

Originally Posted by Muncie6spd
They look great, is this the final color? It looks something like pewter and I love it! Great job David.
The color is called "chrome" but it is darker - more like a pewter as you described it. I will get the manufacturer details for it and post them.

Definitely darker than the silver metallic that is on the Apollo wheels I have mounted now.
 
  #31  
Old 04-14-2019, 04:47 PM
rothwell's Avatar
Veteran Member
Thread Starter
Join Date: Jan 2009
Location: Hudson, Florida
Posts: 2,066
Received 1,252 Likes on 687 Posts
Default

Here is a wheel after sanding the front face ...ready to go back for another powder coat of silver.

 
The following users liked this post:
Muncie6spd (04-14-2019)
  #32  
Old 04-14-2019, 05:04 PM
rothwell's Avatar
Veteran Member
Thread Starter
Join Date: Jan 2009
Location: Hudson, Florida
Posts: 2,066
Received 1,252 Likes on 687 Posts
Default

Info about the powder being used.

TCI Powder
TruBond Metallic Powder Coating
Color # 9911-01007 Chrome
 
  #33  
Old 04-14-2019, 08:39 PM
cjd777's Avatar
Veteran Member
Join Date: Dec 2011
Location: Spencer, NC
Posts: 2,728
Received 1,323 Likes on 735 Posts
Default

I'm pretty sure you got it this time.
The attention to detail is what makes a job, thanks.
 
  #34  
Old 08-29-2019, 06:57 PM
rothwell's Avatar
Veteran Member
Thread Starter
Join Date: Jan 2009
Location: Hudson, Florida
Posts: 2,066
Received 1,252 Likes on 687 Posts
Default

It has been a while since I updated my progress on the wheels. Summer has been distracting.

I have a second coat of powder now on and things are looking really good. I could easily stop here and they would look better than my originals ever did.

The blemishes are now down to one or two significant ones, all due to me not sanding enough.

Since I have the time (and my powder coating guys are on board) I am going to sand down one more time and see how close to perfect I can get.

Notice the blemish at about 3 o'clock.


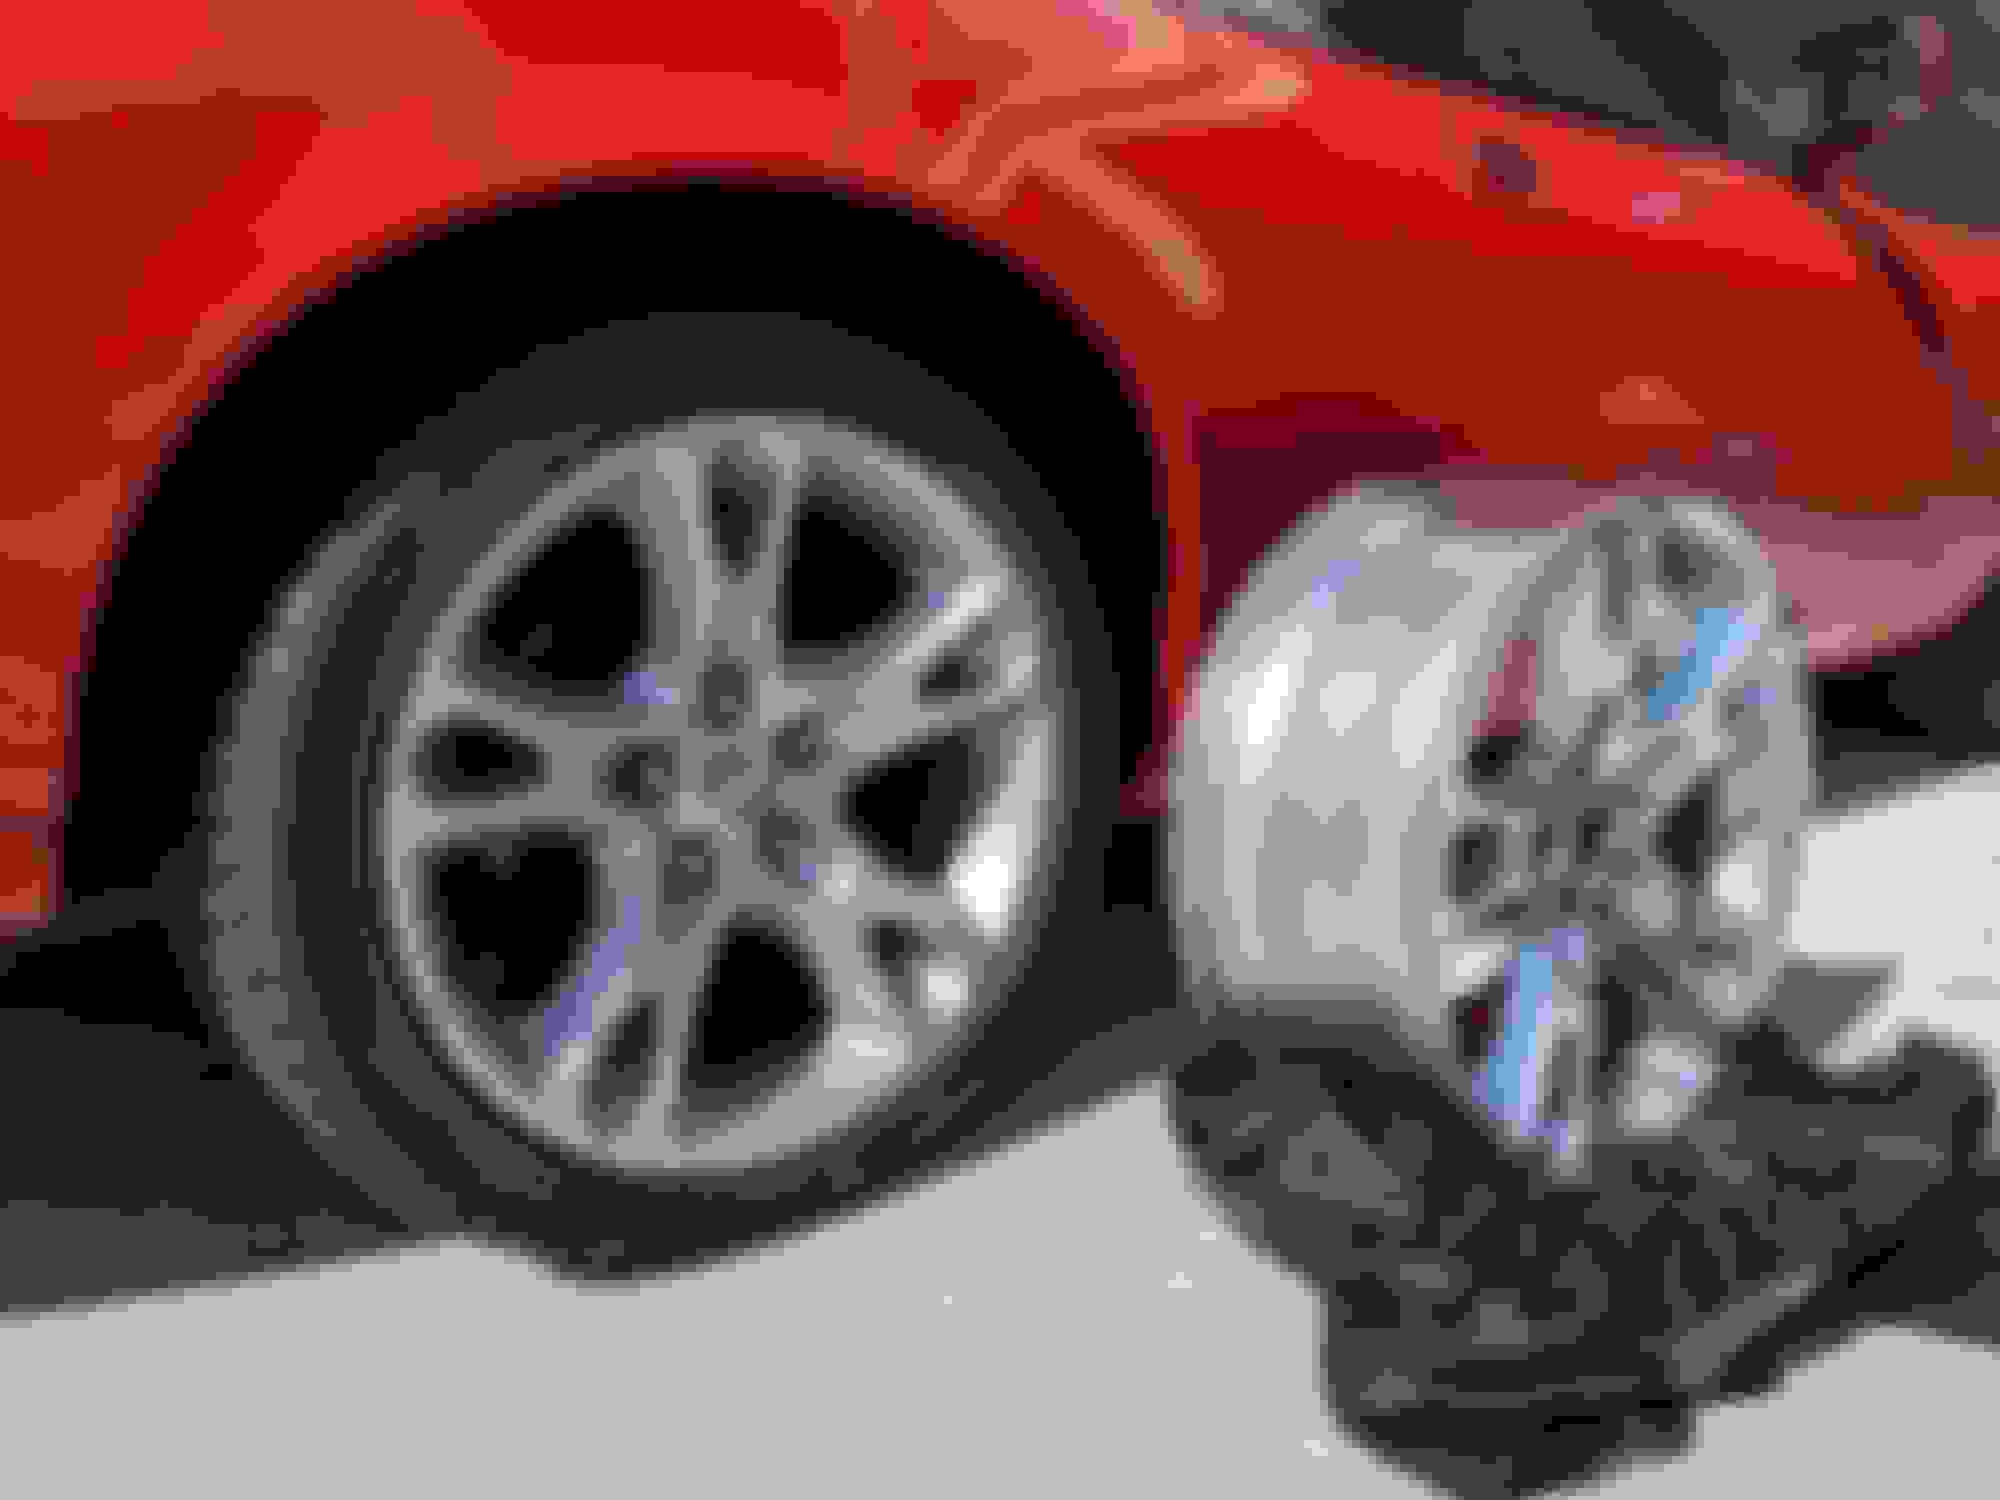
Here's a good comparison to the original which has a much lighter silver tone and more metal flake. I have yet to add the clear coat so I expect even more shine and depth. Also notice the interior is done in the same finish as the face. My originals barely have any coating on the inside, almost looks like over spray and really poor quality.


I will update again after I get another coat of powder on and (hopefully) also have the clear coat as well.

I know it seems like this is taking forever but we have only about 12 hours invested in the restoration so far. I am guessing about 7 or 8 more to get to the finish line but it all happens in between other higher priorities.
 
The following 2 users liked this post by rothwell:
cjd777 (08-30-2019), DavidYau (08-29-2019)
  #35  
Old 08-30-2019, 10:07 AM
Jon89's Avatar
Veteran Member
Join Date: Jan 2009
Location: Raleigh, NC
Posts: 12,534
Received 4,275 Likes on 2,812 Posts
Default

I admire your tenacity and taking your time to get it right. You are fortunate that you have relatively easy access to the right facilities and processes. Your final product will look so much better than chrome does. At some point I will still have to deal with the one front Atlas chrome wheel on my wife's 2006 XK8 that has been gradually pitting in several spots for a couple of years now. The tire still holds its air and the wheel still looks decent from six feet away so I continue to just keep it clean and ignore the gradual pitting for now....

For the 147th time, just let me say that I truly despise ALL chrome wheels....
 
  #36  
Old 08-30-2019, 12:46 PM
nalle's Avatar
Senior Member
Join Date: Jan 2019
Location: Mesa, AZ
Posts: 260
Received 72 Likes on 44 Posts
Default

rothwell, great story! My 2004 came with two problems. A leaper on the hood and chrome wheels. Even though the chrome wheels are perfect, they have to go. Now I have another project to add to the list.
Still have not figured out how to plug the holes in the hood from the leaper. Any good ideas out there??
 
  #37  
Old 08-30-2019, 02:01 PM
fmertz's Avatar
Veteran Member
Join Date: Nov 2014
Location: Eastern USA
Posts: 2,603
Received 1,487 Likes on 1,043 Posts
Default

Originally Posted by Jon89
The tire still holds its air and the wheel still looks decent from six feet away so I continue to just keep it clean and ignore the gradual pitting for now....
Think of it as being within the window of time where you can sell them, where the wheels are still good enough to not be repulsive, and the tires are good enough for a least a winter. Keep your eyes open for a replacement set that you like (or can live with), get a new set of tires for those, and then sell the old set on CL. Chances are the sale will mostly offset either your new-to-you wheels or your tires, and the difference will put you on the better path with new tires. I have done this on 2 separate cars, and, besides the issue of spending money upfront, the old set (with tires!) always eventually sells locally near the asking price.
 
  #38  
Old 09-16-2019, 03:31 PM
rothwell's Avatar
Veteran Member
Thread Starter
Join Date: Jan 2009
Location: Hudson, Florida
Posts: 2,066
Received 1,252 Likes on 687 Posts
Default

Ok I got the last powder coating sanded down and am dropping off tomorrow.

Compared to the last time I sanded this one is nearly perfect. Hoping for good results.

 
The following 2 users liked this post by rothwell:
cjd777 (09-16-2019), DavidYau (09-16-2019)
  #39  
Old 09-16-2019, 05:27 PM
cjd777's Avatar
Veteran Member
Join Date: Dec 2011
Location: Spencer, NC
Posts: 2,728
Received 1,323 Likes on 735 Posts
Default

Now we are talking perfect. I love the color and the finish will be like you wanted, after all the work.
Thanks for sharing. Look forward to the final product.
 
  #40  
Old 09-16-2019, 08:50 PM
DavidYau's Avatar
Veteran Member
Join Date: Jan 2019
Location: Bahrain
Posts: 1,906
Received 1,417 Likes on 755 Posts
Default

Rothwell,

Keep at it. You're almost there. I'm looking forward to seeing pics of the newly finished wheels on your red car.


Quick Reply: Apollo Wheel Refurbishing - A Rags to Riches Story - RESOLVED


All times are GMT -5. The time now is 09:05 PM.