
Broke off thermostat housing port to expansion tank bleeder hose...
#1
 11-22-2012, 02:09 PM

Join Date: May 2009
Location: Haleiwa, HI & Beverly Hills, CA
Posts: 509
Received 25 Likes
on
15 Posts
I managed to break off the little knob port on the thermostat housing where the bleeder hose from the expansion tank connects to.
I was thinking maybe some high temp. RTV red silicon would work to fix this?
or do you recommend I replace the entire thermostat housing as a result of this stupid mistake I made while trying to get the temporary hose off to install the new bleeder hose I just got.
Thanks for the advice to come
I was thinking maybe some high temp. RTV red silicon would work to fix this?
or do you recommend I replace the entire thermostat housing as a result of this stupid mistake I made while trying to get the temporary hose off to install the new bleeder hose I just got.
Thanks for the advice to come
#2
11-22-2012, 02:46 PM

If your temporary fix to re-attach the outlet pipe goes wrong you lose coolant fast with all the associated overheating risks. Go for a replacement ThermoStat Housing and make it an aftermarket aluminium one.
The OE Jaguar Thermostat Housing is a regular failure and the aluminium version is a once-and-for-all fix.
Graham
The OE Jaguar Thermostat Housing is a regular failure and the aluminium version is a once-and-for-all fix.
Graham
The following 2 users liked this post by GGG:
Bob OB (03-28-2013),
hawaiianjag (11-22-2012)
#3
11-22-2012, 03:03 PM
Join Date: May 2009
Location: Haleiwa, HI & Beverly Hills, CA
Posts: 509
Received 25 Likes
on
15 Posts
thanks graham. I figured so. It broke off pretty easy so the plastic must be pretty brittle and ready for a replacement anyway. Knowing my lack of mechanical skills should I have a pro do the replacement for me or is it not very hard to install a new housing? Also while i'm in there should the thermostat be replaced as well in your opinion? My xk8 has 61k on it at the moment
Thanks again for all the help
Thanks again for all the help
Last edited by hawaiianjag; 11-22-2012 at 03:07 PM.
#4
11-22-2012, 03:36 PM

Veteran Member
It's not very easy getting the rear bolts back in and tight. Removal is simple, just break the old housing into pieces. If you do a search you will find info on using a crowfoot wrench. If you don't mind the expense, life is more enjoyable if someone else does it.
Definitely replace the thermostat, they have been known to stick in the closed position when they fail, a serious risk for the engine.
Definitely replace the thermostat, they have been known to stick in the closed position when they fail, a serious risk for the engine.
The following users liked this post:
hawaiianjag (11-22-2012)
#5
11-22-2012, 03:48 PM
Join Date: May 2009
Location: Haleiwa, HI & Beverly Hills, CA
Posts: 509
Received 25 Likes
on
15 Posts
I think it's time I tackle a job myself and since I just bought a new 200 piece tool set im going to attempt to do this myself. It doesn't seem that hard besides the hard to get at nuts, etc. It might take me 3-5x times longer than a pro I think its worth a shot.
Since I will be replacing the thermostat and the housing and I can only find write ups for the housing alone and the thermostat alone is there anything I should do or not do that you can think of when replacing both thermostat, housing, and hoses? Once I take off the housing is it simple to just pop in the thermostat or is it more involved and some people advocate removing the bleeder pin from the t-stat? Do you guys recommend this? Ill be doing as much research as possible but if anyone has done this before themselves any advice is much appreciated.
I like to work on cars but I just don't do it much and this looks like a good opportunity for me to gain some experience and hopefully all goes smoothly and I don't break more parts
Last edited by hawaiianjag; 11-22-2012 at 04:59 PM.
#6
11-22-2012, 05:26 PM
Don't spill coolant over the Serpentine Belt or it will start to squeal on startup. Maybe I'm oversensitive but that sound drives me mad!
If you decide to break the housing to remove it, make sure no pieces drop into the cylinder block. The last thing you need is a piece of plastic getting into the Water Pump impeller or partially blocking a waterway.
The Thermostat fits into a groove in the Thermostat Housing. it takes no effort to fit it and the rubber seal on the perimeter will hold it in place until you fit the cover:
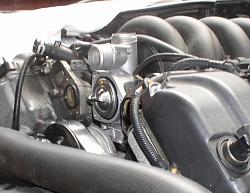
I don't have any worries about either leaving the pin in or removing it. Never remove them myself. Just be sure to place the hole at the top like in the pic.
Which hoses are you planning on changing at the same time?
Graham
The following users liked this post:
hawaiianjag (11-23-2012)
#7
11-22-2012, 07:25 PM
Veteran Member
The following users liked this post:
hawaiianjag (11-23-2012)
Trending Topics
#8
11-22-2012, 07:41 PM

Senior Member
Graham you may what to send him the pic showing the radiator drain plug and location it made my life easier. With the miles on the car, which were the same as mine I would change the upper , lower radiator hose and the shot hose. Part of my problem was the upper hose was starting to get soft and enlarged on the ends. For a few bucks more and piece of mind it's worth it. Jim
The following 2 users liked this post by berlin1977:
GGG (11-23-2012),
hawaiianjag (11-23-2012)
#9
11-22-2012, 09:50 PM
Veteran Member

The following users liked this post:
hawaiianjag (11-24-2012)
#10
11-23-2012, 01:04 AM
Join Date: May 2009
Location: Haleiwa, HI & Beverly Hills, CA
Posts: 509
Received 25 Likes
on
15 Posts
very good tips everyone! I was planning to replace all the major hoses & clamps I can see that I will be taking off in the process of replacing the housing and t-stat since they probably have never been changed since the mileage just hit 60k.
So just to be clear, I should be draining all the coolant from radiator then take apart hoses, remove hosing then fit new housing and t-stat, then reverse process of removal, lastly fill up with dexcool orange coolant(50/50 coolant and water???) then warm up engine by running at 3000 rpm w/ heater on full blast to get any air pockets to pull through t-stat... thats basically what I got from the research ive been doing from various sources so far.
All the help is much appreciated everyone. If anyone thinks of anything else please let me know.
MAHALOOOOO
Last edited by hawaiianjag; 11-23-2012 at 01:59 AM.
#11
11-23-2012, 02:48 AM
Good idea - it's not exactly easy to find!
A plastic plug (item 1) in a plastic radiator - extreme force is NOT required.
Graham
The following users liked this post:
hawaiianjag (11-23-2012)
#12
11-23-2012, 02:57 AM
This Parts Manual diagram may help as a reminder of where everything goes:
JAGUAR XK8 - Thermostat & Water Outlet Pipe.pdf
Rubber Seals items 5, 7 and 10.
A new Thermostat includes Item 5 and Item 7 is included with a replacement Thermostat Housing. The two Water Outlet seals are almost always re-useable.
Graham
JAGUAR XK8 - Thermostat & Water Outlet Pipe.pdf
Rubber Seals items 5, 7 and 10.
A new Thermostat includes Item 5 and Item 7 is included with a replacement Thermostat Housing. The two Water Outlet seals are almost always re-useable.
Graham
The following users liked this post:
hawaiianjag (11-23-2012)
#13
11-23-2012, 05:32 PM
Join Date: May 2009
Location: Haleiwa, HI & Beverly Hills, CA
Posts: 509
Received 25 Likes
on
15 Posts
very very helpful diagrams Graham. You just helped me big time. Looking forward to having the cat purring again.
Would be broke from labor costs before long if it weren't for this great forum that has helpful experts like yourself. It is about time I become a paying member on this site for all the help with the 3 Jags ive owned over the years.
Would be broke from labor costs before long if it weren't for this great forum that has helpful experts like yourself. It is about time I become a paying member on this site for all the help with the 3 Jags ive owned over the years.
The following users liked this post:
GGG (11-23-2012)
#14
11-23-2012, 05:53 PM
Many enthusiastic members here give their time and knowledge but those who ask the questions are just as important as those who answer them.
Together we all keep some of the most beautiful cars ever built roadworthy and enjoyable for ourselves and their future owners.
Graham
The following users liked this post:
hawaiianjag (11-24-2012)
#15
11-23-2012, 05:57 PM

Join Date: Oct 2007
Location: PHX some of the time
Posts: 116,730
Received 6,250 Likes
on
5,450 Posts
The following users liked this post:
hawaiianjag (11-24-2012)
#16
11-23-2012, 06:32 PM
The following users liked this post:
hawaiianjag (11-24-2012)
#17
11-23-2012, 06:49 PM
Senior Member
#18
11-23-2012, 10:52 PM
Join Date: Oct 2007
Location: PHX some of the time
Posts: 116,730
Received 6,250 Likes
on
5,450 Posts
#20
11-24-2012, 08:01 AM


Correct size wrench for those thermostat housing bolts is: 8mm - Hawaiianjag - check my profile and postings - I completed this job in my 00 S Type... this may be of assistance.
The following users liked this post:
hawaiianjag (11-24-2012)