
M Eurosport Dipstick for ZF Transmission - Photos and Review
#1
 10-22-2014, 01:38 PM

Hello guys-
I've got a 1997 XK8 Coupe with the ZF 5HP24 transmission. As you know, checking the fluid level and adding fluid to our gearboxes is a messy, ridiculous exercise. I've been reading on this forum about the M Eurosport Dipstick add-on for our cars, but I'd never seen or installed a kit of this type and didn't really know what to expect.
I recently ordered and installed the "Classic Dipstick for for ZF 5HP24" from M Eurosport. Since not many people (including me) have experience installing add-on dipsticks, I thought I'd upload some good photos for those who want a closer look. The product comes with a pretty good set of installation instructions, so I won't duplicate them here. But here are some photos and notes / thoughts of my own that might be helpful for those considering this upgrade.
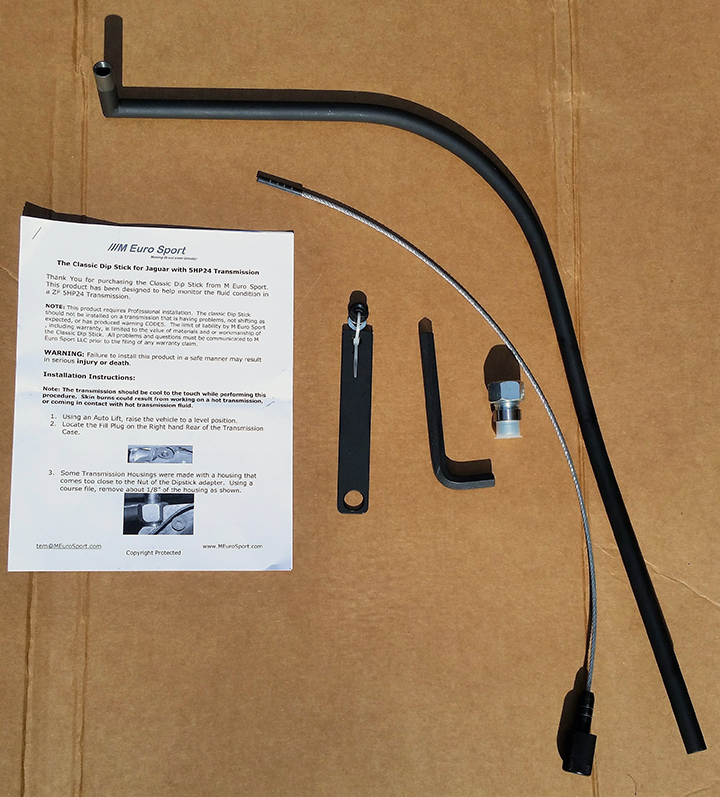
Here's what comes in the box: Instructions with a few photos, dipstick / filler tube, dipstick / gauge, compression nut and adapter, allen wrench, bracket with nut and two washers.
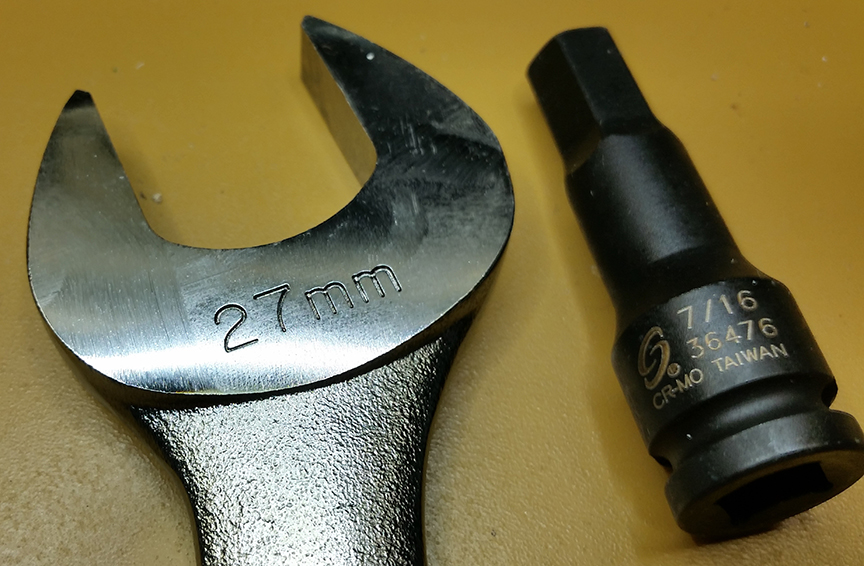
Two important items you must secure before attempting this installation - a 27mm open-end wrench, and an 11mm (or 7/16 inch) hex bit socket. M Eurosport does supply a 7/16 inch allen wrench to torque the adapter into the transmission case, but on my car the space was just too tight to use the supplied allen wrench. And be aware...you'll likely need to find a specialty tool store to find an 11mm OR a 7/16 inch hex bit socket. Neither sizes are commonly found...Sears, Home Depot, Lowe's and Harbor Freight do not carry either size in my area.
The best solution for the open-end wrench might be a 27mm open-end crowfoot wrench attachment that you can use with your torque wrench, to ensure proper torque of the compression nut.
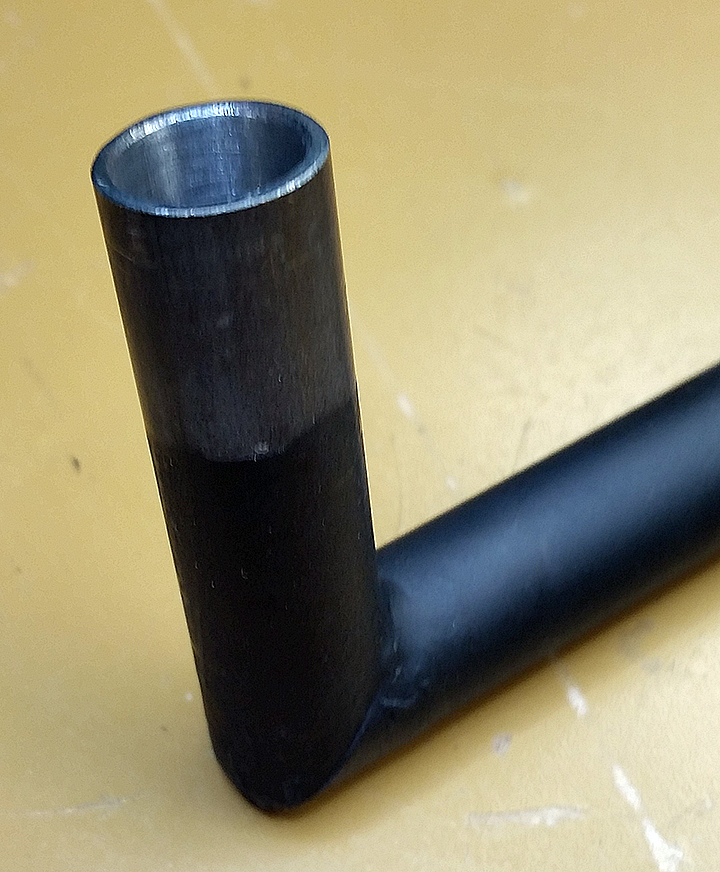
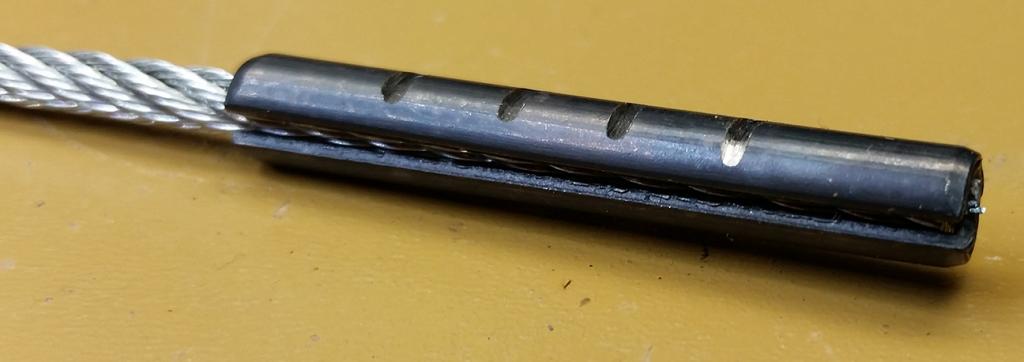
The dipstick tube is well constructed, with a cleanly welded right angle at the entry point into the gearbox, seen below.
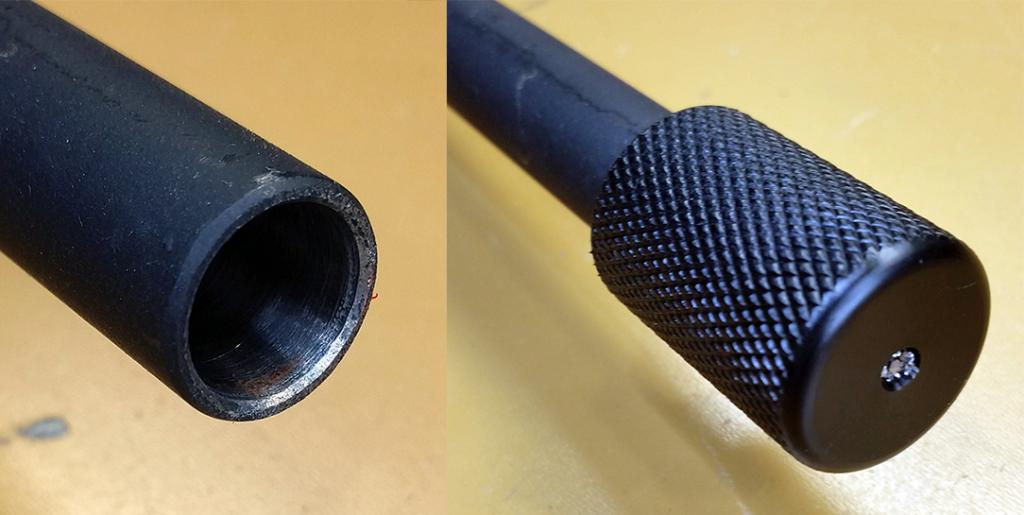
The other end of the tube is designed to reach into the engine bay, and holds the gauge. Here you see the gauge end of the tube with- and without- the gauge in place.
Here's the gauge handle...well constructed, with two o-rings.

Here's the business end of the gauge, with well-defined marks for measuring fluid level.
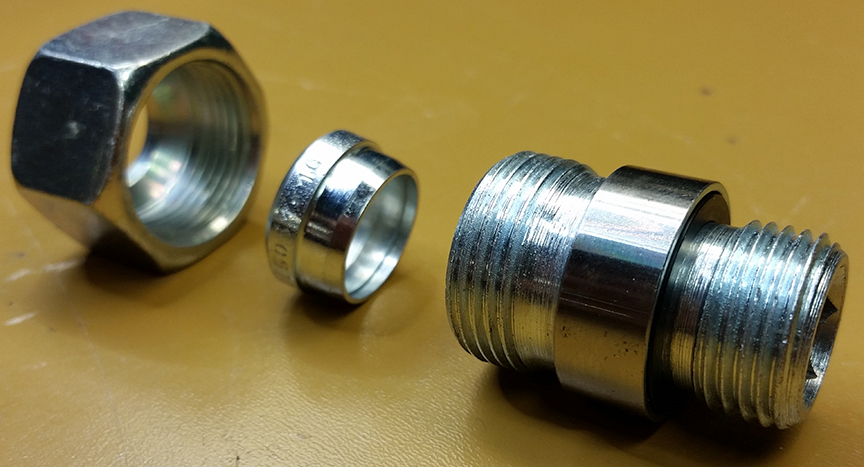
The dipstick is connected and secured to the fill port of the transmission case with a screw-in adapter, followed by a compression nut that fits over the dipstick tube. Here's an exploded view of the adapter and compression nut.
And here's that assembly on the tube end. For illustration only...during installation, the adapter screws into the transmission case first, then the compression nut is put over the tube, then aligned with the adapter and screwed into place. When proper torque is applied, the compression nut holds the tube tightly and makes a (hopefully) leak-free seal.
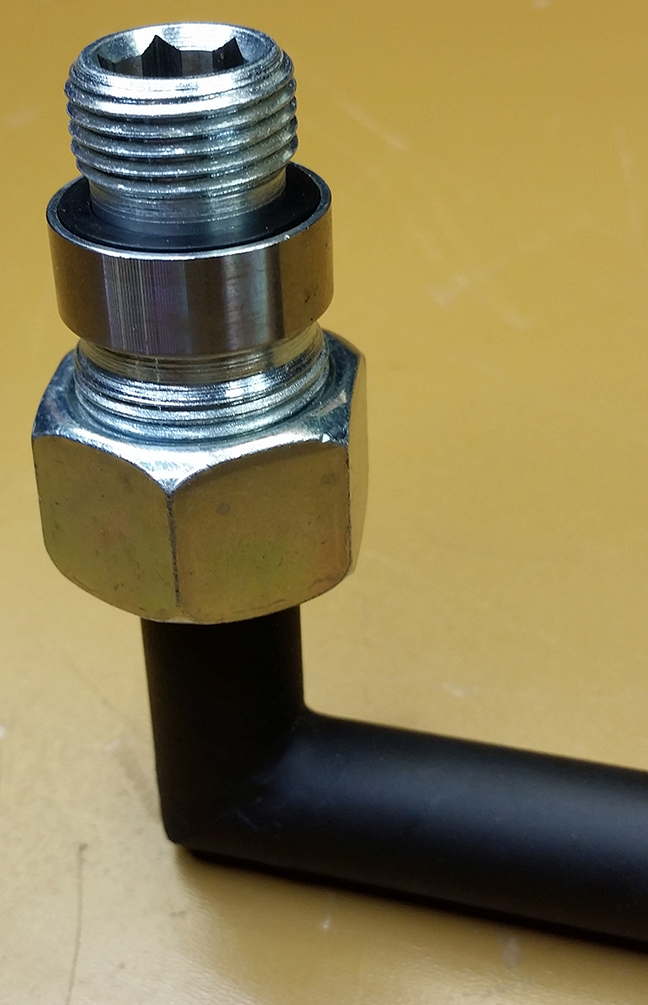
Here's a close-up of the assembly connected to the transmission case, with the tube firmly held by the compression nut. Important note here...I had to carefully(!) file back the two edges of the transmission case, indicated with red lines in the photo below. This was necessary to 1) allow the compression nut to screw on tightly enough, and 2) create enough space between the compression nut and case to allow use of an open-end wrench.
BE VERY CAREFUL when you files these edges away...you're working very close to the edge of the pan and gasket (don't create a pan leak), and close to the fill portal for the transmission case. Keep the flat OE fill plug IN PLACE while you carefully file the edges of the housing, so that no filings get into the transmission case. Thoroughly wipe or blow away the excess filings BEFORE removing the fill plug.

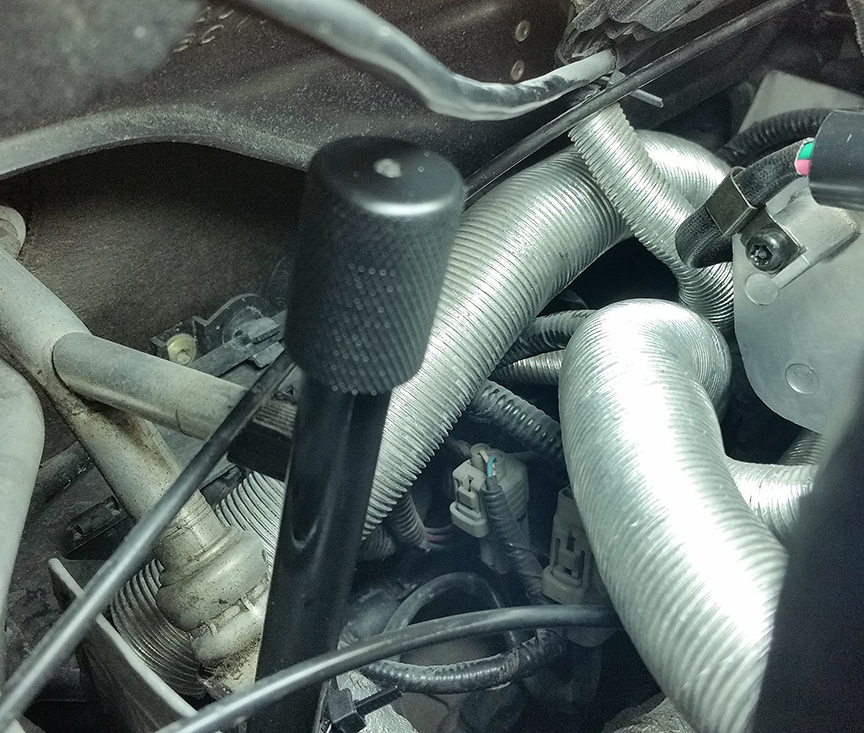
Here's the dipstick end with gauge in place in the engine bay (near the bend of the air intake tube). In normal installation, the small bracket shown earlier in this post slips over the dipstick tube and then bolts onto the exhaust manifold to secure the tube. In my case, I needed to bend the tube a bit to get it to properly align with the adapter in the transmission case. Once that slight bend was made, my bracket didn't line up well with the bolt in the exhaust manifold. So, temporarily, a zip-tie holds the top of the tube securely to prevent movement and rattling. Some weekend soon I'll bend or otherwise adjust the bracket so that it will fit properly.
Overall, I'm happy with the product and the install. No leaks at present. I hope it holds up well over time, because I really don't want to fill the transmission with the old method EVER AGAIN.
You can find more information on the M Eurosport Dipstick HERE.
.
I've got a 1997 XK8 Coupe with the ZF 5HP24 transmission. As you know, checking the fluid level and adding fluid to our gearboxes is a messy, ridiculous exercise. I've been reading on this forum about the M Eurosport Dipstick add-on for our cars, but I'd never seen or installed a kit of this type and didn't really know what to expect.
I recently ordered and installed the "Classic Dipstick for for ZF 5HP24" from M Eurosport. Since not many people (including me) have experience installing add-on dipsticks, I thought I'd upload some good photos for those who want a closer look. The product comes with a pretty good set of installation instructions, so I won't duplicate them here. But here are some photos and notes / thoughts of my own that might be helpful for those considering this upgrade.
Here's what comes in the box: Instructions with a few photos, dipstick / filler tube, dipstick / gauge, compression nut and adapter, allen wrench, bracket with nut and two washers.

Two important items you must secure before attempting this installation - a 27mm open-end wrench, and an 11mm (or 7/16 inch) hex bit socket. M Eurosport does supply a 7/16 inch allen wrench to torque the adapter into the transmission case, but on my car the space was just too tight to use the supplied allen wrench. And be aware...you'll likely need to find a specialty tool store to find an 11mm OR a 7/16 inch hex bit socket. Neither sizes are commonly found...Sears, Home Depot, Lowe's and Harbor Freight do not carry either size in my area.
The best solution for the open-end wrench might be a 27mm open-end crowfoot wrench attachment that you can use with your torque wrench, to ensure proper torque of the compression nut.

The dipstick tube is well constructed, with a cleanly welded right angle at the entry point into the gearbox, seen below.

The other end of the tube is designed to reach into the engine bay, and holds the gauge. Here you see the gauge end of the tube with- and without- the gauge in place.

Here's the gauge handle...well constructed, with two o-rings.

Here's the business end of the gauge, with well-defined marks for measuring fluid level.

The dipstick is connected and secured to the fill port of the transmission case with a screw-in adapter, followed by a compression nut that fits over the dipstick tube. Here's an exploded view of the adapter and compression nut.

And here's that assembly on the tube end. For illustration only...during installation, the adapter screws into the transmission case first, then the compression nut is put over the tube, then aligned with the adapter and screwed into place. When proper torque is applied, the compression nut holds the tube tightly and makes a (hopefully) leak-free seal.

Here's a close-up of the assembly connected to the transmission case, with the tube firmly held by the compression nut. Important note here...I had to carefully(!) file back the two edges of the transmission case, indicated with red lines in the photo below. This was necessary to 1) allow the compression nut to screw on tightly enough, and 2) create enough space between the compression nut and case to allow use of an open-end wrench.
BE VERY CAREFUL when you files these edges away...you're working very close to the edge of the pan and gasket (don't create a pan leak), and close to the fill portal for the transmission case. Keep the flat OE fill plug IN PLACE while you carefully file the edges of the housing, so that no filings get into the transmission case. Thoroughly wipe or blow away the excess filings BEFORE removing the fill plug.

Here's the dipstick end with gauge in place in the engine bay (near the bend of the air intake tube). In normal installation, the small bracket shown earlier in this post slips over the dipstick tube and then bolts onto the exhaust manifold to secure the tube. In my case, I needed to bend the tube a bit to get it to properly align with the adapter in the transmission case. Once that slight bend was made, my bracket didn't line up well with the bolt in the exhaust manifold. So, temporarily, a zip-tie holds the top of the tube securely to prevent movement and rattling. Some weekend soon I'll bend or otherwise adjust the bracket so that it will fit properly.

Overall, I'm happy with the product and the install. No leaks at present. I hope it holds up well over time, because I really don't want to fill the transmission with the old method EVER AGAIN.
You can find more information on the M Eurosport Dipstick HERE.
.
The following 15 users liked this post by The Coupe:
blindside (10-23-2014),
cjd777 (10-22-2014),
clyons (10-22-2014),
Felipe Pr (10-23-2014),
greenforest56 (11-24-2014),
and 10 others liked this post.
#2
10-22-2014, 02:16 PM

Veteran Member
Congrats, and I envy you. Do you know if this company has plans to create the same device for the 6-speed ZF 6HP26 transmission that those of us with the 2003-and-newer cars have?
As tight as the transmission tunnel is in the 2003-and-newer cars, I wouldn't be surprised if it is practically impossible to fit one of these devices into them....
As tight as the transmission tunnel is in the 2003-and-newer cars, I wouldn't be surprised if it is practically impossible to fit one of these devices into them....
#3
10-22-2014, 04:48 PM
Congrats, and I envy you. Do you know if this company has plans to create the same device for the 6-speed ZF 6HP26 transmission that those of us with the 2003-and-newer cars have?
As tight as the transmission tunnel is in the 2003-and-newer cars, I wouldn't be surprised if it is practically impossible to fit one of these devices into them....
As tight as the transmission tunnel is in the 2003-and-newer cars, I wouldn't be surprised if it is practically impossible to fit one of these devices into them....
.
#6
10-23-2014, 07:36 AM
I lost about 1.5 quarts of fluid during the change, and replaced that amount with new fluid. The instructions say to plan on up to 3 quarts...but of course it depends on how high or low your fluid level is before you get started.
By the way, for anyone looking for the proper ZF fluid, California Transmission Supply Company is an excellent source with good pricing. A fraction of what you'd pay for the fluid at any dealer or transmission shop.
The CTSC
.
The following users liked this post:
Felipe Pr (10-23-2014)
#7
10-23-2014, 10:39 AM
Veteran Member
The following users liked this post:
Felipe Pr (12-11-2014)
Trending Topics
#9
12-10-2014, 02:45 PM
The following users liked this post:
greenforest56 (12-12-2014)
#10
12-10-2014, 07:28 PM
Veteran Member
Join Date: Nov 2006
Location: Glasgow, Scotland UK
Posts: 47,303
Received 9,005 Likes
on
4,113 Posts
#11
07-02-2019, 01:06 PM
Veteran Member
Great write up and thank you thank you for the the photos of the kit. This info is and has been up and around on the xk8 100 site a bit where it caught my eye... I need this. I do. BUT,,, and there is always a but. I don't like the cost... Nearly $200 is a lot and,,, if the way I am seeing this products function,,, it's not a research heavy item... I believe in capitalism, profit and paying someone for their innovation and hard worked for experience,,, but damn... $200?
Pictures worth 1000words and I think the one that shows what is contained in the "kit" answered my question.
It looks like, as opposed to filling thru the fill plug until fluid at operating temp begins to dribble at full, the dipstick reader will allow (require) us to fill the trans slightly more - until the fluid starts to run up the tube - where a reading can be had.
It's pretty clear that the cabled reader is quite short, compared to the tube, looking at the photo. It's NOT going down, around that 90, and into the pan - or even close.. It appears to be terminating in the vertical-ish section of the down tube, which makes sense.
Hmmm,,, in that, it's not a super accurate set up (certainly accurate enough). Just one that allows us to know that the fluid level is just OVER the fill point... A bit more than the fill one would get IF doing it the "ol fashioned way",,, and that now the pan is full enough to have fluid headed UP and into the tube. I would guess that this set up would make filling require less than one full additional quart to get a good "reading"....?
Is my thinking messy???
If that's the case it wouldn't be hard to reproduce something like this for 30bucks or so.
What say ya...?
#12
07-02-2019, 10:09 PM

Thank You to all for photos, comments and suggestions.
To JayJagJay, The basic fill hole on the side of the 5HP 24 sets the level of the transmission at ambient temperature. The expansion of the fluid to the operating temperature raises the fluid level approximately 20mm. Yes, I knew that the fluid expanded, but extensive testing on the development car yielded the accurate expansion factor of the fluid. It may not be obvious, but every dipstick is calibrated to establish the location of the top groove. From there each remaining groove represents approximately 250 ml. As I mention in the instructions that the first reading shouldn't be used to make fine adjustments in the level. Take several readings spaced days apart to get a feel for where the true level runs, then adjust by adding a small amount.
Experience is a good judge of success. To date I have sold 127 Classic Dipsticks for the 5HP24 transmission. I installed the first Classic Dipstick in September 2010. To my knowledge it is still working fine today.
Moving forward with the 6HP26 transmission. I would be glad fit this concept to and car with a ZF transmission. All I need is to borrow your car for a whole day. You get a custom Classic Dipstick, I get the template to make more dipsticks for that model car.
I hope this information has been helpful. Please feel free to write at tem@meurosport.com
Best Regards,
Tom
The following users liked this post:
TheDuke (08-04-2020)

#14
08-04-2020, 07:22 AM
Hmmmmm, how far are you from SW Ohio? I don't think $200 is so bad. I've wasted a lot more than that on car parts that didn't work out. TM
Just looked it up. It's 556 miles. So come on east coasters, somebody has to be close enough to supply a test mule. I would do it in a heart beat if I were a lot closer.
Team work makes the dream work.
Just looked it up. It's 556 miles. So come on east coasters, somebody has to be close enough to supply a test mule. I would do it in a heart beat if I were a lot closer.
Team work makes the dream work.
Last edited by STLTHMSTA; 08-04-2020 at 07:38 AM.
The following users liked this post:
Eric-in-Texas (02-27-2022)

Thread
Thread Starter
Forum
Replies
Last Post
XJ6Paul
XJ6 & XJ12 Series I, II & III
1
08-28-2016 07:09 AM
Michaff
XK8 / XKR ( X100 )
6
04-30-2015 03:46 PM
Currently Active Users Viewing This Thread: 1 (0 members and 1 guests)