
Nosejob -> XK8 chrome splitter & overriders replaced with XKR 3-piece setup FAQ
#1
 08-10-2010, 12:31 AM

Most of you know I always admired the XKR grill (the 3-piece version) and I finally got the nerve up to do the swap. A forum member sold me his grill and overriders so my project was on. Before I go into the details of the project itself, and tell you how I did it, let me show some pics.
BEFORE (braces)
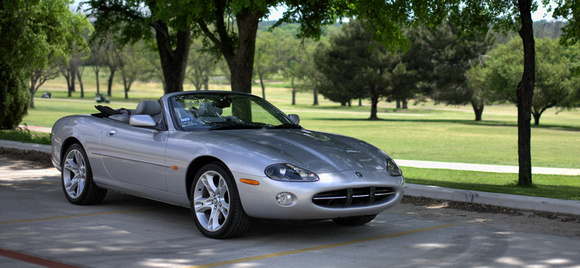
AFTER
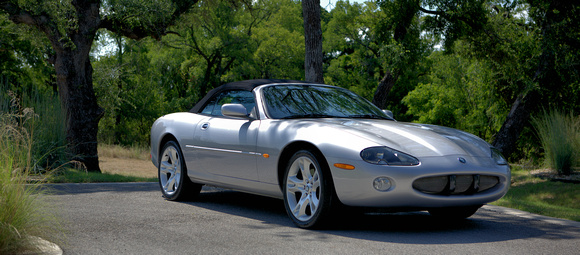

What do you think?
Ok, so now the process of how to do this yourself, if you're inclined and patient. Was it difficult, yes it was...was it worth it? I think it was.
Here's how its done.
Acquisition
Find a grill and bumper overriders from an XKR. The overriders are important, as they are different than the XK8 parts in that they do not have the split in it where the splitter resided. If you reuse the XK8s (I did not try this) there is a good chance the opening will be seen outside of the grille.


Preparation
My 'new' grille was in great shape, all tabs in tact, ready to install. The overriders, however, had a couple nicks and there were holes from the license plate bracket that needed filled in. I did the filler work myself, and prepped it for paint. I admit I screwed up the initial re-paint job, so paid a local body shop to do it right, and it was well worth the $200.

Old Splitter Removal
These overriders come off first. Pull down and out to release the of bumper cover from the bottom of each overrider. The overriders are held onto to the black horizontal structural bar with two long fir fasteners each, on top of the bar. These next images show where the fastener is located on the left side (looking at it from the front) and the fastener removed to show you just how large it is. Be patient at this, I used a split screw driver to wiggle each fastener up and out. It took a long time.


This next part is relatively easy. 8mm bolts hold the chrome splitter onto the black horizontal bar. When those are removed, the splitter comes right out.

After doing this, I removed the power steering cooling line that runs just behind the black bar. It has two brackets (red arrow) and fold them neatly out of the way. I needed the space to get to the fir fasteners inserted for the new overriders later.

Green arrow is for the bolt that holds the exterior air temp sensor...I removed it (moved it aside) just to prevent myself from damaging it during the process.
Now, with the old XK8 features removed, I decided to clean and prep the black bar for a little touchup. It had a few nicks, but mostly it was a faded grey, not black. A little prep work and a couple coats of automotive satin and the bar looked like new.

Modification of the Bumper Cover
If you look at your XK8 bumper, you will notice that the very ends of each opening has a little 'flair' that fit with the chrome splitter. XKRs do not have this, so you need to do a little cutting. I used a dremmel tool (the Wizard) and a router attachment to slowly etch out the pieces from each end.


To Be Continued below...
BEFORE (braces)
AFTER
What do you think?
Ok, so now the process of how to do this yourself, if you're inclined and patient. Was it difficult, yes it was...was it worth it? I think it was.
Here's how its done.
Acquisition
Find a grill and bumper overriders from an XKR. The overriders are important, as they are different than the XK8 parts in that they do not have the split in it where the splitter resided. If you reuse the XK8s (I did not try this) there is a good chance the opening will be seen outside of the grille.
Preparation
My 'new' grille was in great shape, all tabs in tact, ready to install. The overriders, however, had a couple nicks and there were holes from the license plate bracket that needed filled in. I did the filler work myself, and prepped it for paint. I admit I screwed up the initial re-paint job, so paid a local body shop to do it right, and it was well worth the $200.
Old Splitter Removal
These overriders come off first. Pull down and out to release the of bumper cover from the bottom of each overrider. The overriders are held onto to the black horizontal structural bar with two long fir fasteners each, on top of the bar. These next images show where the fastener is located on the left side (looking at it from the front) and the fastener removed to show you just how large it is. Be patient at this, I used a split screw driver to wiggle each fastener up and out. It took a long time.
This next part is relatively easy. 8mm bolts hold the chrome splitter onto the black horizontal bar. When those are removed, the splitter comes right out.
After doing this, I removed the power steering cooling line that runs just behind the black bar. It has two brackets (red arrow) and fold them neatly out of the way. I needed the space to get to the fir fasteners inserted for the new overriders later.
Green arrow is for the bolt that holds the exterior air temp sensor...I removed it (moved it aside) just to prevent myself from damaging it during the process.
Now, with the old XK8 features removed, I decided to clean and prep the black bar for a little touchup. It had a few nicks, but mostly it was a faded grey, not black. A little prep work and a couple coats of automotive satin and the bar looked like new.
Modification of the Bumper Cover
If you look at your XK8 bumper, you will notice that the very ends of each opening has a little 'flair' that fit with the chrome splitter. XKRs do not have this, so you need to do a little cutting. I used a dremmel tool (the Wizard) and a router attachment to slowly etch out the pieces from each end.
To Be Continued below...
Last edited by H20boy; 08-10-2010 at 01:06 AM. Reason: grill...no E dangit!
#2
08-10-2010, 12:31 AM
Installation
Ok, now we can install the new XKR pieces. First, I can assure you this would be easiest if you removed the front bumper cover, installed the pieces, then put the cover back on. I wanted to do this the hard way, and heard that it can be done. It just takes some precautionary measures and a little brute force. The parts can handle it.
First, see the yellow arrow in the pic below? This bolt holds that black bumper bar secure. A 19mm ratcheting wrench is the only way to get to it AND get it back on. Loosen it on each end, but do not remove it (I don't think you can actually) so that the bar moves up and down about 1/2 inch...this is critical to getting a little extra space to negotiate the parts into the bumper cover.

The red arrow on the left is the bracket for the power steering cooler, and the one on the right is the driver side splitter mounting bolt. 8mm all around.
Unlike the XK8, where the splitter goes on first, then the overriders, the XKR is backwards. The overriders go on first, then the grill follows it and its tabs rest ATOP the overriders.
Here are the protection measures I mentioned. I added black electrical tape to each end of the grille, more than one layer. I also put a little on the bottom where it will run atop the lower part of the bumper cover, and along each side of the overrider. Since we're going to be manipulating it to get it to fit, I didn't want to risk scratching either the cover or the newly painted overriders. Blue painters tape EVERYWHERE, just to be safe. I even put some rags down to help the 'sliding' into position. Tape does rip you know. (I ended up with one little scratch in the corner when finished, not from putting it in, but when getting it OUT when I realized the wrong order of install. It can be done w/o damage)
Overriders placed over the aluminum bumper supports, loosely...do not secure. Place the grill in, bottom first, and then pull the overriders out so that they are 'in the groove'.


Choose your favorite side, and tuck the corner of the grill into that one. Be careful not to pull the overriders out in the process. They will be really loose as you do this.

Now, take a big spoonful of spinach, and bear down for some manly grunting. Make sure the overriders are securely on the aluminum supports and should be almost all the way inside the opening.
This is where you will be very cautions. Bending the other corner will take some strength and coordination, so that it does not stray and begin scraping all around it. You will not damage it, nor will it remain bent..it will rebound w/o issue.

Its in! Now, remove all tape and begin the 'fitment' process. Tighten up the black horizontal bar with the 19mm ratcheting wrench, and install/reposition the power steering cooler line and its brackets, as well as that air temp sensor (if you removed it like I did)
Securing 'New' Grill & Overriders
This part is mostly a preferential step. You could go 'by the book' and just put the tabs above the overrider tabbed holes, and insert some new (and not so long) fasteners into the bumper bar, and there is that one securing location on the bottom. I liked the upper half of the grill to be a little more 'forward', so I just secured the overriders separately, and built a little bracket to push the upper edge of the grill forward. No pics of this, its kinda a macgyver move.

Hope you enjoyed the project. Let me know if you see any errors or if any steps need more clarification/description to assist future endeavors.
Ok, now we can install the new XKR pieces. First, I can assure you this would be easiest if you removed the front bumper cover, installed the pieces, then put the cover back on. I wanted to do this the hard way, and heard that it can be done. It just takes some precautionary measures and a little brute force. The parts can handle it.
First, see the yellow arrow in the pic below? This bolt holds that black bumper bar secure. A 19mm ratcheting wrench is the only way to get to it AND get it back on. Loosen it on each end, but do not remove it (I don't think you can actually) so that the bar moves up and down about 1/2 inch...this is critical to getting a little extra space to negotiate the parts into the bumper cover.
The red arrow on the left is the bracket for the power steering cooler, and the one on the right is the driver side splitter mounting bolt. 8mm all around.
Unlike the XK8, where the splitter goes on first, then the overriders, the XKR is backwards. The overriders go on first, then the grill follows it and its tabs rest ATOP the overriders.
Here are the protection measures I mentioned. I added black electrical tape to each end of the grille, more than one layer. I also put a little on the bottom where it will run atop the lower part of the bumper cover, and along each side of the overrider. Since we're going to be manipulating it to get it to fit, I didn't want to risk scratching either the cover or the newly painted overriders. Blue painters tape EVERYWHERE, just to be safe. I even put some rags down to help the 'sliding' into position. Tape does rip you know. (I ended up with one little scratch in the corner when finished, not from putting it in, but when getting it OUT when I realized the wrong order of install. It can be done w/o damage)
Overriders placed over the aluminum bumper supports, loosely...do not secure. Place the grill in, bottom first, and then pull the overriders out so that they are 'in the groove'.
Choose your favorite side, and tuck the corner of the grill into that one. Be careful not to pull the overriders out in the process. They will be really loose as you do this.
Now, take a big spoonful of spinach, and bear down for some manly grunting. Make sure the overriders are securely on the aluminum supports and should be almost all the way inside the opening.
This is where you will be very cautions. Bending the other corner will take some strength and coordination, so that it does not stray and begin scraping all around it. You will not damage it, nor will it remain bent..it will rebound w/o issue.
Its in! Now, remove all tape and begin the 'fitment' process. Tighten up the black horizontal bar with the 19mm ratcheting wrench, and install/reposition the power steering cooler line and its brackets, as well as that air temp sensor (if you removed it like I did)
Securing 'New' Grill & Overriders
This part is mostly a preferential step. You could go 'by the book' and just put the tabs above the overrider tabbed holes, and insert some new (and not so long) fasteners into the bumper bar, and there is that one securing location on the bottom. I liked the upper half of the grill to be a little more 'forward', so I just secured the overriders separately, and built a little bracket to push the upper edge of the grill forward. No pics of this, its kinda a macgyver move.
Hope you enjoyed the project. Let me know if you see any errors or if any steps need more clarification/description to assist future endeavors.
Last edited by H20boy; 08-10-2010 at 01:11 AM.
The following 5 users liked this post by H20boy:
cjd777 (12-26-2014),
edstoll11 (09-08-2014),
Jag Pilot (01-14-2013),
Lufferman (12-21-2014),
marvin.d.miller (12-27-2014)

#7
08-10-2010, 04:31 AM
Senior Member
Trending Topics
#8
08-10-2010, 06:14 AM
Veteran Member
#9
08-10-2010, 06:43 AM
Veteran Member
Join Date: Nov 2006
Location: Glasgow, Scotland UK
Posts: 47,303
Received 9,005 Likes
on
4,113 Posts

Matt, The upgrade looks great and so much better than stock I think

The write up " how to " is excellent and needs to be made FAQ if you haven't done so already?
I'll be changing the title of this thread to include FAQ so please add it to the relevant section if you haven't done so....thanks for sharing
#10
08-10-2010, 08:56 AM
thanks guys, I haven't FAQ'd it yet, as I finished the writeup late last night/early morning, but I will do it promptly.
k.Westra, the mesh will look 10x better on a darker car like yours, definitely worth the minor trouble to get it in. I know of another member that has a set to sell, so be prepared and keep your eye out for it if he posts it for sale soon. The 'set' is hard to come by, believe me, I tried before working with the final source from here.
Richard, I did all this sitting on my bum (<- like how I threw in a british term?) and can honestly say the abs got a good workout thru the ordeal. My shoulders and back hurt a little too, but that could have been paired with my fuel filter swap and sway bar bushing replacement I did in the same weekend.
#11
08-10-2010, 09:04 AM
Veteran Member

#12
08-10-2010, 09:22 AM
Veteran Member
#13
08-10-2010, 10:12 AM
Ha! No, Matt, it was only 11:30 west coast time when I posted. Really great work on the "how to" by the way.
I do have a set of the complete and original 3 piece mesh grill off a 2001 XKR if anyone is interested and inspired after Matt's conversion. Just shoot me an email at:
troydnixon@gmail.com
I do have a set of the complete and original 3 piece mesh grill off a 2001 XKR if anyone is interested and inspired after Matt's conversion. Just shoot me an email at:
troydnixon@gmail.com
#14
08-10-2010, 10:57 AM
Senior Member

#16
08-10-2010, 09:33 PM
Nice write up! I did the same thing a couple of years ago; never did like the "black, gaping abyss". Where we differed was that I removed the entire nose. It was pretty simple and involved removing both front wheels and plastic wheel arches. From that point on, it was REALLY easy to get access to all the fasteners and the front end was off in 30 minutes.
Fitting the three piece was moderately troublesome, as I destroyed the plastic fasteners holding in the splitter, which necessitated a trip to the local NAPA store for replacement fasteners. Surprisingly, Ford fasteners fitted perfectly!!!
I too had to paint the "teeth" and the finished has lasted well, but is now getting chipped. Suppose that R&R to refinish could be a nice Fall weekend project.....
Word of warning, the nose is shimmed at the top with washers, along where the bonnet (hood) meets it. I didn't realize this and when lifting the nose off, the washers went everywhere. Needless to say, it took an hour or so and a couple of Adult Beverages to get the spacing just right. Moral: Count the washers from the top BEFORE removing the nose.
Never thought of doing it your way....Nice Job with excellent instructions!
Cheers,
Hamish
2001 MY
The following users liked this post:
Jag Pilot (01-14-2013)
#17
08-10-2010, 10:08 PM
Dutch, though I am not 100% sure, I have heard the mina grill is not as difficult to install, there is no popeye maneuver required.
thanks Hamish, yes, those washers worried me, and I didn't have any help, so removal by myself would have worried me a bit...getting it off and on correctly.
thanks Hamish, yes, those washers worried me, and I didn't have any help, so removal by myself would have worried me a bit...getting it off and on correctly.