When you click on links to various merchants on this site and make a purchase, this can result in this site earning a commission. Affiliate programs and affiliations include, but are not limited to, the eBay Partner Network.
Paragon Design's (XKRacer) LED Headlight Rings (pics)
I wanted to give my 2003 xk8 another small 'update' since it has been a year or so since installing that blinking 3rd brake light relay. Beth has been looking pretty gloomy over the winter, she has a little leak in her passenger window seal that I'm tracking down, her low pressure oil line seeped and needed replaced during the cold weather, and I just now fixed her flickering lights (chinese fake bulb story...and its a long one at that), so I treated her with some new parts. I installed a 20mm Ultra Racing rear sway bar, and Tony (XKRacer at Paragon Design UK) supplied me with new front and rear sway bar end links.
Though this thread is primarily dedicated to the LED rings, and I'll get to them in a minute, here are a couple photos of the rear sway bar, the Paragon Design rear end links, and the front links installed. Tony's design eliminates the typical "booted" ball joint, and the materials are 1000x higher quality. What is that...stainless steel?!?
Anyway, now to those light rings. Step 1. Once the headlights are removed from the vehicle, separation of the glass lens from the rear housing is VERY simple. 7 or 8 snaps need only a little manipulation to release the glass and it slides outward. This is a great time to check and replenish the rubber seal that is there, as it will only help you keep condensation from occurring...which mine did prior to this project. In addition to a little Gummi Pflege Stift, I put a string of (don't laugh) a new boot shoelace behind the seal to force a better seal at the glass...and i almost couldn't get the snaps to close on it! I successfully tested it out this weekend in the downpours... no condensation, so my fix has worked!
Step 2. Set aside your rear section, maybe wipe off your projector lens with some alcohol if its dusty in there, and turn the glass section around.
Step 3. Remove the two (2) black leads on the small, 'marker' lamp connector up and beside the high beam's opening. That is where the ring will be powered.
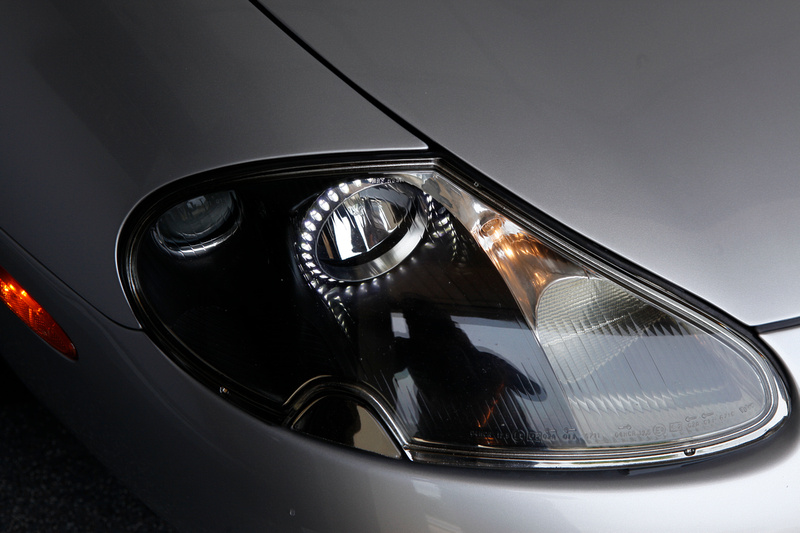
Step 4. Tony's rings are fabricated to be a mm or two smaller than the diameter of the high beam faceplate, and as the opening is not EXACTLY round, the rings just get pressed into the hole so that the ring is flush with the plastic. If you are worried about it moving, you can add a bit of glue at the edge, but as Tony mentioned to me in his original instructions, it is a VERY tight fit, and I didn't feel the need to add any adhesive after all.
Please notice in the above pictures, the power and ground leads are oriented so that they face towards the 'marker' lamp and turn signal bulbs. This also places the spade connectors shown just under the clear inspection panel of the headlight, useful here as you'll see in just a minute.
Step 5. Okay, take those female ends of the LED ring leads and insert them into the 'marker' bulb connector which has male spades. Which wire, whether black or red one on top, well it doesn't matter right now. The original wiring is black and black, so if we need to correct the polarity so the LEDs will work properly, we can do that in our next step.
Step 6. Fit the glass and the rear housing back together carefully, as there are plastic 'guides' that make the alignment easier, and they can be broken if you force the front and rear halves together improperly. You can clip the turn signal harness back on now as well, or you can do it from the access panel in the next step.
Step 7. Once all of the snaps are back together, from the access panel area, connect the LED rings' male spade connectors to the black and black wires you removed from the marker bulb connector in Step 3. They are female spade connectors...made super simple by Tony's planning.
Step 8. Now, let's see if the polarity is correct. Bring the headlight back to the car, and connect the main power harness to the headlamp and turn the marker lights on. Does the ring light? If so, before you install the headlight and tighten down the bolt/screws...check all light operations, low-beam, high beam, and turn signal. I forgot to connect my turn signal on BOTH headlights and had to reattach thru the access panel a day later. Its so easy to miss that step.
Anyway, if the rings do not light up, thankfully those last connections you made to the two (2) black original leads are within easy reach, swapped, and the polarity reversed. Test the lights again, and the rings should function beautifully.
Alas, here are the final pics. and Tony is taking orders today!
I can only tell you what I paid for the entire package of parts...front and rear end links plus these rings, and it was around $800 including shipping. you'll need to ask Tony at Paragon Design for ring prices separately.
Needless to say, it may seem pricey in US dollars, but again, the quality is exceptional on every part, and they will install perfectly and last for years...if not the life of the vehicle. I am extremely pleased, thank you Tony!
Last edited by H20boy; 04-06-2014 at 10:51 AM.
Reason: fixed an error, added two photos
Those rings look great and certainly add that latest fashion in lights. Deuce2000 was looking into something for the fog lights so Paragon Tony's superb work gives us all a product from a quality, known vendor with skin in the game for the long term.
Pretty please, with sugar on top, give us a write up if the rear sway and links in a week or two.
I just finished some canyon carving time here in Colorado and can say my fully maintained, stock 2002 XKR was an understeer monster. Ugh. Before these rear bars were available, a chap who first increased rear stiffness by adding a second factory sway bar in parallel reported it helped a great deal. PM me if you like
I'm glad you guys like the final product, I certainly do!
Smoggy, with the HIDs and those rings, I actually believe the filament marker lamps give it a nice contrast. Otherwise, too many 'cool' colors happening there. And if you notice, I'm also a big fan of the original amber marker lenses too.
About doing a writeup on the rear sway bar, and furthermore on those end links I installed, I really don't think I can give a good comparison with the car's prior handling characteristics. Does it feel stiffer...heck, I think it does, but again...I don't drive this car 'spiritedly' all too often, and my judgement could be influenced by simply knowing i've of bolted on shiny new parts. To what degree this has helped my back end from leaning during a turn, well I can't say for sure. Sorry guys, that's why I won't be doing any sort of detailed writeup on those parts.
I'm glad you guys like the final product, I certainly do!
Smoggy, with the HIDs and those rings, I actually believe the filament marker lamps give it a nice contrast. Otherwise, too many 'cool' colors happening there. And if you notice, I'm also a big fan of the original amber marker lenses too.
Fair enough. I'm looking to buy clear markers to go with my clear indicator / side repeaters. Wouldn't life be boring if we all like the same things?
Matt.... You have an XJ...... Mind you from that pic looks like a X350...... So you probably wont be interested but I made these for my XJ
I would like to ask a favour as well, could you email me the close up pics you took of your headlights in a higher res, they are much better than any of my efforts.... Thanks
Those are snazzy Tony! I bet the projector lens is the same size, I may have to check it the next time I have my headlamp out of the ol' x350 (you were correct).
I sent you a PM with a link to download all of those pics.
Ok this was very delayed, but storing them in the trunk for 1 year prior to installation is part of the official instructions, right...?
So I finally go these light rings in. Tony with Paragon was very helpful with any questions before ordering them, so big thanks there. Seem to be very high quality parts. I did the driver side first and it took about 3.5 hours. Then, the passenger side took about 20 minutes -_- hahahaha...
A few additional details to these instructions of the thread.. That lower bold that holds the headlamp casing is ^&%^*%!!@$!$%&$-ing awkward and hard to get at, especially if they're tight (which one was.. I don't think they're supposed to be but whatever). The other thing to be aware of is that when pushing the rings into place, they may likely scratch off some of the chrome layer inside the headlamp casing - especially if you push it too far or unevenly so one side goes further than where the actual sitting position is. That's more of a concern when it fits realllllllllly tight, which one did. Because everything is so shiny, the black scuff is doubled in size - not really a big deal unless you look close in the daylight. The third thing is that the signal light bulbs, if they have a coating on the bulb to colour it amber, might be old and flaking and you don't notice till you pull them out; in the process, some of those flakes might fall off inside the headlamp casing and static electricity will hold them on the chrome layer inside or even the inside of the glass. Just double check it's all cleaned out of there before reassembling everything. Once it was done, it looks really awesome! (I also put clear covers on the corner running lights, and the next step is to get all the headlight colours to match).

 04-06-2014, 10:15 AM